

Hardware components | ||||||
| × | 1 | ||||
| × | 1 | ||||
| × | 1 | ||||
| × | 1 | ||||
| × | 1 | ||||
| × | 1 | ||||
| × | 1 | ||||
| × | 1 | ||||
| × | 1 | ||||
| × | 1 | ||||
Hand tools and fabrication machines | ||||||
 |
| |||||
 |
| |||||
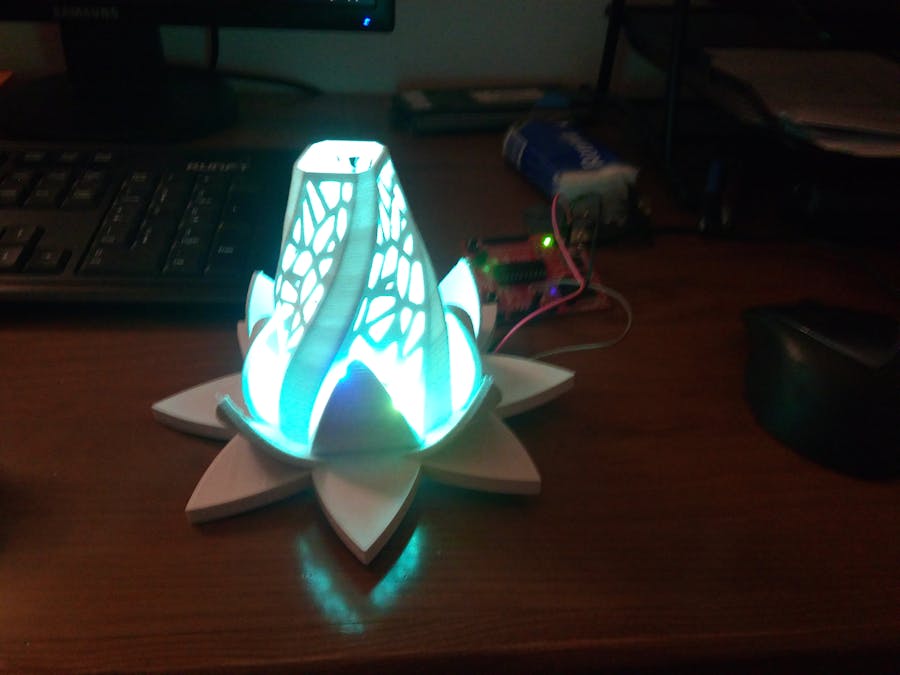
Well, this little project was something I remembered to make for my girlfriend as a gift. I really like making them myself to an extent and I love the effect of RGB LEDs and the idea of using them on lamps. So, now with access to a 3D printer, and the great community of thingy verse, I decided a 3D printed RGB mood lamp was the perfect idea. The project itself is pretty simple and actually and kinda short.
The 3D Model
First I needed to find the 3D model I wanted. I like flowers, the RGB makes the effect of an ever changing flower, so I searched for that, which leaded me to this:
http://www.thingiverse.com/thing:978768
The LED lamp
With that chosen and printed I needed the RGB LEDs. First I thought of using a single 1W LED but that would involve a heatsink and a current limiter, and if it was too badly designed the ripple would kill the LED, and... that was not gonna happen - KISS, keep it simple. I used a lot of WS2812, "smart LEDs", so let's go with that. I chose a ring of 12 WS2812 - why a ring? The idea was to have a "cycling effect" where the colors would spin a bit, in the end it was not quite evident though.
The spinning effect actually allowed an effect, a bit hard to capture in camera, but the projection of colors on the walls is pretty cool!
The right MCU for the task:
Now I need to choose the platform. I use a lot of TI's launchpads and I wanted something in DIP package so I didn't use a whole board (due to price and size). Well the best DIP MCU from TI is the MSP430G2553 - which is actually a low end chip compared to the rest of the MSP430 family - low RAM, 16Mhz, low Flash. But low power and because of that it was perfect for the task and the resources we're enough for the task (a 48-80Mhz ARM here would be overkill!). Just the ri ght tool for the job.
The Pattern
For the pattern, since it was a circle, I decided to make a circling effect, kinda like a loading screen. For that I usually stored the Fade effect between all the 2 color combinations of a RGB LED into 3 arrays, like so:
Red[0] = 0; Green[0]=0; Blue[0] = 0;
Red[1] = 1; Green[1]=0; Blue[1] = 0;
Red[2] = 3; Green[2]=0; Blue[2] = 0;
With this then I would send different pattern positions to individual LEDs. The circling effect would mean that LED 2 would be further ahead in the array than LED 1. In the code it was possible that the LEDs "pattern space" would be adjustable, meaning that LED 2 could be Green, while LED 1 would be yellow, or LED 2 would be Green and LED 1 just another tint of Green. This depends on how "far" I configured it to be.
Code time!
Controlling the WS2812 is a bit of challenge, especially in a 16Mhz MCU. Luckily there was a Assembly library for Energia in 43oh: http://forum.43oh.com/topic/2882-energia-library-ws2811driver-led-controller-class/
The code was a bit of a challenge. I usually load the patterns into RAM, at least just each combination of LED brightness (each color) and then work from there with some array position management. Well that consumes a lot of ram. It would be like:
Just think - a WS2812 has 256 different levels in each of the 3 LEDs. So combinations of 2 different LEDs only would mean something like 1530bytes*3 (1 for each LED). 1500 because there are 6 different LED combinations (Red+Green, Green+Blue, ...), each having 255.Way too much for the little MSP430G2553 512B of RAM. I tried to divide the resolution, instead of incrementing 1 in 1 from 0 to 255 brightness. I could see some difference on the effect, mostly because I've seen many times the higher resolution counterpart but most people didn't complain. I added a bit of random to the increment rate and the color difference between consecutive LEDs so it wasn't always the same (it would change the values every 60 seconds).But...Later I decided to actually developed way that didn't need the pattern stored, getting the high 256 resolution. The "space" between colors was not random anymore but that was fine.
Low power
Energia is really handy for this! The MSP430 has various Low Power Modes (LPM). Easy to implement with register or MSPWare (not available on this MSP430). But simple features like "sleep for x milliseconds" are even easier in Energia! The function "sleep();" would do just that, put the MSP430 to sleep for "x" milliseconds. Meaning, instead of using delays to get the fade more smooth or sharp, you use sleep! Remember, just because it's plugged in, there's no reason to avoid power optimizations - it's greener and save energy - it would just consume 0,01W without these features? How many integrated systems do you think you have at home? Add all those 0,01W and that can be a lot!
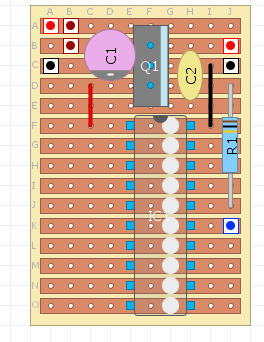
Design the control board
That should be simple. Just needs a pull_up on the RESET pin and a power supply. I used a old 5V transformer so a 3.3V regulator was needed. But the hard part was getting my hands in a voltage regulator that didn't consume a ton of power compared to the MCU. Of course the transformer would consume by itself much more than the MCU and the LEDs too, but the idea was try for the best I could.
Ended up using a common 3.3V regulator which consumes way more than the MCU.
Put all that together and there it is:
Here is also a pic of the control board. It's not that pretty, the glue is to prevent wires breaking from being pulled out the board. I wanted to add a little box to encase everything but I haven't had the time.


Comments