


Hardware components | ||||||
| × | 1 | ||||
Software apps and online services | ||||||
 |
| |||||
Hand tools and fabrication machines | ||||||
| ||||||
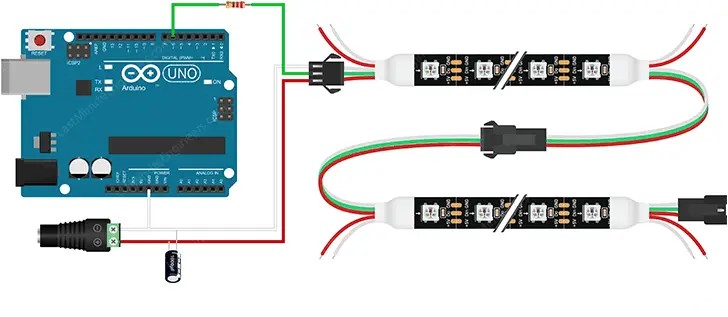
In the following experiment, I will introduce how to drive WS2812 LED strip with Arduino.
SuppliesArduino Uno development board
WS2812B LED light strip (quantity depends on demand)
Several Dupont cables
Step 1: ConnectionConnect the 4-7VDC pin of the WS2812 light strip to the 5V pin of the Arduino Uno.
Connect the GND pin of the WS2812 light strip to the GND pin of the Arduino Uno.
Connect the DI (data input) pin of the WS2812 light strip to the digital 6 pin of the Arduino Uno.
Step 2: Installing the Library FilesIn the IDE, click "Tools" - "Manage Libraries", search for "Adafruit_NeoPixel" and install it.
Using the Adafruit_NeoPixel library allows Arduino or ESP8266 to easily drive WS2812 light strips.
Step 3: CodingOpen the Arduino IDE software.
Create a new blank project.
Copy the following code into the project:
#include <Adafruit_NeoPixel.h>
#ifdef __AVR__
#include <avr/power.h> // Required for 16 MHz Adafruit Trinket
#endif
// Pin number to control WS2812 light strip
#define PIN 6
// Define the number of LEDs to control
#define NUMPIXELS 8
Adafruit_NeoPixel pixels(NUMPIXELS, PIN, NEO_GRB + NEO_KHZ800);
// Delay between adjacent LEDs in milliseconds
#define DELAYVAL 500
void setup() {
// These lines are specifically to support the Adafruit Trinket 5V 16 MHz.
// Any other board, you can remove this part (but no harm leaving it):
#if defined(__AVR_ATtiny85__) && (F_CPU == 16000000)
clock_prescale_set(clock_div_1);
#endif
// END of Trinket-specific code.
pixels.begin(); // INITIALIZE NeoPixel strip object (REQUIRED)
}
//Write your code here to control the brightness and color of the LED light strip
void loop() {
pixels.clear(); // Set all pixel colors to 'off'
// The first NeoPixel in a strand is #0, second is 1, all the way up
// to the count of pixels minus one.
for(int i=0; i<NUMPIXELS; i++) { // For each pixel...
// pixels.Color() takes RGB values, from 0, 0, 0 up to 255, 255, 255
// Here we're using a moderately bright green color:
pixels.setPixelColor(i, pixels.Color(150, 150, 20));
pixels.show(); // Send the updated pixel colors to the hardware.
delay(DELAYVAL); // Pause before next pass through loop
}
}
Write your control code in the loop() function to control the on/off and color of the LED light strip.
Step 4: Important StepConnect the Arduino Uno development board to the computer.
Select the correct development board and port in the Arduino IDE software.
Click the upload button to upload the code to the Arduino Uno development board.
Step 5: ConclusionWith the above steps, you can use Arduino to drive the WS2812 LED light strip. According to your control code, the LED light strip will show different on and off and color effects.


Comments