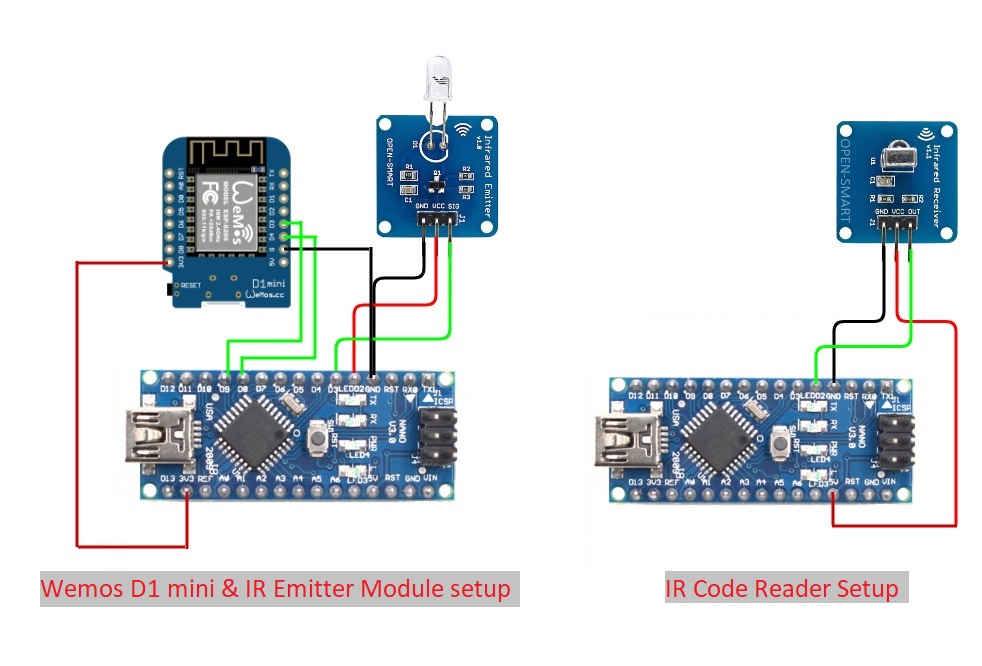
//PART 1. IR receiver Sketch to read IR codes from a remote controller. The codes are needed in the IR Emitter Sketch.

#include <IRremote.h>

int receiverpin = 3;

IRrecv irrecv(receiverpin);
decode_results results;

void setup() {
  pinMode(receiverpin, INPUT);
  Serial.begin(9600);
  irrecv.enableIRIn();
}

void loop() {
  if (irrecv.decode(&results))
  {
    Serial.println(results.value, HEX);
    irrecv.resume();
    delay(150);
  }
}


//PART 2. IR Emitter Sketch to send the appropriate IR code when trigger by the Wemos D1 Mini.Pls note that the code 0xFD708F & 0xFDB04F below are from my TV remote controller. You would have gotten yours from above sketch.

#include <IRremote.h>
#include <IRremoteInt.h>

IRsend irsend;

int TVpower = 9;          //pin for ON/OFF signal
int TVmute = 8;         //pin for Volume signal
int IRpower = 2;          //power to IR LED

int TVpowerState = 0;       //default states
int lastTVpowerState = 0;
int TVmuteState = 0;
int lastTVmuteState = 0;

void setup() {
  Serial.begin(9600);
  pinMode(TVpower, INPUT);
  pinMode(TVmute, INPUT);
  pinMode(IRpower, OUTPUT);
  digitalWrite(IRpower, HIGH);
}

void loop() {
  delay(3000);
  TVmuteState = digitalRead(TVmute);
  if (TVmuteState != lastTVmuteState){
    irsend.sendNEC(0xFD708F, 32);   //TV remote Volume-Mute Code
    Serial.println("Volume Mute");
    delay(50);
    lastTVmuteState = TVmuteState;
    }else{
      TVpowerState = digitalRead(TVpower);
      if (TVpowerState != lastTVpowerState){
        irsend.sendNEC(0xFDB04F, 32);     //TV remote ON/OFF Code
        Serial.println("TV ON");
        delay(50);
        lastTVpowerState = TVpowerState;
        }else{
          }
      }
  }


//PART 3. This Sketch is for the Wemos D1 Mini to work with Amazon Alexa to turn the digital output pins HIGH and LOW. Remember to key in your Wifi details before loading the sketch into the Wemos D1 Mini.


#include <ESP8266WiFi.h>
#include "WemoSwitch.h"
#include "WemoManager.h"
#include "CallbackFunction.h"

// prototypes
boolean connectWifi();

//Callbacks
void TVOn();
void TVOff();
void MuteOn();
void MuteOff();

//------- Replace the following! ------
char ssid[] = "YOUR WIFI NAME";       // your network SSID
char password[] = "YOUR WIFI PASSWORD";  // your network key

WemoManager wemoManager;
WemoSwitch *TV = NULL;
WemoSwitch *Mute = NULL;

const int TVpowerPin = D4;
const int MutePin = D3;

void setup()
{
  Serial.begin(115200);

  // Set WiFi to station mode and disconnect from an AP if it was Previously
  // connected
  WiFi.mode(WIFI_STA);
  WiFi.disconnect();
  delay(100);

  // Attempt to connect to Wifi network:
  Serial.print("Connecting Wifi: ");
  Serial.println(ssid);
  WiFi.begin(ssid, password);
  while (WiFi.status() != WL_CONNECTED) {
    Serial.print(".");
    delay(500);
  }
  Serial.println("");
  Serial.println("WiFi connected");
  Serial.println("IP address: ");
  IPAddress ip = WiFi.localIP();
  Serial.println(ip);

  wemoManager.begin();
  // Format: Alexa invocation name, local port no, on callback, off callback
  TV = new WemoSwitch("TV", 80, TVOn, TVOff);
  wemoManager.addDevice(*TV);
  Mute = new WemoSwitch("Mute", 81, MuteOn, MuteOff);
  wemoManager.addDevice(*Mute);

  pinMode(TVpowerPin, OUTPUT); // initialize digital D0 as an output.
  pinMode(MutePin, OUTPUT); // initialize digital D5 as an output.
  delay(10);
  digitalWrite(TVpowerPin, LOW);
  digitalWrite(MutePin, LOW);
}

void loop()
{
  wemoManager.serverLoop();
}

void TVOn() {
    Serial.print("Turn ON TV...");
    digitalWrite(TVpowerPin, HIGH);
}
void TVOff() {
    Serial.print("Turn OFF TV...");
    digitalWrite(TVpowerPin, LOW);
}

void MuteOn() {
    Serial.print("Volume Mute ON...");
    digitalWrite(MutePin, HIGH);
}
void MuteOff() {
    Serial.print("Volume Mute OFF...");
    digitalWrite(MutePin, LOW);
}


Comments