

Hardware components | ||||||
 |
| × | 1 | |||
| × | 1 | ||||
| × | 1 | ||||
| × | 1 | ||||
| × | 1 | ||||
| × | 1 | ||||
Software apps and online services | ||||||
 |
| |||||
A classroom in the wintertime is ill ventilated, leading to poor air quality causing fatigue and in sometimes nausea.
Well, that's what is commonly known. But is there actual and precise data for every classroom in your school ? Can the problem at hand be solved by just placing plants to purify the air? Should the classroom be equipped with a type 'D' ventilation system? Can the heating be controlled from a database containing occupancy?
And after all that ... Who will water the plants during summer holiday?
This project is a prototype that will allow to acquire data to get all of these questions answered.
Why this is DoneAs with all in education, this is an attempt to keep up with developing technologies while motivating students to learn ever more.
The IdeaEvery teacher sees students doze off during lectures, and since this has nothing to do with my obviously impeccable teaching ability an other cause must be identified. We read somewhere that air quality in classrooms around the world is poor. But how bad is it in our actual case?
Also, our team was last year asked to find newer strategies to control and monitor the heating system in our school. For the moment it isn't monitored but merely controlled using thermostatic valves that are turned off and on by an outdated Windows XP computer system on a local closed network.
That 's when the Flemish Education Minister came up with the idea to offer a €5.000 grant for Science Technology Engineering and Mathematics projects in Schools for Science and Technology (SWeTe).
We took this opportunity, and wrote our group up for a project.
How it is DoneThe first steps
We were very anxious to get things started. So waiting for the AllThingsTalk RDK's we did not waste any time. Using the hardware we had lying around we started with the first experiments. No, not that difficult, actually it was quite easy to get things started with the maker.smartliving.io portal. Just create a profile and follow the instructions, we did our first experiments with Raspberry Pi's ... piece of cake or should that be piece of pi?
Using the tutorials we had the example app up on our Raspberry Pi's up and running in no time. The whole process and the accompanying Python code is well documented
Taking it a step further
Then ... When the Rapid Development Kits we received for pitching the idea on portal.iotopia.be were in the mail, we dove right in. The new Genuino 101 was the first obstacle. Getting a software upgrade on our schools computers required the system administrators intervention. Nevermind, the small delay didn't keep us from trying the darn thing on our personal laptops.
A second obstacle showed up when the Genuino 101 Curie module's programming software generated a list of errors caused by spaces in file names and paths. A quick search on the Arduino website learned us that this is a known problem. To solve it the script ought to be replaced by the one found at github.
Okay, let's move on ... We had no trouble what so ever to get the example application up and running on the Genuino 101. Great.
The time has come to start fiddling with sensors and what not.
We ordered Grove CO2 and O2 sensors Seeedstudio, but those keep us waiting so we started with a Grove TPH sensor with a Sensirion SH2x relative humidity sensor and a Bosch Sensortec BMP180 pressure sensor. It took us a while to get that up and running on the Genuino 101, right until the moment where we were ABSOLUTELY convinced the SH2x sensor had died on us and wrote an email to Peter at SmartLiving.com stating that we suspected the sensor to be broken.
Not a day later the reply to our email said: "There is an incompatibility between the Grove TPH sensor and the Genuino 101, we suspect that there is an I2C address conflict with the Genuino's on board peripherals". We were able to concur with that find in no time when we tried the TPH sensor with an Arduino Ethernet.
The next item on our list ... We wanted to acquire, monitor and store data, the later are unfortunately features that aren't offered by the Smartliving Broker, so we explored using are own broker using Mosquitto on a Raspberry Pi.
So we wrote a small Python script that subscribes with a wildcard to all topics posted on our broker "RPi-KK" on our local network.
#!/usr/bin/env python

import os
import paho.mqtt.client as mqtt

# The callback for when a PUBLISH message is received from the server.
def on_message(client, userdata, msg):
    print(msg.topic+" "+str(msg.payload))

client = mqtt.Client()
client.on_message = on_message
Theclient.connect("RPi-KK", 1883, 60)
client.subscribe("#")
# Blocking call that processes network traffic, dispatches callbacks and
# handles reconnecting.
# Other loop*() functions are available that give a threaded interface and a
# manual interface.
os.system("clear")
print "MQTT message viewer"
rc = 0
while(rc == 0):
    rc = client.loop()
print "Exit"
This script ran on Raspberry Pi and produced the below output when messages were posted using various publishers.
Among the publishers various Arduino boards and the new received Genuino 101 using MQTT PubSubClient library.
That is when we also turned the Grove ESP8266 WiFi module inside out. Trying various downloaded firmware files ending up with the mqtt_esp8266 example in the PubSubClient library.
#include <ESP8266WiFi.h>
#include <PubSubClient.h>
// Update these with values suitable for your network.
const char* ssid =     "************";
const char* password = "************";
const char* mqtt_server = "RPi-KK";
WiFiClient espClient;
PubSubClient client(espClient);
long lastMsg = 0;
char msg[50];
int value = 0;
void setup_wifi();
void callback(char* topic, byte* payload, unsigned int length);
void reconnect();
void setup() {
  pinMode(BUILTIN_LED, OUTPUT);     // Initialize the BUILTIN_LED pin as an output
  Serial.begin(115200);
  setup_wifi();
  client.setServer(mqtt_server, 1883);
  client.setCallback(callback);
}
void setup_wifi() {
  delay(10);
  // We start by connecting to a WiFi network
  Serial.println();
  Serial.print("Connecting to ");
  Serial.println(ssid);
  WiFi.begin(ssid, password);
  while (WiFi.status() != WL_CONNECTED) {
    delay(500);
    Serial.print(".");
  }
  Serial.println("");
  Serial.println("WiFi connected");
  Serial.println("IP address: ");
  Serial.println(WiFi.localIP());
}
void callback(char* topic, byte* payload, unsigned int length) {
  Serial.print("Message arrived [");
  Serial.print(topic);
  Serial.print("] ");
  for (int i = 0; i < length; i++) {
    Serial.print((char)payload[i]);
  }
  Serial.println();
  // Switch on the LED if an 1 was received as first character
  if ((char)payload[0] == '1') {
    digitalWrite(BUILTIN_LED, LOW);   // Turn the LED on (Note that LOW is the voltage level
    // but actually the LED is on; this is because
    // it is acive low on the ESP-01)
  } else {
    digitalWrite(BUILTIN_LED, HIGH);  // Turn the LED off by making the voltage HIGH
  }
}
void reconnect() {
  // Loop until we're reconnected
  while (!client.connected()) {
    Serial.print("Attempting MQTT connection...");
    // Attempt to connect
    if (client.connect("ESP8266Client")) {
      Serial.println("connected");
      // Once connected, publish an announcement...
      client.publish("outTopic", "hello world");
      // ... and resubscribe
      client.subscribe("inTopic");
    } else {
      Serial.print("failed, rc=");
      Serial.print(client.state());
      Serial.println(" try again in 5 seconds");
      // Wait 5 seconds before retrying
      delay(5000);
    }
  }
}
void loop() {
  if (!client.connected()) {
    reconnect();
  }
  client.loop();
  long now = millis();
  if (now - lastMsg > 2000) {
    lastMsg = now;
    ++value;
    snprintf (msg, 75, "hello world #%ld", value);
    Serial.print("Publish message: ");
    Serial.println(msg);
    client.publish("outTopic", msg);
  }
}
This software was used to post the messages in the above screenshot. Building on this example we should be able to piece everything together while waiting for the extra sensors and kits we bought.
OMG, we are running late
My oh my ... Time flies when you're having fun. March 13, and we still have a lot to do ... time for a contingency plan if we want to keep up with IOTopia's schedule.
What about MATLAB
MATLAB is a piece of software everybody knows of, but few use it ... It is primarily focused at scientific computing in the academic world. Reckoning not all sensors scientists read find themselves just around the corner or even on the same planet, we thought MATLAB or The MathWorks Inc. might have something that could be of use.
Surfing the web we came across ThingSpeak an IoT portal supplied by The MathWorks Inc. A quick review lead us to believe this IoT portal for collecting, visualizing and analyzing data must be able to do all that we require right from the shelf.
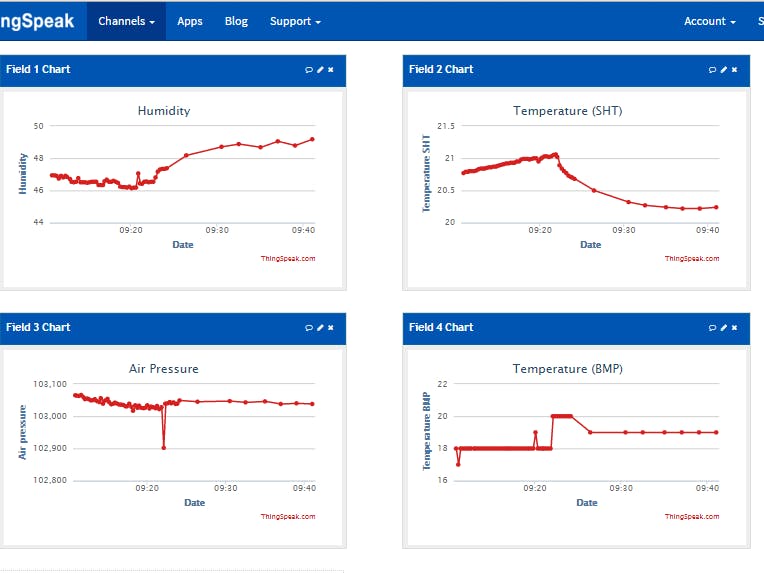
Piecing it all TogetherThere was minimal change needed to get the example cope found at ThingSpeak up and running.
#include <SPI.h>            // Needed for the Ethernet chip
#include <Ethernet.h>       // The Ethernet library
#include <Wire.h>           // Needed by the sensors
#include <Sodaq_TPH.h>      // TPH sensor library

// Local Network Settings
// Must be unique on local network
byte mac[] = { 0x90, 0xA2, 0xDA, 0x0E, 0xDE, 0x3B };

// ThingSpeak Settings
byte server[]  = { 184, 106, 153, 149 };
String writeAPIKey = "****************";

// Time interval in milliseconds to update ThingSpeak
// (number of seconds * 1000 = interval)
const long updateThingSpeakInterval = 120 * 1000L;

// Variable Setup
long lastConnectionTime = 0L;
boolean lastConnected = false;
int failedCounter = 0;

// Initialize Arduino Ethernet Client
EthernetClient client;

void setup() {
  // Start Serial for debugging on the Serial Monitor
  Serial.begin(9600);
  Wire.begin();
  // Start Ethernet on Arduino
  startEthernet();
}

void loop() {
  // Read value from Analog Input Pin 0
  String humidity = String(tph.readHumidity());
  String pressure = String(tph.readPressure());
  String tempSHT = String(tph.readTemperatureSHT());
  String tempBMP = String(tph.readTemperatureBMP());
  // Print Update Response to Serial Monitor
  while (client.available()) {
    char c = client.read();
    Serial.print(c);
  }

  // Disconnect from ThingSpeak
  if (!client.connected() && lastConnected) {
    Serial.println();
    Serial.println("... disconnected");
    client.stop();
  }

  // Update ThingSpeak
  if(!client.connected() &&
    (millis() - lastConnectionTime > updateThingSpeakInterval)) {
    String tmp = "&field1="+humidity+
                 "&field2="+tempSHT+
                 "&field3="+pressure+
                 "&field4="+tempBMP;
    Serial.println(tmp);
    updateThingSpeak(tmp);
  }

  // Check if Arduino Ethernet needs to be restarted
  if (failedCounter > 3 ) {startEthernet();}
  lastConnected = client.connected();
}
void updateThingSpeak(String tsData) {
  if (client.connect(server, 80)) {
    client.println("POST /update HTTP/1.1");
    client.println("Host: api.thingspeak.com");
    client.println("Connection: close");
    client.println("X-THINGSPEAKAPIKEY: "+writeAPIKey);
    client.println("Content-Type: application/x-www-form-urlencoded");
    client.print("Content-Length: ");
    client.println(tsData.length());
    client.println();
    client.println();
    client.print(tsData);
    lastConnectionTime = millis();
    if (client.connected()) {
      Serial.println("Connecting to ThingSpeak...");
      failedCounter = 0;
    } else {
      failedCounter++;
      Serial.println
        ("Connection to ThingSpeak failed ("+String(failedCounter, DEC)+")");
    }
  } else {
    failedCounter++;
    Serial.println
        ("Connection to ThingSpeak Failed ("+String(failedCounter, DEC)+")");
    lastConnectionTime = millis();
  }
}

void startEthernet() {
  client.stop();
  Serial.println("Connecting Arduino to network ...");
  while(!Serial);
  // Connect to network amd obtain an IP address using DHCP
  if (Ethernet.begin(mac) == 0)  {
    Serial.println("DHCP Failed, reset Arduino to try again");
  } else {
    Serial.print("Arduino connected to network using DHCP, IP: ");
    Serial.println(Ethernet.localIP());
  }
  while(!Serial);
}
Well, we did not get all that equipment to leave it just lying there. We plan to continue the project and build about ten devices and gather data over our schools WiFi network from various classrooms. We 'll monitor CO2 concentration (when the sensors arrive from mainland China) Relative Humidity, Temperature and various other polluting agents. With the acquired data we will device a plan to better our inner climate ... So that when students doze off, it is not caused by bad air quality.
For the time being, guests can monitor the humidity and temperature in my home office using this link.


Comments