


Hardware components | ||||||
| × | 1 | ||||
 |
| × | 1 | |||
 |
| × | 1 | |||
Software apps and online services | ||||||
 |
| |||||
Hand tools and fabrication machines | ||||||
 |
| |||||
 |
| |||||
Imagine having a miniature weather station right on your desk - compact, modern, and smart. With this Arduino-based Tabletop Weather Station, you can monitor real-time temperature and humidity using a DHT 11 sensor and display the data on a 0.96-inch OLED screen.
This project is perfect for students, makers, and hobbyists who want to learn about IoT fundamentals, sensor integration, and data visualization.
Whether you're working on a school project or improving your smart home setup, this mini weather station will add a professional touch to your workspace.
Supplies- Arduino Uno x1: Main controller & humidity
- DHT11 Sensor x1: Measures temperatures & humidity
- SSD1306 Display (0.96") x1: 128x64 I2C screen for data display
- Jumper Wires as required : For circuit connections
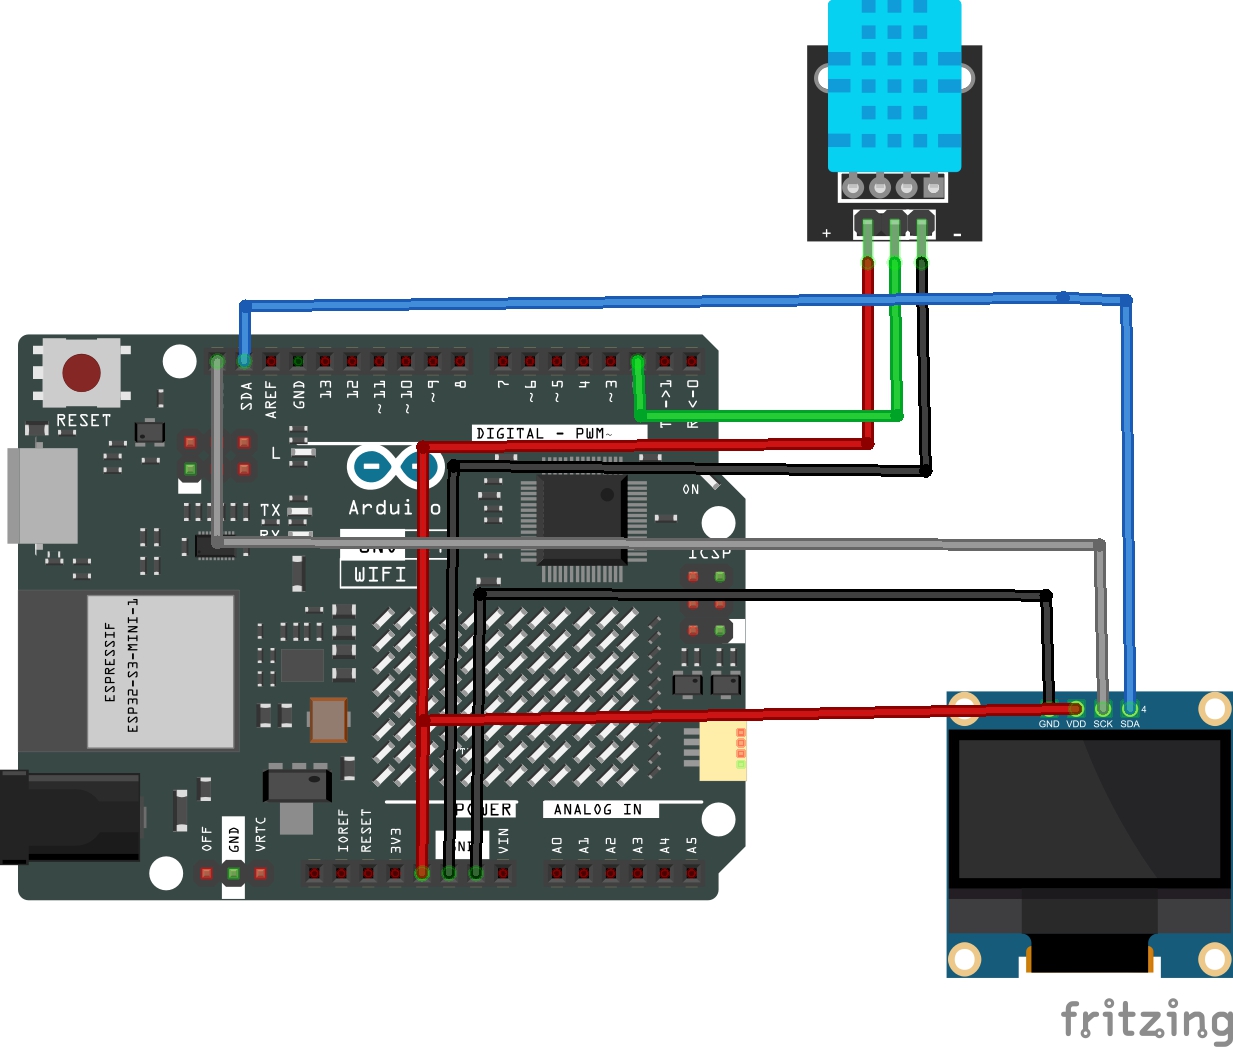
Connect your components according to the table below:
- DHT 11 Signal to Arduino Pin D2
- DHT 11 GND to Arduino's GND Pin
- DHT 11 VCC to Arduino's 3.3v Pin
- OLED VCC to Arduino's 5v Pin
- OLED GND to Arduino's GND Pin
- OLED SCL to Arduino's SCL Pin
- OLED SDA to Arduino's SDA Pin
Tip: Ensure your OLED I2C address is set to 0x3c. You can use an I2C scanner sketch if unsure.Step 2: Installing Libraries
To make your project run smoothly, open your Arduino IDE and install these libraries:
- Adafruit SSD1306
- Adafruit GFX Library
- DHT Sensor Library
Install them via:
Sketch -> Include Library -> Manage Libraries...Then search each one by name and click Install.
Step 3: Upload the CodeNow It's time to program your Arduino.
here's the full, ready-to-upload code:
#include <Wire.h>
#include <Adafruit_GFX.h>
#include <Adafruit_SSD1306.h>
#include <DHT.h>
// ==== OLED SETTINGS ====
#define SCREEN_WIDTH 128
#define SCREEN_HEIGHT 64
#define OLED_ADDR 0x3C
Adafruit_SSD1306 display(SCREEN_WIDTH, SCREEN_HEIGHT, &Wire, -1);
// ==== DHT SETTINGS ====
#define DHTPIN 2
#define DHTTYPE DHT11
DHT dht(DHTPIN, DHTTYPE);
void setup() {
Serial.begin(115200);
delay(1000);
Serial.println("Initializing DHT11 + SSD1306 OLED...");
if (!display.begin(SSD1306_SWITCHCAPVCC, OLED_ADDR)) {
Serial.println("❌ SSD1306 not found! Check wiring or I2C address.");
while (1);
}
display.clearDisplay();
display.setTextColor(SSD1306_WHITE);
display.setTextSize(1);
display.setCursor(20, 25);
display.println("Initializing...");
display.display();
dht.begin();
delay(2000);
}
void loop() {
delay(2000);
float humidity = dht.readHumidity();
float temperature = dht.readTemperature();
if (isnan(humidity) || isnan(temperature)) {
Serial.println("⚠️ Failed to read from DHT11 sensor!");
display.clearDisplay();
display.setTextSize(1);
display.setCursor(25, 25);
display.println("Sensor Error!");
display.display();
return;
}
int tempInt = (int)temperature;
int humInt  = (int)humidity;
Serial.print("Temperature: ");
Serial.print(tempInt);
Serial.print(" °C | Humidity: ");
Serial.print(humInt);
Serial.println(" %");
display.clearDisplay();
display.setTextSize(1);
display.setCursor(35, 0);
display.println("DHT11 DATA");
display.setTextSize(1);
display.setCursor(0, 20);
display.print("Temp: ");
display.print(tempInt);
display.println(" C");
display.setCursor(0, 40);
display.print("Hum : ");
display.print(humInt);
display.println(" %");
display.display();
}
Once uploaded, open the Serial Monitor (115200 baud) to view live readings.
Step 4: View Live DataThe OLED screen will now display your room's:
DHT11 DATA
Temp: 28 C
Hum : 62 %
Readings update every two seconds, allowing you to observe temperature and humidity changes in real-time.
Step 5: Future EnhancementThis basic project can easily evolve into a more advanced IoT station. Here are some exciting next steps:
IoT ControlUpgrade You Arduino to the UNO R4 Wi-Fi and connect your weather station to your cloud or Blynk app for real-time monitoring.
Audio/Visual FeedbackAdd a buzzer or RGB LED that reacts to environmental changes - for example, blinking when humidity exceeds 70%
Taking It to the Next Level - With JUSTWAYOnce the weather station is working reliably on a breadboard, the next improvement is to focus on enclosure, mounting, and overall finish. An exposed setup is useful for testing, but for desk use, exhibitions, or demonstrations, enclosing the electronics makes the project safer, cleaner, and more professional.
A proper enclosure helps protect the Arduino, sensor, and OLED display from dust and accidental damage. It also allows you to neatly position the OLED screen on the front panel while keeping wiring hidden inside. Depending on where and how the device will be used, different enclosure materials can be chosen - plastic for lightweight indoor use or metal for a more robust and long-lasting build.
Fabrication services such as JUSTWAY can be useful once your circuit layout and dimensions are finalized, options like 3d printing are well suited for quick prototypes or student projects, while CNC-machined or sheet-metal enclosures are better for projects that need a durable, polished appearance. Transparent enclosures can be used to display the internal electronics for educational purposes, while opaque designs give a clean, finished look suitable for desk setups.
Focusing on enclosure design not only improves aesthetics but also moves the project closer to a real world, product-style implementation, making it ideal for science fairs, competitions, or long terms personal use
How to Get Started with JUSTWAY ( 4 Easy Steps)- Upload your CAD files at JUSTWAY.com
- Select your material and surface finish
- Preview your 3D model in real-time
- Place your order - transparent pricing, fast delivery, zero hidden fees.
You've built a Tabletop Weather Station that blends creativity, coding, and engineering. With simple components like the DHT11 sensor and SSD1306 OLED display, you now have a compact device that visualizes real-time environmental data.
But why stop there?
With JUSTWAY, you can take your weather station from a simple prototype to a professional-grade IoT product ready to showcase, scale, or sell.
So go ahead - built it, prefect it, and present it proudly


Comments