


Hardware components | ||||||
| × | 1 | ||||
| × | 1 | ||||
 |
| × | 1 | |||
Software apps and online services | ||||||
 |
| |||||
The Smart Presentation Controller is an innovative system designed to navigate presentation slides using simple hand gestures. It leverages the DFRobot GR10-30 Gesture Sensor along with an Arduino Pro Micro to detect left and right hand gesture and simulate keyboard arrow key presses to change slides.
Inspiration Behind the ProjectDuring a hackathon, I noticed a frustrating issue-an explainer was presenting an amazing project, but due to a delay in manually controlling the slides, the flow of the presentation was constantly disrupted. This delay between the explainer and the slide controller created an awkward experience for the audience and the presenter. This inspired the idea of developing a Smart Presentation Controller that eliminates such delays by allowing presenters to navigate slides seamlessly with hand gestures. This project is particularly useful for presenters who want a touch-free solution to navigate slides, improving engagement and ease of use during lectures, meetings, or conferences.
Component Used- Arduino Pro Micro: A microcontroller that supports USB keyboard emulation
- DFRobot GR10-30 Gesture Sensor: Detects different gestures like right, left, up, and down clockwise and counterclockwise hand gestures.
- Jumper Wires: Used for electrical connections.
While the Smart Presentation Controller works reliably on a breadboard, presenting it in a proper enclosure significantly improves durability and visual appeal - especially during demos, exhibitions, or competitions.
To achieve a more polished and professional finish, makers can use rapid prototyping and fabrication services such as JUSTWAY. These services help convert digital enclosure designs into physical parts using methods like 3D Printing, CNC Machining, or Sheet Metal Fabrication, making the project feel closer to a market-ready product.
Steps to Fabricate a Custom EnclosureIf you chose to create a custom enclosure the typical process involves:
1. Upload Your Design Files
Upload STL or STEP files of your enclosure design.
2. Choose Material and Finish
Select plastics, resins, or metals based on strength, appearance, and use case.
3. Preview the 3D Model
Check dimensions and component fir before production
4. Confirm and Place the order
Review pricing and production details, then proceed with manufacturing.
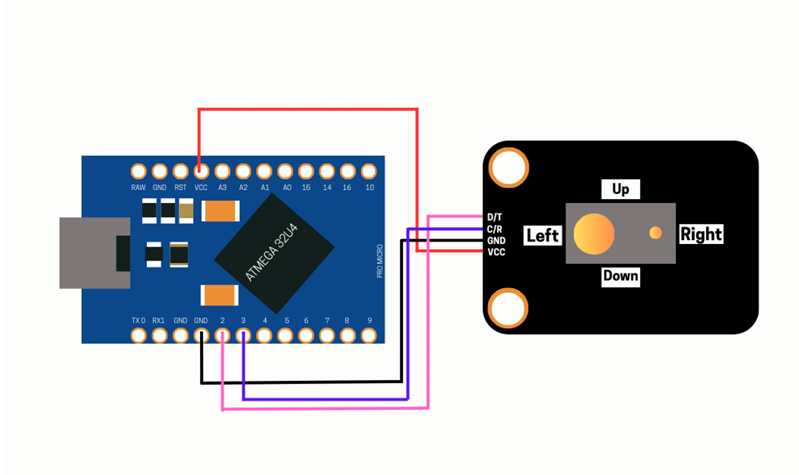
DFRobot GR10-30 Gesture Sensor To Arduino Pro Micro
- VCC To VCC
- GND To GND
- SCL To SDA (Pin 2)
- SCL To SCL (Pin 3)
The GR10-30 Gesture Sensor communicates with the Arduino Pro Micro via I2C protocol
Code ExplanationIncluding Necessary Libraries:
#include "DFRobot_GR10_30.h"
#include <Keyboard.h>- The DFRobot_GR10-30 library is used to interface with the gesture sensor.
- The keyboard library enables the Arduino Pro Micro to send keyboard inputs to a computer.
Configuring I2C Communication
#define I2CMODE
DFRobot_GR10_30 gr10_30(/*addr = */GR10_30_DEVICE_ADDR, /*pWire = */&Wire);- The sensor is initialized in I2C mode for communication with the Arduino
Initializing the Sensor in setup()
void setup() {
Serial.begin(115200);
Keyboard.begin(); // Initialize Keyboard functionality
while (gr10_30.begin() != 0) {
    Serial.println("Sensor initialization failed!");
    delay(1000);
}
Serial.println("Sensor initialized successfully!");
      gr10_30.enGestures(GESTURE_LEFT | GESTURE_RIGHT); // Enable left and right  gestures
}- The sensor is initialized and configured to recognized left and right swipe gestures.
Detecting Gestures and Simulation Key Presses
void loop() {
    if (gr10_30.getDataReady()) {
      uint16_t gestures = gr10_30.getGesturesState();
        if (gestures & GESTURE_LEFT) {
            Serial.println("Right gesture detected");
            Keyboard.press(KEY_LEFT_ARROW);
            delay(100);
            Keyboard.release(KEY_LEFT_ARROW);
      }
if (gestures & GESTURE_RIGHT) {
      Serial.println("Left gesture detected");
      Keyboard.press(KEY_RIGHT_ARROW);
      delay(100);
      Keyboard.release(KEY_RIGHT_ARROW);
  }
 }
delay(1); // Small delay for stability
}- The gesture sensor detects movements
- Left swipe triggers the left arrow key (previous slide).
- Right swipe triggers the right arrow (next slide).
- A small delay ensures stability
- The gesture sensor detects hand movements.
- If a left swipe is detected, the left arrow key is pressed, moving to the previous slide.
- If a right swipe is detected, the right arrow key is pressed, advancing the presentation.
- The Arduino Pro Micro acts as a keyboard, sending keypress signal to the computer.
- The 3D-printed casing holds the components securely, allowing for a compact and stable setup.
The Smart Presentation Controller is a simple yet powerful tool for hands-free slide navigation using gestures. By integrating the DFRobot GR10-30 Gesture Sensor with an Arduino Pro Micro, users can seamlessly control presentations with intuitive hand movements. This project is ideal for educators, professionals, and presenters seeking a convenient, touch-free experience. This project was inspired by a real-world problem observed at a hackathon, where a delay between the presenter and the slide controller disrupted the presentation flow. The Smart Presentation Controller aims to solve this problem by providing an effortless, gesture-based navigation system for presenters.


Comments