


Hardware components | ||||||
 |
| × | 1 | |||
 |
| × | 1 | |||
 |
| × | 1 | |||
| × | 1 | ||||
Software apps and online services | ||||||
 |
| |||||
In a world where technology meets everyday life, security doesn't have to be complicated. This project - the RFID-Based Smart Servo Lock System - brings simple, secure, and smart access control to any physical space.
Whether it's a cupboard, drawer, toolbox, or cabinet, this system replaces traditional keys with an RFID card - making access faster, safer, and futuristic.
I designed this project using an Arduino UNO R4 Wi-Fi, a servo motor, and a Power Bank for portability. All components are mounted openly on a 3D-printed base, creating a transparent design that showcases the wiring and logic clearly. It's functional, educational, and visually appealing - perfect for makers, students, and innovators.
Why You Should Make This ProjectSmart Access Control: Unlock your space with an authorized RFID card - no keys no passwords.
Hands-On Learning: Understand RFID technology, servo motion control, and Arduino programming.
Compact and Portable: Runs smoothly even from a simple power bank
Transparent Design: Every wire and board is visible - a great demo piece for classrooms or exhibitions.
Customizable: Can be adapted for lockers drawers boxes or even doors.
How It Works1. System Start-Up:
- When powered on, the Arduino initializes the RFID reader and sets the servo at the locked position (150).
2. Card Scanning:
- The MFRC522 RFID reader continuously scans for nearby RFID cards or tags
3. Authentication:
- Once a card is detected, its Unique ID (UID) is read and compared with the predefined authorized UID in the Arduino code.
4. If Authorized:
- The servo rotates smoothly from 150 to 0, unlocking the latch.
- The system waits 5 seconds (keeping it unlocked).
- The servo then returns back to 150, re locking automatically.
- The system waits until the card is removed before accepting a new scan.
5. If Unauthorized:
- The servo doesn't move.
- The serial monitor displays "UID NOT authorized."
- Arduino UNO R4 Wi-Fi x1: Acts as the main controller; reads RFID data and drives the servo
- MFRC522 RFID Reader x1: Detects and reads RFID card UIDs
- Servo Motor x1: Mechanically locks and unlocks the system.
- Power Bank x1: Portable power supply for the Arduino and servo.
- Jumper Wires (As Needed): For connections between the Arduino, RFID reader and Servo Motor
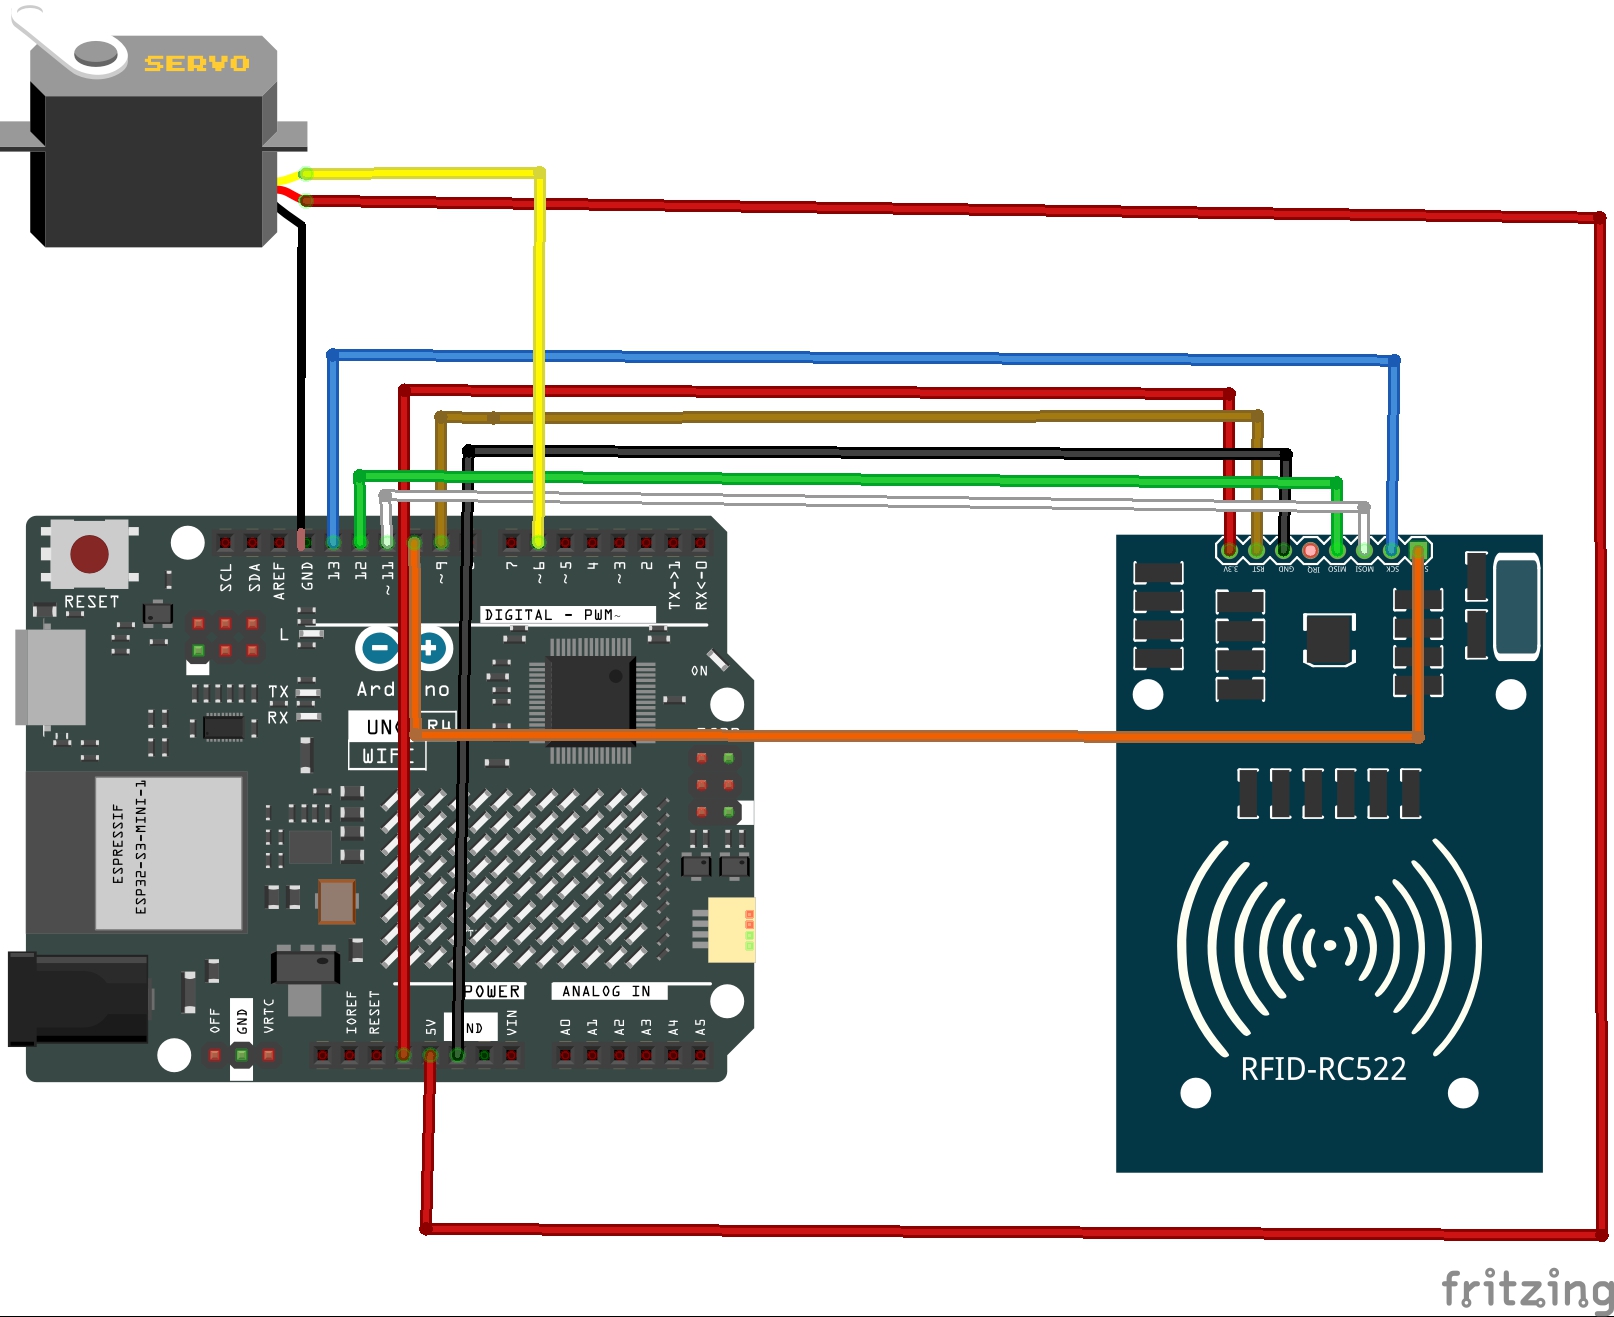
MFRC522 RFID Reader TO Arduino UNO R4 Wi-Fi
- SDA To D10
- SCK To D13
- MOSI To D11
- MISO To D12
- RST To D9
- 3.3v To VCC
- GND To GND
Servo Motor To Arduino UNO R4 Wi-Fi
- Signal To D6
- GND To GND
- VCC To VCC
- Mount your Arduino UNO R4 Wi-Fi, RFID reader, and servo on a 3D-printed base.
- Connect the wires as per the connection table.
- Power the Arduino through a Power Bank for mobility.
- Install the following Arduino Libraries: MFRC522 and Servo
- Replace the AUTH_UID in the code with your own RFID card's UID (check via serial monitor).
- Upload the code to your Arduino.
// RFID-triggered servo: initial 150deg -> on scan move to 0deg, hold 5s, return to 150deg
// Requires MFRC522 (Miguel Balboa) and Servo libraries
// Servo signal on pin D6. RC522 wiring per comments below.
#include <SPI.h>
#include <MFRC522.h>
#include <Servo.h>
#define RST_PIN 9    // RC522 RST
#define SS_PIN 10   // RC522 SDA/SS
#define SERVO_PIN 6    // servo signal pin
// Authorized UID bytes (your card)
const byte AUTH_UID[4] = { 0x2A, 0x7E, 0x17, 0xB1 };
MFRC522 mfrc522(SS_PIN, RST_PIN);
Servo myServo;
const int initialPos = 150;              // starting position (deg)
const int triggeredPos = 0;              // position to move to when RFID read (deg)
const unsigned long holdTimeMs = 5000UL; // hold time at triggeredPos (ms)
const int stepDelay = 8;                 // ms delay between degree steps for smooth movement
void setup() {
Serial.begin(115200);
while (!Serial) { } // wait for Serial on some boards (harmless on others)
SPI.begin();
mfrc522.PCD_Init();
myServo.attach(SERVO_PIN);
myServo.write(initialPos); // place servo at initial position
Serial.println();
Serial.println("RFID -> Servo ready.");
Serial.print("Initial angle: ");
Serial.print(initialPos);
Serial.println(" deg");
Serial.println("Scan authorized card to trigger movement.");
}
void loop() {
// look for a new card
if (!mfrc522.PICC_IsNewCardPresent()) {
return;
}
if (!mfrc522.PICC_ReadCardSerial()) {
return;
}
// Print scanned UID
Serial.print("Scanned UID: ");
for (byte i = 0; i < mfrc522.uid.size; i++) {
if (mfrc522.uid.uidByte[i] < 0x10) Serial.print("0");
Serial.print(mfrc522.uid.uidByte[i], HEX);
if (i < mfrc522.uid.size - 1) Serial.print(":");
}
Serial.println();
// Only react if UID size is 4 and matches AUTH_UID
if (mfrc522.uid.size == 4) {
bool match = true;
for (byte i = 0; i < 4; i++) {
if (mfrc522.uid.uidByte[i] != AUTH_UID[i]) {
match = false;
break;
}
}
if (match) {
Serial.println("Authorized card detected. Moving servo 150 -> 0, hold 5s, return to 150.");
moveServoSmooth(initialPos, triggeredPos, stepDelay);
delay(holdTimeMs);
moveServoSmooth(triggeredPos, initialPos, stepDelay);
Serial.println("Movement complete. Waiting for card removal before next trigger.");
// Halt card & stop crypto
mfrc522.PICC_HaltA();
mfrc522.PCD_StopCrypto1();
// Wait until the card is removed to avoid immediate retrigger
while (mfrc522.PICC_IsNewCardPresent() || mfrc522.PICC_ReadCardSerial()) {
delay(100);
// clear any repeated read
if (mfrc522.PICC_IsNewCardPresent()) {
mfrc522.PICC_HaltA();
mfrc522.PCD_StopCrypto1();
}
}
Serial.println("Card removed. Ready.");
} else {
Serial.println("UID NOT authorized. Ignored.");
}
} else {
Serial.println("UID length not 4 bytes — ignored.");
}
// final cleanup and small debounce
mfrc522.PICC_HaltA();
mfrc522.PCD_StopCrypto1();
delay(150);
}
// Smooth servo movement helper: moves degree-by-degree and prints each angle to Serial
void moveServoSmooth(int fromDeg, int toDeg, int stepDelayMs) {
if (fromDeg == toDeg) {
myServo.write(fromDeg);
Serial.print("Angle: ");
Serial.print(fromDeg);
Serial.println(" deg");
return;
}
int step = (toDeg > fromDeg) ? 1 : -1;
for (int deg = fromDeg; deg != toDeg; deg += step) {
myServo.write(deg);
Serial.print("Angle: ");
Serial.print(deg);
Serial.println(" deg");
delay(stepDelayMs);
}
// final position
myServo.write(toDeg);
Serial.print("Angle: ");
Serial.print(toDeg);
Serial.println(" deg");
}- Open the Serial Monitor at 115200 baud.
- Scan your RFID card:
If authorized - Servo rotates to unlock - waits 5 second - returns to lock
If unauthorized - No movement; access denied message printed.
Step4: Mounting- Attach a locking latch or hook to the servo horn.
- Fix your setup in the desired location - cabinet, box, or door.
- The 3D-printed base keeps everything organized and on display.
- IoT Control: Add cloud or Blynk integration using the UNO R4's Wi-Fi
- Buzzer or LED: For audio / visual feedback when unlocking.
- Battery Monitoring: Display battery percentage from the power bank.
- Multiple Cards: Store several authorized UIDs in EEPROM for multi-user access.
You breadboard prototype may function flawlessly - but to the untrained eye, it can look like a bundle of wires.
When it's time to showcase your creation at a science fair, tech competition, or investor meeting, presentation matters as much as innovation.
That's where JUSTWAY transforms your project from DIY to pro-level.
JUSTWAY - The Future of Hardware PrototypingJUSTWAY is more than a fabrication service - it's a maker's dream factory, where your concept evolves into a professional-grade prototype ready for real-world deployment.
What JUSTWAY OffersRapid Prototyping: From CAD file to physical prototype in under 24 hours. Real-time tracking and instant online quotes make iteration faster than ever.
CNC Machining: Precision aluminum or stainless steel (6061 / 304) enclosures for strong, premium-looking devices.
Sheet Metal Fabrication: Laser-cut, CNC-bent, and powder-coated panels for durable, industrial-quality housings.
Injection Molding: Perfect for scaling up - from your first prototype to full mass production.
Urethane Casting: Ideal for small batches, presentation models, or early field testing.
3D Printing (SLA/ HP-PA12)
- SLA Resin: Transparent, perfect for showcasing internal electronics.
- HP-PA12 Nylon: Strong, matte-finish for a sleek, stealthy look.
Place Your Order - transparent pricing, rapid delivery, zero hidden costs.
Whether you're a hobbyists, startup, or engineer, JUSTWAY bridges the gap between imagination and production.
From transparent display prototypes to sleek production-ready enclosures - JUSTWAY makes your project look as good as it performs.
ConclusionThe RFID-Based Smart Servo Lock System is an elegant fusion of security, simplicity and technology.
It's easy to build, fun to demonstrate, and adaptable to almost any setting - whether it's a workshop cupboard, school lab locker, or even a personal gadget case.
With Arduino UNO R4 Wi-Fi powering the logic, a servo motor handling motion, and a power bank making it portable - this project proves how accessible smart automation can be.
And when you're ready to take it beyond the prototype stage, JUSTWAY ensures your project not only works great but looks world-class.
Invent. Build. Secure. Showcase - The future of DIY is smart, and it starts with you.


Comments