


Hardware components | ||||||
| × | 1 | ||||
 |
| × | 1 | |||
 |
| × | 1 | |||
 |
| × | 1 | |||
 |
| × | 1 | |||
| × | 1 | ||||
Software apps and online services | ||||||
 |
| |||||
Hand tools and fabrication machines | ||||||
 |
| |||||
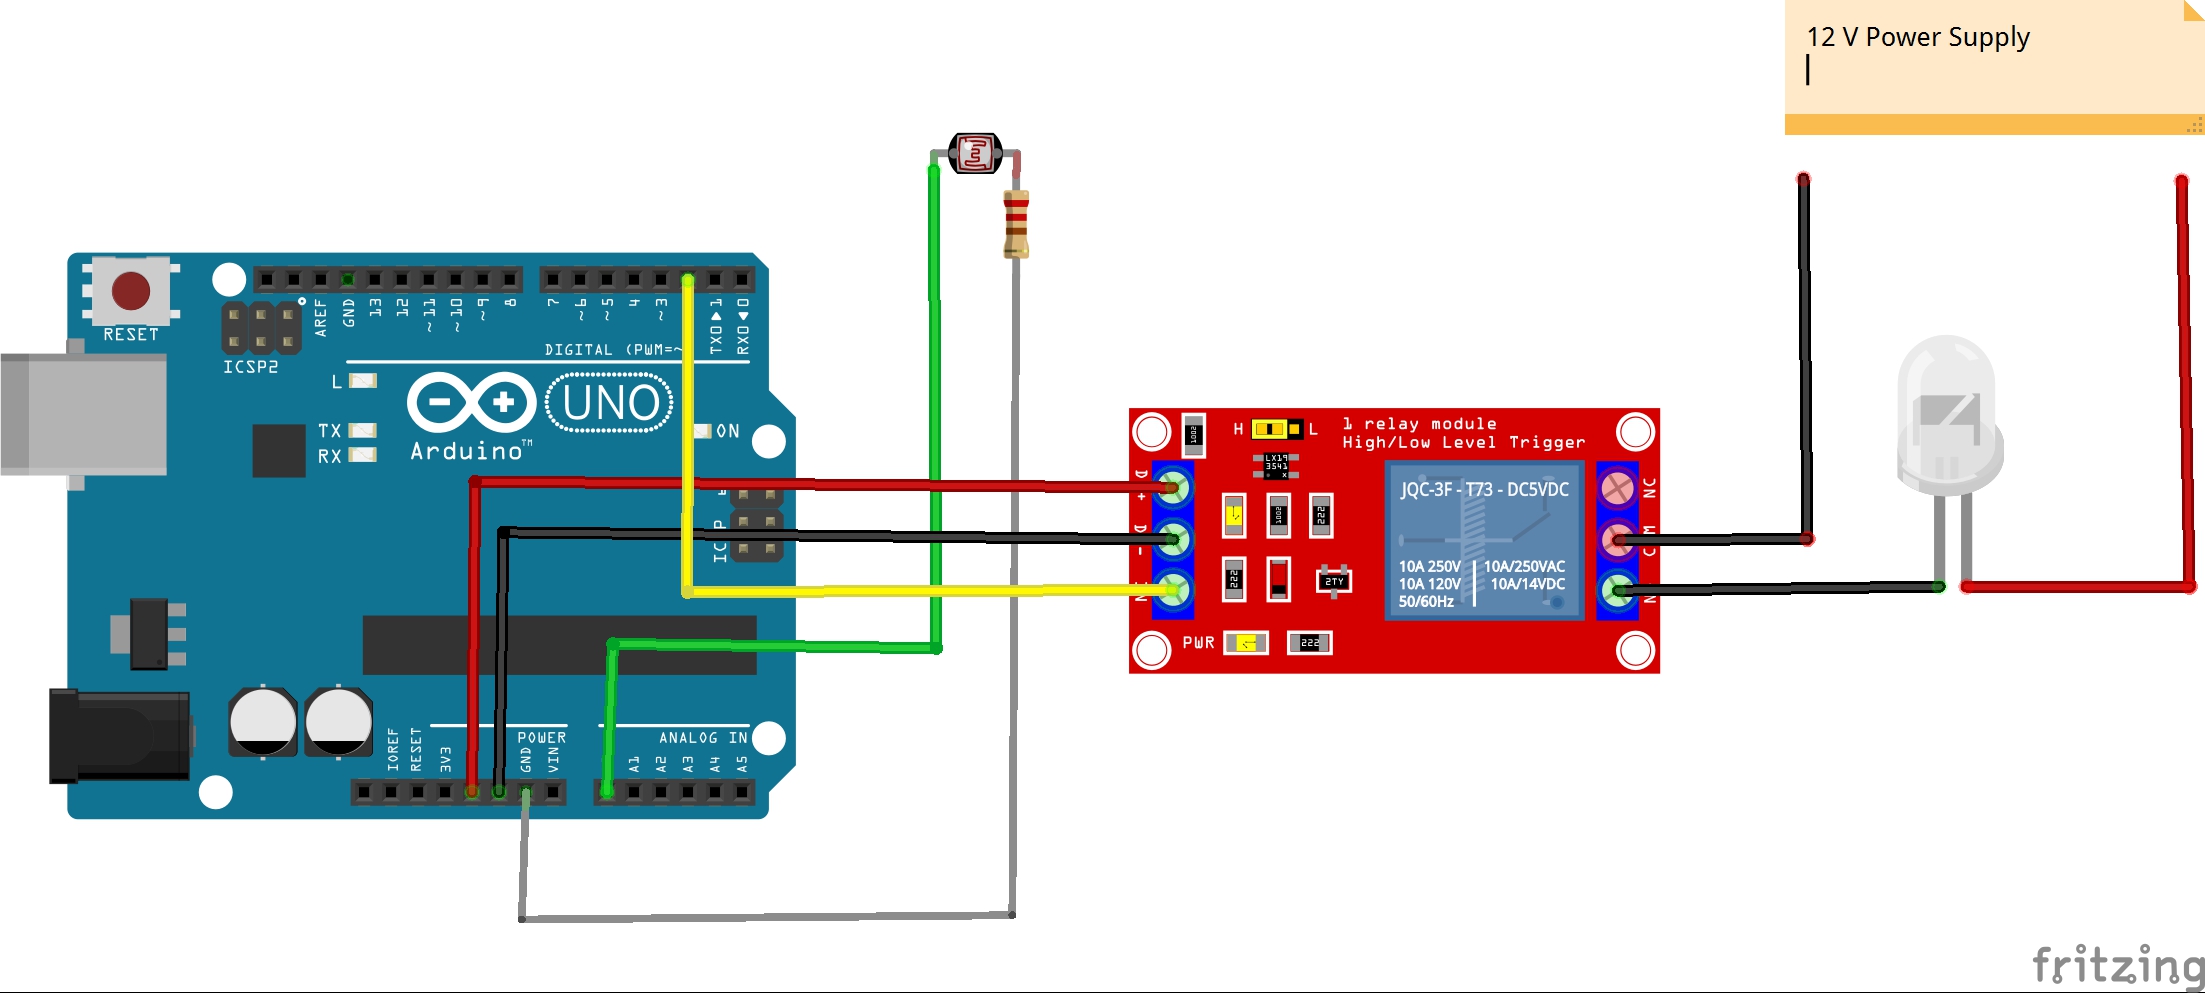
This project creates an automatic light ON/OFF system using an LDR, a relay module, and an Arduino UNO Mini. When the environment becomes dark, the system turns an LED strip ON automatically. When enough light returns, it switches the strip OFF again. This is a clean, simple, beginner-friendly automation build that teaches light sensing, voltage dividers, and relay control.
Supplies Required- Arduino UNO Mini: A smaller, more compact version of the classic Arduino UNO. It acts as the brain of the project. It reads the light level from the LDR makes decision based on the code you upload, and controls the relay. Runs on a 5v microcontroller (ATmega328P) and connects to your computer via USB.
- LDR ( Light Dependent Resistor ): A special type of resistor whose resistance changes with light. Bright light - low resistance Darkness - high resistance By reading this change through an analog pin, the Arduino can tell how bright or dark the environment is. This is the main sensor of the project.
- 10k Resistor: Used with the LDR create a voltage divider. This converts the changing resistance of the LDR into a changing voltage, which the Arduino can measure. The 10k value is ideal for typical indoor lighting conditions.
- Relay Module (5v): A small electrically operated switch. It allows the Arduino (low power 5v signal) controls something that draws much more power like a 12 v LED strip. It provides electrical isolation keeping the Arduino safe. The relay switch ON when the Arduino signals it and OFF when the signal stops.
- LED Strip (12 V): The lighting output of the project. When the relay turns ON, the LED strip receives power from the 12V adapter and lights up. When the relay turns OFF, the power is cut, and the strip turns off automatically.
- 12v Power Adapter: Supplies the necessary power for the LED strip. The Arduino cannot power the LED strip directly, so the adapter provides a separate power source that the relay controls. Provides a stable DC voltage for safe and consistent lighting.
- Jumper Wires: Flexible wires used to connect components on the breadboard. They link the the LDR circuit to the Arduino and connect the relay to the digital pins and power rails.
Arduino IDE: The Arduino Integrated Development Environment (IDE) is the software used to write, edit, and upload code to the Arduino board.
Features include:
- A simple code editor for writing sketches
- One-click Verify and Upload buttons
- A Serial Monitor that shows sensor readings from the board
- Built-in libraries and examples
- Support for thousands of Arduino-compatible boards.
The IDE converts your code into machine instructions and sends it to the Arduino UNO Mini through the USB cable. It is beginner-friendly and perfect for learning programming and electronics.
Steps To BuildWiring the LDR SensorCreate a voltage divider
- LDR leg1 - 5v
- LDR leg 2 - A0
- 10k resistor between A0 and GND
This setup gives the Arduino a changing voltage that represents brightness.
Wiring the Relay Module
- Relay VCC - 5v
- Relay GND - GND
- Relay IN - Digital Pin 2
LEDStripPower
For a 12v LED Strip:
- LED strip + directly to 12V supply
- LED strip - to COM on relay
- Relay NO to the 12v supply ground
The relay will switch the strip ON/OFF by controlling the ground connection.
Uploading The CodeUse the Arduino IDE The sketch below reads the LDR, checks if it's dark, and switches the relay.
// Beginner-friendly: Read button on pin 6 and control a relay on pin 2
// Wiring (recommended):
//  - Relay module VCC -> 5V
//  - Relay module GND -> GND
//  - Relay module IN  -> Arduino digital pin 2
//  - Button one side -> Arduino pin 6
//  - Button other side -> GND
// Note: This sketch uses INPUT_PULLUP, so button connects to GND when pressed.
const int RELAY_PIN = 2;    // Relay control pin
const int BUTTON_PIN = 7;   // Input pin (button or switch)
// If your relay module is "active LOW" (common for many modules), set true.
// If your relay turns ON when IN is HIGH, set false.
const bool RELAY_ACTIVE_LOW = false;
void setup() {
Serial.begin(9600);                 // Optional: debug output to Serial Monitor
pinMode(RELAY_PIN, OUTPUT);         // Relay pin is an output
pinMode(BUTTON_PIN, INPUT_PULLUP);  // Use the internal pull-up resistor
// Make sure relay starts OFF
if (RELAY_ACTIVE_LOW) digitalWrite(RELAY_PIN, HIGH); // HIGH -> off for active-low relay
else digitalWrite(RELAY_PIN, LOW);                   // LOW  -> off for active-high relay
Serial.println("Ready. Press the button to turn the relay ON.");
}
//Made By Rohan Barnwal
void loop() {
// Read the button. Because of INPUT_PULLUP, pressed == LOW.
int raw = digitalRead(BUTTON_PIN);
bool pressed = (raw == LOW); // true when button is pressed
// Simple debounce: when we detect a press state change, wait briefly and re-read.
static bool lastPressed = false;
if (pressed != lastPressed) {
delay(30);                     // small debounce delay (30 ms)
raw = digitalRead(BUTTON_PIN);
pressed = (raw == LOW);
lastPressed = pressed;
}
// Turn relay on or off based on button
if (pressed) {
// Turn relay ON
if (RELAY_ACTIVE_LOW) digitalWrite(RELAY_PIN, LOW);  // active-low -> LOW turns ON
else digitalWrite(RELAY_PIN, HIGH);                  // active-high -> HIGH turns ON
Serial.println("Relay: ON");
} else {
// Turn relay OFF
if (RELAY_ACTIVE_LOW) digitalWrite(RELAY_PIN, HIGH); // active-low -> HIGH turns OFF
else digitalWrite(RELAY_PIN, LOW);                   // active-high -> LOW turns OFF
Serial.println("Relay: OFF");
}
delay(100); // small loop delay to avoid flooding Serial
}- Cover the LDR with your hands - LED strip should turn ON
- Shine a light - LED strip should turn OFF
After successfully testing the circuit on a breadboard, the next logical step is to improve the physical layout and protection of the project. Breadboards are excellent for prototyping, but for real-world use, exhibitions, or long term operations, placing the circuit inside and enclosures makes the system safer and more reliable.
An enclosure helps prevent accidental short circuits, protects components from dust, and keeps wiring organized. it also makes the project easier to mount on a wall or place near and LED strip installation. Depending on the environment where this controller will be used, different enclosure materials can be selected, plastic enclosures are suitable for indoor use, while metal or sheet-metal housings provide better durability for more demanding conditions.
Services such as JUSTWAY can be used to fabricated custom enclosures once the circuit design is finalized. options like 3D Printing are useful for quick prototypes, while CNC machined or sheet-metal cases are better for long-term or repeated use. Transparent enclosures can be used if you want to visually demonstrate the internal electronics, whereas opaque enclosures give a clean, minimal appearance.
Improving the enclosure and wiring not only enhances the look of the project but also brings it closer to a product level implementation, making it suitable for demonstrations, competitions, or practical installations.
How To Order in 4 Easy StepsStep1: Upload You CAD Files at JUSTWAY.comStep2: Select Material & Finish - plastics, resins or metals
You now have a simple and reliable automatic lighting controller using an LDR, relay, and Arduino UNO Mini. This system is great for bedrooms, hallways, stair lighting, or outdoor decorative LEDs. By combining this with a 3D-printed housing from JUSTWAY, you can turn a hobby build into a neat, durable, professional-looking device.


Comments