


Hardware components | ||||||
| × | 1 | ||||
_ztBMuBhMHo.jpg?auto=compress%2Cformat&w=48&h=48&fit=fill&bg=ffffff) |
| × | 1 | |||
| × | 1 | ||||
 |
| × | 1 | |||
 |
| × | 1 | |||
Software apps and online services | ||||||
 |
| |||||
| ||||||
Introduction
Sometimes, the simplest questions spark the biggest journeys.
For me, it started while watching a RoboSoccer match online. Dozens of tiny robots chased the ball, turned sharply, and scored goals like professional footballers - but without a single human touch. My inner maker immediately lit up:
"Can I build something like this myself?"
Of course, I didn't have a high-end lab, advanced robotics degree, or fancy equipment. All I had were some basic electronic skills, endless YouTube tutorials, sleepless nights, and a fire inside me that said: "Build it anyway."
What started as a random thought quickly became an obsession. I didn't want to just make a robot that "moves."I wanted it to move smoothly, look professional, respond perfectly to my commands, and most importantly - look like something that people take seriously.And after countless hours of research, trials, failures, and learning, I finally built my 3D Printed RoboSoccer Car - fully controlled via Bluetooth, perfectly capable of hitting a ball in the goal.
Why I Decided to Build A Smaller, Cleaner VersionAfter my first prototype worked, I realized something:
You can always make something functional. But making it beautifully functional is where real mastery lies.
So now, I've set a new goal:
To design a smaller, tighter, faster RoboSoccer car that look not just like a hobby project, but like a polished, professional-grade product.
And to do that, I turned to a game-changing partner that made all the difference - JUSTWAY
Why This Project Looks So Neat and Clean Credit Goes to JUSTWAYLet's be honest - even the best electronics projects can end up looking like a mess of jumper wires taped to a piece of cardboard. It works, sure, but no one take it too seriously.
That's exactly why I trusted JUSTWAY to take my build to the next level. And bro. they delivered perfection.
Who Is JUSTWAY?JUSTWAY isn't just another manufacturing service - They are literally the Iron Man suit factory for makers like us.
Whether yo need:
- A single prototype that feels like a finished product
- Or a production run of 10, 000 units - JUSTWAY handles it with speed, precision, and true professionalism.
- Instant Quotation System: Upload your CAD files and get instant pricing.
- 3D Live Model Preview: Zoom, rotate, inspect every detail before production.
- Material Options: SLA resin, Nylon PA-12, CNC aluminum, and more.
- Industrial-Level Finish: Smooth surfaces, sharp detailing, perfect fit.
- Full Support: Dedicated engineers review your design, and ensure quality at every step.
JUSTWAY doesn't just print parts. They help makers build dreams that look like professional products.How I Ordered My Custom 3D Printed Model from JUSTWAY (Step-by-Step)Step 1: Upload Your Design
- Go to the JUSTWAY website
- Upload your STL, STP, or CAD files directly.
- Choose from resins, metals, Polymers, and more.
- Customize the finish, material, and tolerances.
- Preview your uploaded model directly on the website.
- Rotate, zoom, and verify every detail before production.
- Review the instant quote.
- Submit your order confidently knowing you'll get top-quality production.
ProTip:If you want your project to look like a product and not a prototype, JUSTWAY is hands-down the best option.
Limited-Time Offer: JUSTWAY 15% Summer Cashback
Campaign Period: June 1 - August 31, 2025 (UTC)
- Get 15% cashback on all qualifying orders.
- After order completion, simply email marketing03@justway.com with your order number(s).
- Cashback will be credited to your JUSTWAY account for future orders.
Let's break down exactly what I used:
- ArduinoUNO: Main brain controlling all logic
- HC-05 Bluetooth Module: Wireless communication with smartphone
- L289N Motor Driver: Controls motors (speed & direction)
- DC Geared Motors: Moves the robot
- 3D Printed Structure (via JUSTWAY): Lightweight, durable, professional looking body
- Li-ion Batteries: Power source
- Jumper Wires: Electrical connections
- Wheels & Ball Caster: Movement and stability
I used the Arduino Car App from the Play Store to control my RoboSoccer Car via Bluetooth. The beauty of this app is:
- You can easily configure which key sends which command.
- It allows advanced configuration for complex moves.
- L → Move Forward
- R → Move Backward
- S → Stop
- B → Turn Left
- F → Turn Right
- X → Enable Precise Turning Mode
- Y → Disable Precise Mode (normal turning)
Why X & Y?
When I send X, my robot enters precise turning mode - where:
- One wheel rotates clockwise,
- The other rotates counter-clockwise,
- Resulting in perfect 360 in-place rotation (tight spot turns).
When Y is sent, it switches back to normal mode where only one wheel rotates during turns - creating a smoother curve turn.
This dual-mode feature made my RoboSoccer car far more agile on the field, giving me better control for hitting the ball precisely towards the goal.
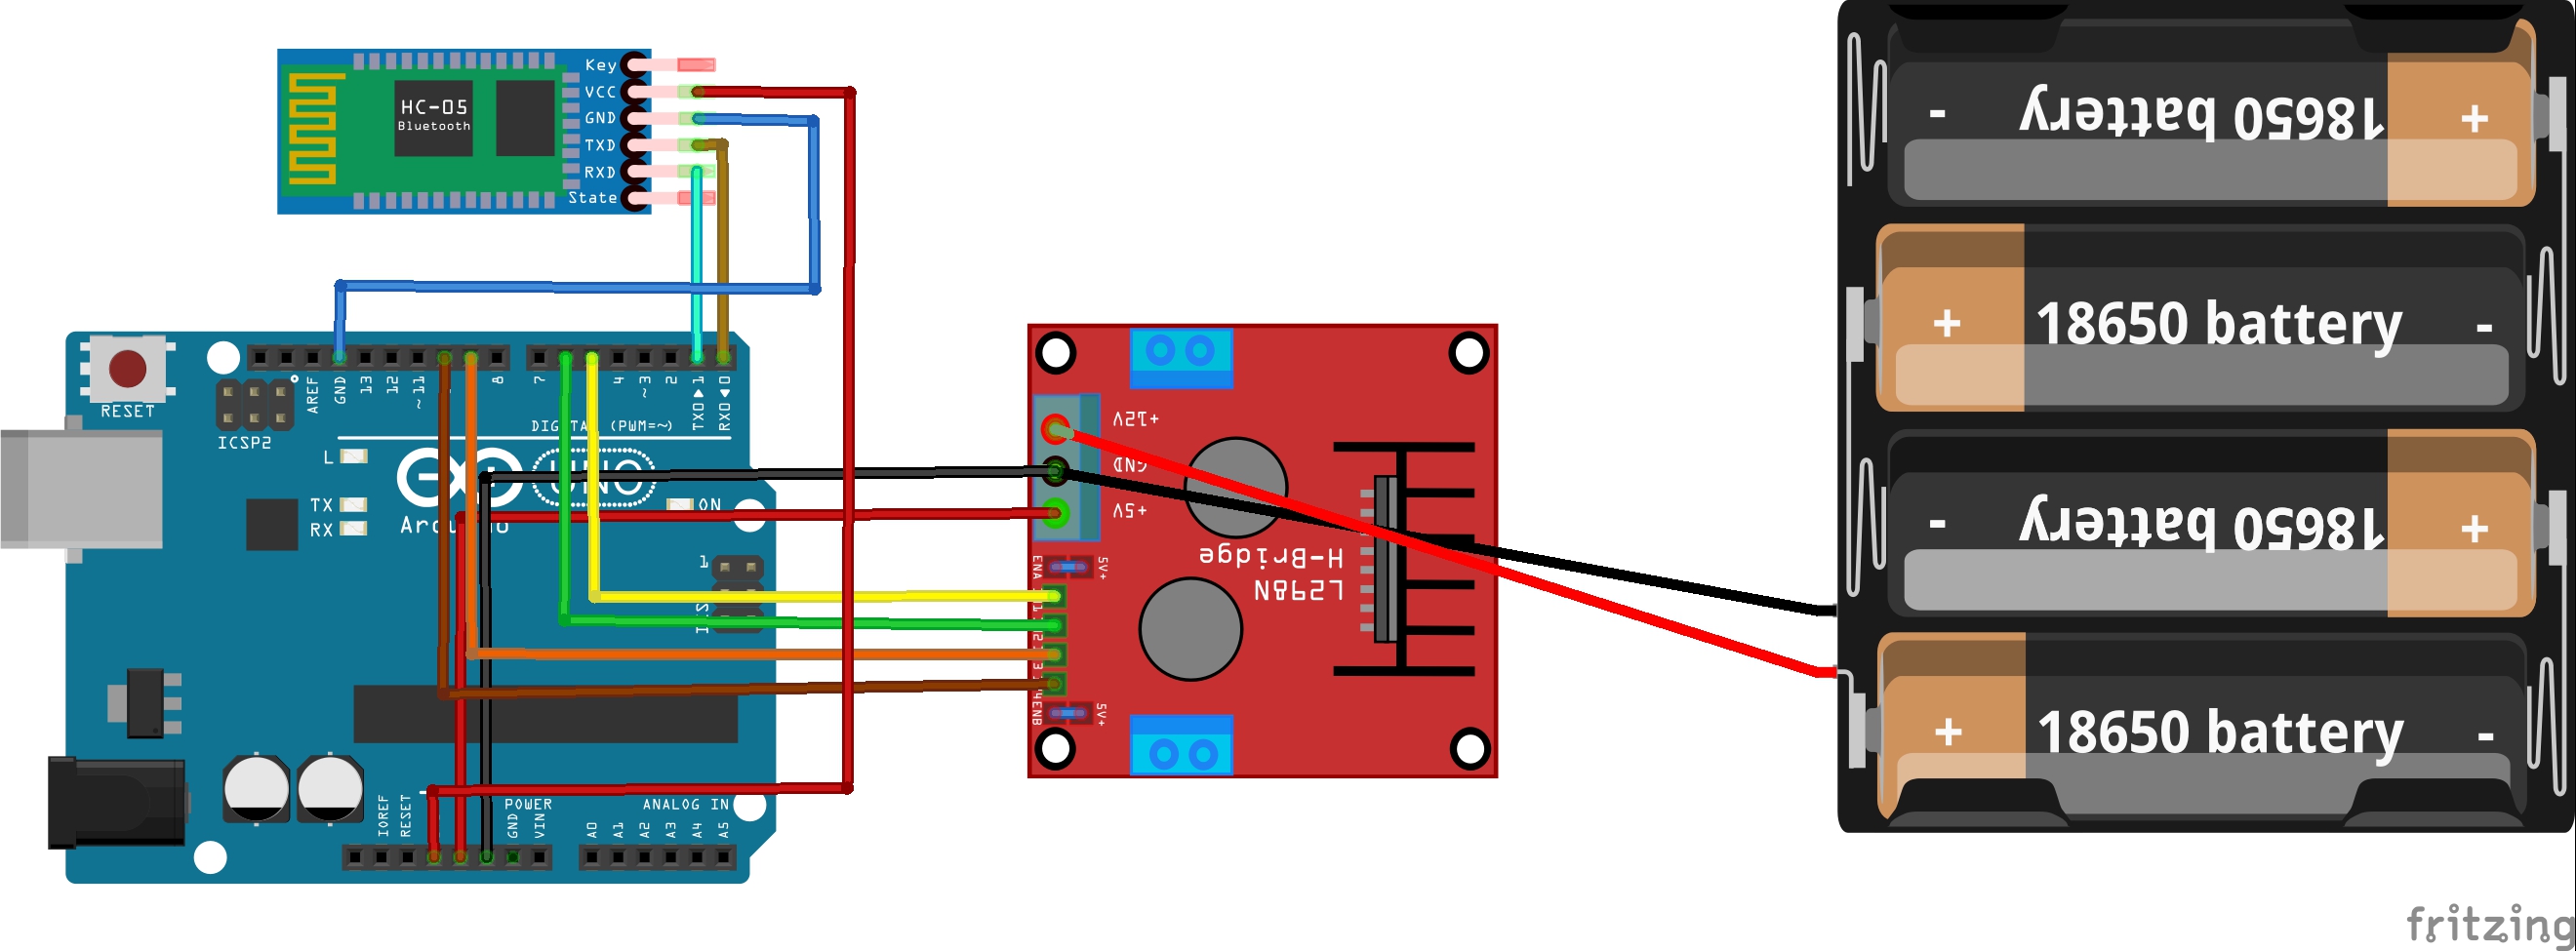
Circuit Connection Overview
HC-05 Bluetooth Module To Arduino UNO
- VCC To Arduino UNO's 5V
- GND To Arduino UNO's GND
- TX To Arduino UNO's Pin D0
- RX To Arduino UNO's Pin D1
L298N Motor Driver To Arduino UNO
- IN1 (Left Motor Forward) → Pin 5
- IN2 (Left Motor Reverse) → Pin 6
- IN3 (Right Motor Forward) → Pin 9
- IN4 (Right Motor Reverse) → Pin 10
- VCC → Battery
- GND → Common ground with Arduino
Power Source:Li-ion battery connected directly to the motor driver and regulated for Arduino.
The Complete Code Logic (In Short)The robot listens to serial data (characters sent via Bluetooth). Based on the command character received, it controls the motors accordingly.
- Forward and Backward are simple directional commands.
- Left and Right turn works differently depending on preciseTurning mode.
- Stop command shuts down all motor movement
char t;
bool preciseTurning = false;
// Motor pins
int in1 = 5;   // Left motor forward
int in2 = 6;   // Left motor reverse
int in3 = 9;   // Right motor forward
int in4 = 10;  // Right motor reverse
void setup() {
pinMode(in1, OUTPUT);
pinMode(in2, OUTPUT);
pinMode(in3, OUTPUT);
pinMode(in4, OUTPUT);
Serial.begin(9600); // HC-05 on pins 0 and 1
}
void loop() {
if (Serial.available()) {
t = Serial.read();
Serial.println(t);  // Optional debug
// Mode toggle
if (t == 'X') {
preciseTurning = true;
}
else if (t == 'Y') {
preciseTurning = false;
}
// ---- Main Movement ----
if (t == 'L') {  // Forward
digitalWrite(in1, LOW);
digitalWrite(in2, HIGH);
digitalWrite(in3, HIGH);
digitalWrite(in4, LOW);
}
else if (t == 'R') {  // Backward
digitalWrite(in1, HIGH);
digitalWrite(in2, LOW);
digitalWrite(in3, LOW);
digitalWrite(in4, HIGH);
}
else if (t == 'S') {  // Stop
digitalWrite(in1, LOW);
digitalWrite(in2, LOW);
digitalWrite(in3, LOW);
digitalWrite(in4, LOW);
}
else if (t == 'B') {  // Turn Left
if (preciseTurning) {
// In-place rotate left
digitalWrite(in1, LOW);
digitalWrite(in2, HIGH);
digitalWrite(in3, LOW);
digitalWrite(in4, HIGH);
} else {
// Only left motor ON
digitalWrite(in1, LOW);
digitalWrite(in2, HIGH);
digitalWrite(in3, LOW);
digitalWrite(in4, LOW);
}
}
else if (t == 'F') {  // Turn Right
if (preciseTurning) {
// In-place rotate right
digitalWrite(in1, HIGH);
digitalWrite(in2, LOW);
digitalWrite(in3, HIGH);
digitalWrite(in4, LOW);
} else {
// Only right motor ON
digitalWrite(in1, LOW);
digitalWrite(in2, LOW);
digitalWrite(in3, HIGH);
digitalWrite(in4, LOW);
}
}
}
}
- Bluetooth pairing issues (intermittent failures)
- Motors heating up after continuous operations
- Power stability issues with the battery
- Code bugs: inverted motor direction during turns
- Loose jumper wires creating intermittent disconnections
Each problem taught me valuable lessons in debugging, wiring, coding logic and hardware design
Conclusion: What This Project Taught MeBuilding this RoboSoccer car was far more than just wiring components together. It was a journey of learning, failing, and never giving up.
- I started with almost no robotic experience
- I faced every possible technical and design challenge.
- I learned real-world problem solving that no online tutorial can fully teach.
And when I finally saw my 3D printed RoboSoccer car - with its professionally manufactured body thanks to JUSTWAY - smoothly hitting the ball towards the goal under my control, it felt absolutely magical.
This project showed me that passion + patience + persistence = anything is possible.
When you build something with your own hands, you don't just create a machine - you create confidence that can build anything.


Comments