

Hardware components | ||||||
_ztBMuBhMHo.jpg?auto=compress%2Cformat&w=48&h=48&fit=fill&bg=ffffff) |
| × | 1 | |||
 |
| × | 1 | |||
 |
| × | 1 | |||
 |
| × | 1 | |||
| × | 1 | ||||
| × | 1 | ||||
 |
| × | 1 | |||
 |
| × | 1 | |||
Hand tools and fabrication machines | ||||||
 |
| |||||
We are a group of hackers working on a project that allows you to communicate with your Arduino project using an Adafruit nRF8001 Bluetooth module. For another version of this guide, check out our blog at http://doteverything.co/blog.html
Arduino is a cool platform because you can easily interact with your projects from your computer. But in 2015, adding the ability to control your project from your smartphone is necessary to creating a viable product. With wireless capability, the variety of projects you can do increases exponentially. This guide will be the first part in a series that will allow you to get an unprecedented level of control over your Arduino projects from your smartphone. Sections titled "(Extra)" are not necessary to complete the project. They do, however, provide supplementary information that can help in overall comprehension.
We will be using the Adafruit nRF8001 breakout board, though there are several great bluetooth breakout boards and shields on the market. We like the 8001 because it implements a UART interface over bluetooth. In short, it lets you send commands and receive responses in good old ASCII plain-text with no hassle. This particular board also uses bluetooth 4.0 which allows it to sip small, regulated amounts of electricity. We are eventually going to make our project entirely battery powered, so we like this. The nRF8001 consumes so little power that, depending on the application, this board could run for years on a single coin cell battery! Adafruit also provides an iOS and Android app to interface with your bluetooth board.
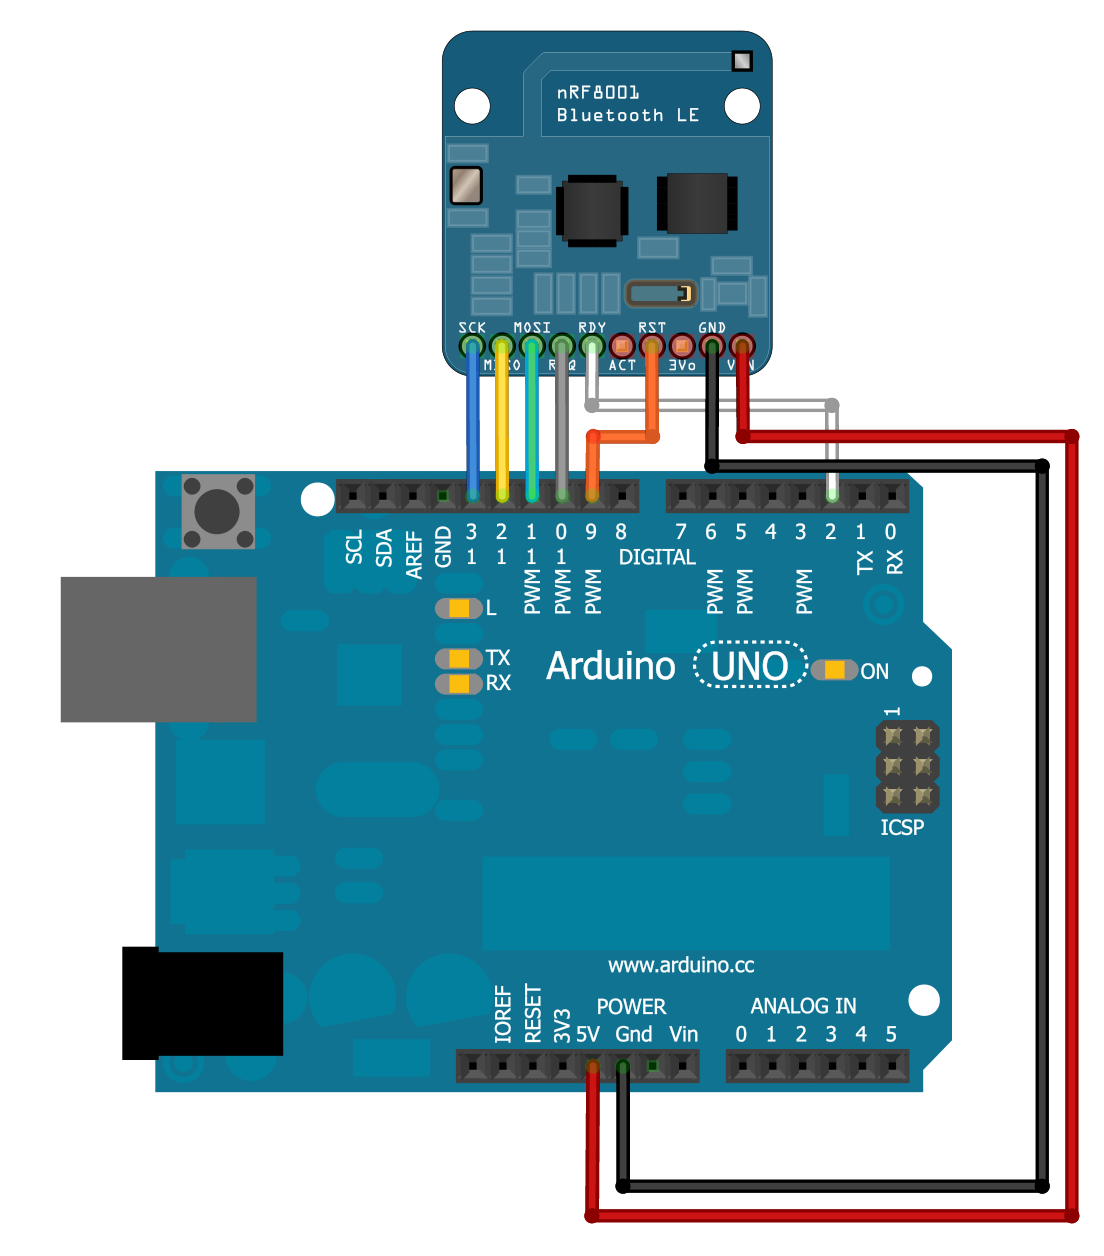
Once you have purchased your bluetooth board, you need to solder the included header pins into the holes on the breakout board. Be sure to solder with the short end of the headers inside the board and the long ends facing downward. Don't try to skip the soldering step - a poor electrical connection will be hard to track down and could waste hours of your time. Wiring it up is straightforward, though it requires a breadboard. (If you are unfamiliar with how a breadboard works, quickly hop over here to make sure you don't accidentally wire something incorrectly.) The wiring should be done like the first image of the board and bluetooth.
Of course this picture doesn't include the breadboard. Here is a close-up shot of the breadboard to show what's going on. Each wire connects to the breadboard "column" of the breakout pin it needs to connect to. Refer to breadboard image above.
If you don't have the Arduino UNO like in the schematic, pay close attention to the Arduino pin number that you connect the wires to. The first 3 breakouts, labeled SCK, MISO, and MOSI, must go to pins 13, 12, and 11 respectively. This should be the same for all ATMega328P based Arduinos (Uno/Duemilanove). If you have another Arduino, you must find out which pins are SPI and connect to those instead.
---------SPI-----------
These three pins are important because they make up a special hardware unit on the Arduino called the Serial Peripheral Interface or SPI. Arduino pin 13 is SCK (Serial Clock), 12 MISO (Master In Slave Out), and 11 MOSI (Master Out Slave In). The Arduino SPI is connected to an equivalent 3 pin SPI unit on the nRF8001. The Arduino behaves as the master and the nRF as the slave, though the roles can be reversed in theory. The concept of SPI is quite simple. The SCK pin clicks up and down in a regularly spaced square wave (square wave meaning it has two values, high or low). For every click of the SCK pin, the slave looks on MOSI and figures out if the voltage is high or low. The master does the same on MISO. If a high voltage is read, that is a '1'. If a low voltage is read, that is a '0'. In this way, a sequence of 1s and 0s is transmitted and translated into letters, numbers, and commands, which the software can then act on. In the case of the nRF8001, these translated letters and numbers are transmitted over the Bluetooth connection to your phone. The letters and numbers that the nRF8001 sends to your Arduino are what it received from the phone over Bluetooth.
SPI is a useful communication standard because it only requires 3 pins. Technically SPI is only a protocol and has nothing to do with the hardware. You can implement an SPI interface anywhere as long as you have 3 pins free and can turn them on and off. Many microcontrollers today have hardware SPI modules where the implementation is done in the circuitry itself instead of in software. This allows communication over SPI to be done much faster and more accurately than possible if done in code. The only downside is that you MUST use the dedicated hardware SPI pins, as opposed to any General Purpose IO pins.
-----------REQ--------------
Strictly speaking, only 3 pins are required to transmit data over an SPI interface. However, additional pins can be used to control the flow of information. These pins do not need to be part of the hardware circuitry of an SPI module and can be implemented in software, since they are not involved in any high speed data transfer themselves. A 4th pin is standard, called the Slave Select or Chip Select pin. On the nRF8001, the REQ pin takes the role of the Slave Select (SS) pin. The SS pin allows multiple SPI slave devices to be connected to the same 3 hardware pins on the master (SCK, MOSI, MISO). That is to say, you could connect 1 master SPI device to 2, 3, or more slaves and transmit data to any of them. Obviously it's unlikely that all the slaves need the same information sent to them over MOSI at the same time. That's where the SS pin comes in. A slave will only read the instructions coming over its MOSI line if it has been selected as the 'active slave' by having its Slave Select line held low. The Master therefore needs a SS pin dedicated to each slave connected to the SPI lines. When it wants to talk to a particular slave, it holds the SS pin corresponding to that slave low, while keeping all of the other SS pins high. Only the chosen slave will communicate until its SS pin is set high. The nRF8001 uses the REQ line to know when it is being allowed to communicate with the master Arduino. If you need to communicate with other SPI devices (for example, a sensor or LCD display), you simply need to hook another free IO pin to that device's SS pin, and you can connect the device's SPI pins to the same 3 Arduino SPI pins.
The REQ pin does not have to be pin 10 on the Arduino. However, if you change it you will need to change the line in the code that says "#define ADAFRUITBLE_REQ 10" where the number 10 should be replaced with the pin you connected REQ to.
---------------RDY and RST---------------
The REQ pin indicates to the nRF that the Arduino wants to communicate over SPI. When the Arduino asks to start communicating by toggling the REQ pin, it waits until RDY switches before actually sending data, which indicates that the nRF is ready to receive. Likewise, the RDY pin indicates to the Arduino that the nRF wants to communicate. And likewise, after toggling the RDY pin, the nRF waits until the Arduino toggles the REQ pin before actually starting to send data.
The RDY pin is special. Like the SPI pins, it cannot simply be re-mapped to any Arduino pin. It must be re-mapped to another interrupt capable pin. An interrupt pin is one that is monitored by the Arduino on a hardware level. If a signal comes in on the interrupt pin, the Arduino stops everything it is doing and enters a special section of code to address the interrupt pin. This is great because the Arduino doesn't have to sit around checking if the nRF wants to talk to it every few milliseconds. The Arduino can do its own thing and if data comes in, it will be notified immediately. This saves battery power, lets the Arduino focus on other tasks (including sleeping!) the 99.9% of the time that no data is coming in over Bluetooth, and makes sure the Arduino is very responsive when data finally does arrive. From the perspective of user code, we don't need to deal with any details of communicating with the Bluetooth device at all. When information is available it "magically" gets put into a particular spot in memory (by the interrupt code behind the scenes) and we just need to read it.
The RST pin is straightforward. It basically "restarts" the nRF8001 when it is toggled. This is performed by the code automatically whenever the Arduino itself is reset. Like the REQ pin, the RST pin can be mapped to any unused Arduino pin, as long as "#define ADAFRUITBLE_RST 9" at the start of the code is changed appropriately.
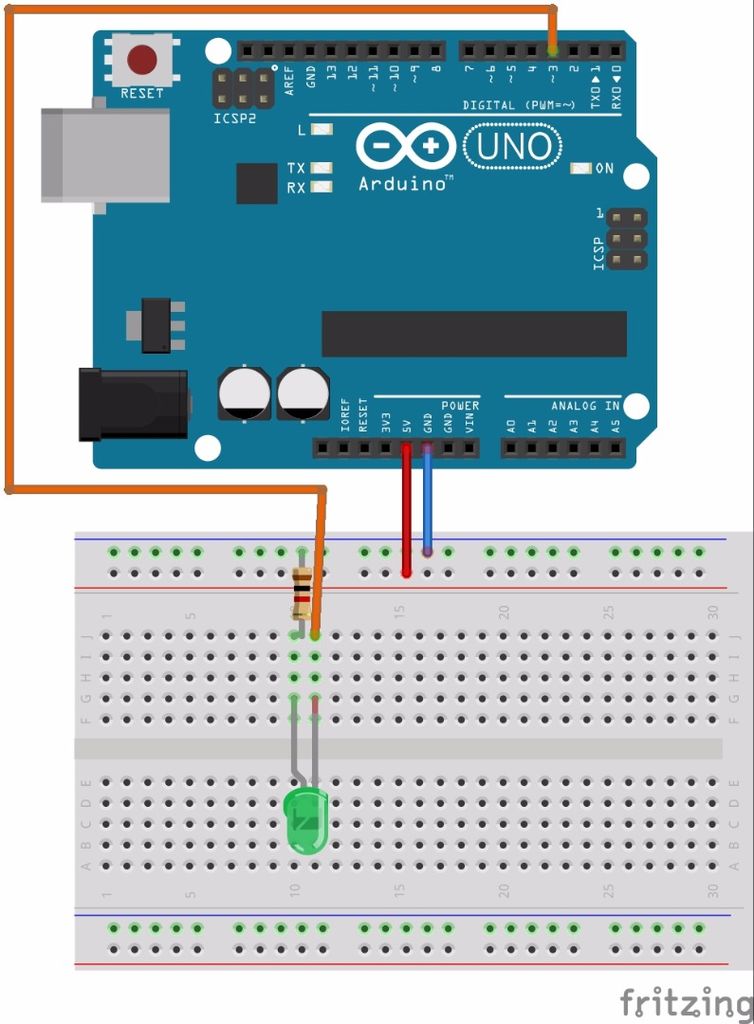
Step 4: Hooking up the LEDNow obviously once the nRF is hooked up, there are still a ton of open pins left on the Arduino and a lot of empty memory to add your programs. You can hook up many different devices. We will demonstrate how to hook up an LED as an example. Using our code, which you can download below, you should be able to turn this LED on or off from your smartphone. You can hook up other sensors like a temperature sensor or light sensor to give the LED additional intelligence, and you can monitor everything on your phone whenever you are in bluetooth range.
LEDs have 2 leads. The shorter lead is always negative or "ground". For our circuit, connect the longer lead to pin 3 of the Arduino. Connect the shorter lead to a resistor, which connects to ground. Remember that a breadboard completes connections in one direction only (along the columns), so it is very important to place the LED across 2 different columns as shown in the picture, and likewise to connect the resistor across 2 different columns or between a column and the power rail. Refer to the image 1.
A breadboard also has power rails along either side, and these complete connections horizontally, not vertically. You can use this rail to distribute GND and +5V to multiple components if necessary. Refer to image 2.
For your resistor, a safe value is 1k Ohms. You can reduce the resistor value if you want a brighter LED, but be wary of driving more than 40 mA from any pin of your Arduino as this will destroy it. A good bright value is 20 mA. To figure out what resistor value you need to get 20 mA flowing through your LED, use a multimeter to measure the voltage across the LED while it is in operation and hooked up to a 1k resistor. Take your supply voltage (5 volts), subtract the measured voltage drop across the resistor (varies anywhere from 1.8 to 3.6 V depending on the particular LED), and divide the remainder by .02. The answer should be your MINIMUM resistance. Choose the next higher resistor you have. If you don't have a multimeter, you can look at the datasheet for the resistor you have to see what the forward voltage drop is. If you don't have the datasheet either, google the typical voltage drop for your color of LED and choose the smallest value in the range that comes up, to be safe. Once again, the formula is 5 - (LED forward voltage drop) = (Resistor Voltage)
Minimum Resistance = (Resistor Voltage)/.02
Download the code to run this project here and upload it to your Arduino. You will also need to install the Adafruit code library for the nRF8001 which can be found here. You don't need to do anything special to install the library other than place it in your sketchbook folder which should be the directory "/Documents/Arduino/libraries" or something similar. Don't forget to restart the Arduino IDE once you have done this. If you need detailed instructions on installing the library, just follow the directions here.
In this section we will look over the code, so that you can modify it yourself in the future.
The first important section is line 23 and 24. SPI.h must be included to use the SPI hardware on the Arduino. Adafruit_BLE_UART.h must be included as a library in Arduino as described in the previous section, or you will get an error. This library handles all the low level communications to the Adafruit bluetooth board - everything described in the SPI section.
Lines 28-30 describe pin mappings. As described in the REQ pin and RST pin sections above, pins 9 and 10 can be moved to pretty much any other pin, as long as lines 28 and 30 are changed as well. If you use one of the analog input pins, they are numbered A0, A1, A2, etc.
Pin 2, the RDY pin can be moved as well- but only to another interrupt capable pin. On Uno and Duemilanove, that's only pin 2 or 3. Refer to Image 1.
If you add any additional pins, you need to make sure to initialize them in the setup( ) function. The pinMode( ) function takes the pin number as the first argument (in this case, led = 3), and either OUPUT or INPUT as the second argument. On line 49 we are making sure the LED is off, by setting it LOW with digitalWrite( ). Setting it HIGH would turn the LED on. Later we will see how to initialize an analog pin. Refer to Image 2.
The loop( ) function is where your code goes when it's "just sitting around". The code here needs to be able to handle all situations you care about. This code is run over and over again until power is disconnected. The first thing of note is line 61, which causes the loop to idle for 50 milliseconds so that it only completes about 20 times per second. This keeps power consumption down, and is still probably faster than you need. Refer to Image 3.
The rest of the loop handles communicating with the code that looks after the Bluetooth board. You can probably ignore it until you get to line 73. Here, a single character is read from the bluetooth at a time and placed in the variable "val". Line 74 uses an if( ) statement to figure out what character was read. Everything between the { } following the if statement only happens if that if statement evaluates to be true. On line 75 we turn the LED on by setting pin 3 to HIGH. On line 76 we use a custom function to send data over bluetooth back to the user. More complex behavior can be added by adding more if( ) { } blocks. The code can be set to respond to different letter commands and manipulate various pins or send back data in response.
The sendData function is on line 87. In the while loop, we use the commands sendData("\nLED ON") and sendData("\nLED OFF"). The nRF8001 chip can only send 20 characters at a time, so that is the limitation in the sendData function as well. The \n character is not displayed, but rather causes a new line to be displayed in the smartphone app (equivalent of a carriage return). Refer to Image 4.
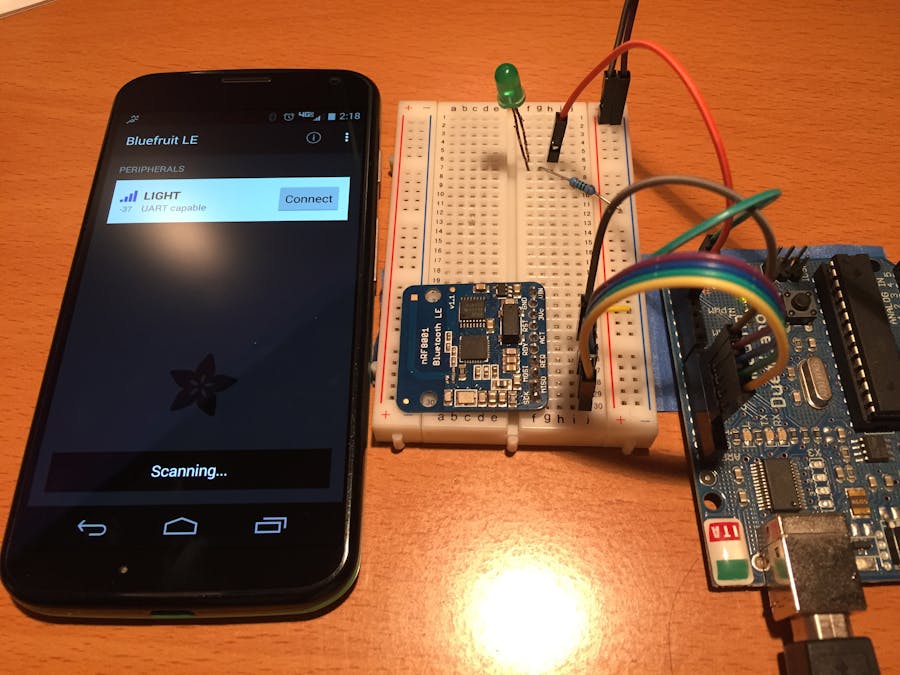
Once you have the circuit hooked up and the code loaded, power up your Arduino and download the "Bluefruit LE" app on your Bluetooth 4.0 compatible Android or iOS device. Fire up the App (make sure your phone's Bluetooth is on as well, but don't worry about "pairing" anything). You should see a device called light. Refer to Image 1.
Hit Connect. On the menu that pops up, choose UART mode. Refer to Image 2.
Then type a number "1" into the box and hit send. You should receive a response from the Arduino and the LED should turn on! Refer to Image 3.
Send a "0" to turn it off. You don't have to be right next to the Arduino. We've connected to our project from across a football field!
The final step is to take what we have provided and start modifying it for your own purposes. The code should be easy to understand and modify if you follow the template we've laid out.
Don't forget that you can run this whole project without having the Arduino connected to your computer. Just connect the USB cable to a wall wart USB charger. Or, if you have a 7 Volt or higher DC power supply, you can connect it to the power port of the Arduino.
We've also added a light sensor to our project and have written up an in-depth guide. Come check it out at our DIY Blog.
That's it for this first guide. Join our slack channel if you run into any issues or have feedback on what circuits you would like us to construct and provide code for. We are responsive 24/7 so come hack with us! To join, just email us at team@doteverything.co and you'll be added shortly.


Comments