

Hardware components | ||||||
_ztBMuBhMHo.jpg?auto=compress%2Cformat&w=48&h=48&fit=fill&bg=ffffff) |
| × | 1 | |||
| × | 1 | ||||
| × | 1 | ||||
 |
| × | 1 | |||
| × | 1 | ||||
 |
| × | 1 | |||
| × | 1 | ||||
 |
| × | 1 | |||
| × | 1 | ||||
 |
| × | 3 | |||
 |
| × | 3 | |||
 |
| × | 3 | |||
 |
| × | 1 | |||
 |
| × | 1 | |||
 |
| × | 1 | |||
Software apps and online services | ||||||
| ||||||
Hand tools and fabrication machines | ||||||
 |
| |||||
As a kid I always wanted to have a special ability, like moving objects with thoughts or flying. I tried to move objects with “the power of my mind” of course with no success. Well, yes, I was and I am a huge Star Wars fan, but I also like electronics and programming, so why not combine these two things to build an incredible project?
You can find all parts, codes and libraries with links at the Hardware and Software section.
The main concept is that using different brainwaves the user will be able to control a robot, the cursor on his PC or turn on/off lights in his home, while a microcontroller (Particle Photon) creates an online analyzing about the user’s brainwaves. This is a perfect method to detect diseases or stress and sleepy statement. This also can be used to help people live better their life, learn to control their emotions and how to be always happy. The human brain needs balance, to be healthly, we should sleep, think, move... Using the Particle Photon and the webserver created by the founders of the Particle we can help people to find their natural brain-balance. A childhood dream guided me to this project, and I'm very happy that I made it.
So yes, with this device you can actually use the Force...
But if we put Star Wars and the Force away for a bit, this device is not only for lazy people or for fans, it’s made to give back an ability for people who are fighting each day with their disability. The robot that I designed works the same way as a wheelchair, the home automation system would help for the user to control lights or TV-s even if he/she can’t move. The PC controller mode can be useful even for those who is perfectly healthly. I think all of us wants to play computer games or just surf on the internet using only thoughts.
Watch this short introduiction video about the story of the project:
Would you like to build your own? Here I’ll explain everything that you should know for this project. I share codes, schematics and this detailed instruction, so warm up your soldering iron…
The Science Behind the ProjectElectroencephalography (EEG) is an electrophysiological monitoring method to record electrical activity of the brain. It is typically noninvasive, with the electrodesplaced along the scalp, although invasive electrodes are sometimes used in specific applications. EEG measures voltage fluctuations resulting from ionic current within the neurons of the brain. Diagnostic applications generally focus on the spectral content of EEG, that is, the type of neural oscillations (popularly called "brain waves") that can be observed in EEG signals. (thank you Wikipedia) But we're going to use two very accurate values
- Alpha is the frequency range from 7 Hz to 14 Hz. It emerges with closing of the eyes and with relaxation, and attenuates with eye opening or mental exertion.
- Beta is the frequency range from 15 Hz to about 30 Hz. Low amplitude beta with multiple and varying frequencies is often associated with active, busy or anxious thinking and active concentration.
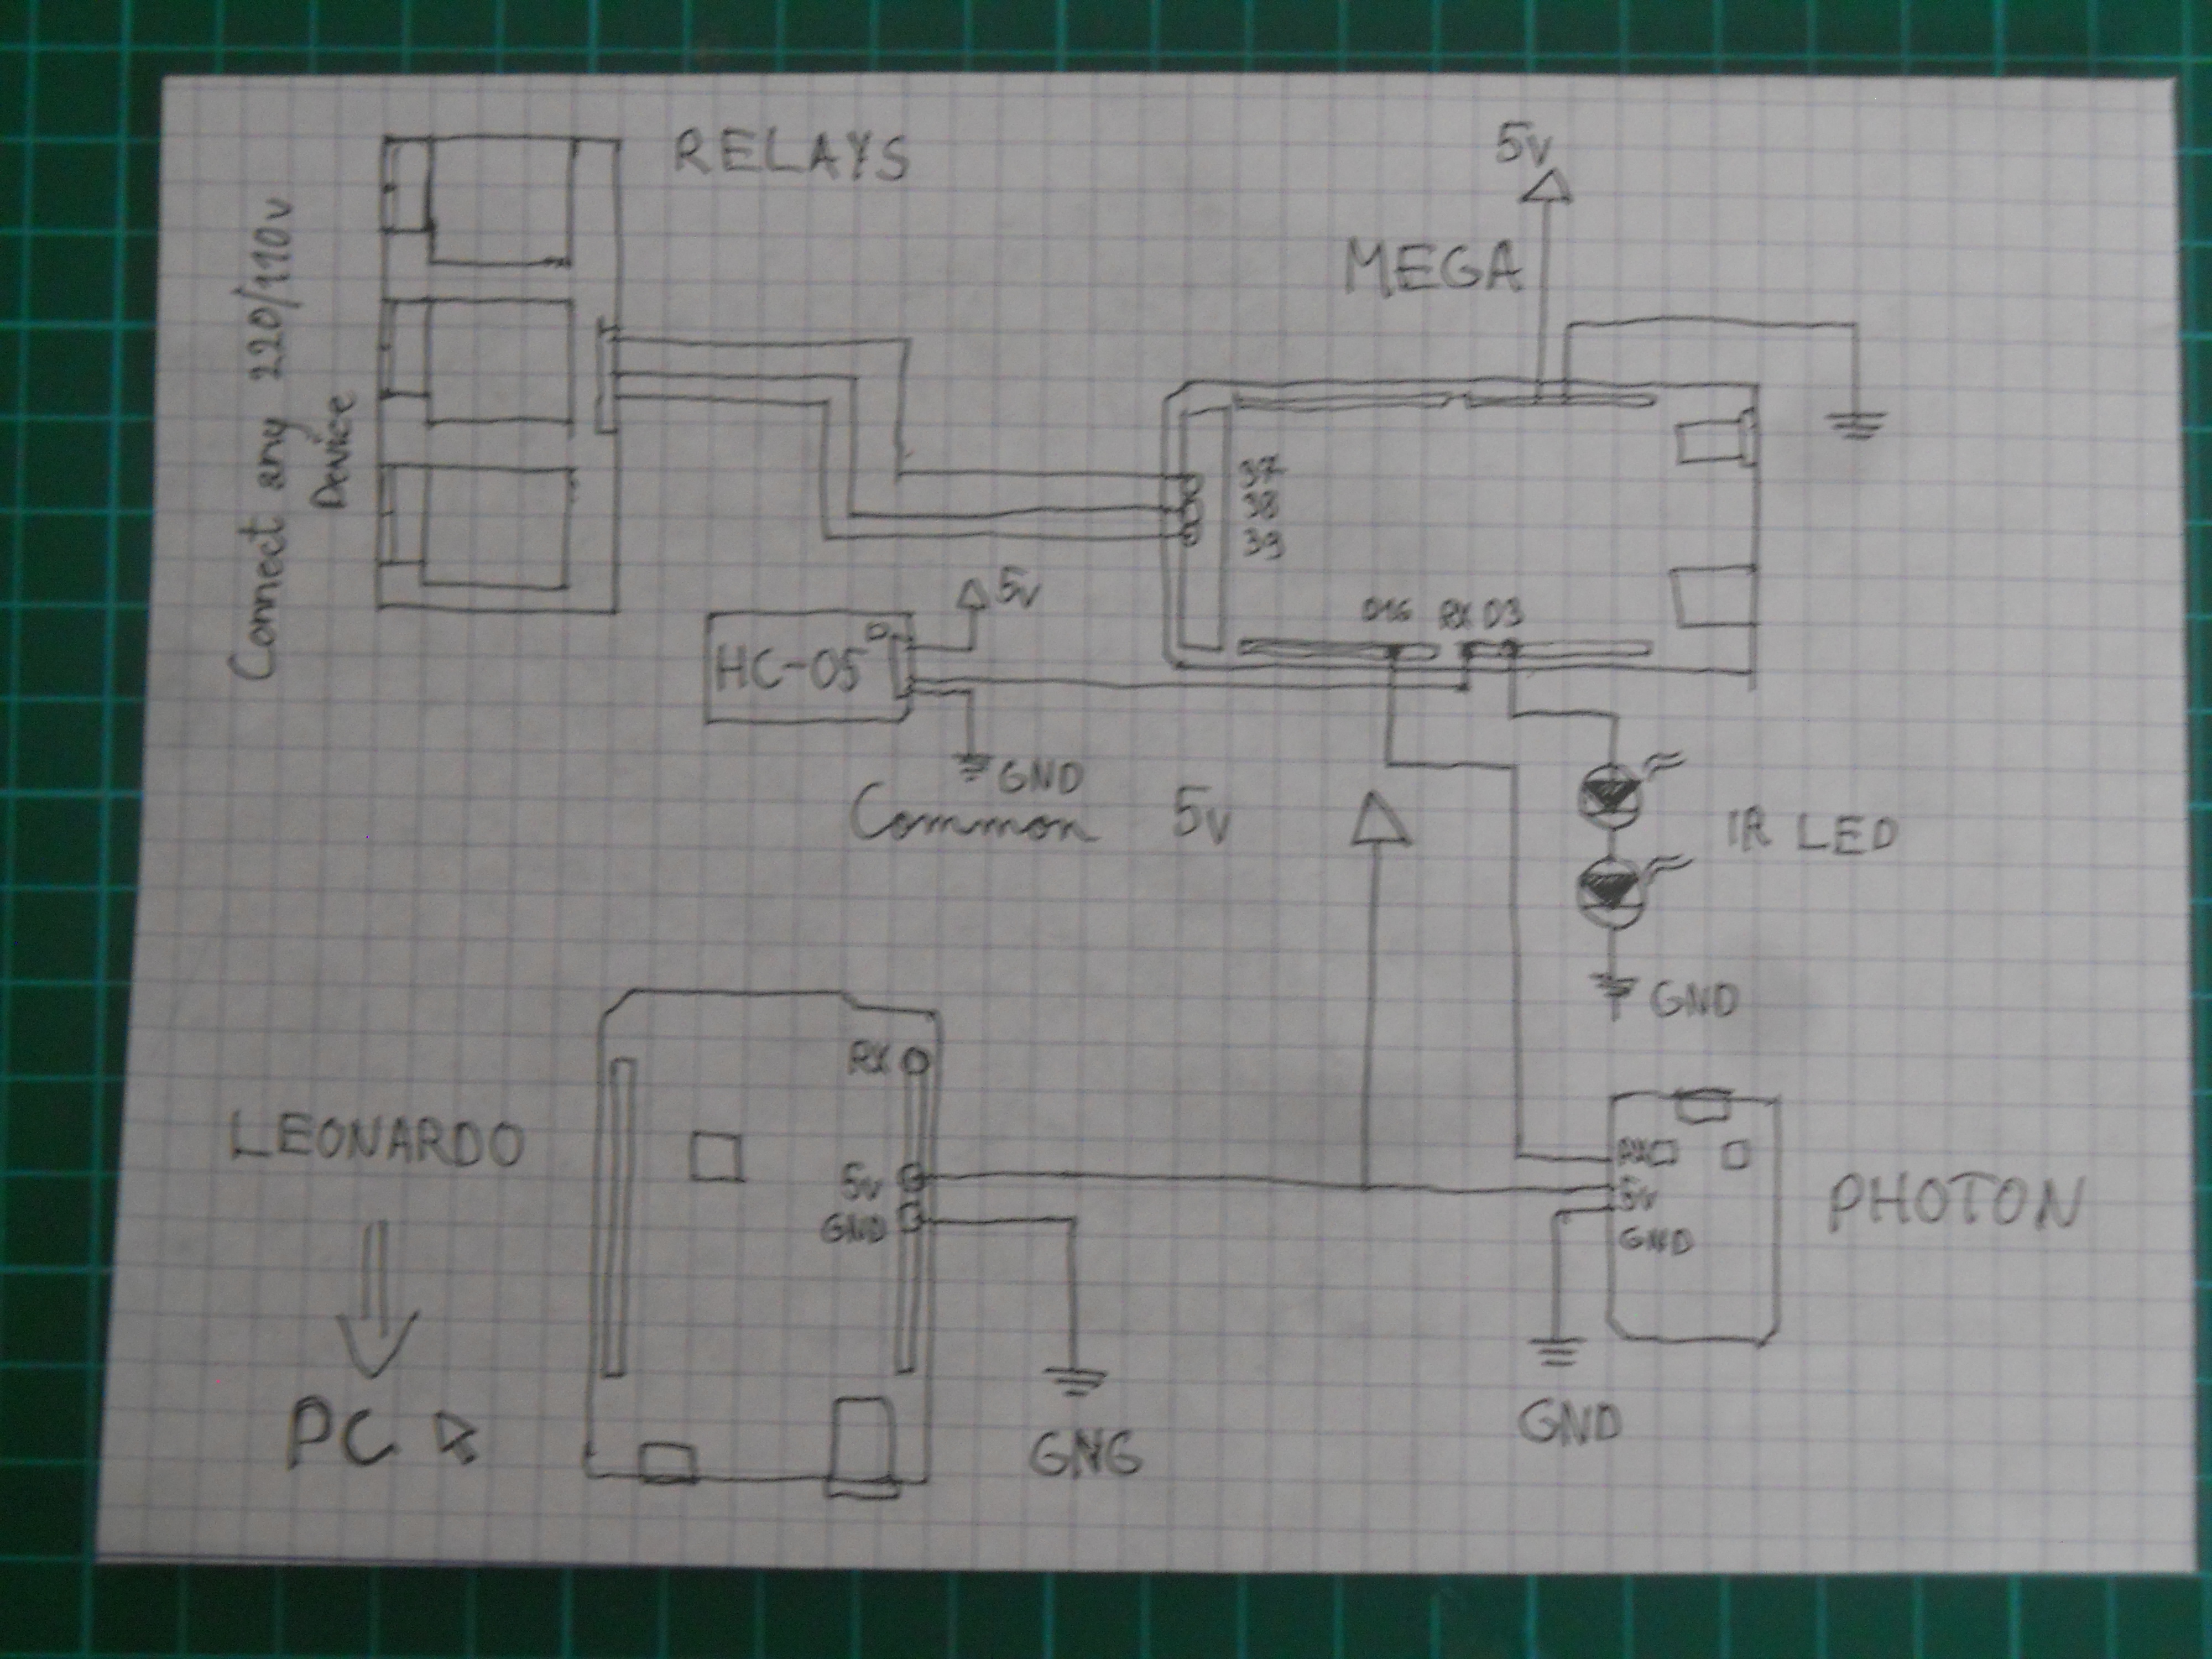
I used four microcontrollers to bring this project to life: an Arduino Mega, an Arduino Leonardo, an UNO and a Particle Photon. The Mega is the brain of the project that receives signals from the headset, analyzes then forwards commands to the other devices. Transmits every data forward to the Photon that creates the webserver. The Leonardo controls the mouse on a PC and the Uno is used to receive IR (infrared signals) and controls the robot. As I said the device is able to control three different things (or more if you want to program anything else). Now I’ll call these three different things channels. The device switches between these channels if you close your eyes:
- Close your eyes for 1-2 seconds: switches to home automation featurette
- Close your eyes for 2-4 seconds: switches to robot controller mode
- Close your eyes for 1-6 seconds: switches to mouse controller mode
I used relays to make the home automation featurette you can connect anything to them: TV, light bulbs, wall outlets anything you want
The wireless headset:
I love hacking toys so I bought a brainwave sensing toy called Necomimi, that is able to move its ears depending on your brainwaves (attention, meditation). This is the most useless toy that I’ve ever saw, but there’s inside a small chip that reads brainwaves, filters noise and gives a very good signal. Works with UART (Serial) interface, so with some hacking we can use Arduinos to read brainwaves. The role of this headset is to transmit brainwaves wirelessly to the central server. Nobody wants cables on his head so I created this comfortable and user friendly headset.
Go down to see how to take apart and make a wireless Bluetooth headset out of it.
How to use it?We have two measurable eSense values (NeuroSky values): meditation from 0 to 100 and attention from 0 to 100. The more focused you are, the higher the attention value becomes. The more relaxed you are, the higher the meditation level becomes.
The system is working with thoughts, nothing else is needed only learn how to be focused or relaxed. After a week of experimenting I was able to control my "attention" value very accurate. I can set my attention level consciously to about 15, or 39, 65 and 90. You have to find out how to control your values, we are all different. It worked very well with emotions. Thinking on love, friendship, anger or fear gives a very good contrast in the values.
To power up the system plug a micro USB cable in the Arduino Leonardo. This will also control your mouse (if you want) and ensures 5 volts and 500mA for the system.
Controlling the Home Automation System
If you are switched to home automation mode increase your attention level upper than 70 to turn on first relay, increase meditation level upper than 70 to turn on second relay, and increase both of them upper than 70 to turn on third relay. It's a bit tricky but isn't imposible after some mind-training. If is already turned on, use the same command to turn it off (so if is turned on reach again 70 to turn it off). When the system is done you can connect any high-voltage device (light, TV, PC, cooler fan, anything you want) to the relay module.
Controlling the Mouse
The cursor is controlled with emotions. If attention level is under 25 moves left, if is between 25 and 50 moves right, if is between 50 and 75 moves up and if is between 75 and 100 moves down. You can click by increasing meditation level. As I said before the attention level can be easily controlled with emotions (for me).
Controlling the Robot
The robot has only three different statements: stop, turn left, and move forward. Why only two movement options? Because these two directions are enough to move the robot anywhere you want. Use your meditation level to spin with the robot, and when you reached the direction where you want to move stop the robot then move forward with the attention level. It's a better method to control the robot and even beginners, who can't control their attention/meditation values so good, can play with this robot.
My PlanThis is an older picture about my plan, but succeeded so I’m very happy with the results. The headset transmits BT (Bluetooth) signals to the Arduino Mega that analyzes the incoming bytes and depending on the user’s thought controls the different features. It was very hard to find out the best ways to transmit this lot of data, but I choose Bluetooth instead of WiFi. At first time I wanted use the Particle Photon as a data transmitter, but that little guy got a better role in the making of the webserver. That was the biggest modification in the whole project. (On the picture you can see the actual plan). I used homemade Arduino modules, because I love design my own circuits. You can buy these modules online if you want or build yourself with me.
A half year of learning and experimentingI worked a lot on this project and yes, I started almost half year ago, but with the Photon things accelerated. It was very easy to use their dashboard. By the way there are many tutorials on the internet how to hack EEG toys, that helped me a bit, but they didn't have any extra functions. So I decided that I'll hack this Necomimi toy and using my creativity I created this device that has much more features than blinking a LED. Hope you'll enjoy!
Let’s get started!
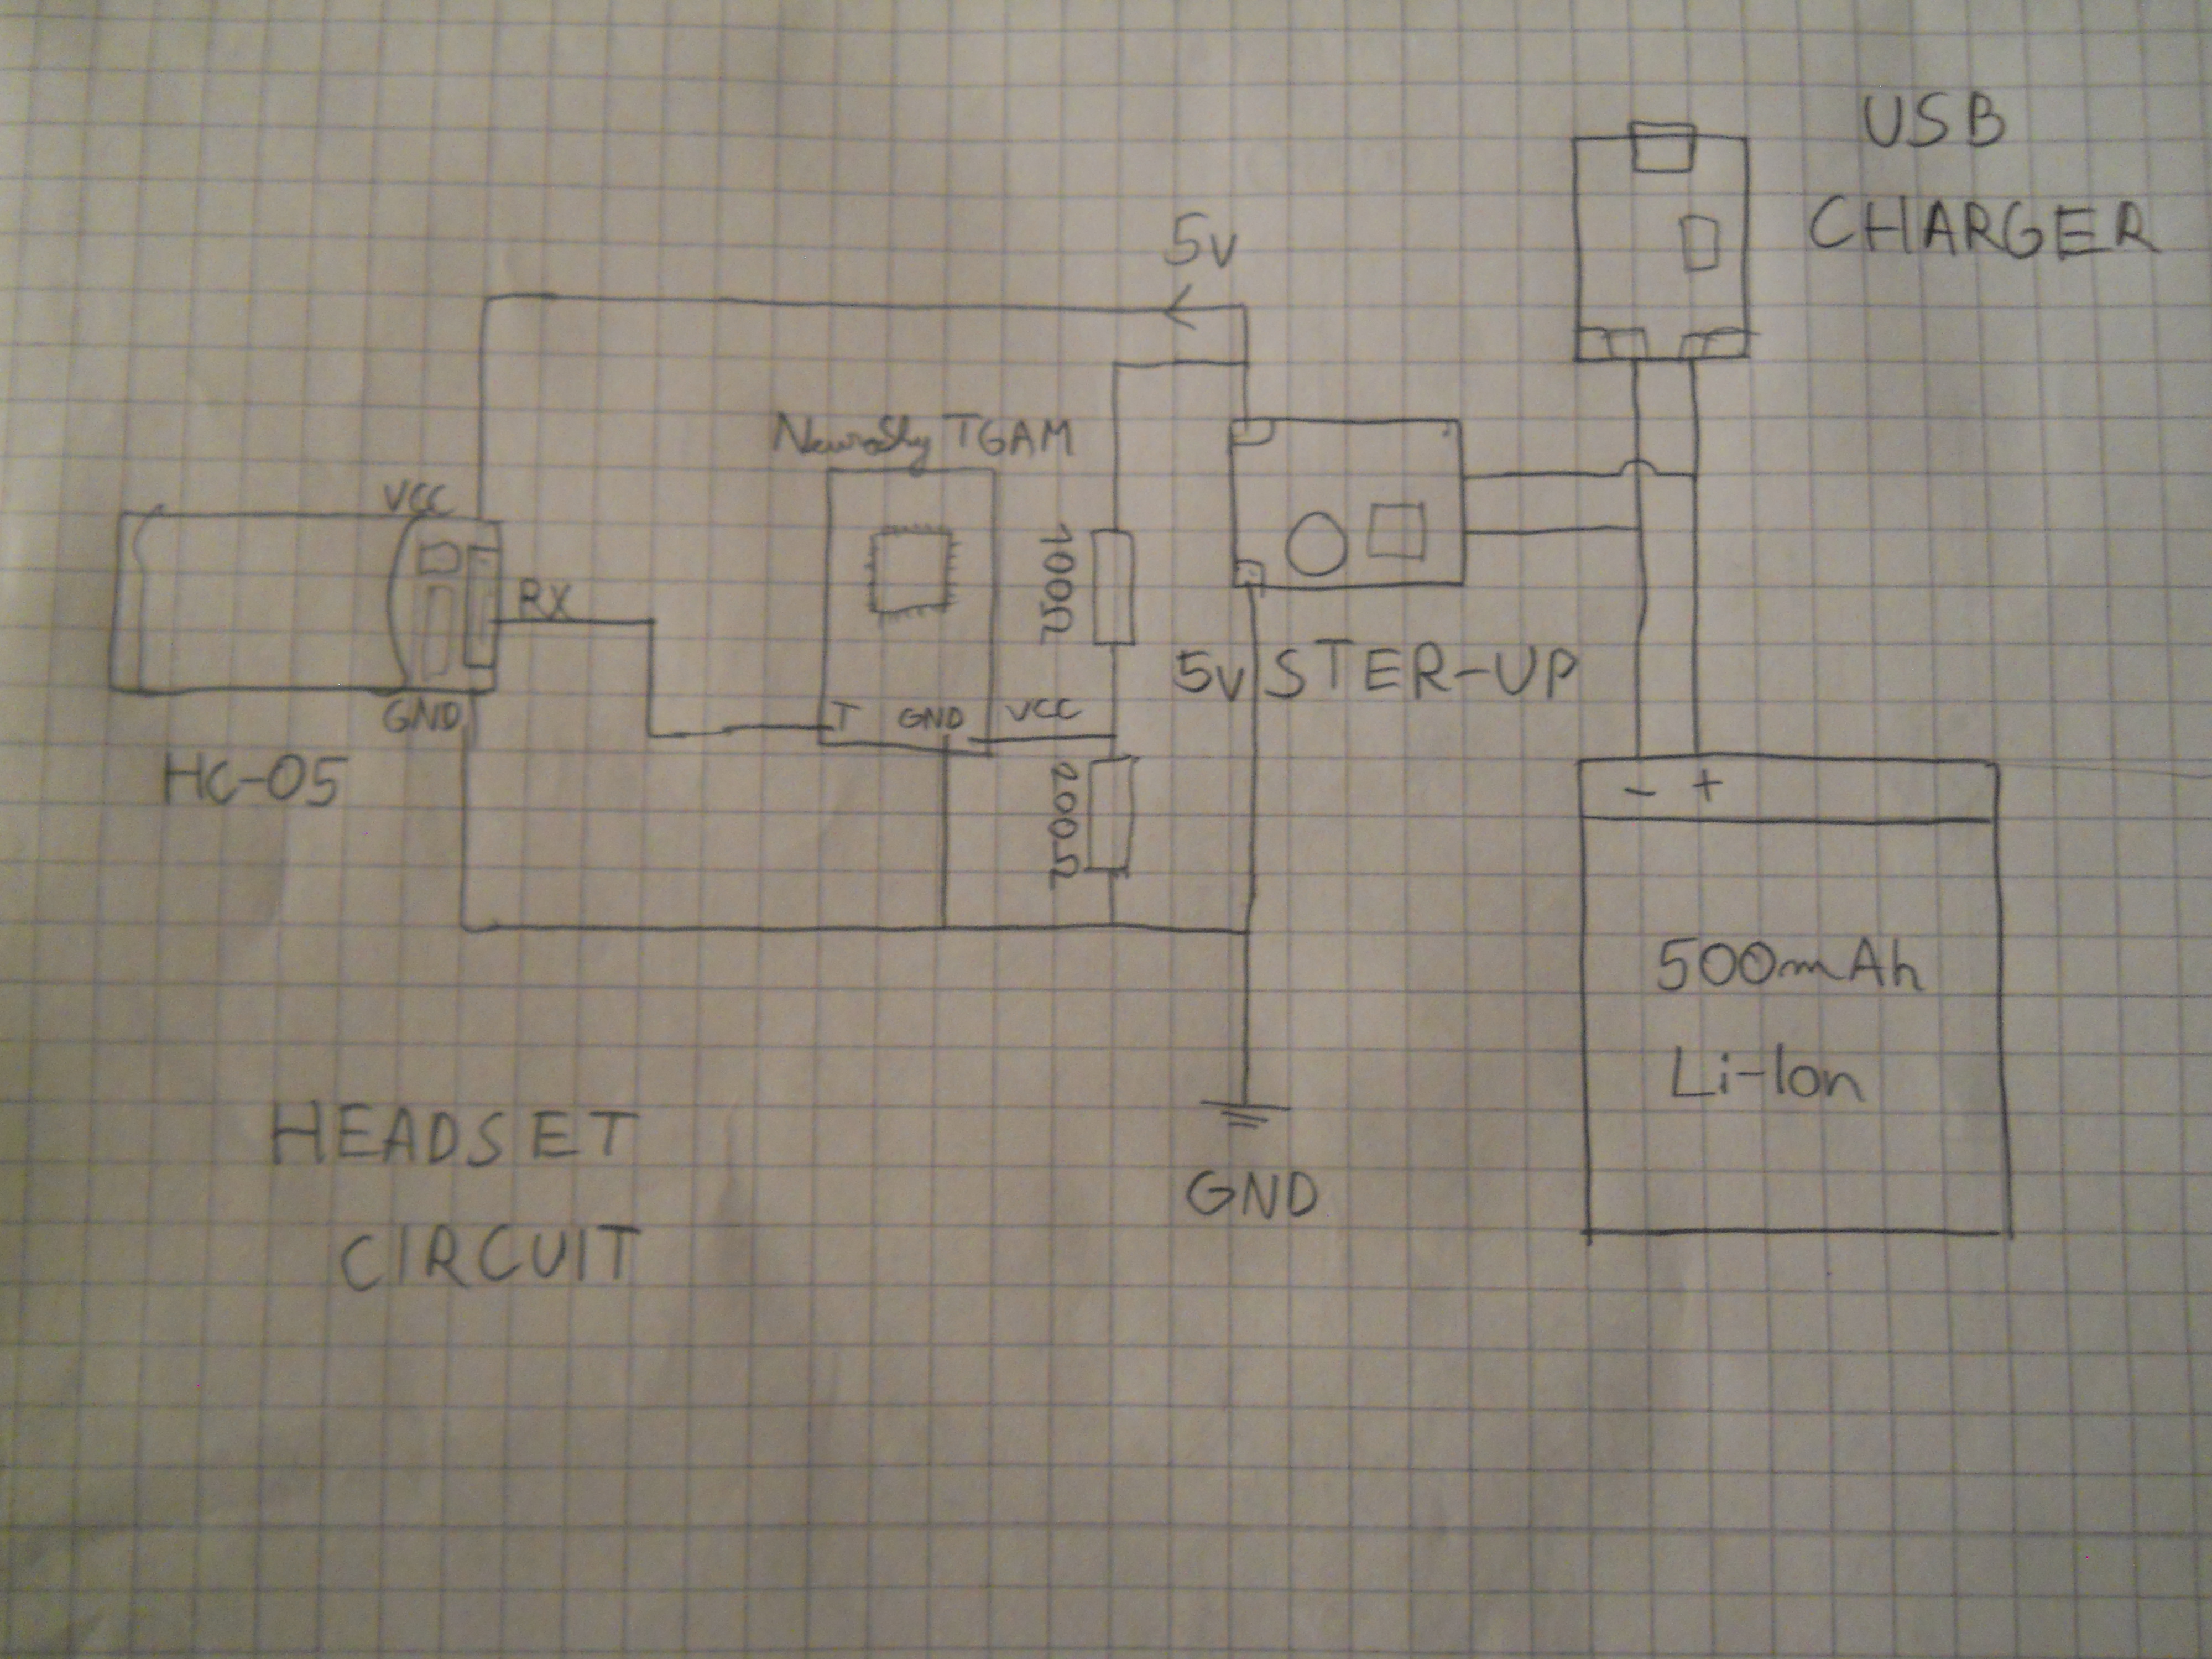
Hacking the Necomimi ToyWe want to modify this EEG toy to transmit data via Bluetooth so first take apart the case. The screws are under the sticker. Remove the sticker and the back of the device and you’ll find inside a small circuit. The one that is under the main circuit is the Neurosky TGAM chip. This is connected with four header pins to the main microcontroller board so take a soldering iron and remove this circuit carefully. Now solder three wires to the GND-pin to the VCC-pin and to the T-pin. The T-pin is the transmitter pin with 57600 baud rate, this sends data packets to our microcontroller, but I connected this directly to a HC-06 slave BT module. The HC-06 is set to 9600 baud rate but don’t worry we’ll fix this problem. If you soldered the three wires to the you can build in your own rechargeable power source. I used a 500mAh Li-Ion battery, a USB charger circuit, a 5v step up circuit and two resistors (100 ohm and 200 ohm) to ensure a perfect 3.4 volt power supply for the chip and for the Bluetooth module. Follow the schematic to build the circuit that is needed in the headset. If the circuit is done configure the Bluetooth module.
About the chip:
The Neurosky ThinkGear AM is designed to filter, amplify and send data through serial interface. More info here.
The Schematic / ElectronicsFollow the instructions and the pictures below and create your own wireless EEG headset.
You'll need a 500mAh Lithium-Ion battery, a 5v voltage step-up module to create a stable voltage then a 100 Ohm and 200 Ohm resistor to reduvóce voltage to stable 3.3 Volts. I soldered female header pins to power up and transmit data to the bluetooth module.
The most important part is to connect the the "T" pin with the "RX" on the Bluetooth module. This brings our project to life.
Configuring Bluetooth modulesHC-06: First load up the sketch named “HC_06_Bluetooth” to an Arduino UNO then connect the Bluetooth module as the schematic shows. I found this schematic on Artronix team's website and seemed useful.
void setup() {

   // Start the hardware serial.
Serial.begin(9600);  // default HC-06 baud rate
delay(1000);
Serial.print("AT");
delay(1000);
Serial.print("AT+VERSION");
delay(1000);
Serial.print("AT+PIN"); // to remove password
delay(1000);
Serial.print("AT+BAUD7"); // Set baudrate to 576000 - eg Necomimi dafault
delay(1000);
Serial.begin(57600);    //
delay(1000);
}
void loop() {
}
Open your Serial Monitor in the Arduino IDE and wait until the Arduino configures the BT module. Now your Bluetooth module is set to 57600 baud rate. You can try out a lot BCI (Brain Computer Interface) apps, because this hacked bluetooth Necomimi toy will be compatible with every Neurosky apps.
You can use these apps to learn to control your brainwaves and values, like attention or meditation. You can try a lot of cool games, but I recommend these apps (they are compatible with PC, iOS and Android):
http://store.neurosky.com/products/brainwave-visualizer-android
http://store.neurosky.com/products/eeg-analyzer
http://store.neurosky.com/collections/android/products/blink-camera-android
Then use the "HC_05_Bluetooth" and load up to your Arduino the same way like before. Connect "EN" pin of the HC-05 to the 3v3 of the Arduino. You should write the adress of your HC-06 module in the code. Check the adress of the BT module with an Android smartphone, like me. Replace ":" (double dottles) with "," commas in the code.
And you should change the adress in the code:
20:15:09:15:17:82 ==> 2015,09,151782 This way the HC-05 module can recognise the adress. So just leave some ":", because they aren't neccesary.
// HC-05 configuration
void setup() {
  // Start the hardware serial.
  Serial.begin(9600);  // default HC-05 baud rate
  delay(1000);
  Serial.print("AT");
  delay(1000);
  Serial.print("AT+VERSION");
  delay(1000);
  Serial.println("AT+ROLE=1"); //set the HC-05 to master mode
  delay(1000);
  Serial.println(" AT+LINK="copy here your adress"); //now the module should connnect automatically
  delay(1000);
  Serial.print("AT+UART=57600,1,0"); // Set baudrate to 576000
   Serial.begin(57600);    //
  delay(1000);
}
void loop() {
}
Finally the two modules should connect to each other. If you have problems click on this link to read more.
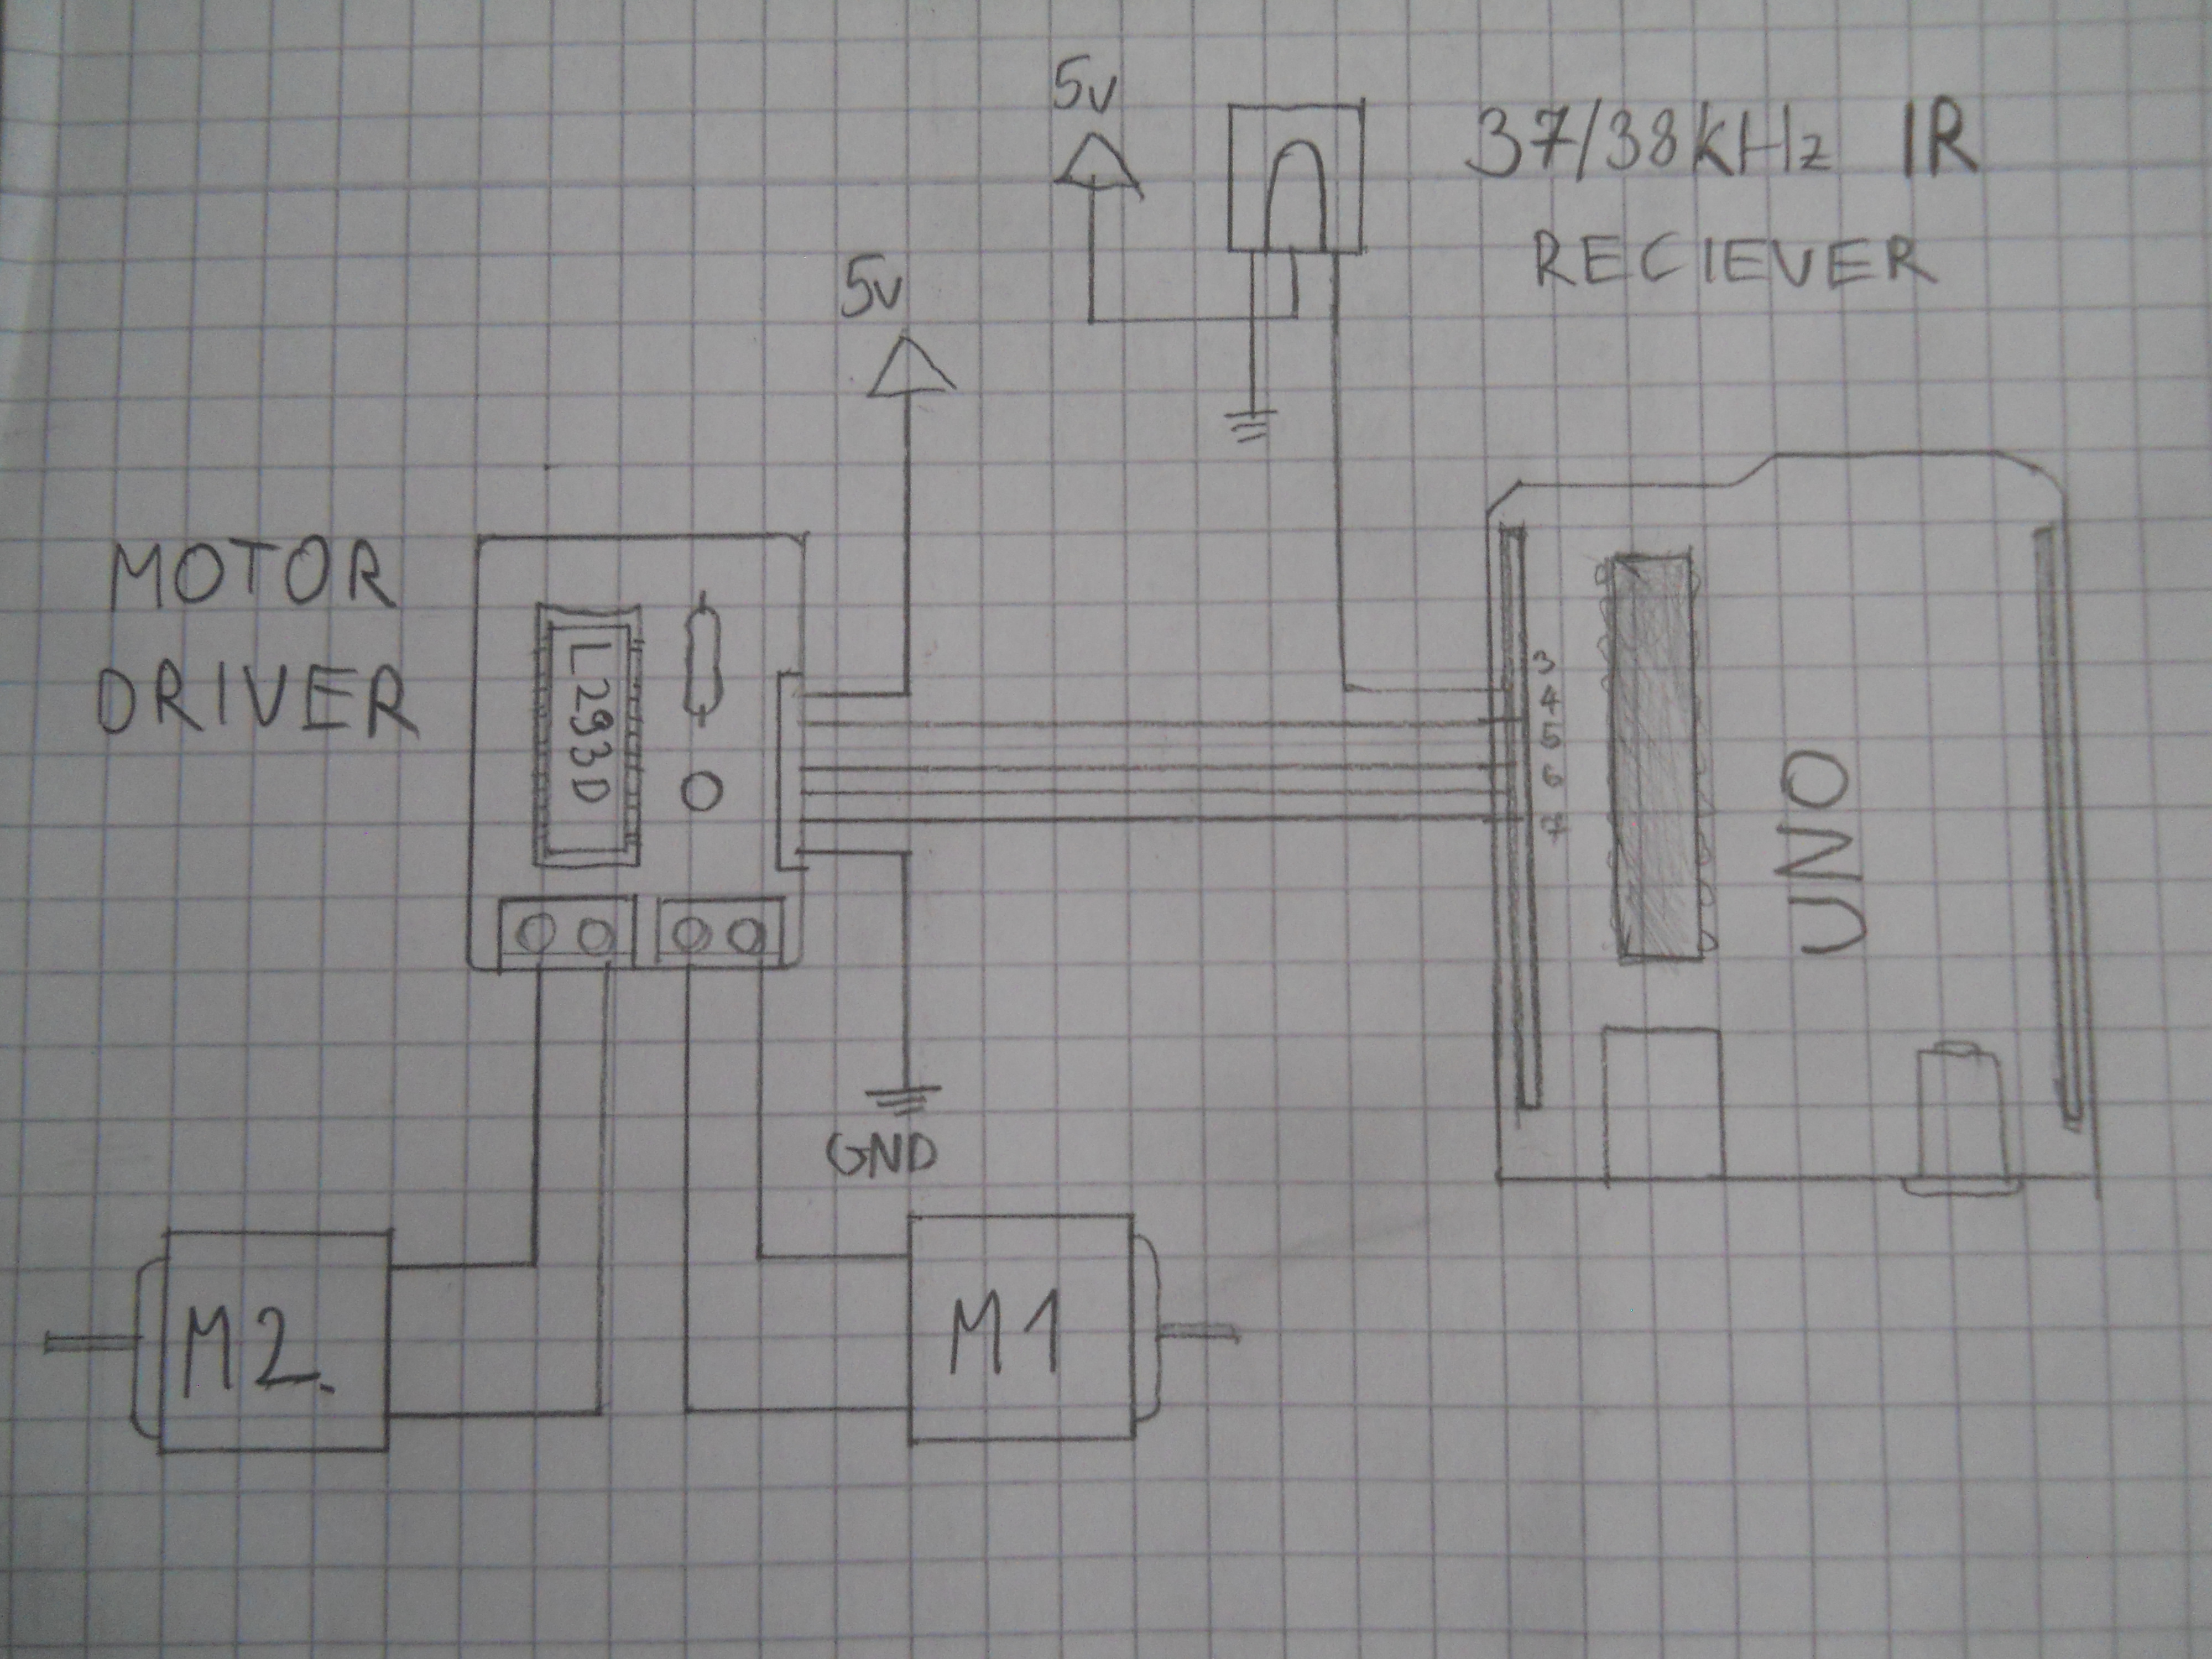
The Remote Controlled RobotTo make this inexpensive robot I used 38kHz IR technology, that is used in TV remote controllers. I bought from Amazon a chassis for my robot. The IR receiver is salvaged from an old TV and the Arduino is also from the Amazon. I added links to the parts (see down in the Hardware section).
The motor driver circuit
You’ll need these parts:
- 2 Screw Terminals
- L293D IC
- 3 Header Pin
- 9 Header Pin (90 degrees)
- 1k Resistor
- Red LED
- Wires
- A PCB Board
I used some copper wires and following the schematic connected the pins of the IC to the header pins. Doesn't matter that which pin goes to which header pin, just remember that were did you connected them. The LED is connected in series with the resistor and in paralell with the 5v VCC.
Assemble the chassis
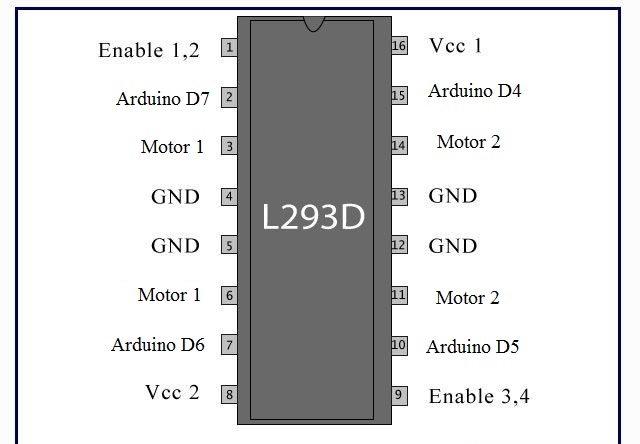
This step was very easy, used a screwdriver and some crafting skills I built the frame in five minutes. After this is coming the harder part, we should build a motor driver circuit. To control my motors I choose the L293D IC that can drive two motors. Look at the schematic to build circuit.
Connect the parts to the Arduino
I used jumper wires to connect the sensor and the motor driver to the Arduino.
Arduino Pin ==> Motor Driver
4 ==> 15
5 ==> 10
6 ==> 7
7 ==> 2
VIN ==> 8
5v ==> 1, 9, 16
GND ==> 4, 5, 13, 12
So look at the schematic of the L293D module, then connect its pins to the Arduino UNO as I wrote here. The 5v pin of the Arduino should be connected to the 1, 9, 16 pins to enable the IC's motor driver function. Then finally use the screwterminals to power up the motors.
Writing codes…
Using the IRremote library I created a code that reads 38kHz infrared signals, decodes them, then moves the robot. (Download the library at the Code section).
I added explanations in the code, but the substance is that decodes IR signals coming from the main server, then depending on what the user wants, move the motors than will move the robot forward or turns left. Downloload the code: "Robot_Code". Load up this to your Arduino and and your robot will complete.
The server reads incoming data packets from the wireless headset. We’ll use the configured BT module to ensure the connection between the headset and the server. The Arduino Mega is the brain of the circuit, everything is connected to this microcontroller: Bluetooth, infrared transmitter LED, webserver, and mouse controller. The code is a bit complicated, but I added explanations to understand.
The Case
It’s simple but looks great. I cut two 18x15 cm plates the smoothened the edges with sandpaper. Using some screws, I connected them to each other.
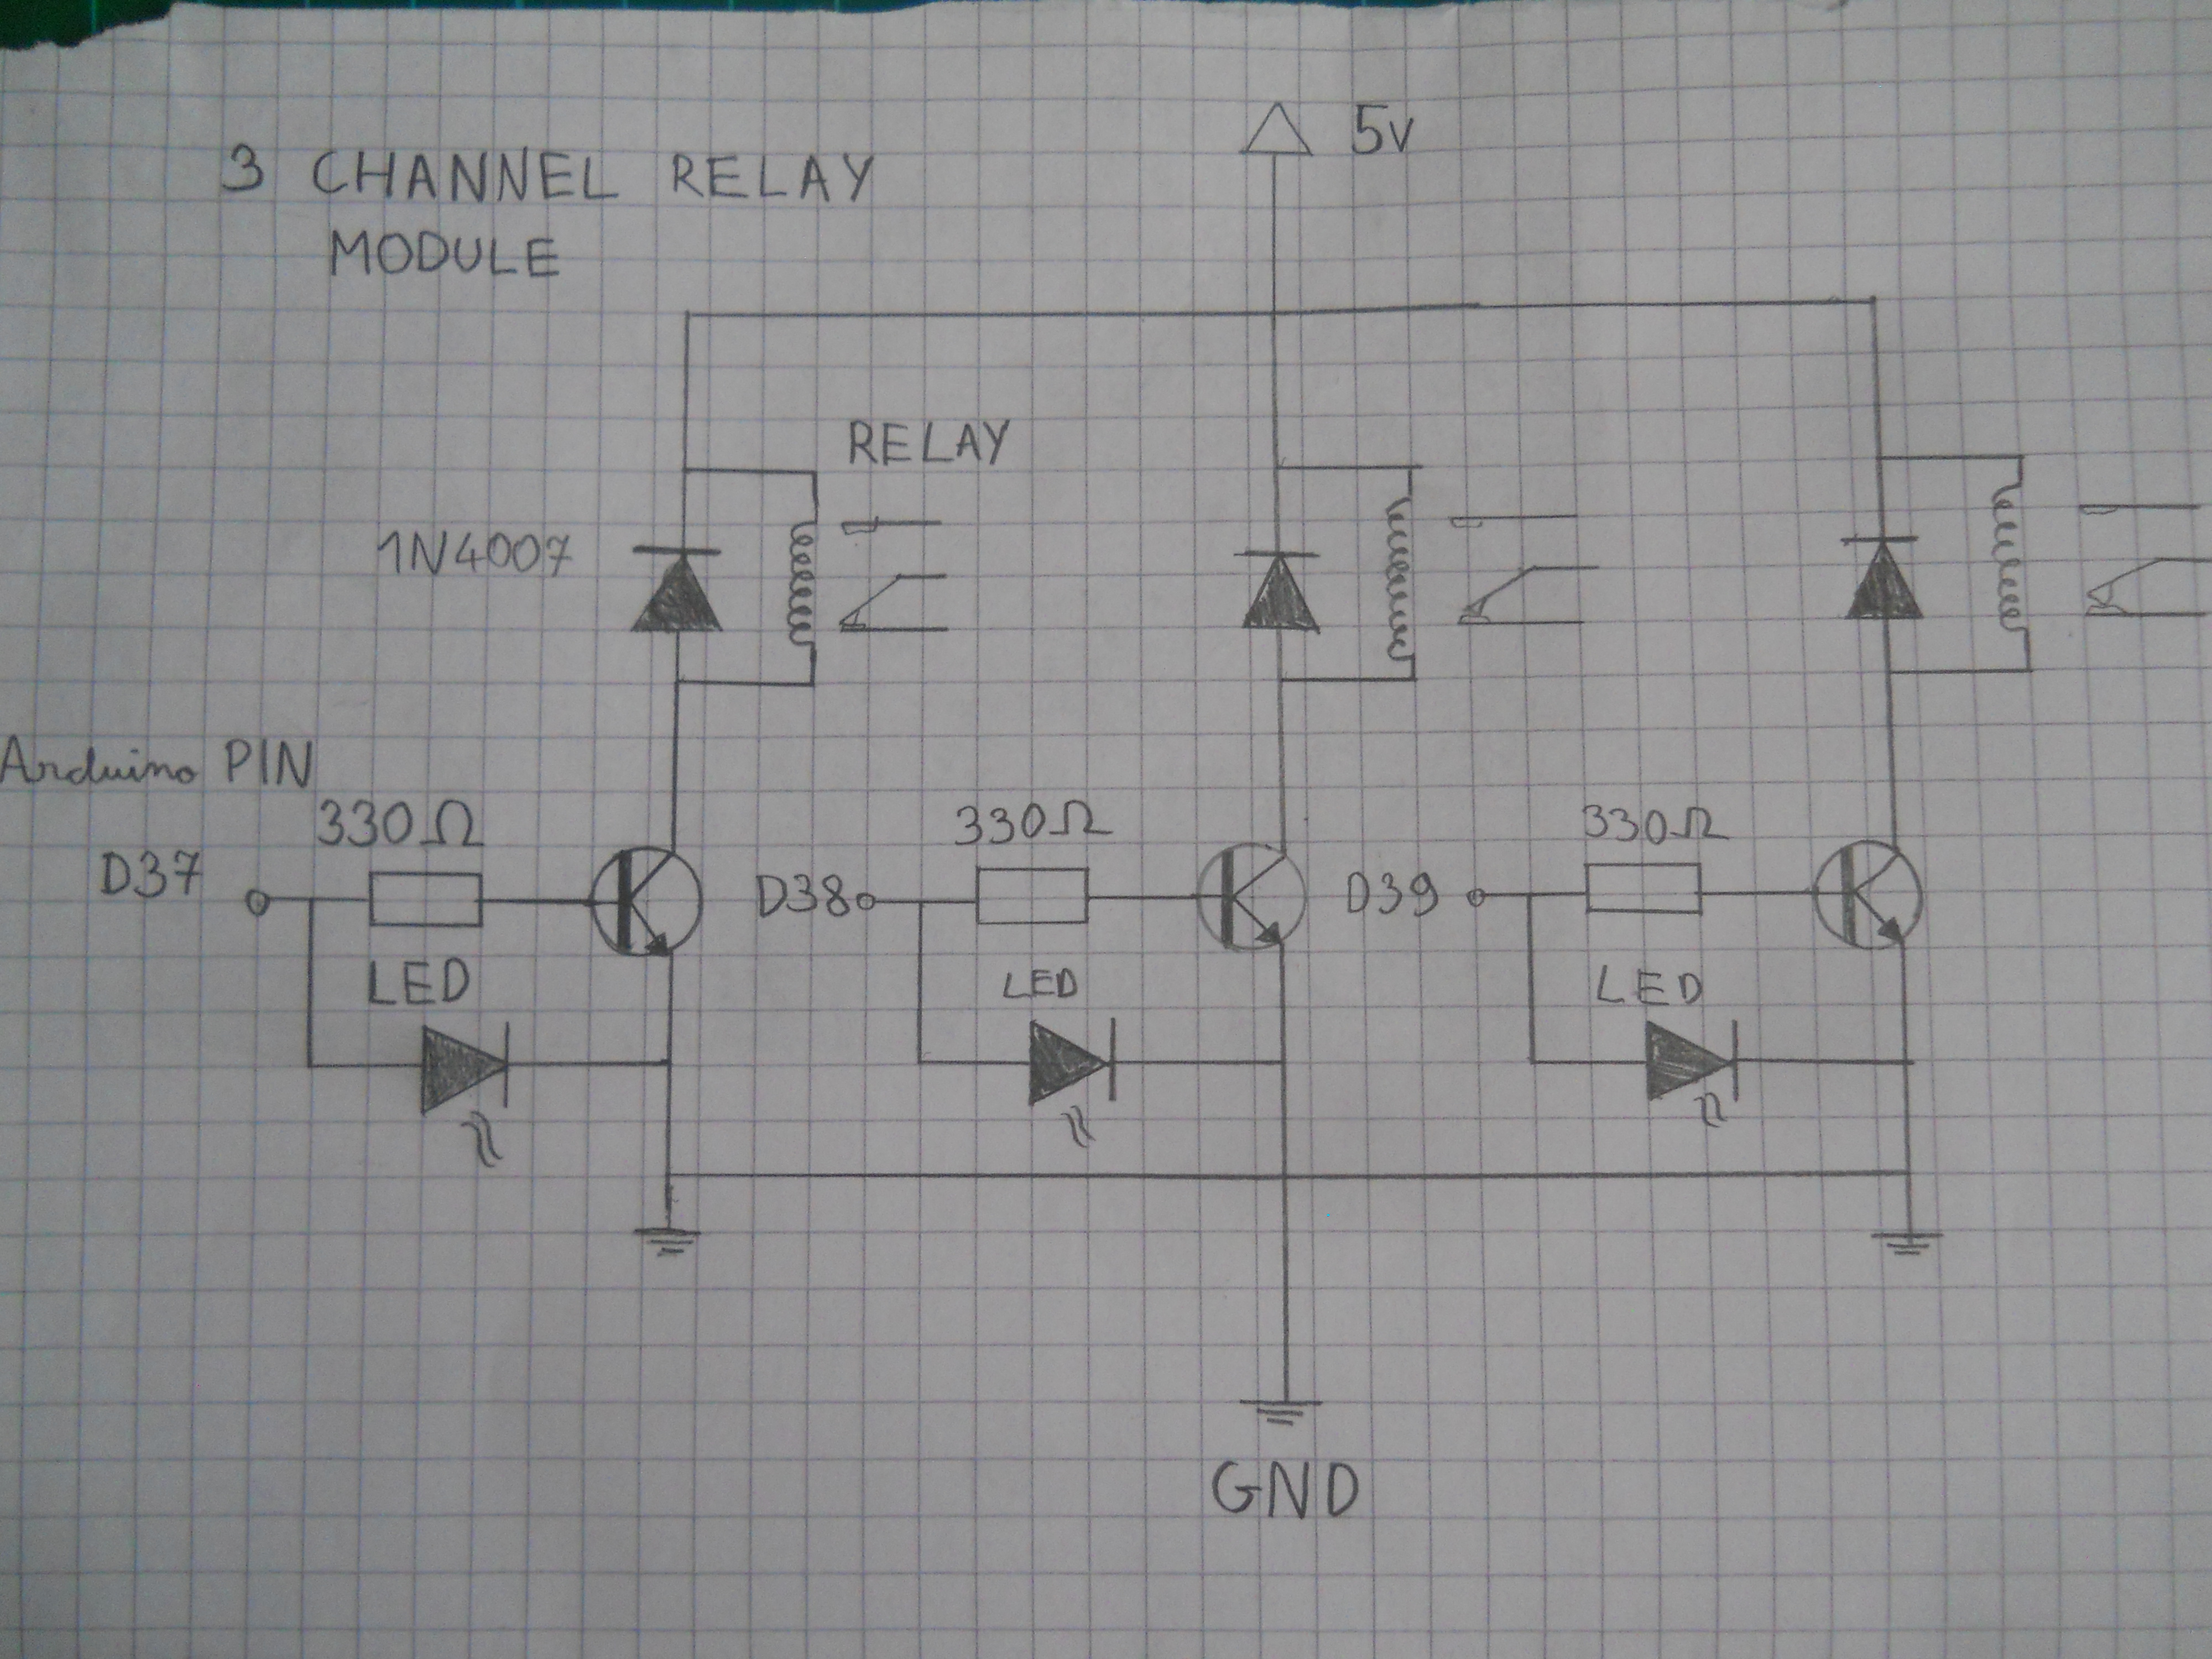
The Relay Circuit
You’ll need these parts:
- 2n2222 transistor (3 PCS)
- germanium diodes (3 PCS)
- 330 ohm resistors (3 PCS)
- 1k Ohm resistors (3 PCS)
- 5v relays (3 PCS)
- hook-up wires
- header pins
- PCB board
A picture worth more than a thousand words, so instead of trying to writing how should you connect the parts on the PCB look at the schematic If the “Signal” pin gets signal from the Arduino the relay will turn on. The transistor amplifies the signal to ensure enough power fot the relays. We will use 37-38-39 pins to control HIGH-LOW levels of each relay.
Install Parts in the Case
To install the parts on the plexy-glass case I used some double sided white tape. This loks noce and hold the circuits on the case pretty strong.
The Server-Circuitry
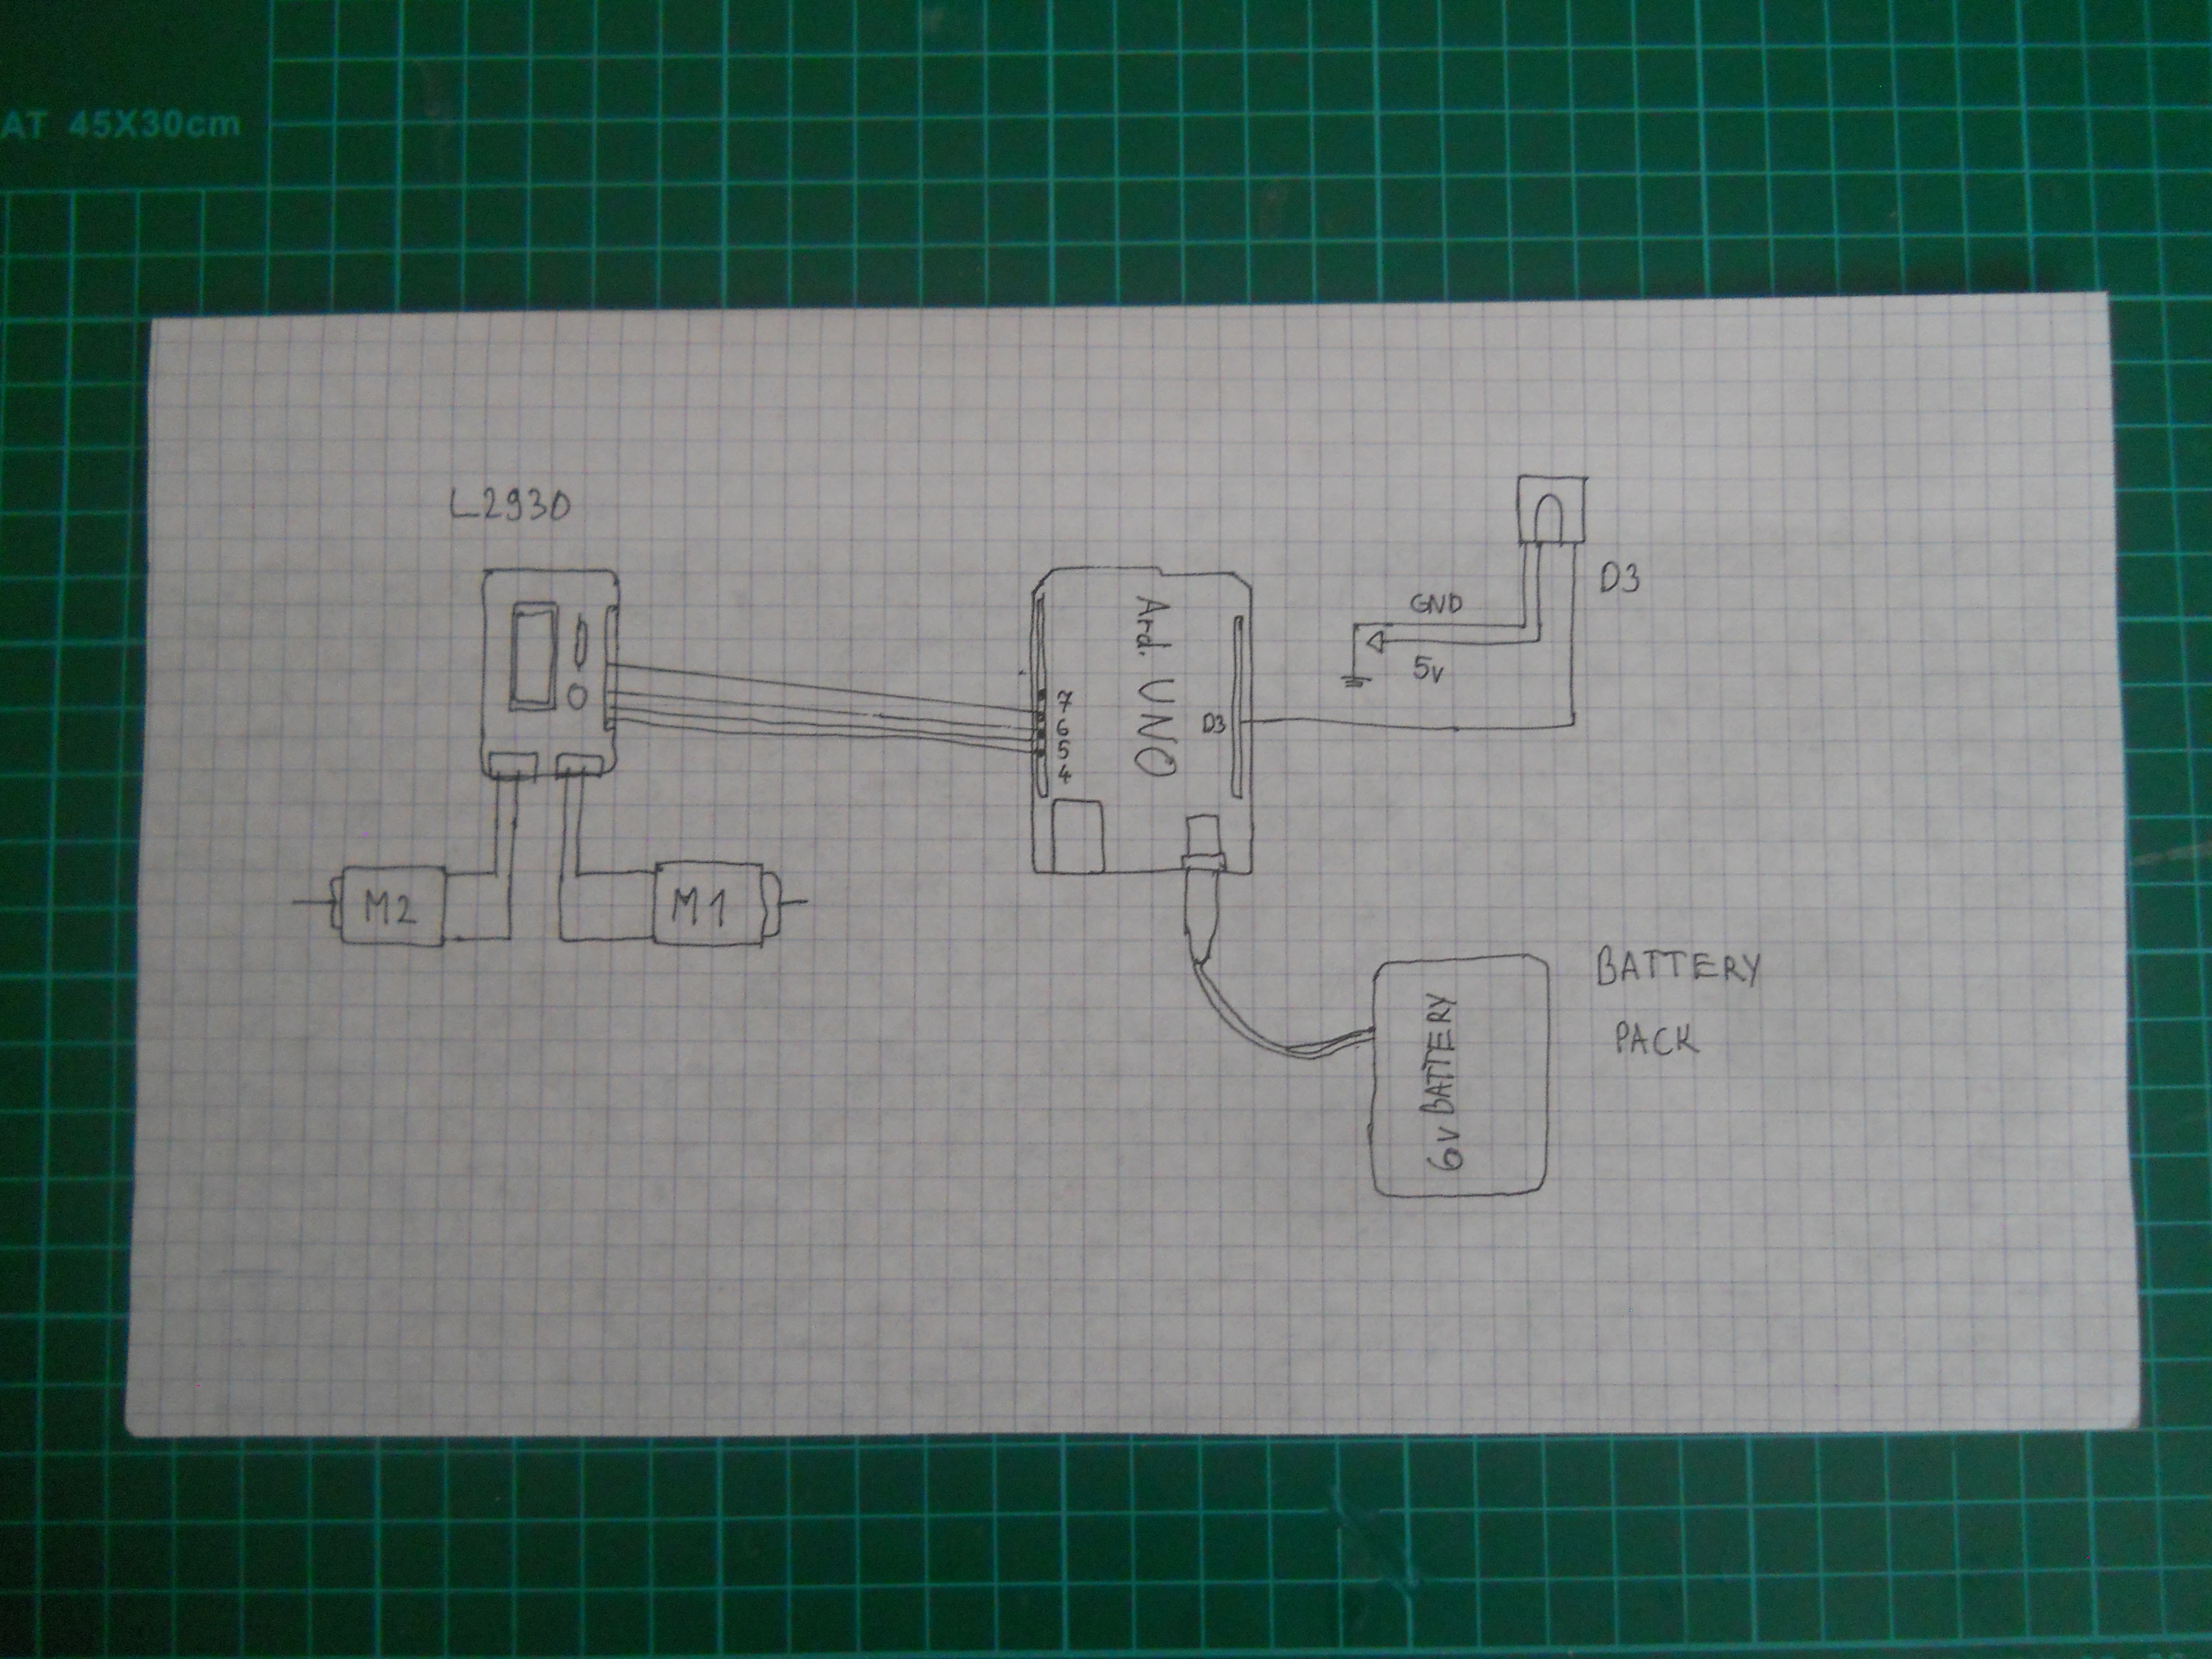
This server is software based so making the circuit isn’t so hard. (See schematic downer). You just need to power up the microcontrollers and make connection between them. The IR LED is connected to pin D3 and the relays to 37-38-39. D16 of the Arduino Mega goes to RX of the Photon and the D18 to the RX of the Leonardo.
Connection with the Robot
The IR Leds are connected to the digital pin D3 and with the IRremote library we send codes to the robot. It's pretty simple. The IR codes must be the same in the robot's code. If you think you're done you can test it with your camera. The infrared light looks purple on a photo, cameras can detect the IR light. This trick always works.
The Code
Use the "Arduino_Mega_Server" code in the Software part.
I suffered a lot while wrote the codes. I should program three different microcontrollers, so it was a big challenge. I used IRremote, Brain, SofwareSerial and Mouse libraries. (see download links at the Software part). But now the code is done and works so you just should upload to your microcontrollers. Download the .ino file or copy/paste the code in your IDE and use it. The code to the Particle Photon should be uploaded via the browser IDE. To make this register to the Particle Build. And connect your laptop to your microcontroller. I was really surprised that this happened almost automatically, I just added my Device ID number.
Before loading up the codes be sure nothing is connected to the RX/TX pins. So disconnect your BLuetooth module from the Mega, and disconnect the Mega from the Leonardo and the Photon.
The Mouse ControllerI wanted to add an IoT (Internet of Things) function in my project, so I made an online data logger using the Particle Photon. Depending on what you make with the device the Photon creates a personal server, and writes the data in the Cloud.
This may seem scary at first time, but imagine that you can detect if you are stressful (attention level increases and decreases quickly) or if you should sleep (meditation level is always higher than 80). This webserver may help you to live healthlier.
The Particle also has an online dashboard where you can publish any kind of data with the "Particle.publish();" syntax. We should have to say a big "thank you" for the developers of the dashboard. They saved a lot of time for us.
Writing codes in a browser?
It was intresting to write codes on a web page, but worked the same way like the normal IDE. The code was uploaded wirelessly. This microcontroller would be a very useful tool in everyone's toolbox.
The dashboard looks somehow like this if you worked fine. Shows Attention and Meditation, and you can check them anytime, at your dashboard URL. For more info about the dashboards click here.
A quick upgrade for those who want to control only a robot with mindwaves:You don't want to build the build the whole project, only a mindwave controlled robot? Don't worry if you're a beginner I thought even on you. I made a code with explanations that needs an Arduino Mini Pro and an IR LED and of course the headset to control the robot. I know that many of my readers wants to make a simple and fun weekend project so here's the description and the code for you.
Use the "RobotControlllerHeadset" code inthe Software section. Connect an IR LED to the D3 pin on the Mini Pro (Or Arduino UNO) and connect the T pin of the NeuroSky chip to the RX pin of the Arduino. Power up with 3.3 or 5 volts and you're done. So build the robot, then use this code in your headset:
#include <IRremote.h>

#include <IRremoteInt.h>

#include <Brain.h>

IRsend irsend;

Brain brain(Serial);

const int ledPin = 3;

long interval = 500;

long previousMillis = 0;

int ledState = LOW;

int medValue;

void setup() {

 // Set up the LED pin.

 pinMode(ledPin, OUTPUT);

 // Start the hardware serial.

 Serial.begin(57600);

}

void loop() {

 // Expect packets about once per second.

 if (brain.update()) {

 Serial.println(brain.readCSV());

 // Attention runs from 0 to 100.

 medValue = brain.readMeditation();

 }

 // Make sure we have a signal.

 if(brain.readSignalQuality() == 0) {

 // Send a signal to the LED.

 if (medValue > 65) {

irsend.sendNEC(0xFF10EF, 32);

 delay(40);

 }

 if (brain.readAttention() > 65) {

irsend.sendNEC(0xFF18E7, 32);

 delay(40);

 }

 }

}
After making everything that I explained here, only one thing is left: try it out. Use the power of your mind, use the Force of the neurons in your brain, move your little robot, control your home, control everything with thoughts...
Now you become a real IoT Jedi!
The device has many features and it's very fun to play with. But as I said before it isn't only a toy, featuring biology and electronics we created a device that may help for people, who fight each day with their disabilities, to get back their natural capabilities.
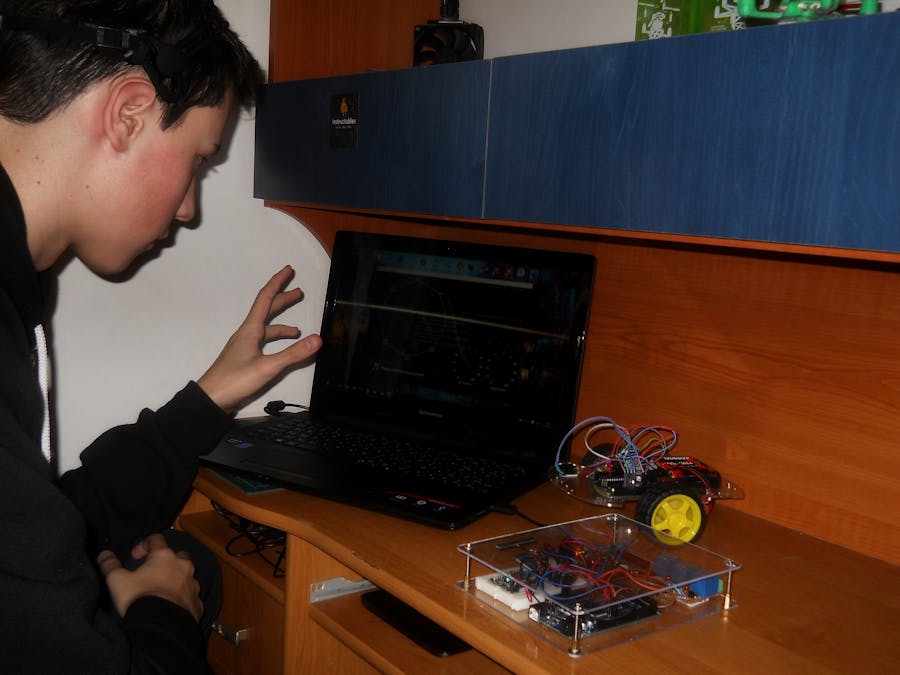
The robot can be controlled easily, the relays aren't big challange too. You only should learn how to control your attention levels to control the mouse. On the picture I'm trying to exit an app with my brainwaves. More practice guarantees better experience.
Thank you for watching!I really hope that you liked my project and please write your opinion in comments. I wanted to make a video about the device, but coding was hard so I haven't enough time to make a short movie, but I'll publish it very soon on my Youtube channel and I'll update this project presentation too.
Being the richest man in the cemetry doesn't matter to me... Going to bed at night saying we've done something wonderful... That matters to me - Steve Jobs
May the Force be with you, always!


_3u05Tpwasz.png?auto=compress%2Cformat&w=40&h=40&fit=fillmax&bg=fff&dpr=2)
Comments