

Hardware components | ||||||
_ztBMuBhMHo.jpg?auto=compress%2Cformat&w=48&h=48&fit=fill&bg=ffffff) |
| × | 1 | |||
 |
| × | 1 | |||
 |
| × | 2 | |||
Software apps and online services | ||||||
 |
| |||||
| ||||||
Hello everybody! I wanted to share my latest creation on Hackster, which is a an app using ElectronJS to play songs on a buzzer using an Arduino! This project was a bit challenging as this is my first attempt at making an Electron app.
ElectronJS is software that allows you to make native apps using JavaScript — which makes it super easy to build a desktop app to work with our Arduino!
Idea BackgroundThis idea came to me as I wanted to make something using a buzzer, as I didn't experiment with buzzers often, so I decided to make something. Then it hit me — why not make an application to play music on it?
I also noticed there is a library of songs that can play songs on a buzzer using Johnny-Five, so why not make an app to control a selection of songs over the Arduino? In fact, why not an Electron app??
And that's when I started making my idea!
Wait wait wait...Electron?Some people may not be aware as to what ElectronJS is. To put it simply, it's software that enables you to make Native applications using the Blink engine, which is the same engine Google Chrome uses! This allows us to make applications that use HTML, CSS, and JavaScript, and allow it to work with Node.js to work with entire file systems if we want to.
For this project, we're simply making an app that communicates down to our server, which is at the same level as our Arduino.
Setting Up The ApplicationFor this project, it's very simple and very bare. The main objectives of the project were to make a working menu bar app, that communicates via websockets to start and stop the songs playing on the buzzer. Also, the app has to know when a song has finished playing to update the interface so the user knows the song is finished.
Making a menubar application is a big step for someone that's new to ElectronJS, as opposed to making a simple Chrome-based application using a typical window. This in itself was quite challenging, but it's not impossible.
Application StructureFor this project, I set out to fragment the application to work as an app that works with websockets, in order for the commands to be sent down to the server, which was on the same level as the robot's programming.
 project
 ├─-app
 |   └--index.js
 ├--config.js
 ├--index.html
 ├--main.js
 └--robot.js
In this case, main.js is where all of our Electron's application scripts go. It calls on an index.html file to use as the front end, with app/index.js being the front end's scripting. The robot.js file is used for the Arduino and also the server.
There is also a config file, which is used to store the hostname and port for these files.
Making the Electron TraySince this project is merely a menubar app, this is needing some configuration to not only show the window, but also make what is known as a 'tray'.
// Set up Tray and Window variables
let win;
let tray;

// Once the app is ready, make the menu tray and create a new window.
app.on('ready', () => {
 makeTray();
 makeWindow();
});

// Store the app's tray icon in a variable — required to make the tray.
const appIcon = path.join(__dirname, 'static/images/tray-icon.png');
const appIconHighlighted = path.join(__dirname, 'static/images/tray-icon-highlight.png');

// Build the Tray in our Menubar
const makeTray = () => {
 tray = new Tray(appIcon);
 tray.setToolTip(config.appName);
 // Toggle the app's window when the tray's icon is clicked
 tray.on('click', function(event) {
   toggleWindow();
   if (win.isVisible() && process.defaultApp && event.metaKey) {
     win.openDevTools({ mode: 'detach' })
   }
 });
 if (process.platform == 'darwin') {
   tray.setPressedImage(appIconHighlighted);
 }
}

// Build the App's Window
const makeWindow = () => {
 win = new BrowserWindow({
   width: 300,
   height: 570,
   show: false,
   frame: false,
   resizable: false,
   fullscreen: false,
   transparent: true,
   title: config.appName
 });

 // Load the project's HTML file into the app window
 win.loadURL(`file://${path.join(__dirname, 'index.html')}`);
 // When the user goes to another app, hide our app
 win.on('blur', () => {
   if(!win.webContents.isDevToolsOpened) {
     win.hide();
   }
 });
}

// Toggle function for the app window
const toggleWindow = () => {
 if (win.isVisible()) {
   win.hide()
 } else {
   showWindow();
 }
}

// Set positioning for window when it shown (mostly for Mac OS)
const showWindow = () => {
 const trayPos = tray.getBounds();
 const winPos = win.getBounds();
 // set x and y co-ordinate variables to 0
 let x, y = 0;
 if (process.platform === 'darwin') {
   x = Math.round(trayPos.x + (trayPos.width / 2) - (winPos.width / 2));
   y = Math.round(trayPos.y + trayPos.height);
 }
 win.setPosition(x, y, false);
 win.show();
 win.focus();
}
Using the code above in main.js, the Electron app will make a menubar tray, which, when toggled, will show or hide our application. On MacOS/OS X, this will place our application window directly beneath the centre of our app's tray icon!
One other thing required for the menu tray to work is to show it during an event fired from the ipcRenderer, from our application front end, so under our scripts for app/main.js we send the 'show-window' event once the application's DOM (Document Object Model) has been loaded.
// app/index.js
const { ipcRenderer } = require('electron');
document.addEventListener('DOMContentLoaded', () => {
 // Fire the `show-window` event for the ipc in Electron
 ipcRenderer.send('show-window');
});
// main.js
// When the app's file sends the 'show-window' event, run showWindow()
ipcMain.on('show-window', () => {
 showWindow();
});
And now we've got the application running as a menubar application!
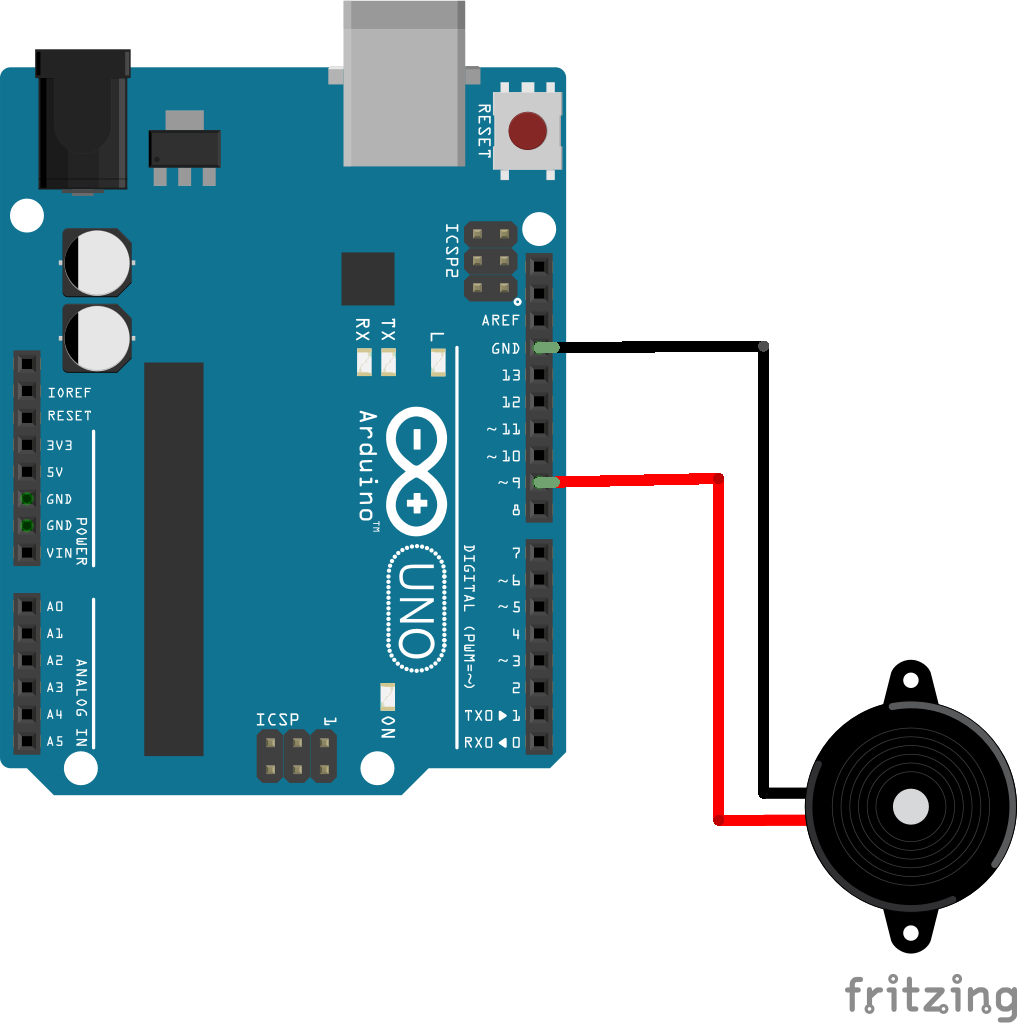
Making Our Arduino's ServerIn `robot.js`, a server can be made that's exclusively for taking data sent from the application's front end, and vice versa. The idea is to build a server that runs under a specific port, with Websockets running on the server.
const { Board, Piezo, Led } = require('johnny-five');
const express = require('express');
const { Server } = require('http');
const socketIO = require('socket.io');
const songs = require('j5-songs');

// Import project config
const config = require('./config');

// Set up the socket server
const app = express();
const http = Server(app);
const io = socketIO.listen(http);

// Make a new johnny-five Board() instance
const board = new Board();

// Begin the server under the specified port
http.listen(config.port, () => {
 console.log(`Server Running under *:${config.port}. Remember to run 'yarn start' to run the app.`);
});

board.on('ready', function() {
 console.log('board ready');

 // Store the Piezo in a constant
 const buzzer = new Piezo(3);

 // If the board is connected and is connected to the client, give a handshake.
 io.on('connect', (client) => {
   client.on('join', handshake => {

     io.emit('robot-connected', 'Robot Connected');

     // Write the handshake in the terminal console
     console.log(handshake);
   });

    // When the app selects a song to play, stop the buzzer playing the current song, then play the selected song.
   client.on('play-song', (song) => {
     buzzer.stop();
     buzzer.play(songs.load(song), (songEnded) => {
       if(songEnded) {
         io.emit('song-ended');
       }
     });
   });

    // If the app selects a song that's already playing, stop the buzzer.
   client.on('stop-song', () => {
     buzzer.stop();
   });
 });
});
Once the Arduino board is connected, it will wait for the front end to connect and, when successful, will let the front end know the app is connected to the Arduino. It's necessary for the Arduino board to be running alongside the server in order to run the app.
Using Johnny Five and Julian Duque's j5-songs library, sockets can be set up to wait for the front end to press a button, and receive the button's value to play a song on the buzzer. In addition, the server will let the front end know when the song is finished.
// app/index.js
const socketIOClient = require('socket.io-client');
// Fetch Config file
const config = require('../config');
// Set up connection to Server Sockets
const io = socketIOClient(`http://${config.hostName}:${config.port}`);
Another thing to add in the application's front end scripts is to set up the Websockets client, and where the sockets should connect to!
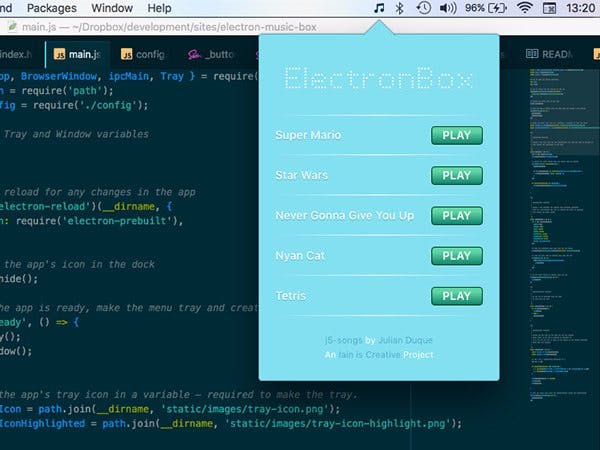
Building The Front End and Making It CommunicateNow that the app and server is running, a front end has to be built using HTML, CSS, and JavaScript. The main part of our HTML is an unordered list that contains a set number of songs for buzzer.
<!-- Playlist application controls -->
<ul class="playlist app-controls" id="playlist">

 <li class="playlist__item">
   <div class="playlist__item__label">
     <span>Super Mario</span>
   </div>

   <div class="playlist__item__button">
     <button class="c-button" data-song="mario-fanfare">Play</button>
   </div>
 </li>

 <li class="playlist__item">
   <div class="playlist__item__label">
     <span>Star Wars</span>
   </div>

   <div class="playlist__item__button">
     <button class="c-button" data-song="starwars-theme">Play</button>
   </div>
 </li>

 <li class="playlist__item">
   <div class="playlist__item__label">
     <span>Never Gonna Give You Up</span>
   </div>

   <div class="playlist__item__button">
     <button class="c-button" data-song="never-gonna-give-you-up">Play</button>
   </div>
 </li>

 <li class="playlist__item">
   <div class="playlist__item__label">
     <span>Nyan Cat</span>
   </div>

   <div class="playlist__item__button">
     <button class="c-button" data-song="nyan-melody">Play</button>
   </div>
 </li>

 <li class="playlist__item">
   <div class="playlist__item__label">
     <span>Tetris</span>
   </div>

   <div class="playlist__item__button">
     <button class="c-button" data-song="tetris-theme">Play</button>
   </div>
 </li>
</ul>
<!-- /Playlist application controls -->
In the button of each item, there's a data attribute called data-song that contains the Song ID of the list item's song, as specified in the Songs table in the j5-songs repository. The value stored in the data-song attribute will be sent to the server so the buzzer knows which song to play!
// Store Playlist Unordered List in a variable
const playList = document.getElementById('playlist');
// Get every item in the list
const playListItems = playList.getElementsByTagName('li');

// Begin loop through the playlist items
for (i = 0; i < playListItems.length; i++) {
 // Get the button in the playlist item
 const playButton = playListItems[i].getElementsByTagName('button')[0];
 let playing = false;

// Store the song name in a constant.
 const songName = playButton.dataset.song;

/**
  *
  * Play Button Click Event
  *
  * When clicked, check if the item is already playing.
  * If so, tell the music box to stop the song and change the button text.
  *
  * If not, tell the music box to play the selected song and change the
  * button text to say 'Stop' instead of 'Play'.
  * Then find all the other buttons and change the button text from 'Stop' to
  * 'Play'.
  *
  */
 playButton.addEventListener('click', () => {

   if (playing) {
     playing = false;
     playButton.innerHTML = 'Play';
     playButton.classList.remove('c-button--playing');
     io.emit('stop-song');
   } else {
     playing = true;
     playButton.innerHTML = 'Stop';
     playButton.classList.add('c-button--playing');
     io.emit('play-song', songName);

    for(n = 0; n < playListItems.length; n++) {
         const otherPlayButton = playListItems[n].getElementsByTagName('button')[0];
         /**
          *
          * If the item's button is not the current song and has the text
          * 'Stop', change its appearance back to the initial state.
          *
          */
         if(otherPlayButton.dataset.song != songName && otherPlayButton.innerHTML == 'Stop') {
           otherPlayButton.innerHTML = 'Play';
           otherPlayButton.classList.remove('c-button--playing');
         }
       }

     // When the song ends, change the button back to its initial state
     io.on('song-ended', () => {
       playing = false;
       playButton.innerHTML = 'Play';
       playButton.classList.remove('c-button--playing');
     });
   }
 });
}
With the above script, we can loop through each list item, and then find if an item's button has been pressed. If it's not playing, it will send the song's ID through to the Arduino via a websocket, to play it, and got through the other items to see if their button was previously playing, to set them back to their initial state.
If the specified button in the loop is already playing, it should stop playing the song on the buzzer and set the button back to its initial state.
Also, if the song has ended on the Arduino, it will send the event to the front end and set the item's button back to its initial state.
At this point, this is now a functional app!
ConclusionThis was a pretty fun project! It was challenging at first, but I thoroughly enjoyed building an app to work with the Arduino, and was a joy to see it actually work! Extending this idea would include using an API and making a more dynamic front end, or use a similar app design to work with more complicated circuits.
If you enjoyed this project and helped you learn more about using JavaScript with your projects, feel free to pledge to my Patreon or donate to my PayPal so I can make more awesome stuff. You can also follow me on Twitter or like me on Facebook to stay up to date!
Have fun!


Comments