


Hardware components | ||||||
_ztBMuBhMHo.jpg?auto=compress%2Cformat&w=48&h=48&fit=fill&bg=ffffff) |
| × | 1 | |||
| × | 1 | ||||
| × | 1 | ||||
 |
| × | 1 | |||
Software apps and online services | ||||||
| ||||||
| ||||||
This project uses the Arduino Uno with TF-Luna LiDAR sensor to measure distance in real time. The Arduino reads distance data from the TF-Luna over i2C and processes the values.The measured distance is then transmitted wirelessly using the XBee S2C module.
On the receiver side, another XBee module connected to a system (Arduino/PC) receives the transmitted data and displays or logs the distance.
The setup provides a simple wireless distance monitoring system without the need for physical connections between the sensing and receiving units. It can be used for basic remote sensing, obstacle detection, or monitoring applications.
Project Overview
Content Type : Hardware / IoT
Platform : Arduino Uno (ATmega328P)
IDE : Arduino IDE
Config Tool : Digi XCTU
Protocol : I2C (TF-Luna LiDAR) + UART (XBee)
Devices & ComponentsMicrocontroller
- Arduino Uno (ATmega328P, 5 V logic)
Sensor
- Benewake TF-Luna LiDAR — range 0.2 m to 8 m, I2C or UART interface
Wireless
- Digi XBee S2C (ZigBee)
- XBee Breakout / Shield for 3.3 V logic-level conversion (recommended)
Passive Components & Accessories
- Jumper wires (M-M and M-F)
- Breadboard
- USB-to-Serial adapter (for receiver XBee connected to PC)
Software & Tools
- Arduino IDE — firmware development and serial monitor
- Digi XCTU — XBee firmware flashing and AT-mode configuration
- Wire.h — built-in Arduino I2C library (no external install needed)
- SoftwareSerial.h — routes XBee TX/RX
How It Works :
This project works by using the TF-Luna LiDAR sensor in I2C mode (address 0x10) to measure distance continuously. The Arduino Uno initializes the I2C bus using the Wire library and, inside the loop, sends a command (0x00) to request measurement data from the sensor. It then requests 7 bytes of data from the TF-Luna and checks if all bytes are available before reading them into an array. The distance is calculated by combining two bytes using bit shifting: (data[1] << 8) | data[0], while signal strength is also extracted similarly. The measured distance is printed to the Serial Monitor for debugging and then converted into a formatted string using snprintf (e.g., " D 120\n"). This string is transmitted through the XBee module using SoftwareSerial on pins 2 (RX) and 3 (TX) at 9600 baud. Since the XBee is operating in transparent (AT) mode, it directly sends the received serial data wirelessly. On the receiver side, another XBee module outputs the same data to a connected system, enabling real-time wireless distance monitoring. The loop runs with a 1-second delay, sending updated distance values periodically.
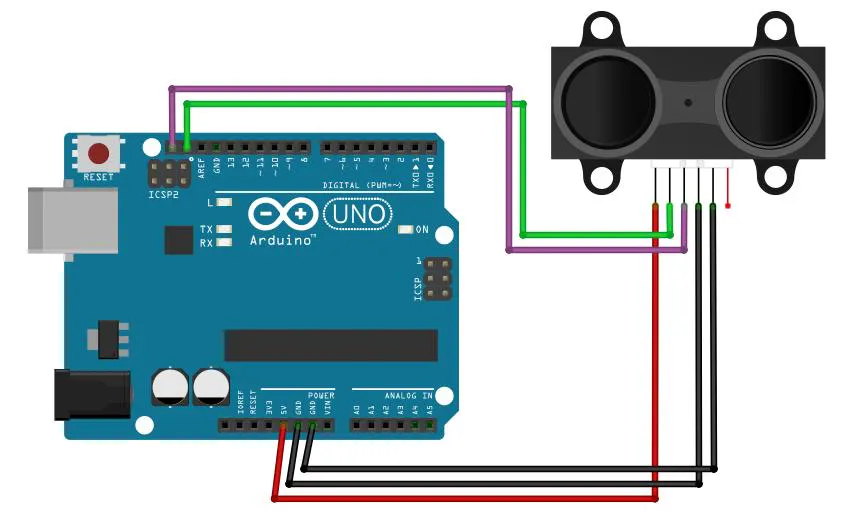
TF-Luna to Arduino Uno (I2C)
- SDA → A4 : I2C Data
- SCL → A5 : I2C Clock
- GND → GND : Common Ground
- VCC (5V) → 5V : Power Supply
XBee S2C to Arduino Uno (SoftwareSerial)
- DOUT (TX) → D2 : XBee transmit → Arduino receive
- DIN (RX) → D3 : Arduino transmit → XBee receive
- GND → GND : Common Ground
- VCC (3.3V) → 3.3V : Power supply (use regulated 3.3V)
XBee Configuration with XCTU
Configure the Xbee before to use using XCTU
Codes OverviewStep-by-Step Working :
1. Libraries and Setup
#include "SoftwareSerial.h"
#include <Wire.h>
Wire.h → for I2C communication with TF-Luna
SoftwareSerial.h → to create a second serial port for XBee

byte deviceAddress = 0x10;
SoftwareSerial XBee(2,3);

0x10 → I2C address of TF-Luna
Pin 2 → RX (from XBee TX)
Pin 3 → TX (to XBee RX)
2. Setup Function
Wire.begin();
Serial.begin(9600);
XBee.begin(9600);

Starts I2C communication
Serial Monitor for debugging
XBee communication at 9600 baud
3. Request Data from TF-Luna
Wire.beginTransmission(deviceAddress);
Wire.write(0x00);
Wire.endTransmission();

Arduino sends a request to TF-Luna
0x00 acts like a register/command to fetch measurement data
4. Read Data from Sensor
Wire.requestFrom((uint8_t)deviceAddress, (uint8_t)7);
Requests 7 bytes from TF-Luna

if (Wire.available() == 7)
Ensures full data packet is received

byte data[7];
for (int i = 0; i < 7; i++) {
  data[i] = Wire.read();
}
Stores incoming bytes into array
5. Extract Distance & Signal
unsigned int distance = (data[1] << 8) | data[0];
Combines 2 bytes into distance value


data[0] → low byte
data[1] → high byte


unsigned int signalStrength = (data[3] << 8) | data[2];
Same method for signal strength (not used further)
6. Debug Output
Serial.print("Distance: ");
Serial.print(distance);
Serial.print(" cm\n");

Prints distance to Serial Monitor
7. Format Data for XBee
int A = distance;
char distanceStr[10];
snprintf(distanceStr, sizeof(distanceStr), " D %d\n", A);
Converts integer → string


Final format sent:

D 120
This makes it easier for receiver to parse
8. Send via XBee
XBee.write(distanceStr);


Sends string over SoftwareSerial
XBee transmits wirelessly
9. Delay
delay(1000);
Sends data every 1 second
Complete Flow
TF-Luna (I2C)
↓
Arduino reads 7 bytes
↓
Extract distance
↓
Convert to string
↓
Send via SoftwareSerial (Pin 3)
↓
XBee Transmitter ))) ((( XBee Receiver
↓
Receiver gets "D 120
Notes
Precautions:
- Use only 3.3V supply for the XBee module- Ensure proper wiring and common ground
Tips:
- Configure XBee using Digi XCTU before use- Use Serial Monitor for debugging- Keep data format simple for easy parsing
Additional Notes:- Check baud rate and TX/RX connections if communication fails- Avoid signal interference for better wireless performance- System can be expanded with multiple sensors or nodes
If you plan to scale or customize this project further, it can be helpful to hire Arduino programmer for more complex implementations.


Comments