


Hardware components | ||||||
 |
| × | 1 | |||
| × | 1 | ||||
 |
| × | 1 | |||
Software apps and online services | ||||||
| ||||||
| ||||||
| ||||||
Project Overview
The UPI have became the go to payment method in India and if any business want to a smart solutions then they got to have an UPI integration. Its very easy to use payment system, that we integrated using the ESP32 and the QR code is displayed on a small screen. This solution can be used in any Digital business from vending machines to smart lockers and kiosk systems.
It dynamically generates UPI QR codes and verifies transactions in near real-time via a backend PHP server integrated with the Razorpay Payment Gateway.
The system bridges embedded hardware and cloud APIs, enabling fully automated payment-triggered actions — such as unlocking a door, dispensing a product, or activating a relay — without requiring expensive POS terminals or dedicated Android/iOS devices.Core Features
• Dynamic UPI QR code generation per transaction
• Local configuration via ESP32 Access Point (AP) mode
• TFT display (ILI9341, SPI) for real-time QR rendering
• Backend payment verification using Razorpay Enterprise APIs
• Trigger-based hardware automation after payment confirmation
• Lightweight and scalable for multiple deployment sites
• No Android/iOS device or PC required at the terminal
Hardware Stack
- ESP32 Development Board
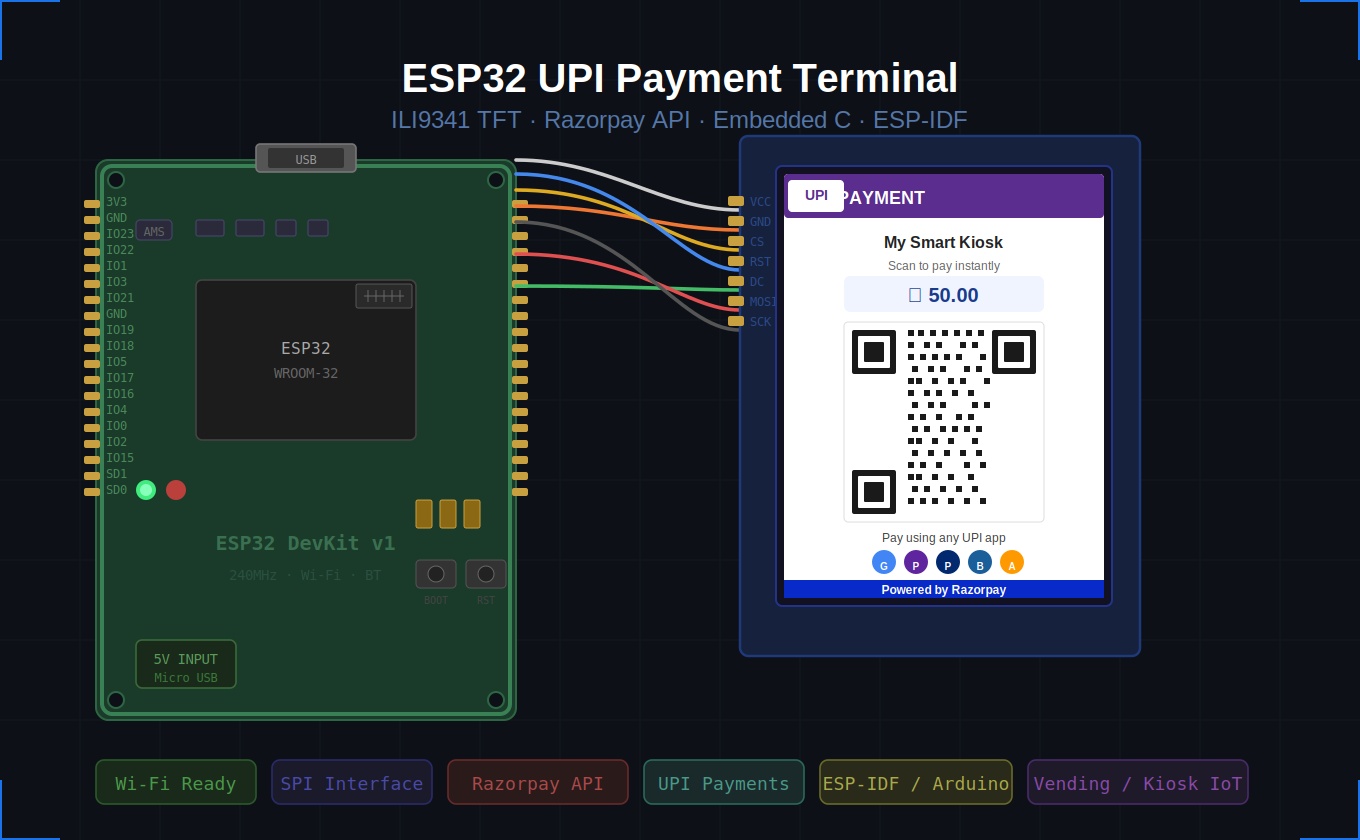
- 2.8” TFT Display (ILI9341, SPI interface)
- 5V Power Supply
- Firmware: ESP-IDF (Embedded C)
- Backend APIs: PHP-based server
- Communication: HTTP/REST APIs
- Payment Gateway Integration: Razorpay (Enterprise Token-based validation)
The system operates in a clean 9-step flow from boot to payment confirmation:
1.API Mode Boot: ESP32 starts a Wi-Fi Access Point for first-time configuration
2.User Configuration :User connects and submits UPI ID and Merchant Name via web form
3.QR Payload Generation:Backend server creates a UPI-compatible QR payload via Razorpay API
4.QR Render on TFT: ESP32 receives QR data and draws it live on the ILI9341 display
5.Customer Scans QR :Customer scans using GPay, PhonePe, Paytm, or any UPI app
6.Payment Processed:UPI transaction hits backend server through Razorpay gateway
7.Server Validates :PHP server validates transaction status via Razorpay token-based API
8.ESP32 Polls / Receives:ESP32 polls backend every 3 seconds for confirmation
9.Hardware Trigger:On success: relay/GPIO triggers — product dispensed or door unlocked
Detailed Working Steps
Step 1 — Boot & Display Init
On power-on, the ESP32 initializes the SPI bus and ILI9341 TFT driver. A boot screen with the project name is displayed while the system prepares for configuration or operation mode.
If no Wi-Fi credentials are stored in flash (NVS), the ESP32 starts in Access Point mode. The user connects a phone/laptop to this AP, opens a browser, and enters the merchant UPI ID, merchant name, and Wi-Fi credentials. These values are saved to ESP32 non-volatile storage.
Step 3 — QR Code Generation via Backend + RazorpayESP32 sends an authenticated HTTP POST request to the PHP backend. The backend calls the Razorpay QR Codes API using the Enterprise Token and receives a live QR payload with a unique transaction ID and amount.
The QR data (binary matrix or image URL) is processed and drawn pixel-by-pixel on the 240x320 ILI9341 display using TFT_eSPI library. The amount and merchant name are shown below the QR code as readable text.
Step 5 — Customer Payment via UPIThe customer scans the QR with any UPI-compatible app (GPay, PhonePe, Paytm, BHIM). The amount is auto-filled. On payment, the transaction is processed through the Razorpay gateway in real time.
ESP32 polls the backend every 3 seconds with the transaction ID. The backend queries Razorpay for payment status. On success, the backend returns a confirmed response; on timeout (120 seconds), it returns a failed response.
Upon receiving payment confirmation, ESP32 sets a GPIO pin HIGH to activate a relay, buzzer, or any actuator. The TFT shows a green success screen. The system resets to idle state after 5 seconds, ready for the next transaction.
• Memory management on ESP32 was critical — Razorpay JSON responses required careful DynamicJsonDocument sizing.
• Rendering QR bitmaps on TFT required converting URL-based QR image data into a drawable pixel matrix.
• Wi-Fi reconnection logic was essential for real-world unattended deployments.
• Razorpay Enterprise Token authentication required proper Base64 encoding in HTTP headers from C firmware.
• AP mode and station mode switching without a full reboot required careful esp_wifi state management.
Future Improvements• Add a touchscreen keypad for on-device amount input.
• Integrate HTTPS (TLS) for fully encrypted API communication.
• SD card logging of all transactions with timestamps.
• OTA (Over-the-Air) firmware updates via ESP-IDF OTA partition.
• Battery + solar enclosure for outdoor vending deployments.
• Multi-currency and multi-merchant support via cloud config panel.
ConclusionThis project demonstrates how a low-cost ESP32 microcontroller can be transformed into a fully functional, production-grade UPI payment terminal integrated with Razorpay's powerful payment infrastructure. The combination of embedded firmware, a PHP backend, and real-time QR rendering on a TFT display opens the door to affordable, scalable cashless payment automation for kiosks, vending machines, and smart IoT systems across India.
For teams looking to build or extend this kind of hardware-software integration at scale, professional Embedded Software Development Services can accelerate development, ensure production reliability, and tailor the firmware to specific deployment environments.


Comments