You can view the basics of how my machine works, and some clips of it in action, in the video below.
This video comprises a holistic overview of my project
In this article I will explain in more detail the process through which I arrived at my current design. For the sake of clarity, some concepts found in the video will also be covered in this article.
The Idea
When I first had the idea to hack Pie Face, I had several design goals in mind:
The outward appearance of the game should remain unchanged.
The game should shouldn't create a lot of additional noise (i.e. no loud whirring noises from motors or servos.)
The game should interface with a mobile phone wirelessly.
In short, I wanted to have complete control over the throwing mechanism of the game, without anyone else noticing. A daunting task to say the least. The main problem being packing everything into a very limited volume.
Reverse Engineering
In order to understand how to hack Pie Face, I first needed to understand how the mechanics of the game worked. And that required some reverse engineering.
1 / 3 • Figure 1: Pie Face mechanics module
This module contains all of the mechanics of Pie Face. As you can see there's a lot going on under the hood of this game. The lever on the right in figures 1 and 2 is what the purple throwing arm attaches to, and the large gear in the center of figure 2 is what is rotated by the knob on the side of the game. If you look closely at figure 2, you can see tiny wedges scattered around the inner track of the gear. As you'll see in the following animation, these wedges are the key element that makes the game run.
Figure 4: Animation illustrating how Pie Face works with only 2 wedges
This animation represents how the mechanics of Pie Face operate. The large gear is turned by the user, once the idler(shown in red) is forced upwards by one of the wedges, the throwing arm(shown in purple) is released. There are only 2 wedges in this animation for the sake of simplicity. As you can see in figure 2, the actual gear has many more wedges scattered randomly around its inner track. This means that Pie Faceisn’t random at all! It’s just designed to feel like it is. In reality, there is a defined pattern for when the arm will be triggered.
Implementation
Figure 5: Animation illustrating how the mechanics of my hacked version of the game work
I hacked the game by doing the following. I took apart the mechanics module, sanded down the triggering wedges, and drilled a hole in the idler. Then I attached a fishing line to the idler, routed the line through an eyebolt, then attached the other end to a servo. Now, the throwing arm isn't ever triggered unless the servo pulls down on the fishing line.
I won't go into detail on why I chose this method to hack the game over others, as that was covered in the video. But I will say that this method willnotworkwithamicro-servo. The torque required to overcome the force of the idler is much higher than a micro-servo can handle. I used a servo with an output torque of 20 kg, and that has worked great so far.
On another note, I was initially concerned that the amount of noise the servo made would tip people off. And after initial testing, I discovered that you can hear the servo when it's turning inside the game, but the sound is so brief that it doesn't raise suspicion.
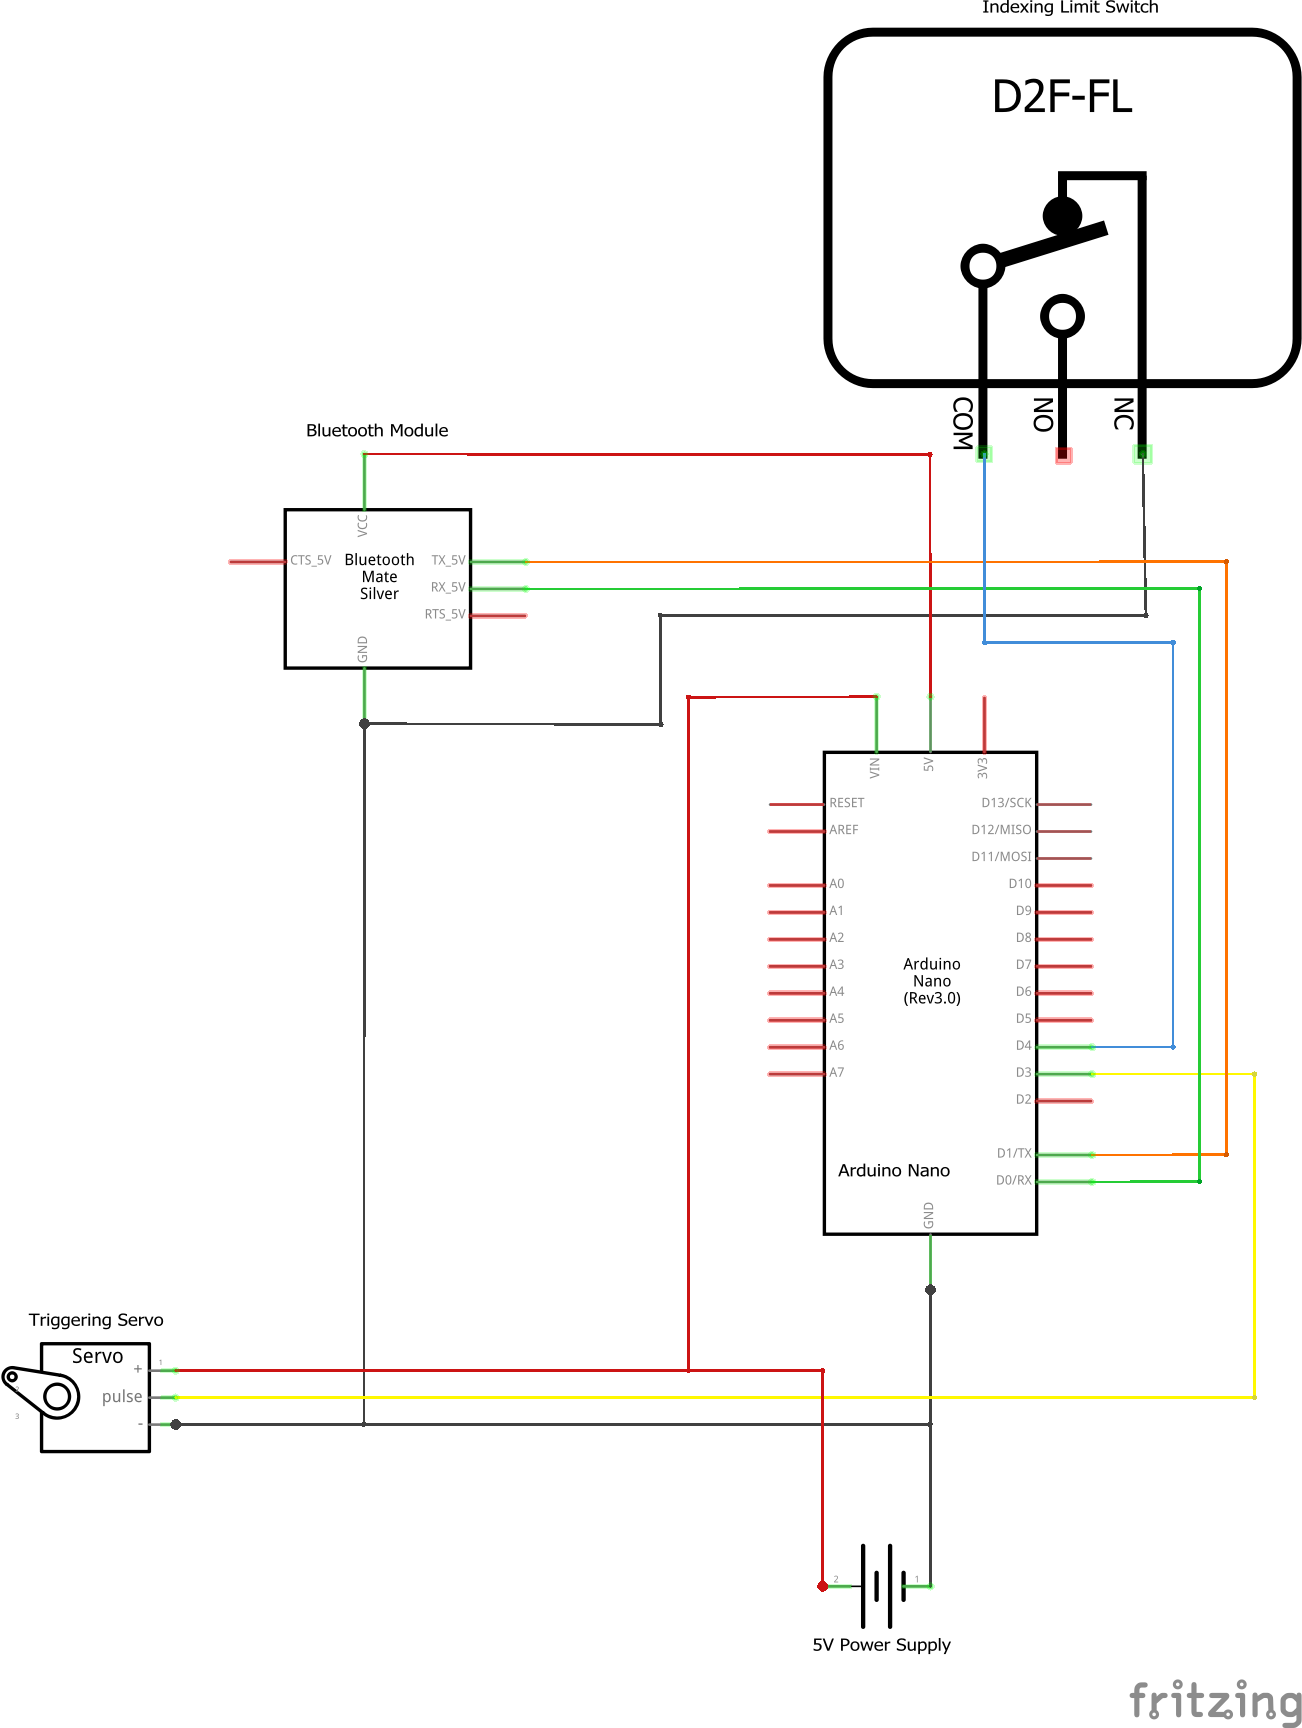
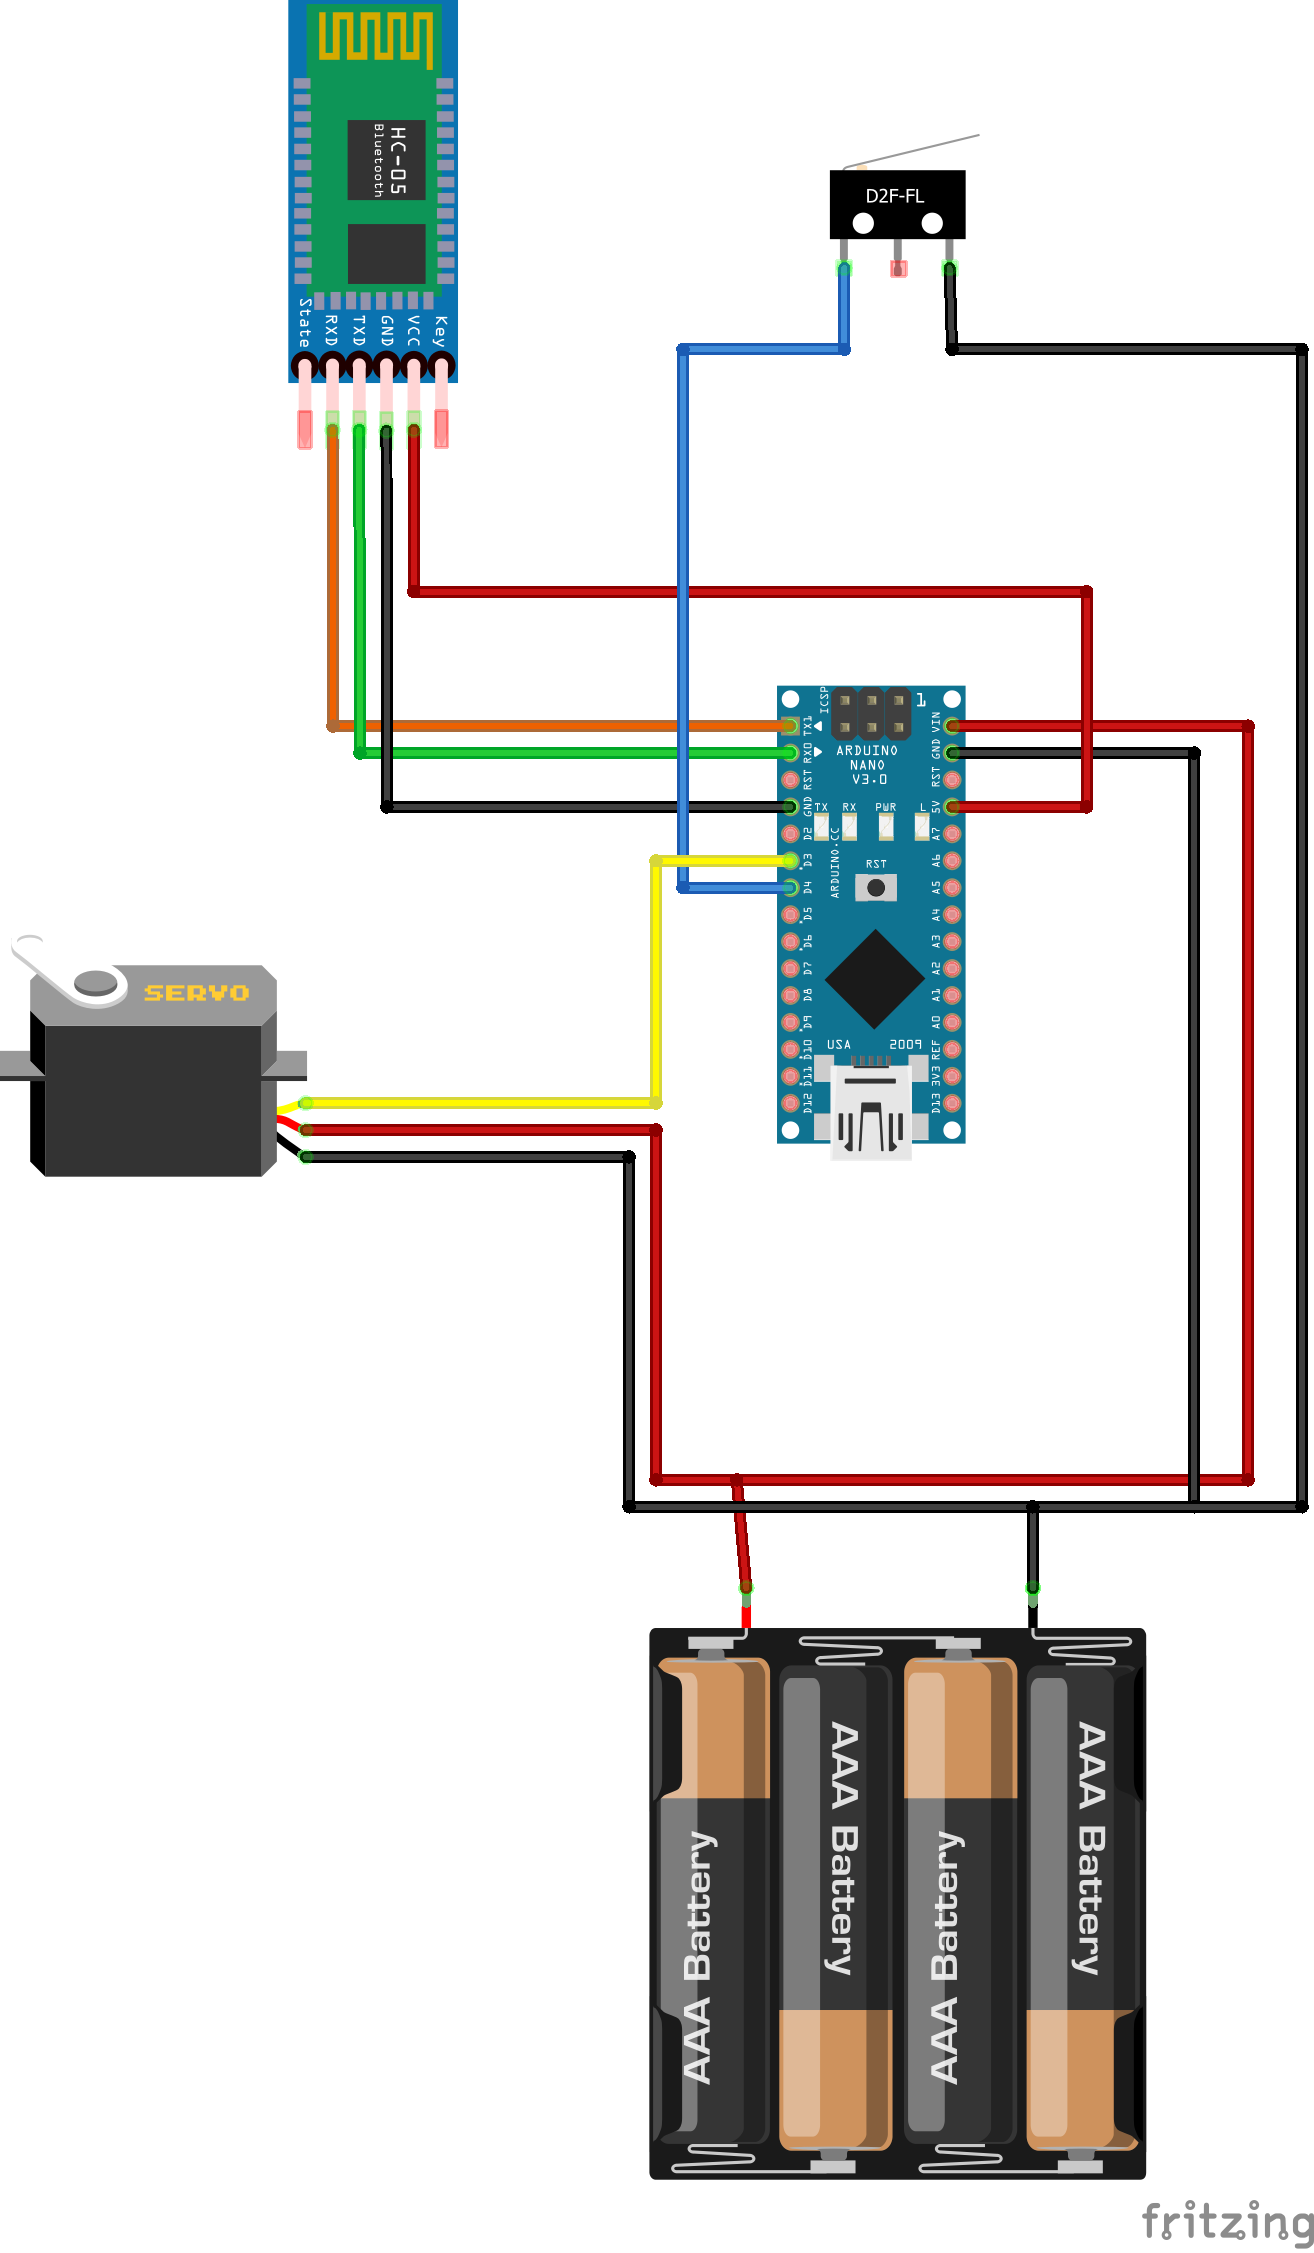
As far as electronics go, I used an HC-05 Bluetooth module to establish communication between an Arduino Nano, and an app on my phone called Serial Bluetooth Terminal. Many different apps exist for interfacing with Bluetooth modules and an Arduino, but this was the one that worked best for me. Connecting to my Bluetooth module with this app gives me direct access to the Nano’s serial port, which allows for extremely simple commands to be used to communicate with the Nano.
V0.5
Figure 6: ESP8266 WiFi Arduino
During the early stages of development, I used an ESP8266 WiFi Arduino to establish communication between the phone and the Pie Face game. This method worked fine, but I quickly abandoned this approach in favor of Bluetooth, which would allow me to connect to the game even if there wasn't a Wifi network available.
V1
Figure 7: First attempt at hacking Pie Face
Figure 8: Power supply for V1
My first iteration was really rough around the edges. All the connections were hot glued and taped, and the power supply was a AA battery bank I salvaged from an old RC car (figure 8.)
1 / 2 • Figure 9: Close up of open limit switch on V2
In order to ensure the arm was triggered at the exact moment the user turns the knob (as it does in the original game), I hot glued a limit switch right beneath a protrusion that oscillates back and forth when the central gear is rotated (figures 9-10.) I then programmed the Arduino Nano to wait for both a trigger from my phone, and a trigger from the limit switch. Only when both of these conditions are met does it launch the arm.
1 / 2 • Figure 10: The eyebolt protrudes out the top of the casing
I installed the eyebolt for the fishing line to run through right beneath the chin rest (Figures 10-11.) Technically this modifies the outward appearance of the game, but it hides underneath the chin rest quite nicely, and no one would suspect anything if they saw the end of a bolt on the game anyway.
After I took the V1 out for a little test drive (the outdoor game of Pie Face in the video), I decided to rebuild my V1 and make several design improvements.
V2
1 / 5 • Figure 12: My second attempt at hacking Pie Face
The V2 was a huge improvement over the V1. I made two main modifications to my original design when I build the V2, namely:
I mounted all of the electronics to a central belly pan which attached to the mechanics module (Figure 13.) I did this to allow the two halves of the game to separate completely, which was not possible with the V1 due to the fishing line tying the two halves together due to the way it was attached. I mounted the belly pan by screwing it into standoffs I hot glued to the mechanics module.
I replaced the clunky AA battery pack with a low profile 5V USB battery pack (figures 14-16.) This was a much easier to use and cheaper solution to powering the game, as I didn't have to buy new batteries every time I wanted to use it.
Something that is really neat about the software I wrote for my hacked version of Pie Face, is that it utilizes the limit switch to allow me to specify the number of turns I want the game to wait before activating the arm. It's basically a delayed activation feature. This allows me to send the character "5" to the Arduino Nano from my phone (this sets the delay count to 5 turns), then go to the camera app on my phone, and record my friends as they get hit!
All in all the V2 has less potential points of failure, and it worked like a charm in field testing (the indoor game of Pie Face in the overview video).
Final Thoughts and Possible Improvements
If you decide you want to make your own hacked Pie Face game, make sure your power supply has a decent capacity. I mention this because in order for the outward appearance of the game to remain unchanged, I didn't install any kind of power switch. This means the unit must be powered on when assembled, and the battery has to last from the time it's assembled, to the time you start to play the game. The USB battery pack I used has a rating of 2600 mAh, and it can power the game for up to 6 hours when it isn't in use (i.e. it won't power the game for 6 hours while you are playing it, as the servo moving would drain the battery much more quickly.)
All in all, I'm very pleased with the way this project turned out. It was a great engineering challenge, I had a blast doing it, my friends didn't suspect a thing, and I was able to fulfill all my original design criteria:
The outward appearance of my hacked game remains virtually unchanged.
It doesn't create a suspicious amount of noise.
It interfaces with my Android phone wirelessly
If I ever decide to make a V3, I will probably:
3D Print the belly pan rather than using wood.
Find an easier way to tension the fishing line. In its current state, it is nearly impossible to fit my fingers in far enough to do so.
Add a switch to the RX and TX lines connected to the Bluetooth module. The Arduino doesn't accept software changes when these serial communication lines are in use. In order to upload new software, I have to unplug the Bluetooth module, upload my code, then plug the module back in. A switch would make this process much easier.
1 / 5
Additional images of the V2 are shown above.
Comments, questions, and criticism are all welcome!
This is the code that runs on the Arduino Nano. The main function of the code is to monitor the limit switch, listen for a trigger from the bluetooth module, and activate the arm by rotating the servo when a trigger is received from the bluetooth module.
#include<Wire.h>#include<Servo.h>// Code for debouncing of the limit switch was taken from official Arduino website:// https://www.arduino.cc/en/tutorial/debounceServoarm;intbuttonState;// the current reading from the input pinintlastButtonState=LOW;// the previous reading from the input pin// the following variables are unsigned longs because the time, measured in// milliseconds, will quickly become a bigger number than can be stored in an int.unsignedlonglastDebounceTime=0;// the last time the output pin was toggledunsignedlongdebounceDelay=20;// the debounce time; increase if the output flickersconstintbuttonPin=4;// Indexing limit switch pin numberbooleanisTriggered=false;booleanthrowPie=false;charinput="";intcode=-1;doubletotalCount=0;intthrowIndex=-2;// These two positions will vary depending on the tension of the fishing lineintthrowPos=155;intstandByPos=93;voidsetup(){pinMode(buttonPin,INPUT_PULLUP);arm.attach(3);Serial.begin(9600);// attaches the servo on pin 9 to the servo object}voidloop(){if(Serial.available()>0){input=Serial.read();Serial.println(input);}switch(input){case'1':code=1;throwIndex=totalCount+code;break;case'2':code=2;throwIndex=totalCount+code;break;case'3':code=3;throwIndex=totalCount+code;break;case'4':code=4;throwIndex=totalCount+code;break;case'5':code=5;throwIndex=totalCount+code;break;case'6':code=6;throwIndex=totalCount+code;break;default:break;}// read the state of the switch into a local variable:intreading=!digitalRead(buttonPin);// If the switch changed, due to noise or pressing:if(reading!=lastButtonState){// reset the debouncing timerlastDebounceTime=millis();}if((millis()-lastDebounceTime)>debounceDelay){// whatever the reading is at, it's been there for longer than the debounce// delay, so take it as the actual current state:// if the button state has changed:if(reading!=buttonState){buttonState=reading;totalCount+=0.5;Serial.print("\ntotalCount = ");Serial.println(totalCount);Serial.print("\nthrowIndex = ");Serial.println(throwIndex);}}if(totalCount-throwIndex==-1){isTriggered=true;throwIndex=-2;}if(isTriggered==true&&buttonState==HIGH){throwPie=true;isTriggered=false;}if(throwPie){arm.write(throwPos);Serial.println("\nIki Iki Iki Ptwang!");delay(500);arm.write(standByPos);throwPie=false;}// save the reading. Next time through the loop, it'll be the lastButtonState:lastButtonState=reading;}


Comments