


Hardware components | ||||||
| × | 1 | ||||
| × | 1 | ||||
 |
| × | 1 | |||
 |
| × | 1 | |||
Software apps and online services | ||||||
 |
| |||||
We all use PIN codes on our phones and bank cards. But what if a PIN could be spoken out loud instead of typed?
That’s exactly what we’ve built: a voice-activated smart lock running entirely on the VoxControl Kit (ESP32-S3).
This isn’t cloud-based magic — it’s pure offline AI. Right on your desk, you can try the same technology that will soon power smart homes and secure offices.
- Voice as your key: your 4-digit PIN is spoken, not typed.
- Runs fully offline: no servers, no Wi-Fi dependency, instant response.
- Sci-fi feeling in your hands: a door lock that listens and obeys your voice.
- Powered by VoxControl Kit: our ready-to-use ESP32-S3 module designed for voice-first projects.
VoicePIN isn’t just a demo — it’s a playground for ideas:
- Smart workshop or garage — only those who know the voice PIN can enter.
- Educational labs — show students how voice authentication systems work in real life.
- Smart home prototype — create a door, drawer, or safe that responds to the right spoken code.
- Show-stopping demo — at hackathons or expos, a “lock that listens to your voice” always grabs attention.
1. Set PIN: You speak your four digits once, and the system memorizes them.
2. Verify PIN: speak again — if digits match, the lock opens.
3. All logic runs inside the VoicePIN app, part of the free firmware bundle we provide with the GRC module.
Try it YourselfThis project takes just an evening to build — but the result feels like a scene from science fiction.
With the GRC AI Robot Control module, you don’t just follow instructions — you unlock a whole world of voice-first projects.
What You’ll Need1. VoxControl Kit - a board with the VoicePIN app preinstalled
2. Electromagnetic latch lock (12V, 1.1A)
3. 12V 1A power supply – a wall adapter with a 5.5×2.5 mm plug
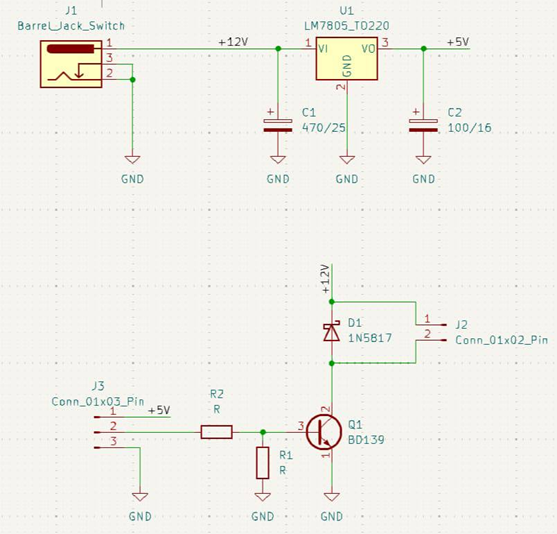
4. Lock control board: A 5V voltage regulator and a power switch to control the electromagnet
The lock control board performs two tasks:
- When connected to a power source, it supplies 5V to the GRC AI DevBoard via a regulator to power the board.
- It delivers 12V to the electromagnetic lock to open it upon receiving a signal from the GRC DevBoard. In other words, when the correct voice PIN is spoken, the GRC AI DevBoard triggers the transistor on the power board, sending voltage to the electromagnet and releasing the latch.
It can be assembled using the provided documentation or replaced with any suitable alternative—for example, a custom-built one using components from Electromagnetic Lock, and Crowtail-Relay 2.0.
The board’s schematic:
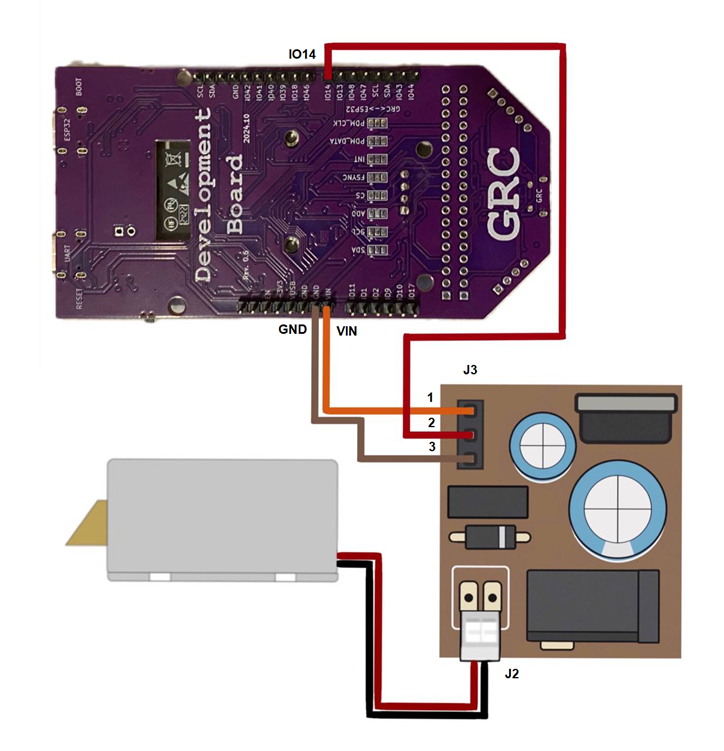
Next, let’s break down the wiring diagram for all components.
1. Connect the output on the power board (connector J3, pin 1) to the VIN pin on the DevBoard. This supplies the necessary 5V power.
2. Connect the ground (GND) from the power board (J3, pin 3) to the GND pin on the DevBoard.
3. To control the lock, link the GPIO_NUM_14 pin on the GRC DevBoard to pin 2 of connector J3 on the power board.
4. Connect the electromagnetic lock to connector J2 and the power adapter (with the plug) to J1 on the power board.
The fully assembled device looks like this:
Upon first boot, you’ll need to create a PIN code. The user must speak four digits aloud, and the DevBoard will memorize them after confirming the new password.
Once saved, the device will prompt you to repeat the code and verify it against the initial input. If correct, the lock will open with a confirmation message. If not, the lock remains closed, and the DevBoard will notify you of the incorrect input.
What’s NextVoicePIN is just one of the apps included in our bundle. Once you have the GRC module, you can also try:
- AI Teacher — helps kids learn words and numbers.
- RoboControl — drive robots by voice commands.
Same hardware. Multiple applications. Endless ideas.
Share Your Feedback 🚀We’d love to hear from you!
- Built the project? Tell us how it worked.
- Got new ideas for VoicePIN? Share them!
· Any questions? Drop a comment — your feedback helps us build even better tools.
LinksRelated Hackster projects: AI Teacher | Gate | RoboControl | Wild


Comments