

Hardware components | ||||||
 |
| × | 1 | |||
_ztBMuBhMHo.jpg?auto=compress%2Cformat&w=48&h=48&fit=fill&bg=ffffff) |
| × | 1 | |||
 |
| × | 1 | |||
 |
| × | 1 | |||
 |
| × | 4 | |||
 |
| × | 4 | |||
Software apps and online services | ||||||
 |
| |||||
This series focuses on the ATTiny85 AVR. No prior experience is necessary and we'll use the familiar Arduino IDE for all lessons in this series. However, we will not be using the methods you may be familiar with to program the ATTiny, these include things like:
- pinMode()
- digitalWrite()
- digitalRead()
- analogWrite()
- analogRead()
- and delay(), we'll never, ever use delay.
The reason we won't be using these easy-to-use methods will become more apparent as you make your way through this series. Instead, we'll be accessing the control registers built-in to the ATTiny (and every other AVR) to control the behavior of the MCU and peripherals. Some of the registers we'll examine (in exhaustive detail) in future lessons of this series:
- Pin Control Registers
- Analog to Digital Converter (ADC) Control Registers
- Timer 0 (8-bit) Control Registers
- Timer 1 (8-bit) Control Registers
- Interrupt Control Registers
- MCU Control Registers
- EEPROM Control Registers
- Watch Dog Timer Control Registers
If you're really serious about a deep dive into the ATTiny85, the very first thing you should do is download the ATTiny 25/45/85 datasheet from Microchip. I will be referring to it frequently throughout this series. Once you've mastered the ATTiny85, you'll feel comfortable programming just about any AVR MCU product on the market, including the ATMega328 that's at the heart of the Arduino Uno. For example, with a few jumper wire changes, the setup we'll discuss below will program an ATTiny84 (the ATTiny85's bigger cousin) to give you access to more functionality, as well as more input/output pins.
Some things that would be extremely helpful, but not mandatory for this series:
- Oscilloscope - I'll include images of my oscilloscope for reference, but an oscilloscope in invaluable when experimenting with different PWM signals and monitoring other input and output signals.
- Multi-meter - Power will be a major discussion point. Most ATTiny projects will probably be small and be run from a coin cell battery. It's very important to conserve power when we can. A multi-meter that can measure voltage and amperage in the milli and micro range will be very useful.
- Atmel Studio 7 coupled with a programmer/debugger - I mention Atmel Studio, because that's the IDE I normally use. I'm an old-school Visual Studio developer and the environment is very familiar to me, and living without intellisense and auto-complete is not an option! The programmer/debugger I use is an AVR Dragon. It can be a finicky beast, but once you tame your Dragon, you'll wonder how you ever lived without it. Using a feature built-in to most AVRs, named "debugWire, " you can set breakpoints in the code and inspect the ATTiny's registers, variables and step through the code as it runs. There are newer products out there but you can pick up a Dragon for < $50 on Ebay.
- Understand the basic steps involved in uploading a program to a slave AVR device using the ISP protocol.
- Understand the basic concept of what the CS, MOSI, MISO and SCK signals are used for in the ISP protocol.
- Be able to download and install the prerequisite board package needed to program the ATTiny85.
- Be able to setup an Arduino Uno to act as an ISP programmer using the ArduinoISP sketch.
- Be able to write and upload a sketch to the ATTiny85 and observe the expected results.
- Understand the difference between the CPU and Peripheral devices within an AVR.
- Understand the basic principle and benefits of bitwise operators as they relate to AVR programming.
There are many ways to get your program onto an ATTiny device. I use an Tiny AVR Programmer and the AVR Dragon mostly, but we'll be using an Arduino Uno for all lessons in this series to make sure everybody reading this can follow along.
Get your Arduino Uno ReadyWe'll be programming the ATTiny using an interface called In-System Programming (ISP), also known as In-Circuit Serial Programming (ICSP). Lucky for us, the Arduino IDE has an example sketch named ArduinoISP ready to go. Plug in your Arduino Uno, and load the example sketch into your Arduino IDE:
Note: Figure 1 shows that I'm using the latest build of the Arduino IDE at the time of this writing: Version 1.8.9
Once you've loaded the ArduinoISP sketch into your Aruindo IDE, compile and upload the code as you would any other sketch. You can set the Arduino Uno aside for now while we discuss the ATTiny85 pinout and setup the breadboard.
The ATTiny85 PinoutIf you read the comments in the ArduinoISP sketch, you'll see it says to connect pins 10, 11, 12 and 13 to RESET/CS, MOSI, MISO and SCK respectively. Obviously, we're going to need to look at the pinout of the ATTiny85 to find out where these pins are located. While we're at it, let's figure out what a CS, MOSI, MISO and SCK are:
Important Note: Pin 1is located next to the small "dot" on the upper left corner of the ATTiny85. Make sure you always position the chip properly on yourbreadboard before connecting any other wires or applying power.The rest of the pins are sequentially incremented "around the horn" of the chip as illustrated in Figure 2.Most ICs follow this same pinout standard.
ISP Programming PinLocations:
- RESET is on PB5/Pin1
- MOSI is on PB0/Pin5
- MISO is on PB1/Pin 6
- SCK is on PB2/Pin 7
- You must also supply Vcc and Ground on Pin 8 and Pin 4 respectively.
ISP Programming Pin Functions:
- RESET/CS - A low level on this pin will generate a reset, even if the clock is not running. In ISP protocol talk, this is normally known as the Chip Select (CS) line since multiple chips can be daisy chained for synchronous serial communication between devices. (Output from Arduino Uno).
- MOSI - Master Out Slave In (Output from Arduino Uno)
- MISO - Master In Slave Out (Output from ATTiny85)
- SCK - Serial Clock (Output from master)
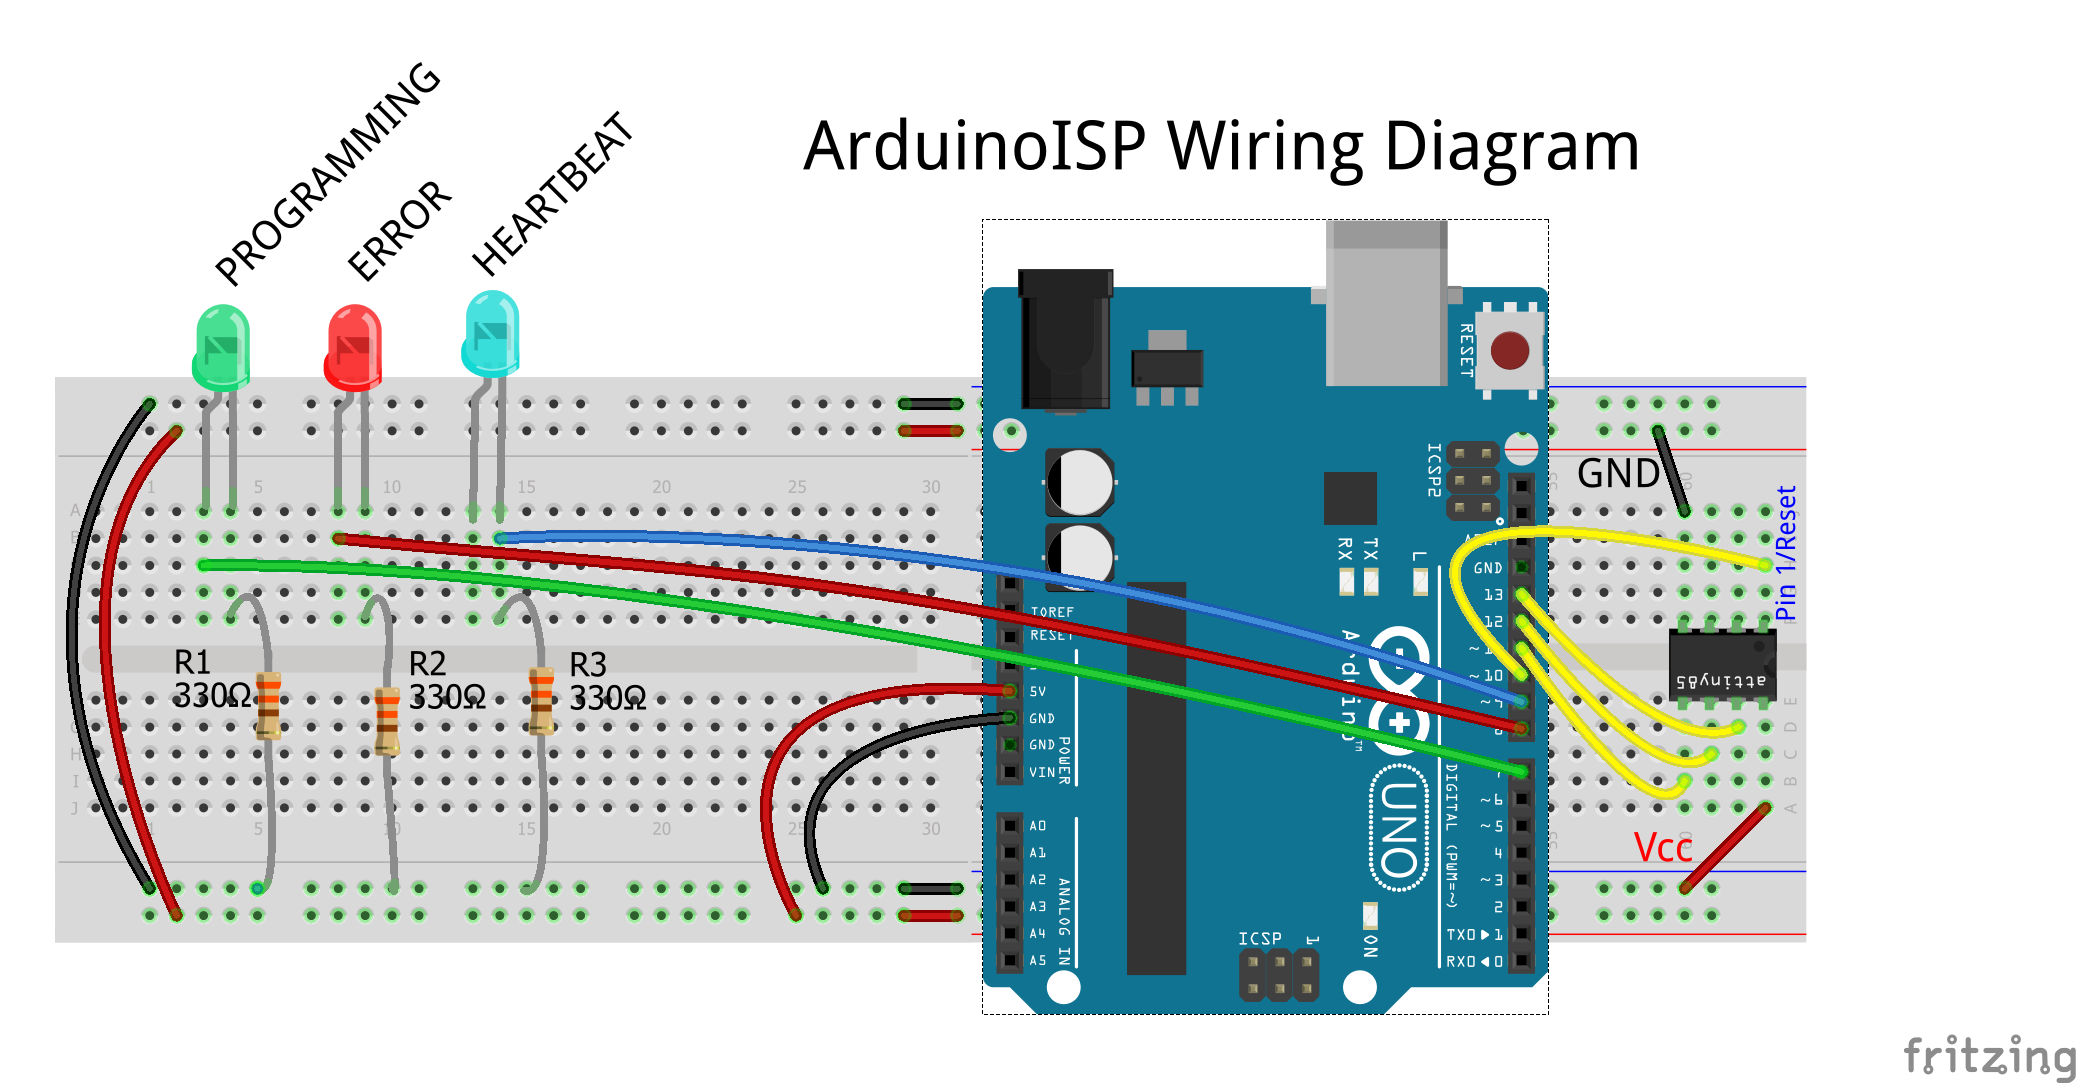
Ok, now we know what pins we're dealing with on the ATTiny85 concerning the ISP protocol. If we refer to the ArduinoISP sketch comments again, they also call for LEDs to be connected to the following pins of the Arduino Uno through a resistor. I used a 330 ohm resistor on the cathode of each LED and connected the anode of each to the following pins:
- Pin 7: Programming - communicating with the ATTiny85. I used a green LED for this pin.
- Pin 8: Error - turns on if something goes wrong during programming. I used a red LED for this pin.
- Pin 9: Heartbeat - shows the programmer is working properly (pulses up and down). I used a blue LED for this pin.
Use jumper wires to connect your breadboard as shown below:
Don't forget the Ground and Vcc to the ATTiny85 and to connect the +5v and GND pins from the Arduino Uno to your breadboard.
Note: You could supply 3.3v to the ATTiny85 for programming, but we'll be using 5v to power it for this lesson. In future lessons we'll consider the 3.3v option andpower management techniques to conserve power for battery powered projects.
Tip: I use a set of 3 male breakawaystackable (long) headers to connect to MOSI, MISO and SCK on the ATTiny to allow me to disconnect from the Arduino Uno and hook up sensors, and other things to PB0, PB1 and PB2 after programming. This keeps the pins together to avoidmistakes when plugging the jumper wires into the breadboard, while at the same time, allowingme to quickly clear the breadboard work area around the ATTiny85 for experimentation.
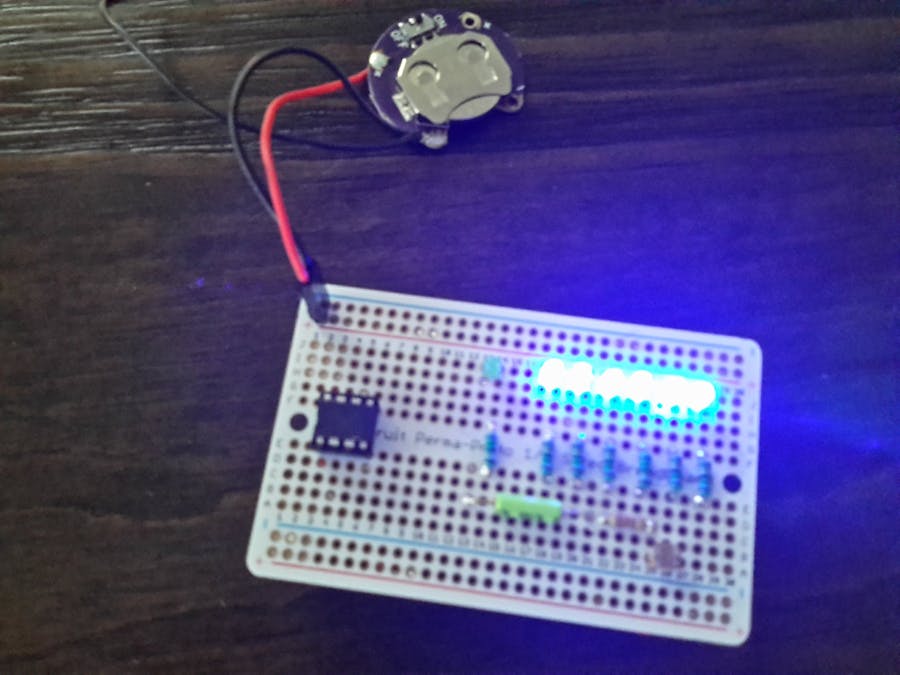
Here's a couple images of my breadboard I used for this project, note the yellow CS/RESET line is tucked under the resistors and flush with the breadboard to avoid clutter around the ATTiny85 and allow more area for experimentation. The images below illustrate how the male headers can be easily connected/disconnected from the breadboard:
Before we can program the ATTiny85 we'll need to get the support files loaded into the Arduino IDE, below is a step-by-step procedure:
Step 1: Under the File menu item, click "Preferences":
Step 2: In the Preferences window, copy and paste the following address into the "Additional Boards Manager URLs" textbox:
Step 3: Click "OK".
Step 4: Under the Tools menu, select "Board, " then "Boards Manager...":
Step 5: Scroll to the bottom of the Boards Manager window until you see the following new entry, then click "Install":
Step 6: The installation should only take a few seconds. Verify you see "INSTALLED" next to the ATTiny package, then click "Close":
Step 7: Under Tools, click "Board":
Step 8: In the list of available boards, scroll to the bottom, then click "ATtiny25/45/85":
Note: After selecting "ATtiny25/45/85" from the Boards list, the processor will default to ATtiny25. Use the following step to select the ATTiny85.
Step 9: Under Tools, click "Processor, " then "ATtiny85":
Note: The factory default systemclock speed for the ATTiny85 is set to 1MHz, we'll change it to 8MHz for this lesson in the next step.
CAUTION! : While it may be tempting to select a faster clock speed, stick to either an Internal 1MHz or 8MHz clock for now. As of this writing I have not tested the 16MHz PLL clock and would not know how to help you if you ran into problems. Also, unless you have a programmer/debugger like the AVR Dragon (or an external oscillator handy), NEVER select an External clock. Once an external clock is burned to the fuses of the ATTiny, you'll either need to install an external clock or use a programmer/debugger to "reset" the chip. You will NOT be able to program it again until of these two procedures is performed, and both are beyond the scope of this lesson.
Step 10: Under Tools, click "Clock, " then "Internal 8MHz":
Step 11: Under Tools, verify the Port is still set to your Arduino Uno port, then click "Programmer" and select "Arduino as ISP":
Note: The "ArduinoISP" and "ArdiunoISP.org" selections are NOT the same as "Arduinoas ISP." Make sure you select the correct one or this process will not work properly.
Step 12: Under Tools, verify your settings again before we perform the next step: "Burn Bootloader."
Note: This does not really burn a bootloader to the ATTiny device, it simply sets special registers called "fuses" to correspond to the settings we just made in the preceding steps. These settings are non-volatile and will remain until you explicitly change them and "Burn Bootloader" again. Make sure your Arduino Uno is plugged into the USB port of your computer and the blue "heartbeat" LED on the breadboard is pulsing up and down repeatedly.
Step 13: Under Tools, click "Burn Bootloader" to set the fuses in the ATTiny85.
If everything is set up correctly, you should see the LEDs blink a few times, then the heartbeat LED will return to it's up/down pulse. The Output window in the Arduino IDE should report: "Done burning bootloader." The fuses are now set and we're ready to upload our first program.
Note: If you'd like to see what's going on behind the scenes with the compiler and avrdude while it's burning the bootloader or uploading a sketch, turn on verbose compilation, upload and compiler warnings from the Preferences window. The output will be displayed in the window directly under the sketch in the Arduino IDE:
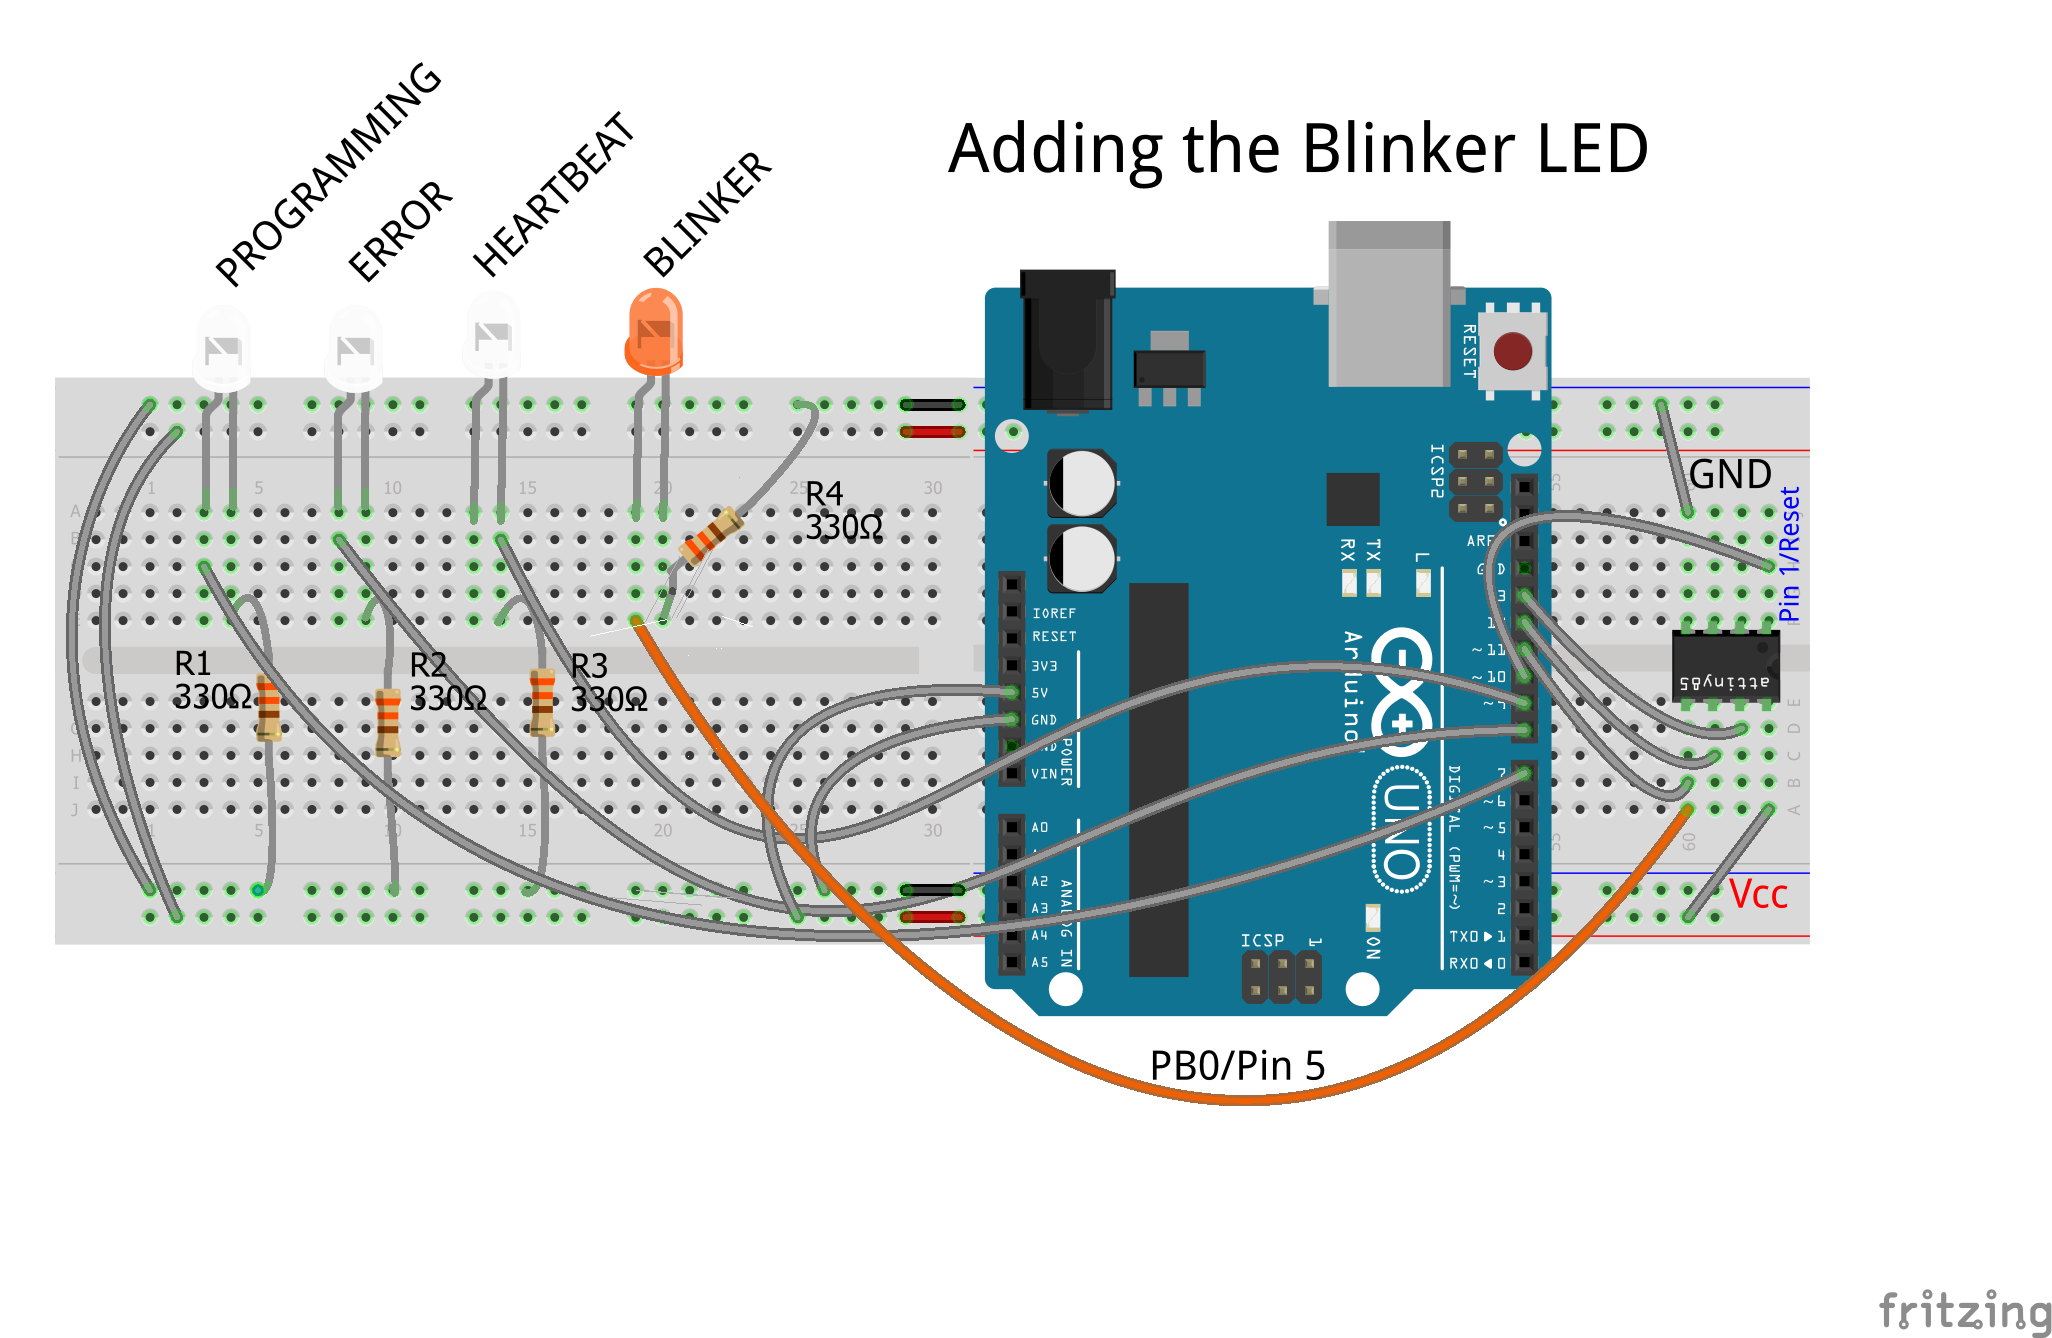
Before we compile and upload the special "Blink" sketch I've written—as a teaser for future lessons, let's add one more LED and resistor to our breadboard. Add any color LED and a 330 ohm resistor to PB0 of the ATTiny85 as illustrated below:
Make sure the bottom right of the screen displays "ATtiny25/45/85 on COMx."
Note: My Arduino is connected to COM5, your Port may be different.
Compile and UploadNeo-Blink.ino
Copy and Paste the following code into a new Arduino Sketch, then compile and upload it to the ATTiny85 like you would any other sketch:
//////////////////////////////////////////////////////////////////////
// Neo-Blink.ino
// Author:  Kevin Gagnon
// Origin: ATTiny85 - A Deep Dive Series - Lesson 1: Programming an AVR
// Purpose: Make an LED connected to PB1 blink at a specific rate
//////////////////////////////////////////////////////////////////////
void setup()
{

   //Set PB1/Pin 6 as an output
   DDRB  = B00000010;

   //Configure Timer/Counter1 Control Register 1 (TCCR1)
   TCCR1 = B10011111;

   //Set LED blink rate
   OCR1C = 100;

}

void loop()
{
 //////////////
 //Message from CPU: I'M BORED!!
 /////////////
}
The LED you connected to PB1 should start blinking immediately.
Note: Admittedly, using binary numbers (i.e. B10011111) to configurethe controlregisters is not how I program. It's too cryptic.I'll show you the method I use (that's much more humanreadable) in future lessons.
That the LED is blinking is significant, but not the main takeaway of this teaser sketch. Think about the following facts:
Benefits of the Register Manipulation TechniqueBy using Data Direction Register B (DDRB) to set PB1 to output offers these benefits:
1) It's fast. Much faster than the pinMode() method. The pinMode() method is comprised of a dozen or so lines of code, that in turn gets compiled into quite a few bytes of instructions. Most instructions take one clock cycle for the CPU. Take a look at the pinMode() method below:
void pinMode(uint8_t pin, uint8_t mode)
{
	uint8_t bit = digitalPinToBitMask(pin);
	uint8_t port = digitalPinToPort(pin);
	volatile uint8_t *reg, *out;
	if (port == NOT_A_PIN) return;
	// JWS: can I let the optimizer do this?
	reg = portModeRegister(port);
	out = portOutputRegister(port);
	if (mode == INPUT) {
		uint8_t oldSREG = SREG;
               cli();
		*reg &= ~bit;
		*out &= ~bit;
		SREG = oldSREG;
	} else if (mode == INPUT_PULLUP) {
		uint8_t oldSREG = SREG;
               cli();
		*reg &= ~bit;
		*out |= bit;
		SREG = oldSREG;
	} else {
		uint8_t oldSREG = SREG;
               cli();
		*reg |= bit;
		SREG = oldSREG;
	}
}
Shameless Teaser: This method is fast because we're not *really* changing hardware registers when we set the value of DDRB, were setting memory address 0x37 in Random Access Memory (RAM), as we'll see and discuss in detail in Lesson 2 :)
2) Our programs will use fewer bytes in flash memory. Even considering that the ATTiny85 is the "beefy" ATTiny compared to its siblings (the 25 and 45), it still only has 8192 bytes of flash memory available for your sketches.
For example, when you compile the above sketch, the Arduino reports the sketch uses 292 bytes (3%) of program storage space. On the other hand, if you compile the Arduino Blink sketch for the ATTiny85, it uses 684 bytes (8%) of program storage space. That's quite a difference. Not to mention the above sketch doesn't use the delay() method that would block all other processing until the delay ends.
3) Last but not least, and the pièce de résistance main takeaway of this whole exercise encapsulates one of the main objectives of this series:
What is the CPU doing?Think about that. If you examine the loop() method of the Neo-Blink.ino sketch you can see the answer is: not much. When we configure the TCCR1 register in the second line of the code we set up an independent clock speed for the timer. It doesn't need anything else from the CPU. Think of it as a "set it and forget it" peripheral. And to top it all off, Timer/Counter 0 and the Analog to Digital Converter (ADC) have the same feature and independence.
Imagine what else the CPU could be doing if we used the peripherals available in the ATTiny series of AVRs efficiently. This is just a very simple example of much more to come. Stay Tuned!
Suggested Reading and Going FurtherIf this lesson intrigues you and you want to go further, here's what I recommend you do before Lesson 2, where I will cover bitwise operators in more detail and demonstrate those operators using the Pin Control Registers:
- Download and get familiar with the ATTiny25/45/85 datasheet.
- If your not familiar or comfortable with bitwise operators, study them. There's a wealth of knowledge about the subject online.
- And don't forget to have fun!
OnBitwise Syntax: I use the following syntax when setting a bit to a '1' but you can use whatever method you're comfortable with, this method has worked well for me and my brain seems to comprehend it easily:
DDRB |= (1 << PB0); //Set PB0 to Output
and to set a bit to a '0, ' I use this syntax:
DDRB &= ~(1 << PB0); //Set PB0 to Input
I will often set every bit of a register when initializing them for the first time to ensure I'm not chasing some logic error around due to a simple mistake, like when I set up the multiplexer for the ADC this is the method I use:
   ADMUX =
            (1 << ADLAR)	|   // left shift result (8-bit resolution)
            (0 << REFS2)	|   // Sets ref. voltage to Vcc, bit 2
	    (0 << REFS1)	|   // Sets ref. voltage to Vcc, bit 1
	    (0 << REFS0)	|   // Sets ref. voltage to Vcc, bit 0
	    (0 << MUX3)		|   // use ADC1 for input (PB2), MUX bit 3
	    (0 << MUX2)		|   // use ADC1 for input (PB2), MUX bit 2
	    (0 << MUX1)		|   // use ADC1 for input (PB2), MUX bit 1
	    (1 << MUX0);	    // use ADC1 for input (PB2), MUX bit 0
All 8 bits are front and center and can be inspected for easy debugging.
Know your "ands" and "ors." Always pay attention to your operators. Be careful when you're only using the assignment operator "=" like the above code snippet since most control registers depend on the value of the bit, rather than the register value as a whole.
Links to other ATTiny CoresThere are other ATTiny cores available, but since I don't really plan to use the methods they make available, (e.g. delay(), digitalWrite(), analogWrite(), etc.) this one works great for my purposes. If you want to take a look at the others available, here are some I've seen around:
Spence Konde has a very well documented version that can handle many other AVRs, and has more functionality. There's also a custom SoftwareSerial.h library I may want to look at in the future for debugging the ATTiny.
I found one on Google that I haven't had a chance to look into as well.
If you have any questions, comments or suggestions for other topics drop me a line on here, or check me out on Twitter and I'll get back to you as soon as I can. See you next time.
Regards,
Kevin


Comments