

Hardware components | ||||||
| × | 1 | ||||
| × | 1 | ||||
| × | 4 | ||||
| × | 1 | ||||
| × | 1 | ||||
| × | 1 | ||||
Hand tools and fabrication machines | ||||||
 |
| |||||
| ||||||
| ||||||
| ||||||
 |
| |||||
When flying any aerial vehicle make sure to check local regulations before flying. Always check battery levels, frame stability, and the strength of any connections before flying to prevent catastrophic failure. Most areas now require a permit or written consent of landowners to fly in an area and have height requirements. For US users check http://knowbeforeyoufly.org for information.
This guide involves using power tools and soldering to ~15v Lithium Polymer bateries. Excercize caution when dealing with and high voltage sources and tools. Also, make sure to follow directions carefully as mistakes can lead to injury or damage to equipment. Make sure to never service a drone with the propellers on. They can cause serious injury.
To be clear: this is an entire quad MINUS the flight controller. I did not want to suggest only one controller because there are many options and all of them can be set up to work with this quad.
ThanksFirst of I would like to thank the people at Hackster who as always did a wonderful job coordinating and running the contest (FlexIO) which this was originally designed for. It has been a great learning experience and has been the opportunity I needed to build and fly my first drone.
I also would like to thank the people at the Chicago Public Library Harold Washington Branch Maker Lab for the help they offered through the process of getting the frame cut. Without their help and the open access to their machines this would not have been possible.
Specs for Final Quad:These are in case you want to know the specifics or source your own electronics.
Frame Weight: ~700g + electronics (Will vary based on the type of wood used)
Reccommended Total Weight: ~1.7kg
Max Total Thrust: 3856g@14.8v (964g per motor)
ESCs: 20A 4S
Props: 9545 (a.k.a 9.5" x 4.5")
Motors: 960kv
Batteries: 4000mAh, 14.8v (4S), 35C - I was originally going to run a parallel setup to extend flight time, but decided against it because I don't have the correct charging equipment. However, if you are able to do so, the weight will still be within the safe are and the drone should last much longer. When I get the right materials to create a parallel setup I will create and link a guide.
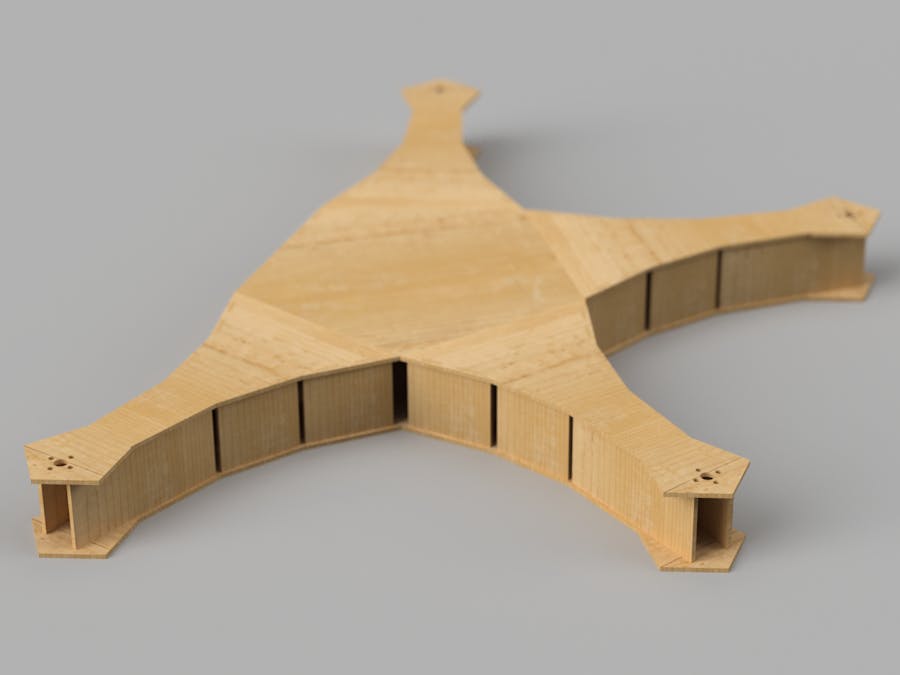
Building the FrameThe entire frame is laser cut. You can use any material you like. I used 1/8 plywood. According to the staff at the maker lab plywood found at a store like Home Depot or Lowes will not work because it has flammable coatings. Make sure to get wood dedicated for laser cutting or crafts.
If using the attached DXF files please note that each line is a double path. This means the laser will go over everything twice. There are two ways to deal with this. Either half the power or double the speed you would normally use for your material or in Inkscape import the file, select all, perform Object> Ungroup and then manually delete the top set of lines/curves. I suggest you go with halving the power as the time between passes will allow heat to dissipate and reduces char on the wood (and risk of fire).
If you use a different material thickness you will need to make changes to the model. In Fusion 360 under the Modify menu select Change Parameters (the last option) and change "material thickness" to the correct value. You can also change other values, but I do not suggest this as I have not tested if the work correctly and they many result in issues.
If you are using different motors contact me or wait for me to finish a guide and adjusting motors mount sizes.
If you are using the same configuration as I am just download the DXF files.
You will need to cut:
- 8x Panel A
- 8x Panel B
- 8x Panel C
- 2x Center
- 1x Side
- 8x Arm Top -or- 4x Arm Top & 4x Arm Bottom
The reason for using 8 tops would be to allow the future addition of a second set of motors and props to create an octa copter with the same frame.
Assembling the arms is straight forwards. Start with the bottom (which can be a top piece) of the arm on the ground. Then insert all the sides. They are cut so that they will only fit in the right place. If they are too tight of a fit, sand the tabs down a little. This can happen if the wood swells slightly from humidity. After inserting all the sides, put the top on. I have found it is easiest in assemble starting at the small end and work down the arm, one pair of tabs at a time.
ElectronicsThe electronics are especially simple for this quad because it is build using a power system, so there is no need to spend time specing motors, props and escs that work together.
Props
Before attaching the self-tighnteing props the caps must be installed on them. counter/anti clockwise (CCW) caps are marked with arrows. CW are left unmarked. Props are also marked with their spin direction. The caps are easy to insert and just need to be pushed into the top of the prop. Due to the relatively low quality (~$2 a piece) of the props this may require a mallet or a little sanding. It is good for them to be a tight fit. Now is a good time to balance them, which is very necessary due to the quality.
Attach Props
Props are very easy to attach and can be simply screwed onto the motors.
ESCs
Before the ESCs can be used with the power distribution board they need Deans T-Plug connectors. They are very easy to solder, but due to their size should be held in place so that they do not slip. Make sure to heatshrink your connections. A short at high voltage is very dangerous.
Positioning the Electronics
Put the power distribution board in the center of the frame and pull one ESC into each arm.
Mounting and Connecting
Screw each motor onto the mount on the top of a different arm. Make sure the wires are pointing towards the center. Bring them through the hole and connect them to the ESC nearby.
Connections
The last step is to connect the arms to the frame. This can be done by gluing or cutting wooden rectangles and screwing or nailing them to both the arm and the center.
When you are done and satisfied with the fit use a strong glue (if in a pinch hot glue will also due) to secure the joints. This is done by removing a few tabs at a time, covering them with glue and re-inserting them. Wait for the glue to dry and repeat. If at any point you are unable to lift the top to expose the tabs to glue them the joints are good enough. Move over to the other end and repeat. I left the tops un-glued so that I could access the inside for maintenance more easily. If they fit well without glue this is the preferable option.
You can also paint it at this time. This is optional and can be done later. If you choose to remove or cover your motors as to not risk getting paint inside them.
Hook up your flight controller and you're good to go.
Comments