


Hardware components | ||||||
| × | 1 | ||||
| × | 1 | ||||
| × | 1 | ||||
| × | 2 | ||||
| × | 1 | ||||
| × | 1 | ||||
Software apps and online services | ||||||
 |
| |||||
 |
| |||||
| ||||||
Hand tools and fabrication machines | ||||||
 |
| |||||
 |
| |||||
 |
| |||||
 |
| |||||
 |
| |||||
 |
| |||||
If you're passionate about WiFi security, ethical hacking, or ESP32-based gadgets, then this project will be one of the coolest devices you’ll ever build.Today, we’re making a DIY ESP32 Marauder — a portable WiFi testing tool inspired by the open-source Marauder project.A Powerful Handheld Gadget for Network Analysis, Packet Monitoring & Educational Cybersecurity Experiments 🔐📡
Here is everything you will need to build your Marauder:
- Custom PCB (you will add your Gerber link)
- ESP32 Board
- NEO-6M GPS Module
- 2.4-inch SPI TFT Display (240×320)
- Micro SD card + SD card adapter
- TP4056 Type-C charging module
- SMA connector (to mount on PCB)
- WiFi Antenna
- On/Off switch
- Dual 18650 batteries
- Battery springs (2 for + side, 2 for – side)
- Female header pins
- Jumper wir
Everything together makes a compact, rugged, powerful WiFi-tool that fits in your hand 🔥📱
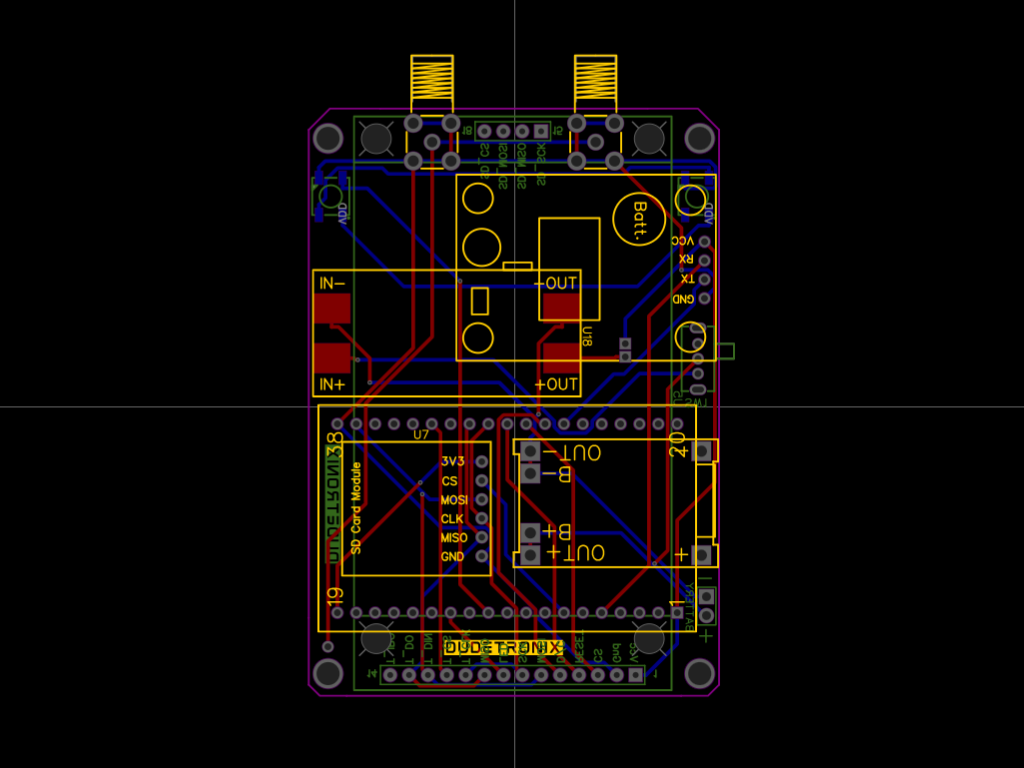
🛠️ STEP 1 — Design The PCBOrder your PCB easily from JLCPCB by visitinghttps://jlcpcb.com/?from=Electropcb
Just upload your Gerber files, select the PCB specifications you need, and get instant pricing. JLCPCB offers fast manufacturing, multiple PCB options, and direct delivery, making it a reliable choice for both prototypes and custom electronics projects.
Start with your custom PCB.This PCB has footprints for all components, making the final build clean and professional.
- Take the PCB and solder all female headers exactly as per their footprint.
- Insert and solder the SMA antenna connector on the PCB’s RF output pad.
- Double-check your solder joints to ensure no short circuits.
Your PCB is now ready to accept modules like LEGO blocks!
Now attach the core modules:
🔹 TP4056 USB Type-C Charging Board & MT3608 Boost Converter
Place it onto its designated footprint.Solder carefully—this will be your main charging port.
🔹 ESP32
Insert the ESP32 module into the female headers.Ensure correct orientation as per the PCB silkscreen.
🔹 NEO-6M GPS
Insert the GPS module into its header pads.This helps in capturing time/location data for testing modes.
Your PCB is slowly coming to life.
STEP 3 — Now I have Designed a case for itYou can 3D print these parts using your own 3D printer. If you do not have a printer, Justway offers advanced professional 3D printing services supporting a wide range of technologies, including FDM, SLA, SLS, DLP, MJF, and SLM, enabling high-quality production for both plastic and metal parts.
Looking for the STL files?Drop me a quick DM and I’ll send you the download link right away! or click here
Justway offers precision metal 3D printing services for tool steel, delivering durable, high-performance components designed for demanding tooling and industrial applications. Tool steel is especially valued for its exceptional hardness, resistance to wear and deformation, and its ability to maintain a sharp cutting edge even at elevated operating temperatures. These properties make it ideal for manufacturing tools, molds, dies, and high-stress mechanical parts.
Material Overview: Tool SteelTool steel encompasses a range of carbon and alloy steels engineered specifically for tooling applications. These materials are formulated to provide outstanding abrasion resistance, high compressive strength, and excellent thermal stability. Tool steel components produced through metal 3D printing offer superior dimensional accuracy and complex internal geometries that are difficult or impossible to achieve with traditional manufacturing methods. As a result, 3D printed tool steel parts are well-suited for applications requiring durability, precision, and long service life under extreme mechanical and thermal loads.
Order 3D Printed Tool Steel Parts
Justway enables rapid production of custom tool steel parts with high structural integrity and consistent quality, supporting both prototyping and full-scale manufacturing needs.
STEP 4 — Build the Dual Battery System (Springs + Wiring)- Your 3D printed case includes battery slots on both sides.
- Add a spring for + terminal and another for – terminal on each side.
Do this for both battery sides → total 4 springs.
- Use small wires to solder:
- Left side (+) spring → PCB battery input
- Right side (–) spring → ground
Make sure springs sit firmly and make good contact.
Your Marauder now supports dual 18650 batteries for long runtime 🔥🔋🔋
STEP 5 — Mount the PCB Inside the 3D Printed BaseTime to bring everything into the enclosure.
- Take the fully assembled PCB.
- Place it into the 3D printed base.
- Align the SMA connector with the two holes provided.
- Make sure the PCB sits properly on the 4 mounting pillars inside the case.
- Tighten with small screws if required
🛠️ STEP 6 — Attach the 2.4-inch TFT Display 📺✨
Your TFT display will plug directly into the female headers on the PCB.
- Take the 2.4-inch 240×320 TFT
- Align its pins with the header
- Press gently until fully seated
- Ensure no pins are bending
This display will show menus, logs, scan lists, GPS data, and more.
Now take the 3D printed top cover.
- Align it over the PCB and display
- Make sure the button holes, connector holes, and screen window align perfectly
- Screw or snap it into place depending on your design
Your Marauder now starts to look like a real handheld gadget 😍📱
The TFT display module includes an SD card slot.
- Insert the full-size SD card
- Inside it, add a microSD card in an adapter (if required)
- Make sure it clicks securely
This SD card stores logs, captured packets, GPS data, and configuration files.
STEP 9 — Attach the WiFi Antenna 📡
Now screw the antenna onto the SMA connector.
This gives the Marauder a strong signal range for scanning, logging, and testing WiFi networks.
- Slide the 18650 batteries into both sides
- Check polarity (+ and –)
- Insert the battery cover (3D printed)
Your Marauder is now fully powered and portable 🚀
Download the firmware, open the flasher tool, select the correct COM port, load the BIN file, and press ‘Flash’.I have included the complete flashing guide and all firmware files in the download link below.
You will also add:
🔗 Firmware + flashing tool link - https://github.com/justcallmekoko/ESP32Marauder🔗 GitHub link of the developer (for reference and credits) - https://github.com/justcallmekoko/ESP32Marauder
🔗 Google Drive Link – https://drive.google.com/drive/folders/1691f_X7h0wl0IzIa1LQ3MHt7VZ-o7xsw?usp=sharing
⚠️ Important Note (Educational Use Only!)
This device is ONLY for:
- WiFi security education
- Ethical hacking
- Network testing
- Research
- Learning cybersecurity principles
🎉 Conclusion – Your Custom ESP32 Marauder is Ready! 🚀📡
You have successfully built a fully functional DIY ESP32 Marauder WiFi Testing Tool.With GPS, SD logging, TFT display, dual batteries, Type-C charging, and a strong SMA antenna—this is one of the most advanced DIY handheld gadgets you can build.
Perfect for:
- Cybersecurity students
- Network testers
- Ethical hackers
- IoT developers
- Tech hobbyists
Add your images, 3D files, and firmware links — and your article is fully ready for publishing! 📝✨


_t9PF3orMPd.png?auto=compress%2Cformat&w=40&h=40&fit=fillmax&bg=fff&dpr=2)


Comments