


Hardware components | ||||||
 |
| × | 1 | |||
Software apps and online services | ||||||
 |
| |||||
| ||||||
Hand tools and fabrication machines | ||||||
 |
| |||||
Ever wanted to build your own remote-controlled boat with a sleek design, long-range wireless control, and smart electronics? In this project, we’ll build a fully 3D-printed RC boat powered by a 1000KV BLDC motor, steered by a SG90 servo, and controlled via an ESP8266 and NRF24L01 combo.
This DIY aquatic project is ideal for hobbyists, students, and anyone looking to dive into wireless robotics, 3D printing, and waterproof design.
🧠 Project Highlights- 🌊 Fully 3D-printed modular hull and components
- ⚙️ 1000KV BLDC motor for high-speed propulsion
- 📶 Long-range wireless control using NRF24L01
- 🧭 Servo-powered rudder for accurate steering
- 💧 TPU sealing for water resistance
- 🔌 Smart receiver using ESP8266 microcontroller
Start by printing all the essential components of the boat using PLA or PETG (for rigidity), and TPU (for sealing).
🧩 Required 3D Printed Parts:- 🛶 Main Boat Body (housing for motor + electronics)
- 🧢 Upper Cover (screws onto the body)
- 🧭 Steering Mechanism (rudder + holder)
- 🔁 Propeller Housing
- 🧽 TPU Waterproof Gasket (sandwiched between body and lid)
- Layer Height: 0.2 mm
- Infill: 20%
- Supports: Enabled
- Wall Thickness: 1.2 mm
Now let’s bring power to the water! We’ll install the 1000KV BLDC motor and build a custom shaft system to drive the propeller.
🧰 Hardware Needed:- 🌀 1000KV BLDC Motor
- 🔗 13 cm Custom Shaft (e.g., cycle spoke inside antenna tube)
- 🟡 Brass Coupler (from old DC motor)
- M3 × 5mm Screws (×2)
- Mini Screwdriver / Allen Key
Mount the Motor: Align the BLDC motor in its slot and secure it with M3 screws.
Build the Shaft Assembly: Insert a cycle spoke rod inside a hollow antenna tube to form the shaft.
Connect Motor & Propeller: Use a brass coupler to transfer rotation from motor to shaft.
Seal & Align: Add sponge or O-ring at the shaft exit to reduce leaks and vibration.
💡 Align everything precisely to minimize drag and avoid damage during high-speed runs.
Time to give your boat direction! We'll use a SG90 micro servo to control a rudder mounted at the rear.
🧰 You’ll Need:- SG90 Micro Servo
- 3D-Printed Rudder & Mount
- Metal Link Rod
- Servo Horn
- M2 Screws (×2)
- Mount the rudder at the back using M2 screws.
- Connect the servo horn to the rudder via the link rod.
- Place the servo inside the boat body, near the rudder hole.
- Test left-right movement by powering the servo and adjusting the rod as needed.
💡 Use a servo tester or Arduino to calibrate center position before locking everything in place.
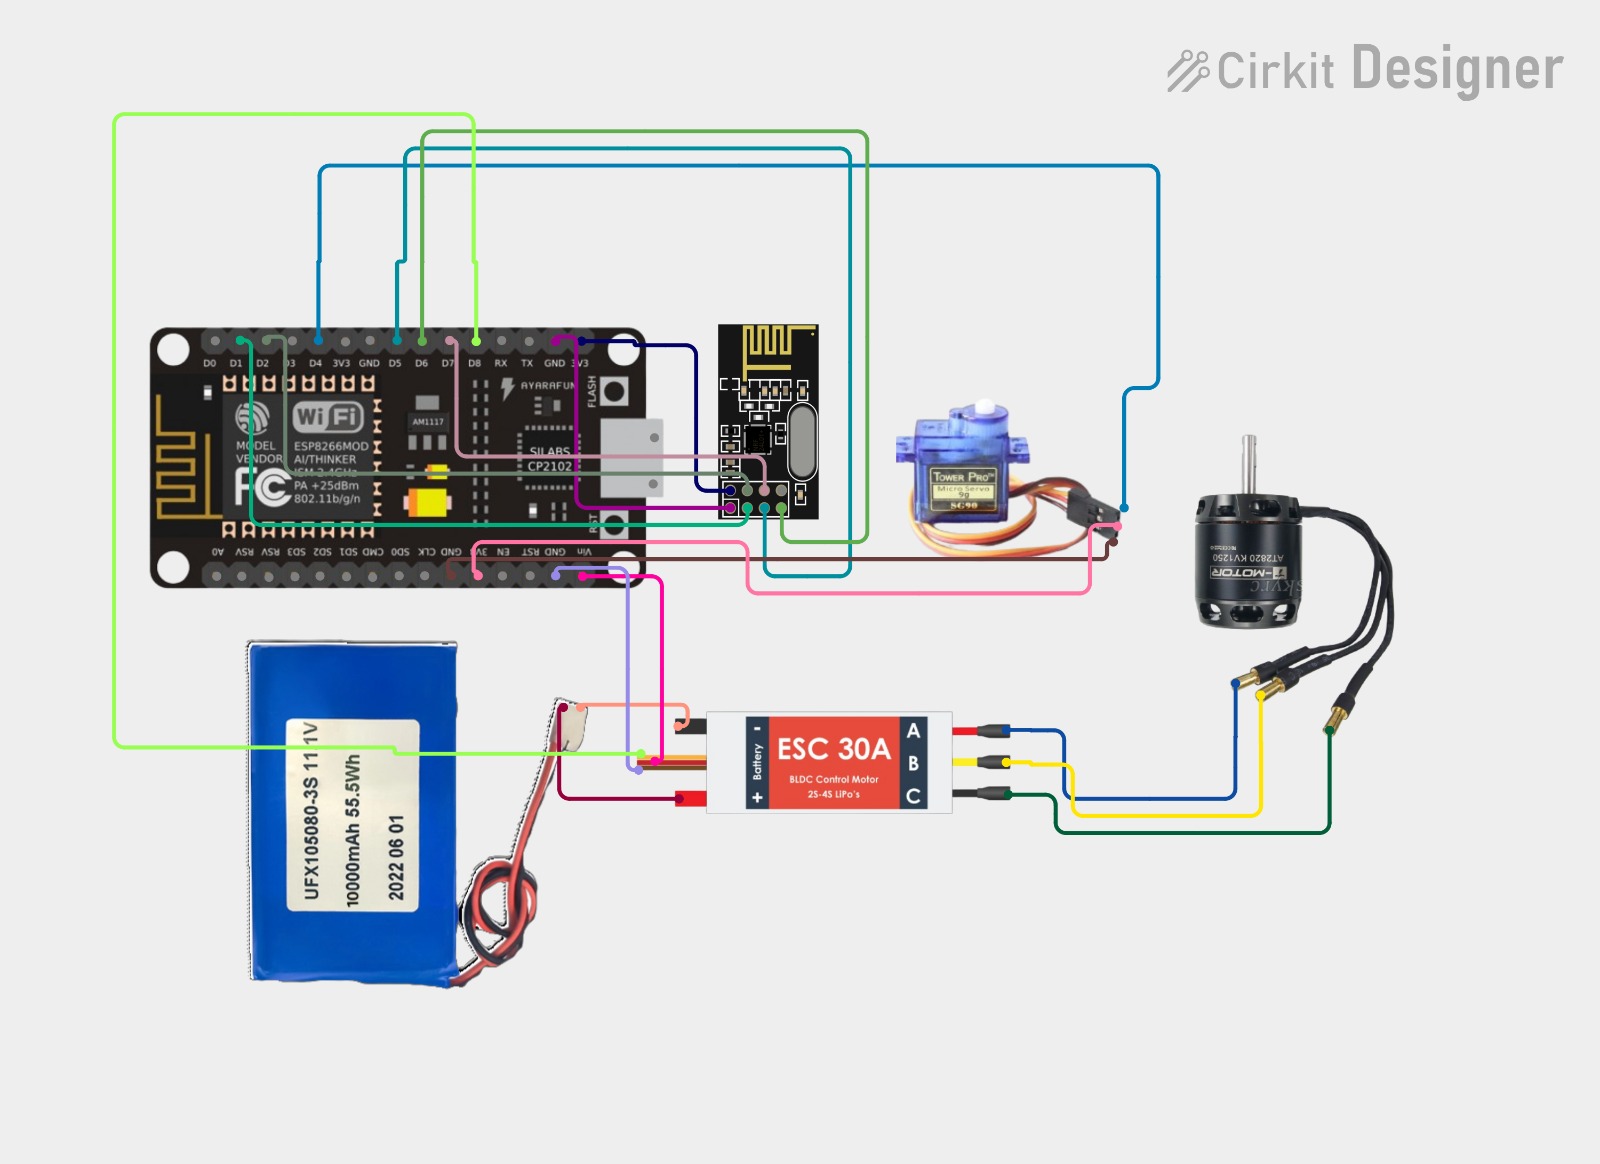
🔌 Step 4: Wiring the ElectronicsNow let’s connect the electronics and get the system running!
🧰 Electronics Required:- ⚡ 30A–40A ESC
- 🔋 11.1V (3S) LiPo Battery
- 📡 ESP8266 (NodeMCU or Wemos D1 Mini)
- 📶 NRF24L01 (+ 10μF capacitor)
- 🧭 SG90 Servo
- 🔌 Wires, Connectors, Switch
- ESC to BLDC Motor: Connect 3 motor wires. Swap any two if the direction is reversed.
- ESC to Battery: Use XT60 or JST connector. Add a power switch.
- ESP8266 to NRF24L01: Wire the NRF via SPI and add a capacitor across VCC & GND.
- Servo to ESP8266: Connect servo signal to D4 (GPIO2). Power it from external 5V, not the 3.3V pin.
- Power Management: Use a buck converter to safely power the ESP8266 from your 3S LiPo.
💡 Secure all components using hot glue or foam tape to avoid vibrations and water exposure.
🧠 Step 5: Program the ESP8266 ReceiverWith hardware ready, it’s time to flash your ESP8266 with the receiver firmware.
🔧 Tools & Libraries:Arduino IDE
Install: RF24, Servo.h, ESP8266WiFi.h (for OTA/debugging)
📜 How It Works:- The NRF24L01 receives movement commands from your transmitter.
- The ESC is controlled via PWM (D1/GPIO5) for motor speed.
- The servo is driven on D4 (GPIO2) for steering.
- Use Serial Monitor to debug signals in real time.
📄 Code Snippet: 👉 Receiver Code Gist
💡 Want the transmitter code and circuit too? DM me — I’ll send the full setup privately!
🛡️ Step 6: Final Assembly & WaterproofingLet’s protect your electronics before heading to water!
🧰 Required:- 🧽 TPU Gasket
- 🧢 3D-Printed Cover
- 🔩 6 × M3 Bolts & Nuts
- 🧼 Optional: Foam Tape / Silicone Sealant
If you're planning to build a similar tank or want STL files, code, or circuit diagram, just drop me a message! 💬
✅ DM me or email — I'm always ready to help fellow makers. Or you guys can order it from “JUSTWAY”.
🤝 Sponsored by JUSTWAY – Build More, Save More!This DIY tank project is proudly brought to you in partnership with JUSTWAY, your reliable source for custom 3D printing and CNC machining services.🛠️ Whether you're prototyping parts like the Boat, propeller or custom enclosures — JUSTWAY makes it easy with fast turnaround and high-quality prints.And right now, during their Summer Cashback Event, you can get 15% cashback on your orders placed between June 1 and August 31, 2025!👉 After your order is completed, simply email marketing03@justway.com with your order number and account info to claim your cashback.Perfect time to stock up on parts for your next robotics or maker project!🎁 Bonus: 👉 Get 15% Off Here
🛠️ Waterproofing Steps:- Place the TPU gasket around the top edge of the boat body.
- Carefully align and place the upper cove
- Tighten bolts evenly to compress the gasket.
- Add foam or silicone near cable exits for extra safety.
💡 You can also apply waterproof spray for added protection.
🎉 Ready to Set Sail!Drop your boat into a calm pond or pool and enjoy the result of your hard work — a fully functional, high-speed, 3D-printed RC boat powered by smart wireless control. 🌊 Whether you're into RC, 3D printing, or electronics, this project brings them all together in one exciting aquatic adventure!


_t9PF3orMPd.png?auto=compress%2Cformat&w=40&h=40&fit=fillmax&bg=fff&dpr=2)


_3u05Tpwasz.png?auto=compress%2Cformat&w=40&h=40&fit=fillmax&bg=fff&dpr=2)


Comments