


Hardware components | ||||||
 |
| × | 1 | |||
| × | 1 | ||||
| × | 1 | ||||
 |
| × | 1 | |||
| × | 1 | ||||
| × | 1 | ||||
Software apps and online services | ||||||
 |
| |||||
Hand tools and fabrication machines | ||||||
| ||||||
Adapted for Hackster - originally authored and published on my personal project.
What This Project DoesThis is a DIY handheld Arduino game consolepowered by an Arduino UNO R4 WiFi. It runs 10 retro-style arcade games on a 0.96" SSD1306 OLED display (128×64 px), controlled by four tactile push buttons. A LiPo battery with a 5V boost converter makes it fully portable. All components are mounted on a custom HAT-style perfboard that sits directly on the Arduino, no loose wires, no breadboard.
Games included: Asteroids, Breakout, Dino, Flappy Bird, Maze Runner, Pacman, Pong, Snake, Space Invaders, Tetris.
These are not original commercial games; they are lightweight replicas recreated and optimised to fit within the memory and speed limits of the Arduino platform.
- Arduino UNO R4 WiFi - 1x
- Double-sided perfboard - 1x (for the HAT)
- 0.96" I2C OLED Display (SSD1306, 128×64) - 1x
- Tactile push buttons - 4x
- Active buzzer - 1x
- 1S LiPo battery (3.7V) - 1x
- 5V boost converter module - 1x
- Slide switch - 1x
- Connecting wires - as required
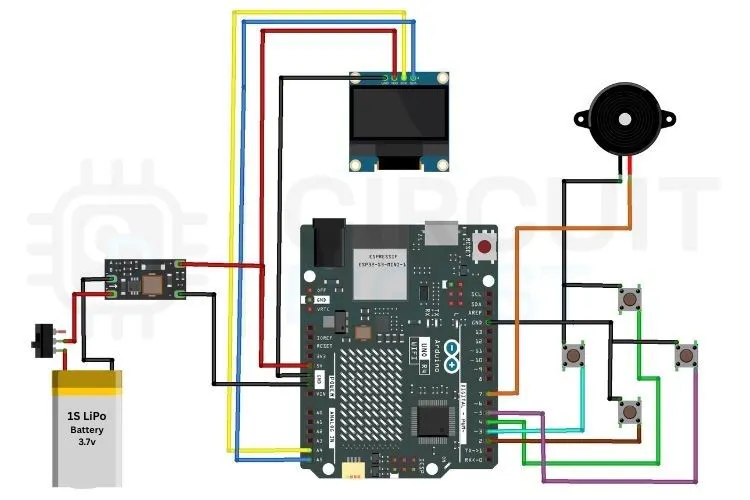
All components connect to the Arduino R4 WiFi as follows:
OLED Display (I2C)
- VCC → 5V
- GND → GND
- SDA → A4
- SCL → A5
Buttons (active LOW, other side to GND)
- UP → D4
- DOWN → D2
- LEFT → D3
- RIGHT → D5
Buzzer
- (+) → D7
- (−) → GND
Power
- 5V Boost Converter OUT → Arduino 5V pin
- LiPo battery → Slide switch → Boost converter IN
All components are soldered onto a double-sided perfboard cut to fit the Arduino R4 WiFi header footprint, essentially a custom HAT. The OLED, buttons, and buzzer are placed on the top side; power components (boost converter, battery connector, slide switch) run along the bottom edge.
Assembly tips that saved me headaches:
- Use female header strips on the HAT so you can remove it for reprogramming without desoldering
- Route I2C wires (SDA/SCL) away from button signal lines to avoid display noise
- Verify the boost converter output is exactly 5V with a multimeter before connecting to the Arduino
- Use heat-shrink tubing on all LiPo leads to prevent shorts
- Keep wires as short as possible; it matters more than you think for a compact build
The firmware is fully modular. Each game lives in its own header file. The main. ino just handles library setup, button reading, the menu, and game dispatch. This makes it easy to add or remove games without touching core logic.
If you're fairly new to Arduino and want to get comfortable with the basics before diving into a build like this, browsing through a solid collection of Arduino projects is a good way to understand how different peripherals, such as displays, buttons, and buzzers, are typically handled before you combine them all into one system.
Libraries Used
 #include <Arduino.h>
 #include <U8g2lib.h>
#include <Wire.h>- Arduino.h - core functions (pinMode, digitalRead, millis, tone)
- U8g2lib.h - OLED graphics with full-frame buffering and font support
- Wire.h - I2C communication for the display
Why U8g2 instead of Adafruit GFX? During development, Adafruit GFX had initialisation issues with the UNO R4. U8g2 worked reliably out of the box and offers better rendering performance.
Pin Definitions#define SCREEN_W 128
#define SCREEN_H 64
#defineBTN_UP 4
#define BTN_DOWN 2
#define BTN_LEFT 3
#define BTN_RIGHT 5
#define BUZZER_PIN 7#include "Asteroids.h"
#include "Breakout.h"
#include "Dino.h"
#include "FlappyBird.h"
#include "MazeRunner.h"
#include "Pacman.h"
#include "Pong.h"
#include "Snake.h"
#include "SpaceInvaders.h"
#include "Tetris.h"Mechanical buttons bounce; they rapidly flicker between HIGH and LOW for a few milliseconds when pressed. Without debouncing, a single press can register as 5+ inputs, wrecking gameplay. This function handles it in software:
bool btnPressed(uint8_t pin) {
static uint32_t lastTime[4] = {0, 0, 0, 0};
static bool lastSt[4] = {true, true, true, true};
uint8_t idx;
if (pin == BTN_UP) idx = 0;
else if (pin == BTN_DOWN) idx = 1;
else if (pin == BTN_LEFT) idx = 2;
else if (pin == BTN_RIGHT) idx = 3;
else return false;
bool cur = (digitalRead(pin) == LOW);
bool edge = cur && !lastSt[idx] && (millis() - lastTime[idx] > 40);
if (cur != lastSt[idx]) lastTime[idx] = millis();
lastSt[idx] = cur;
return edge;
}
Each button gets its own static state and timestamp. A press is only registered as valid if 40ms have passed since the last state change — clean edge detection, no false triggers.
Setup Functionvoid setup() {
pinMode(BTN_UP, INPUT_PULLUP);
pinMode(BTN_DOWN, INPUT_PULLUP);
pinMode(BTN_LEFT, INPUT_PULLUP);
pinMode(BTN_RIGHT, INPUT_PULLUP);
pinMode(BUZZER_PIN, OUTPUT);
randomSeed(analogRead(A0));
u8g2.begin();
u8g2.setContrast(200);
u8g2.setFont(u8g2_font_6x10_tr);
u8g2.setDrawColor(1);
u8g2.setBitmapMode(0);
showSplash();
}Buttons use INPUT_PULLUP for stable readings. randomSeed(analogRead(A0)) seeds the RNG from floating analog noise- so game behaviour like asteroid spawning is genuinely random each power-on.
Main Loopvoid loop() {
int sel = menuSelect();
switch (sel) {
case 0: game_asteroids(); break;
case 1: game_breakout(); break;
case 2: game_dino(); break;
case 3: game_flappy(); break;
case 4: game_maze(); break;
case 5: game_pacman(); break;
case 6: game_pong(); break;
case 7: game_snake(); break;
case 8: game_spaceinvaders(); break;
case 9: game_tetris(); break;
}
}menuSelect() displays the scrollable game list. UP/DOWN navigates, LEFT/RIGHT confirms. After a game ends, control returns here automatically — no reset needed.
How It Works (User Flow)1. Power on → splash screen appears → press any button to continue
2. Game list menu loads, scroll with UP/DOWN
3. Press LEFT or RIGHT to launch a game
4. Game ends → automatically returns to the menu
Library incompatibility: Adafruit GFX didn't initialize properly on the Arduino UNO R4. Switched to U8g2, which worked immediately and gave better rendering control.
Button bouncing: Early builds had menus skipping items randomly. Solved by implementing the edge-detection debounce function described above with a 40ms threshold.
What's Next
- High score saving (EEPROM or SD card)
- Adjustable difficulty levels per game
- Wireless multiplayer using the built-in WiFi on the R4
- Larger display support for higher-resolution gameplay
- Power optimisation for extended battery life


Comments