


Unlike Wi-Fi-only solutions, this tracker works anywhere there’s cellular coverage. In this ESP32 project, the NEO-6M fetches your coordinates from GPS satellites, and the SIM800L transmits that data over the mobile network via GPRS. The result is a compact, low-cost, and fully connected GPS tracker that doesn’t rely on Wi-Fi or fancy servers.
Let’s get building!
How the ESP32 GPS Tracker WorksAt its core, this project is about combining three capabilities:
- ESP32 → The brain of the system; handles data processing and communication.
- NEO-6M GPS Module → Fetches latitude and longitude from satellites.
- SIM800L GSM Module → Sends that data to the cloud over 2G using GPRS.
The ESP32 reads position data from the GPS module via serial communication and uses the GSM module to upload it to the GeoLinker Cloud Platform. GeoLinker is an online dashboard by CircuitDigest Cloud that helps visualize live GPS data on a map so you can actually see where your device is in real time.
If Wi-Fi isn’t available (which is often the case in outdoor or vehicle applications), the GSM connectivity makes sure your data still reaches the cloud.
That’s it! You can easily expand the setup later, maybe add motion sensors, a relay for engine cut-off, or even a temperature sensor if you’re tracking something sensitive.
Setting Up GeoLinker CloudBefore jumping into the wiring, you’ll need an API key from GeoLinker. That’s how your ESP32 will talk to the cloud securely.
- Go to CircuitDigest Cloud
- Create an account (it’s free).
- Log in and head to “My Account”.
- Click Generate API Key under GeoLinker.
- Copy the key and save it for later use in the Arduino code.
Each key lets you upload up to 10, 000 GPS data points, plenty for testing. When you hit the limit, you can just generate a new key.
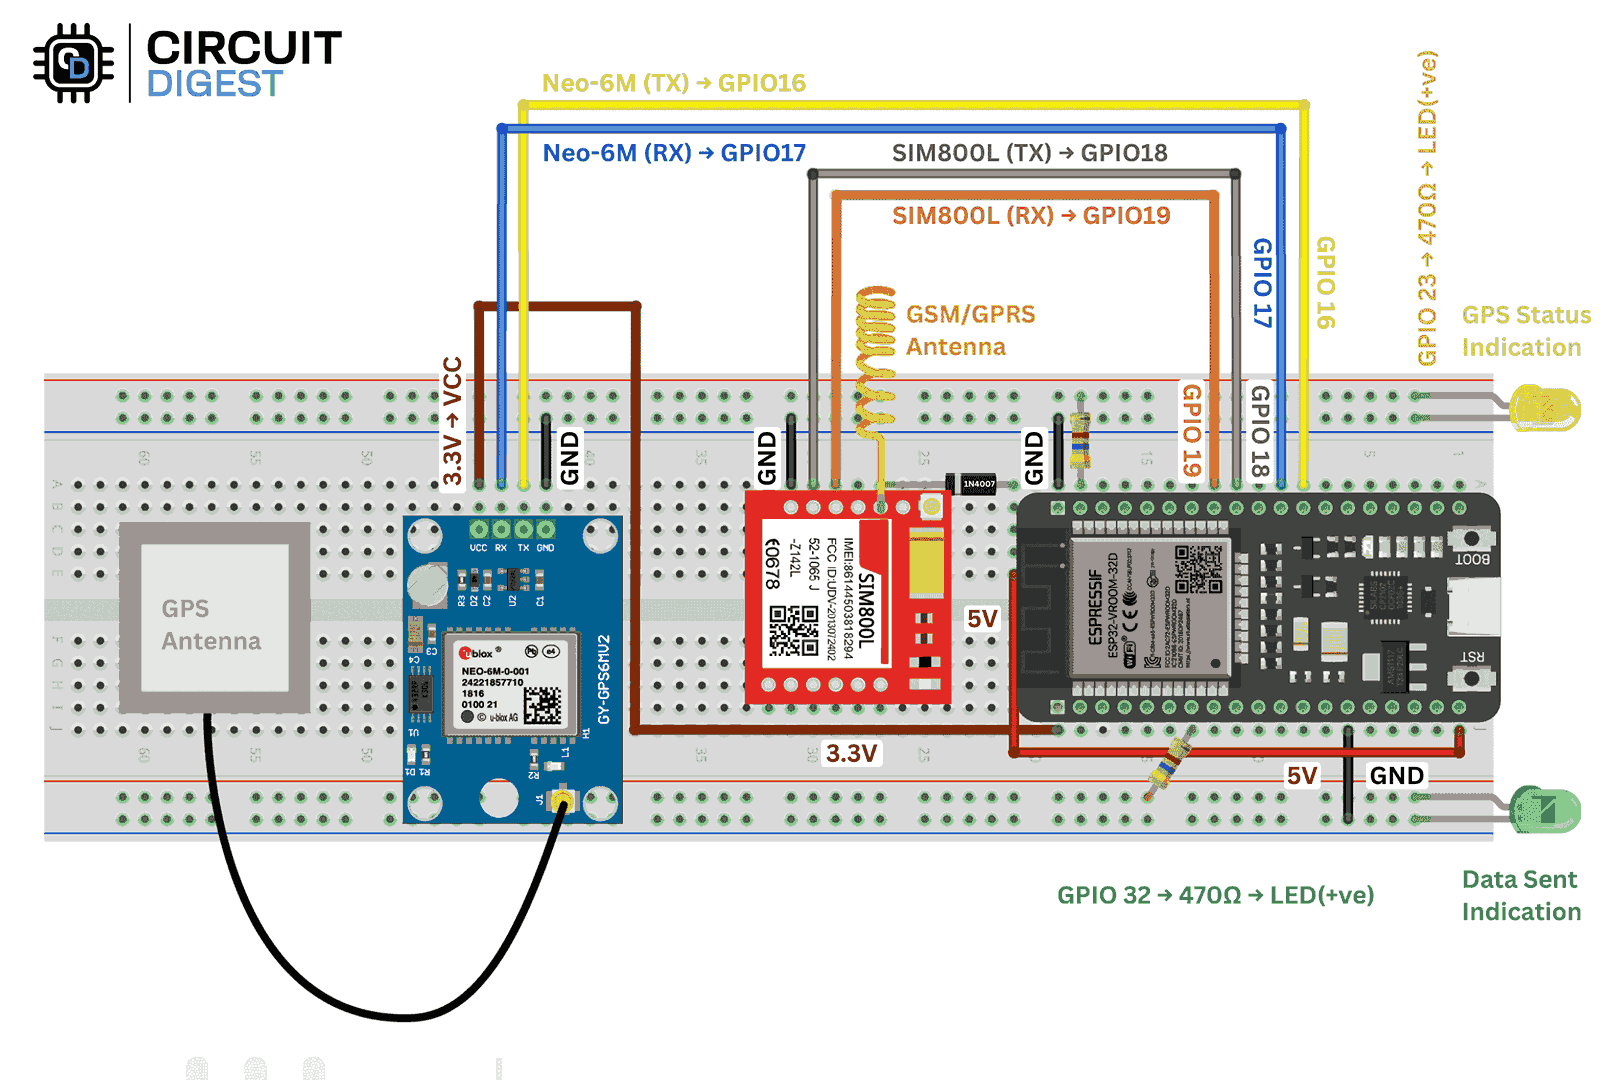
Circuit ConnectionsWiring up the modules is straightforward, though you’ll want to be careful with voltages. The SIM800L likes around 3.7–4.2V, so powering it directly from the ESP32’s 5V pin can cause issues. Use a separate Li-ion cell or a buck converter to regulate the voltage.
Here’s the connection summary:
- Module TX Pin RX Pin Power
- SIM800L GPIO19 GPIO18 3.7–4.2V
- NEO-6M GPS GPIO17 GPIO16 3.3V
- Status LED 1 (GPS) GPIO23 — 470Ω + LED
- Status LED 2 (Data Sent) GPIO32 — 470Ω + LED
Tip: If your GPS module doesn’t get a fix indoors, move it near a window or outdoors. It needs a clear view of the sky to connect to satellites.
The best part? Coding is simple, thanks to the GeoLinker Arduino Library. It handles all the GSM, GPS, and cloud communication logic in the background so you just configure it.
Start with:
#include <GeoLinker.h>Then define your serial ports for the GPS and GSM modules:
HardwareSerial gpsSerial(1);
#define GPS_RX 16
#define GPS_TX 17
HardwareSerial gsmSerial(2);
#define GSM_RX 18
#define GSM_TX 19
Next, add your credentials:
const char* apn = "yourAPN";
const char* apiKey = "YOUR_API_KEY";
const char* deviceID = "ESP32_SIM800L_TRACKER";
Now initialize GeoLinker:
GeoLinker geo;
void setup() {
Serial.begin(115200);
gpsSerial.begin(9600, SERIAL_8N1, GPS_RX, GPS_TX);
gsmSerial.begin(9600, SERIAL_8N1, GSM_RX, GSM_TX);
geo.begin(gpsSerial);
geo.setApiKey(apiKey);
geo.setDeviceID(deviceID);
geo.setNetworkMode(GEOLINKER_CELLULAR);
geo.setModemCredentials(apn, nullptr, nullptr);
geo.beginModem(gsmSerial, -1, -1, true);
}
And finally, upload the data in the loop():
void loop() {
uint8_t status = geo.loop();
if (status == STATUS_SENT) {
Serial.println("Location sent successfully!");
} else if (status == STATUS_GPS_ERROR) {
Serial.println("GPS not fixed yet...");
}
}
That’s all the code you need to start sending location data to the cloud.
Testing and Live TrackingOnce the code is uploaded, power up your tracker. You should see two LEDs:
- Yellow LED (GPS) – turns ON when a valid GPS fix is available.
- Green LED (Data) – blinks every time data is sent to the cloud.
- The SIM800L has its own onboard NETLIGHT indicator:
- Blinks every 1 sec → not connected to network
- Blinks every 3 sec → connected
- Blinks every 2 sec → data transmission active
When everything’s working, open your GeoLinker dashboard and you’ll see your device location updating live on the map, no extra setup required.
If you plan to test it outdoors, power it using a USB power bank or a 18650 battery. I zip-tied my ESP32 and battery to a small mount and took it for a ride; the map updated in real time, and it was surprisingly accurate.
Troubleshooting TipsIf you run into issues, here are quick checks:
- No GPS Fix? Go outside, wait 2–10 minutes for a cold start, and ensure the antenna is upright.
- No GSM Signal? Check that your SIM card supports 2G. In India, Airtel, VI, or BSNL still work. Jio won’t, since it’s 4G-only.
- SIM800L keeps restarting? Your power source isn’t stable. Use a Li-ion battery instead of a 5V USB.
- Data not showing on GeoLinker? Double-check your API key and APN.
During testing, the setup worked flawlessly over several kilometers. The GPS updates every 30 seconds (configurable), and the GSM network handled uploads reliably. GeoLinker plots each point as a breadcrumb trail so you can visualize the full path of your trip.
Even when I went through a low-signal area, the offline buffer feature cached the data locally and synced it automatically once the signal returned. For a DIY setup, that’s incredibly powerful.
Ideas to Take It FurtherOnce you’ve got the basics running, there’s a ton you can do:
- Add an accelerometer to detect movement and log only when moving.
- Use deep sleep between transmissions to save power.
- Combine with an RFID or relay for an anti-theft vehicle tracker.
- Make it solar-powered for long-term outdoor use.
- Display live coordinates on an OLED or LCD screen.
This ESP32 GPS Tracker with SIM800L is a great example of what happens when you combine powerful open hardware with easy-to-use cloud tools.
It’s not just about tracking; it’s about understanding how devices communicate beyond Wi-Fi and bringing real-world data into the cloud.


Comments