


Hardware components | ||||||
 |
| × | 1 | |||
 |
| × | 1 | |||
|
| × | 1 | |||
 |
| × | 1 | |||
 |
| × | 1 | |||
Software apps and online services | ||||||
 |
| |||||
Hand tools and fabrication machines | ||||||
| ||||||
Have you ever wanted to build a robot that mimics a human arm? In this tutorial, we take you step-by-step through constructing a fully functional 6-degree-of-freedom (6-DOF) robotic arm powered by an Arduino Uno and controlled via a web-based dashboard interface. This project blends mechanical design, 3D printing, embedded programming, and web technologies — making it perfect for makers, students, and robotics enthusiasts alike.
Throughout this build, you’ll gain hands-on experience with motion control, power management, servo calibration, and real-time system interaction. By the end, your creation will not just move — it will allow motion recording, playback, and intuitive control right from your browser.
An Arduino Robotic Arm with 6 DOF is a mechanical manipulator designed to replicate human arm movement with precision and repeatability. At its core, it consists of several rigid links connected by joints driven by actuators — in this case, servo motors. The more degrees of freedom it has, the more complex and human-like the motion it can achieve. A 6-DOF arm can pitch, rotate, and reach in 3D space much like a human arm, allowing versatile tasks beyond basic robotic builds.
Robotic arms are vital in industries ranging from manufacturing and laboratory automation to medical systems and educational robotics. They’re used for pick-and-place operations, assembly, welding, and even precision surgical assistance — demonstrating the real-world impact of robotics.
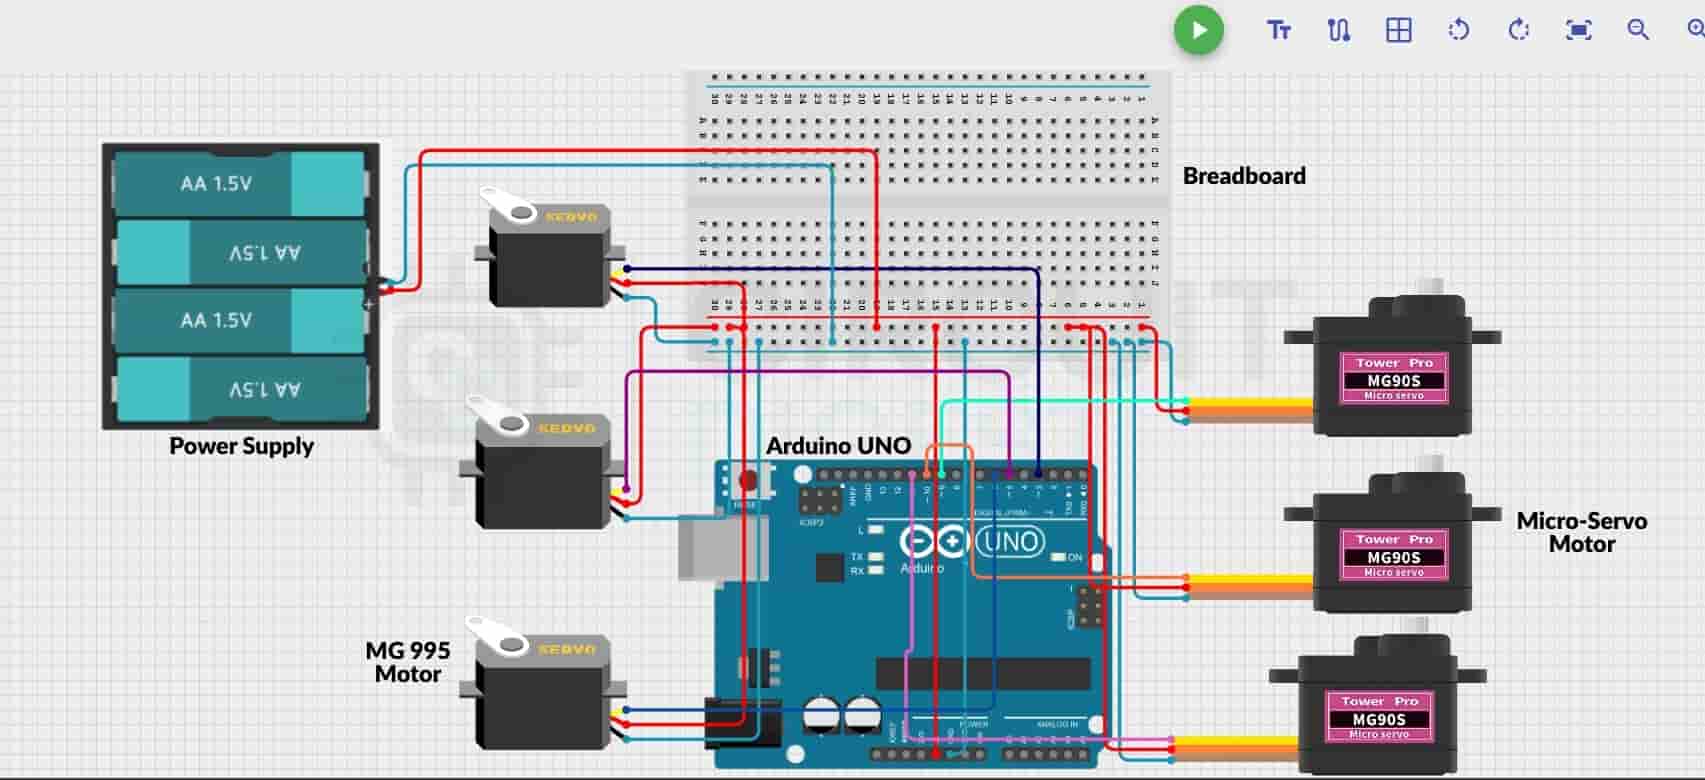
Constructing the arm begins with careful assembly of the 3D-printed parts — base, shoulder, elbow, wrist, and gripper — using screws and fasteners. Once the physical structure is sound:
- Mount each servo into its designated slot.
- Wire the servos to the Arduino PWM pins according to the circuit guide.
- Distribute power from the external supply to the servos.
- Ensure all grounds are shared with the Arduino to avoid erratic behavior.
This setup creates a reliable platform for complex movement while protecting your control electronics from power fluctuations.
The core logic for this robotic arm is written in the Arduino IDE using the Servo library. At startup, each servo initializes to a safe 90° neutral angle, reducing mechanical stress and preparing the arm for controlled motion.
The firmware supports:
- Smooth motion transitions
- Serial command parsing
- Safety limits on servo ranges
- Position updates on demand
This means you can send specific angle commands for each joint without risking mechanical binding or sudden jerks — essential for fluid robotic motion.
To make interaction intuitive, this project includes a browser-based dashboard built with HTML, CSS, and JavaScript. This dashboard connects to your Arduino via the Web Serial API, allowing:
- Real-time control of all six joints using sliders
- Record and playback of motion sequences
- Save and load movement profiles as JSON files
The interface is plug-and-play — simply open it in a modern Chromium-based browser (like Chrome) to start moving your robotic arm without additional software.
Once assembled and coded:
- Upload the firmware to the Arduino Uno.
- Open the web dashboard in your browser.
- Use sliders to drive individual joints.
- Record compelling motion sequences.
- Replay motions instantly for demos, experiments, or automation tasks.
This setup not only brings your robot to life but also offers an interactive learning platform from hardware to software.
🧠 Why This MattersBy completing this project, you’ll learn:
- Mechanical assembly with 3D-printed parts
- Servo motor behavior and PWM control
- Power distribution best practices
- Embedded programming with real-world electronics
- Web-based control systems and interactive interfaces
It’s the perfect foundation for advanced robotics — whether that means adding wireless control, integrating computer vision, or exploring AI-assisted motion planning in future builds.
📌 ConclusionThis Arduino-powered 6-DOF robotic arm project bridges mechanical design, practical electronics, and modern web interfaces — delivering an engaging, scalable, and educational robotics build. Whether you’re a student, hobbyist, or seasoned maker, this guide empowers you to create robotic motion systems with real-world relevance. Learn real-world implementations through this curated list of Arduino based projects and applications.


Comments