
Hardware components | ||||||
 |
| × | 1 | |||
_zhWsCcSEcl.jpg?auto=compress%2Cformat&w=48&h=48&fit=fill&bg=ffffff) |
| × | 1 | |||
 |
| × | 1 | |||
| × | 1 | ||||
| × | 1 | ||||
 |
| × | 1 | |||
 |
| × | 1 | |||
| × | 1 | ||||
 |
| × | 1 | |||
 |
| × | 1 | |||
 |
| × | 3 | |||
 |
| × | 1 | |||
| × | 1 | ||||
 |
| × | 1 | |||
 |
| × | 1 | |||
Software apps and online services | ||||||
 |
| |||||
| ||||||
| ||||||
 |
| |||||
 |
| |||||
 |
| |||||
Hand tools and fabrication machines | ||||||
 |
| |||||
| ||||||
Sustainable sensing and automated irrigation platform with predictive analysis via the Nvidia Jetson Nano.
If you are in a hurry check out the video summary!:
https://drive.google.com/drive/folders/1D0L8of2KWXOZfIo8sGg6XAk8ScAb6cEy?usp=sharing
IntroductionIn recent years Urban agriculture has made its mark in popular culture as an alternative to industrial farming. It offers several benefits and also helps to solve some of the most nefarious problems that we will have going forward regarding food supply, the growing population and the new trends favoring organic, naturally grown food. Despite all that it has been faced with a plethora of problems including its access to water, pollution concerns, and high maintenance costs. In addition to those most farming methods are very empirical in nature and it has been just a few years since the Internet of Things and other Industry 4.0 technologies have reached Agriculture. And among most of those, its degree of adoption is quite lackluster. Urban agriculture needs a cheap and readily available solution, for it to be sustainable.
Now I am going to go a little bit local as I am from Mexico, but the problem is very similar to the US, and more so in the southern states.
IF we want to have the most impact with a project regarding sustainability, namely Water sustainability we have to focus on the industry that requires more of it, which is Agriculture.
And regarding that the main problem in agriculture is actually Water. Most countries have their periods of drought, but as years become even hotter because of climate change, drought greatly affects several parts.
This next picture represents the areas in Mexico with more drought, Yellow means bad and red means catastrophe.
Also we don't really have to add that most of the fields and people who work them in Mexico are in a big technological and educative lag, so that adds to the problem because those are the people which climate change will harm the most.
So we get into a $22 Billion USD problem adding all the parameters. Industry 4.0 tools and automation are severely needed to attack this.
That is why Urban Agriculture is important in a sense, and I am trying to do my part, but I have a very particular problem that I cannot solve without Computer Vision.
This is a photo of one of the Tomato fruits I have in my backyard which I cannot continuously check. Sometimes I am away or very busy, and I tend to neglect its care. Another thing is regarding collecting fruit at the proper moments because they may become uneatable at some point. The problem regarding water can be taken care of if I automate irrigation, but fruit ripeness and knowing when to pick them up will need a little bit more of technology to automate.
To solve this problem we will make use of the power of the Internet of Things by creating three things. But we will go one step beyond, by integrating the JEtson Nano we will implement computer vision to solve that problem of mine regarding fruit and evolve the producto to an Artificial Intelligente enabled IoT solution. Hence AIoT!
Our solution to the problem will be to create a sustainable platform of sensing and irrigation automation with predictive analysis via the Jetson instead of relying entirely on cloud. With one objective in mind: SAVE WATER. Apart from that, in my personal experience developing solutions for urban and large scale agriculture I have seen that the sensors alone are not sufficient to keep an eye on the plants. For this I'll develop a CV module using the GPU on the Jetson, that can be a direct conduit to the user and will be able to adjust certain tresholds of the automation of the system only by doing Image analysis. That on the edge of course.
There are several solutions of this kind in the market, but they are mainly focused in large scale agriculture, such as: https://www.the-iot-marketplace.com/libelium-sensorinsight-urban-agriculture-kit-4g For the Urban agriculture part, there are also a couple of incumbent, but at a much higher price, more dedicated to vertical farming. See: https://www.digiteum.com/iot-agriculture
What will make this solution remarkable is the price first, those solutions are much higher in price to what will be developed here and the remarkable part is the usage of computer vision which no one does at this point.
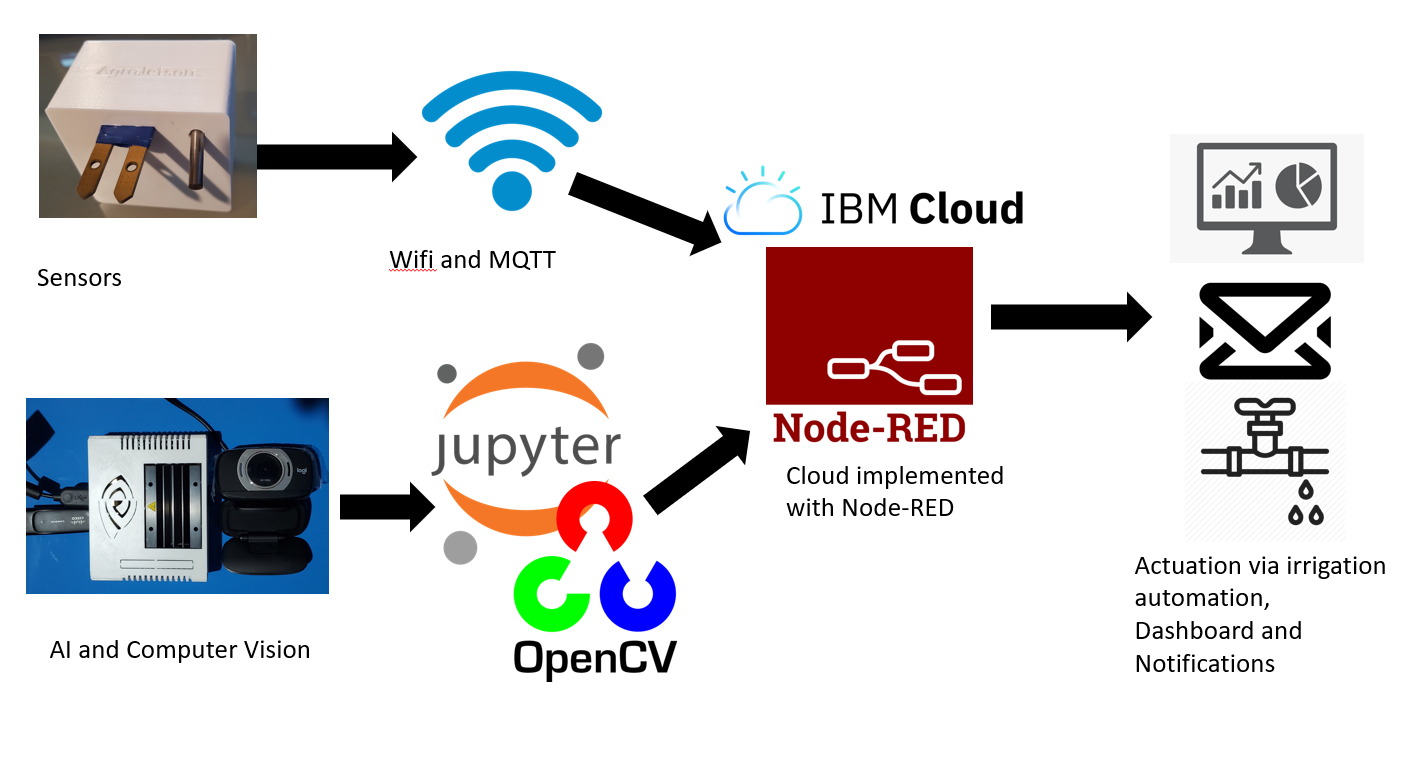
I'll try to summarize in two sections, one dedicated to the IoT component and the other one to the CV one. The IoT will be sensor based and the CV will be very GPU-hardware based.
A): IoT 1.- Using temperature with humidity, soil moisture and soil temperature sensors, we will obtain sensor data every 6 min. Wifi has been chosen this time because its characteristics of long range and low power. For that in turn we will use a Particle Argon board. Each batch of sensing is done at this frequency to send 120 packets per day and to keep the Cellular prices low. For this system it was decided to usethat board to obtain the data from the sensors (using the vast array of libraries from Arduino and particle) and send them directly to a cloud service via MQTT (Namely Bluemix). Then using the Openweathermap API and Node-RED we will create a Dashboard and notification capabilities.
2.- Once we have the data at IBM Bluemix, on the Bluemix platform, we made it possible to develop almost any application with the obtained data. (All the applications are based on Node Red to make the prototyping easier).
3.- We then will make a Dashboard with the data obtained for the complete and simple visualization of the data. For the application, we will perform data crossing with the OpenWeatherMap API, to perform the control of an electrovalve connected to a Particle Photon microcontroller. The data crossing obtained is used to check if that day is going to rain, and thus not use irrigation water in crops. Also if the system detects that water is needed, in the field by the humidity sensors, the irrigation system is turned on. In turn once a day an email will be sent to the farmer with the general information of his field or he can check anytime on his dashboard. Also everytime the irrigation system is online, a notification will be sent.
This project is an iteration of a past project we already designed called Aggrofox:
https://www.hackster.io/107329/aggrofox-large-scale-and-urban-agriculture-iot-solution-8155fe
It is a very remarkable project in the fact that it is my most viewed project and at the same time allowed my team to win a Hackathon. We have also developed versions for Sigfox and Cellular which you can see in some of the images here.
Now we will make it Edge-based and much bigger. One huge emphasis of these two projects is for them to also be used in Urban Agriculture and WiFi is the best choice for that one as we live in one of the biggest cities in the world (Mexico) and the reliability of Sigfox or LoRA drops when you don't have line of sight.
Usage of AIFor the IoT sensor analysis I'll use a simple linear regression model to come up with the thresholds needed. But, next is where the fun begins. Using a Yolo model I'll train a model to come up with certain plant characteristics such as coloration, leaf bending and so forth to decide on thresholds. Then I'll feed OpenCV with those models, naturally all this will run in the Jetson Nano using also its CUDA submodule for faster image analysis than any other board of its denomination can achieve.
Extensive Project Tutorial: How to get started.1. Assemble the circuitsSensor Module:
To complete this circuit, we used the Particle Argon dev board to send information to the cloud via WiFi. This uses the extensive libraries of the Arduino and Particle Ecosystems so the proyect may be expanded further without limits.
Bill of Materials:
- Particle Argon. https://docs.particle.io/argon/
- Particle Grove adapter Kit for the argon with sensors: https://www.seeedstudio.com/Grove-Starter-Kit-for-Particle-Mesh-p-3038.html
- Grove Moisture Sensor: http://wiki.seeedstudio.com/Grove-Moisture_Sensor/
- DHT11 sensor for grove
- Water temperaure sensor.
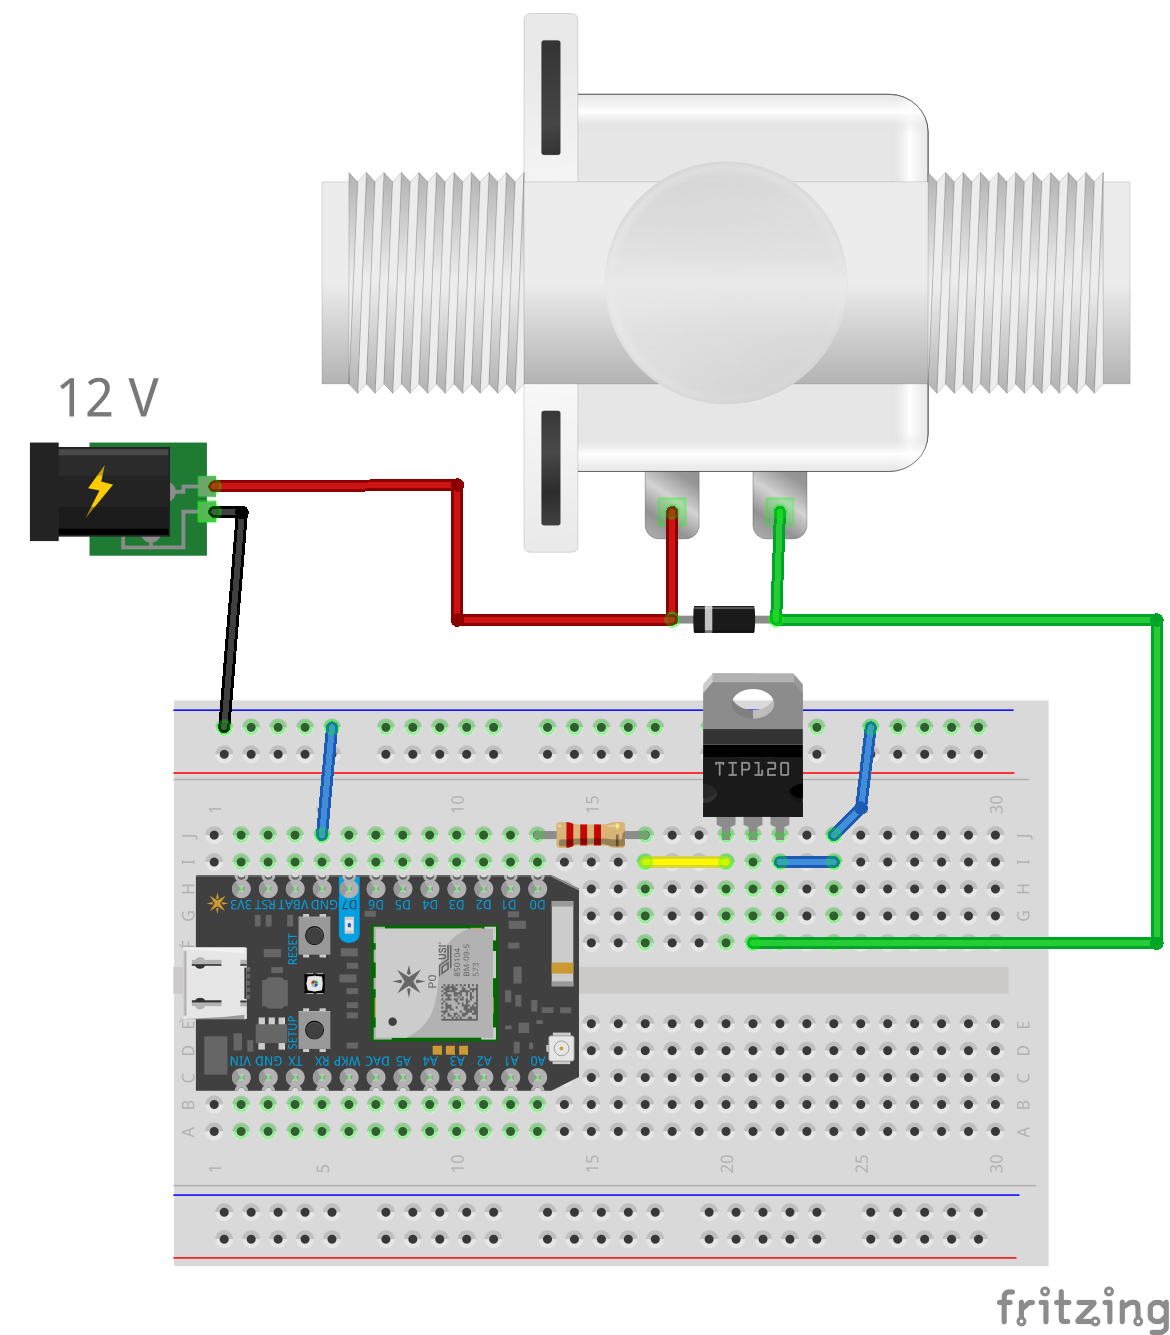
Valve Module:
Once the main circuit is completed, make the automated irrigation valve.
Bill of Materials:
- Photon Particle (or any other Wifi board).
- TIP120
- 12v Source.
- Solenoid Valve Nc 1/2.
- Diode 1N4007.
- 1 Resistances of 2.2kohm.
- Cable, Solder, Jump wire or similar.
Real Implementation of both circuits:
Refrain from uploading both the Argon code and the Photon code at this moment as we will need certain credentials.
2. Create your Node-Red DashboardFollow this guide here:
https://github.com/EddOliver/AgroJetson/tree/master/IBM%20cloud%20Agrojetson
That is a guide for the absolute beginner, but taking a look at our flow we can see several instances of what we are doing.
By using the MQTT node, we will sync it to CloudMqtt.com which is a freemium message broker for the internet of things, our two "things" have to be setup to this broker, but that part has to be manually done.
Go ahead and create a user on that platform or any other, you can also use AWS IoT, IBM or Azure according to taste. At this point you will have to input your credentials into the Argon code. Just replace the information of "YOURPORT", "YOUR_USER" and "YOUR_PASSWORD":
In the case you are using another broker than m12.cloudmqtt.com, you might be needing more information and will need to change the broker.
Now we will go ahead and explain the configuration of the nodes which is very easy.
By taking both the "start" and "end" MQTT nodes we will form a messaging "bridge" so the Dashboard can "hear" the messages on Cloudmqtt. Grab the end node, go to server and then click on the edit icon to configure this part of the node.
Now input your credentials from the MQTT broker of your choice, here is done with Cloudmqtt.
Then grab the "start" node and set it up like so:
Notice the Topic, it is set up according to the topic of the sensor you will be using in this case the soil temperature sensor and is in accordance to the code on the Argon.
You'll have to do this three times (or whichever you need) if you are mannually creating the dashboard or just grab the code at the end and ONLY input into it your credentials.
3. Irrigation system via Openweathermap Forecast and Particle Photon.We have to explain first the why's before the know how's.
The use of tracking the forecast of the weather is the main purpose of the project itself, that is to optimize water usage.
What use there is of having a sensor that tracks that the soil is dry and activate an irrigation system with that info, but it is going to rain that same day?
We can save a lot of water simply by using the weather forecast systems available to notify our platform that it is going to rain and stop from using water that day.
And of course we want to automate everything.
Without further ado:
1.- Get to: https://openweathermap.org/ and Sign up.
2.- After that then simply go to Sign In and click on API Keys, then copy the API KEY.
3.- Go then to your Node-RED flow. Remember the openweathermap node? Drag it to the Node-RED dashboard and configure it like so:
4.- Remember to paste an "Inject" node before, a "function" node after and also a "debug" node if you wish to check what has been transfered.
Double click the function node and paste the following code:
msg.payload= msg.payload[0].weather[0].main
msg.count = msg.payload
return msg;
What this does, is to seek the weather condition that we desire which is "Rain" and it puts it into the payload of the flow.
You can also grab a Text Dashboard node and connect it to this flow to get this info to the dashboard.
6.- Go to your particle IDE and paste the code for the Photon.
The main point of the code is understanding that it creates a function that can be accessed via the particle cloud. Whenever you input certain conditions to that functions externally you can do some previous programmed actions.
Flash it and go back to Node-RED. If you need aditional help with the Photon go directly to www.particle.io/start for a great place to begin.
7.- Now in Node-RED make a flow like so:
The Particle node is indeed the function node.
8.- Double click on the Particle node and click on the pencil on "Add new particle cloud". Then fill it like so:
Your access token is in your particle IDE, Devices section and clicking on the current device you are using. Update and in the next screen fill it with your device name that you can get on the Particle IDE and also on "CLoud Function" input "led".
9.- Now your Particle Photon node is configured to get an "on" or "off" payload and do the appropriate action with it.
10.- To configure properly the email node you have to log in to your gmail account and then go to: http://myaccount.google.com/u/1/lesssecureapps and turn it on, if you followed this guide accordingly, you set a password and username to your Node-RED so this procedure should be safe.
Then just fill the required fields.
11.- The most important step:
Finally, you have reached the end of this part of the tutorial so you have an idea of how to do the main parts of the project. Next is to do your own and use the concepts to get to a final product like the one presented here. There is also the main Flow that we did but we strongly suggest the reader to cultivate their own so you can have a great information harvest.
If you still want to have a complete solution in the "code section" there is the Node Red flow used in the project, which you should load into the Jetson Nano or any other computer (hint: that includes cloud services).
4. Going Green: Solar PowerThis device has to have a solar panel to reduce the cost of infrastructure.
We reccomend that you use at least a 2W Solar panel in tandem with a LiPo Battery like in the following circuit:
The power segment of the circuit is intended to power the circuit via a Solar Power during the day and then charge the LiPo battery so it can continue working at night.
For this purpose you can see the Regulator in the image that is a connection module that regulates the LiPo battery charge and the Solar Panel feeding energy to the system.
Here are some reccomended links to these components:
Sunny Buddy: https://www.sparkfun.com/products/12885
Lipo Rider pro: https://www.seeedstudio.com/LiPo-Rider-Pro-p-992.html
Solar panel: https://www.seeedstudio.com/2W-Solar-Panel-80X180-p-921.html
LiPo Battery: https://www.adafruit.com/product/258
Now its time to upload the Argon code into your dev board! (If you have already input your credentials properly beforehand). Get everything into their cases (3D CAD models provided).
At this point we have the two "Things" of our AIoT solution that sense and actuate, fully functional and operational. (hehe)
Lets test it:
Now we are in need of the brain and a little AI for the third "Thing". Which leads us to:
5. Jetson Nano setupNow to get the Nano running, there are already several guides online that do a better job of explaining how to set it up than I could do at this moment so I will link you to them. This guide is already quite long as it is:
https://developer.nvidia.com/embedded/jetson-nano-developer-kit
And this one:
https://developer.nvidia.com/embedded/learn/get-started-jetson-nano-devkit
We don't really need the installation provided in the AI course, but I will link the Jetbot github also because it teaches quite a lot of how to use the Jetson Nano and it actually gave me the idea to use a Jupyter Notebook:
https://github.com/NVIDIA-AI-IOT/jetbot/wiki
I will explain fully the project at the Jupyter notebook in the github nevetheless in order to make it run you will need a couple things, these libraries and Jupyter notebook:
- numpy
- Argparse
- Cv2
- Paho.mqtt
- json
For Jupyter notebook go to:
What we want is a clean installation with Jupyter notebook and those libraries.
Another option is to install Jetbot, that means grab the SD image and just install the aforementioned libraries (this is reccommended). If at this point you lack any library from those mentioned simply do a pip install.
To install Paho:
https://pypi.org/project/paho-mqtt/
6. Fruit detection Model creationPrerequisites:
You need a google drive account.
Have OpenCV-contrib installed (amazing version of OpenCV with DNN capabilities)
git clone https://github.com/JetsonHacksNano/buildOpenCV

  cd buildOpenCV

./buildOpenCV.sh |& tee openCV_build.logTo be able to detect an image of a fruit or vegetable, in this case tomato, it was necessary to make a custom object detection model since networks trained like yoloV3 are already trained with enough objects. However in my case, not one has ripe and immature tomatoes, that's why I gave myself the task of training my own neural network.
However neither the jetson nor my laptop (A gaming one) are able to perform this process, that's why I had to do the training in a Jupyter notebook in Google Colab.
NOTE: The free Google Colab platform has a runtime time limit of 12 hours, I recommend not trying to do the model workouts in very long sessions since we will lose all the work if we end the session. Even with that limitation the platform has a very very good performance.
Dataset preparation.
In this case I modified a tool to manually make the labels, my modified tool is in the "yolo-dataset" folder and the original one.
https://github.com/xiaqunfeng/BBox-Label-Tool
To search images for Deep learning I recommend this google page that has a large database of images of all kinds.
https://storage.googleapis.com/openimages/web/index.html
With this tool you can download and filter images from this database.
https://www.learnopencv.com/fast-image-downloader-for-open-images-v4/
Or use your own but they have to be like these ones:
Instructions:
First we will write our labels in the following files:
One in each line:
We then write the number of classes:
Separated by commas:
- We open the toll via: python main.py
In the "Image input folder" and "Label output folder" section we put the folder where the images go and select "Load Dir".
Select the Label that we are going to put and press "ConfirmClass"
Now we go select the objects that will have that category with the cursor.
By pressing Next at the bottom the labels will be saved next to the file in this way.
Since all our images have their corresponding file label, we have to run the file "createtest.py" to create the training file, this is a list with all the files we have in the img folder.
python createtest.pyOnce all this is ready, we have to compress the file as a zip and in our google drive paste it into a folder called "ml" in this way.
Now we can start the process.
https://colab.research.google.com/
Once all this is ready, we have to compress the file as a zip and in our google drive paste it into a folder called "ml" in this way.
Once the training section is finished we will have our finished model and its cfg file inside the "ml" drive folder.
Download all the files shown in the image and paste them in the "OpenCV Yolo" folder where the file "Yolo with OpenCV.ipynb"
The files are already configured as follows in the file, but you can configure them as you want.
With Enough training the model has to be able to reach this kind of results:
For this part we need two things, to run the trained model in the Jetson Nano using all its capabilities and to send the information back to our dashboard.
For that we will run a Jupyter Notebook with the aforementioned libraries. The most important one for communication in turn is PahoMQTT.
As soon as you have the libraries just create a folder with the file (Yolo with OpenCV.ipynb) you can find in the Github:
https://github.com/EddOliver/AgroJetson/tree/master/OpenCV%20Yolo
It contains a good share of explanation but in essence it uses a Yolo model with the trained weights and labels from the last part and with that generates our intended information. Which we then feed it to our dashboard.
MQTT communication:
Following the example from the IoT configuration part just do the same in Node-RED. The video shows how:
And now we have the three "Things" working in tandem in a single platform!
IoT and CV through AI creating our AIoT solution.
8. Testing the Prototype:Last video, here is how I installed the prototype in my Grove:
9. Commentary and Future Rollout.Let's take a look at some facts:
• The population in Mexico (The author's country) and in the world will grow.
• By 2050 the production of food will have to DOUBLE to feed this population.
• The amount of arable Land will not increase.
• The amount of Water available will be decreasing.
Sustainable disruption is needed because current methods are insufficient for the rising demand, infrastructure is costly and most fields are in remote areas. Also despite what it promises urban agriculture needs a cheap and readily available solution, for it to be sustainable.
The current project offers an initial solution to these problems by starting with one of my own, but it is not difficult to see how one of these can expand. For now I think the implementation of AI and CV to solve this first problem of ripeness then can be later expanded to attack plagues, deliver pesticides correctly (hopefully organic ones) and many more applications. Companies like John Deere are already doing that, but at a much higher cost. This offers a cheap and affordable solution that can serve the local, home or urban farmer as it can automate several of their processes and most important of all provide valuable information about their crops that they can use to make good decisions.
10. References.

Comments