

Software apps and online services | ||||||
| ||||||
| ||||||
| ||||||
Hand tools and fabrication machines | ||||||
 |
| |||||
Rebuilding bike bearings is a great way to get your hands dirty, and keep things running smoothly.
Shimano generally makes pretty good parts, but they have the unfortunate habit of designing parts that need specialised tools, and then redesigning parts to need new tools. This can lead to a toolbox full of expensive single use tools.
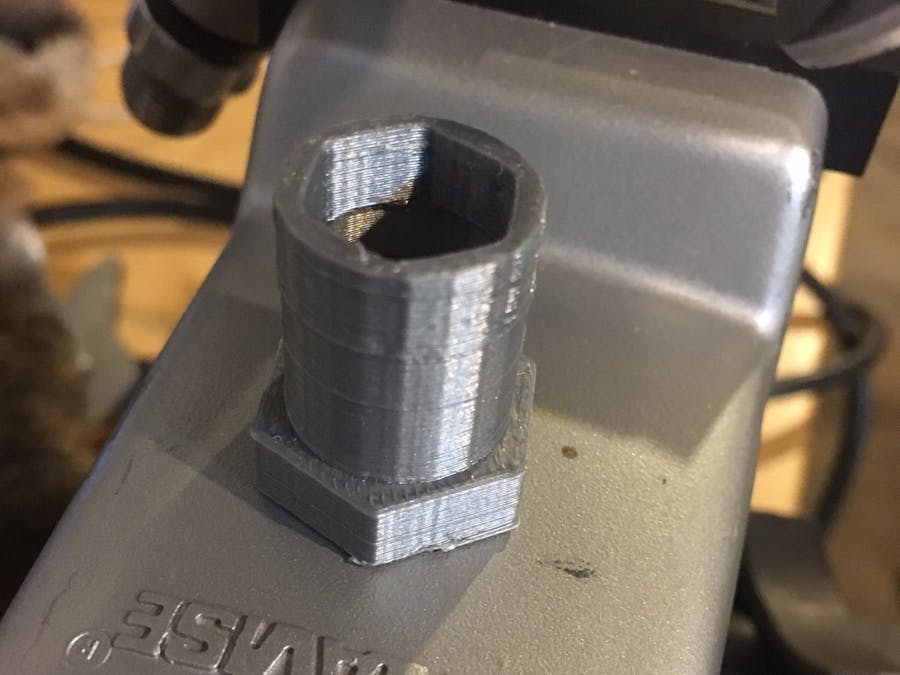
Rebuilding Shimano pd-324 pedals calls for a ~$50 hollow socket to properly adjust the bearing cone nuts, for a ~$35 pair of pedals. Folks online suggest jamming a screwdriver in to hold the cone nut in place, hollowing out a 13mm thinwall socket, a process of back and forth adjustment alternating between the 13mm and 10mm sockets or just tossing them and getting new ones.
For 3D printer owners, or folks with access to one, the needed tool can be created pretty quickly, saving money and keeping a pair of pedals from the trash.
Making a 3D ModelBeing new to 3D, I used a fairly basic but powerful tool, Autodesk's Tinkercad.
By combining a few primitive shapes, and keeping in mind the limits of 3D printing (specifically avoiding unsupported overhangs) it is possible to pretty quickly create useful objects.
Export the model from Tinkercad as an .stl, and open it in Cura to prepare it for printing. The specifics will depend on your printer, but in general: A thick layer (.2mm) height is fine as printing will be faster and it doesn't need to have a refined appearance.
Note: Layer height should be a multiple of your printer z-screw pitch (great explainer by Mackenzie Wall).
I used a 50% fill rate, as I was worried about the tool's strength. I also used a brim (a wide first layer printed around your object) to help it stick to the build plate. If you have a heated bed you may not need it.
If your computer is connected to your printer, you can either export the print file (gcode) or print right from Cura.
Because my printer is in a workspace I didn't want my computer tethered to the printer, so I use OctoPi to do the printing. OctoPi is a Raspberry Pi image that runs print and webcam server (to keep an eye on your prints) with a web interface. The Pi can stay plugged into the printer and the computer can be free.
If your printer has a LCD interface you may be able to print from SD cards as well.
TestingThe part needed to fit inside the pedal (17.2mm) and have a 10mm socket fit inside.


_t9PF3orMPd.png?auto=compress%2Cformat&w=40&h=40&fit=fillmax&bg=fff&dpr=2)


Comments