



This project combines a HUSKYLENS 2 AI vision sensor, its microscope camera module, and a UNIHIKER K10 to identify microscopic targets such as onion epidermal cells. HUSKYLENS 2 captures the microscope image and runs a custom object-detection model locally. It sends the detection result to the K10 over I2C, and the K10 displays immediate feedback.
The same workflow can be adapted for classroom cell observations, microorganism checks in water samples, or preliminary seed-germination screening. The model still needs to be trained with representative images for the exact sample and conditions you want to recognize.
The workflow is:
- Collect and annotate microscope images in Mind+ V2.0.
- Train and convert an object-detection model for HUSKYLENS 2.
- Install the model on HUSKYLENS 2.
- Send inference results to UNIHIKER K10 over I2C.
- Display a detection or warning message on the K10.
Watch the embedded project demonstration before starting.
The source project demonstrates the electronics and AI workflow. It does not document the construction of the mechanical display base shown in the finished-project photos, so use your own stable microscope stand or sample holder if you need one.
This Hackster project is adapted from auroraAA's DFRobot Maker Community project under the Creative Commons Attribution 4.0 license.
Hardware and SoftwareHardware- 1 × UNIHIKER K10 AI Learning Device, DFR0992-EN
- 1 × HUSKYLENS 2 AI Vision Sensor, SEN0638
- 1 × HUSKYLENS 2 Microscope Camera Module, SEN0683
- 1 × 20 cm PH2.0-4P male-to-male cable, FIT0915
- 2 × USB 3.0 to Type-C data cables, FIT0641
- 1 × computer
- Cell samples or prepared microscope slides suitable for your experiment
- A stable sample holder or microscope stand
- Mind+ V2.0 or later
- Internet access for model conversion
- Prepared HUSKYLENS 2 cell model
- Mind+ model project and K10 program
Download and install Mind+ V2.0 or later, then open the application.
The model-training and HUSKYLENS 2 deployment workflow shown in this project requires Mind+ V2.0 or later. Keep the computer connected to the internet when converting a trained model for HUSKYLENS 2.
If you want the quickest path to a working demo, download the prepared model and program from the Supplies section and continue with Step 5. To train a model for your own cell categories, continue with Step 2.
Collect Microscope ImagesOpen the Camera function on HUSKYLENS 2.
Place a sample under the microscope camera and press Button A to take a photo.
Collect images for every cell category you want the model to detect. The source project recommends at least 50 images per category, with approximately 100 images per category preferred. Vary the sample position, orientation, and visible area so the model does not learn only one view.
Connect HUSKYLENS 2 to the computer with a USB data cable.
Open the photo folder on the HUSKYLENS drive.
Copy the captured images into a local folder named Dataset.
Upload, Annotate, and Train the Dataset
In Mind+, open Model > Object Detection, then choose Upload.
Select the appropriate import type for your images. Use the unannotated option for newly captured images, or the YOLO option only when your dataset already contains matching annotations.
Choose the images from the Dataset folder.
Start the upload and wait until every image appears in the dataset workspace.
Create a label for each cell category, then draw a bounding box around every target cell in every image. Keep the class names consistent across the full dataset. Train the object-detection model only after all targets have been annotated.
For a detailed walkthrough of the Mind+ annotation and training interface, follow the model-training portion of DFRobot's Object Detection-Based Self Checkout System guide. The example objects are different, but the data annotation and object-detection training workflow is the one referenced by the original cell-identification project.
Convert and Download the HUSKYLENS 2 ModelAfter training is complete, click Deploy to HuskyLens2.
Enter an application name and display title. The source workflow notes that these fields currently accept English letters and numbers.
Start the conversion. Mind+ uploads the model and converts it in the cloud, so keep the page open and the computer online.
When the conversion succeeds, click Download to Local Computer. Keep the downloaded ZIP file unchanged because HUSKYLENS 2 uses its original package name and contents during installation.
Connect HUSKYLENS 2 to the computer. A drive named HuskyLens should appear.
Copy the downloaded model ZIP into:
\storage\installation_packageDo not rename the ZIP file. Renaming it can prevent HUSKYLENS 2 from recognizing or installing the model.
On HUSKYLENS 2, swipe through the applications and open Model Installation.
Choose Local Installation, select the copied package, and wait for installation to finish.
A new mode named cell should appear after the prepared model is installed.
On HUSKYLENS 2, open System Settings > Protocol Type and select I2C. Return to the main interface when the setting is saved.
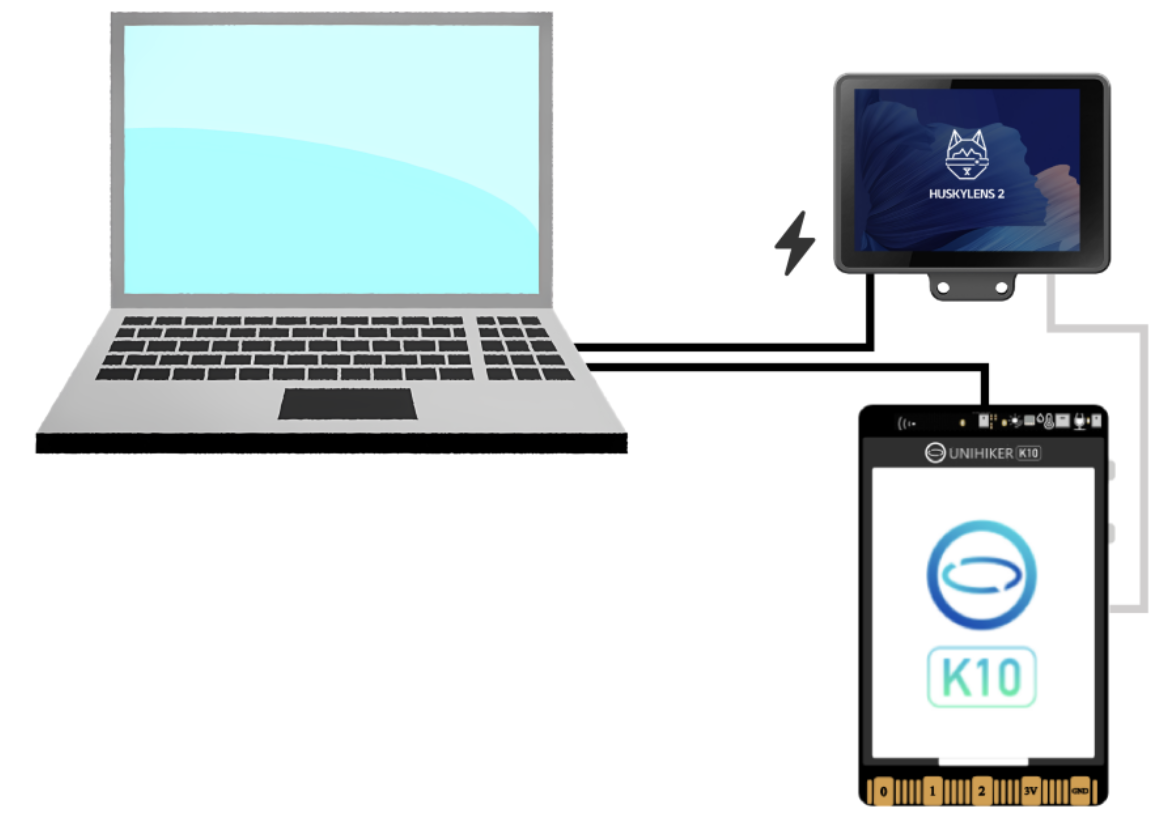
Connect HUSKYLENS 2 to the K10 with the PH2.0 4-pin cable as shown. Use the USB cables to connect the K10 and HUSKYLENS 2 to the computer or suitable USB power sources.
Make all connections before running the program. If the K10 later receives no results, recheck the I2C setting, cable orientation, and physical connection first.
Create the Mind+ Upload-Mode ProjectOpen Mind+, select Coding, and choose Upload Mode to create a new project.
Open Extensions.
Switch to the Board tab, search for K10, and add UNIHIKER K10.
Use the same process to add HUSKYLENS 2 AI Camera.
Click Back to return to the programming interface.
Connect the K10 to the computer with a USB data cable and click Connect Device in Mind+.
Select the detected UNIHIKER K10.
Continue only after Mind+ reports that the connection succeeded.
Recreate the block program shown below. It initializes the HUSKYLENS 2 connection and the K10 display, reads the custom model's detection result, and changes the screen feedback according to whether a new cell is detected.
Set the Model ID in the program to the number shown by the installed model on HUSKYLENS 2. The example screenshot uses ID 129, but your model can use a different number.
The program contains four main parts:
- Device and model initialization
- Repeated detection and result acquisition
- Feedback when a new target is detected
- Feedback when no target is detected
Use the block groups in the analysis image as a reference when recreating the logic.
You can skip manual block recreation by using the supplied project archive. Extract program-cell-identification.zip, then open the Project menu in Mind+ and choose Load Project.
Select Program-cell identification.mpcode from the extracted folder.
Confirm that its Model ID matches the model installed on your HUSKYLENS 2. Click Upload and wait for the program to transfer to the K10.
Open the installed cell mode on HUSKYLENS 2, place the microscope camera over a prepared sample, and run the K10 program.
HUSKYLENS 2 should draw detection boxes on matching cells. When a new cell is detected, the K10 displays a green confirmation screen.
If the result does not match the demonstration:
- The
cellmode is missing: Confirm that the model ZIP was copied to\storage\installation_package, was not renamed, and completed local installation. - The K10 receives no detection data: Confirm that HUSKYLENS 2 is set to I2C and recheck the PH2.0 4-pin connection.
- The program responds to the wrong model: Set the program's Model ID to the number shown on HUSKYLENS 2.
- The model misses cells: Collect more representative microscope images, correct the bounding boxes, and retrain the model.
- Mind+ cannot convert the model: Check the internet connection and keep the conversion page open until it finishes.




Comments