

Hardware components | ||||||
_ztBMuBhMHo.jpg?auto=compress%2Cformat&w=48&h=48&fit=fill&bg=ffffff) |
| × | 1 | |||
 |
| × | 1 | |||
 |
| × | 1 | |||
 |
| × | 1 | |||
 |
| × | 1 | |||
Software apps and online services | ||||||
 |
| |||||
Hand tools and fabrication machines | ||||||
 |
| |||||
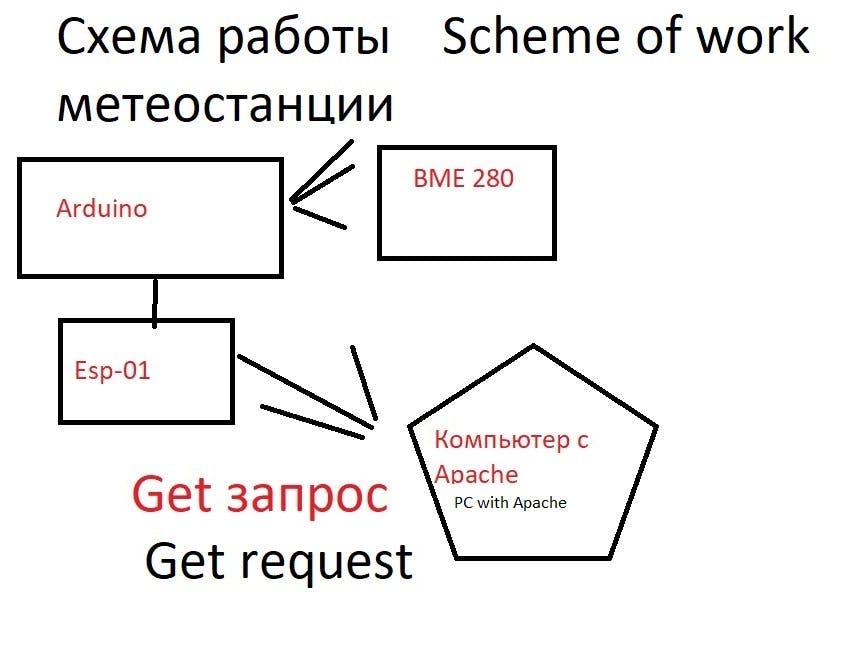
In this video I am going to discribe the setup of an Arduino weather station from beginning to end. The weather station will consit of the ESP8266 (network adapter), the BME280 (weather sensor), the an Arduino UNO, the adapter for ESP8266, and the local network.
The BME280 will send the temperature, humidity, pressure to the Arduino. The Arduino will configure the ESP8266 to connect local network,
Then, we'll make to the ESP- zero one http-GET request with weather data to local computer with WAMP (WINDOWS APACHE MYSQL PHP).
What will you need?- Local network with WiFi router
- Arduino UNO
- USB cable (to connect Arduino)
- BME280 sensor
- Solder station with hot air gun
- Flux
- ESP8266
- Adapter for ESP
- Four female-male jumper wires
- Four male-male jumper wires
- Four 50cm jumper wires
- Four thin heat shrink tubing
- One large heat shrink tubing
In order for the weather station to send the date, we need a network. As a result, you should set for the compers in the network same work group.
Go to the properties of the computer and fix it.
Also, turn off the firewall. You will need open acess in properties of network adapter. In addition, you need know your local IP address.
Click on network icon.
Further, click on properties is your local IP. You need open eighty and thirty three zero six ports on router.
You can see how it do for the router.
If you want the weather station work fine, you need a web server.
You need these componets:
- Apache is taken the weather data.
- PHP will taken the data and save it in database.
- Mysql is database, where are saved the data.
- Heldi sql is the viver of data.You can chose thirty-two or sixty six componets if you have system sixty six bit.
But you need that the componets have same bit number.
How can you install apache?
Make folder C:server and inside folders data, bin. Unzip the Apahe in folder data.
You can save Apache in other folder, but you need set right way in cofirahion file.
Got to uzip apache folder. Open HTTP conf:
Set in string way to apache. Set the name of server.Set the way to weather station site.
Set the file type of weather station site. Uncomment string mod rewrite.
Go to vhost file and set your local ip, document way, and name of server.
In adithon open cmd and start installethion of apache.Next open servises and start apache. Open servises and start apache. Type local adress of your computer in browser. If the installation is correct, you will see the page "index of."
Install php. Unzip php in folder bin. Go to HTTP conf set PHP settings. Go to PHP folder and uncomment connethion to mysql string.
Install Mysql.Start inslalation of MySql five.Why five?Becouse I don t now the comam bind server for latest version mysql.
If yo know type it in comments. Take all plivileges for your Mysql user, and apahe host.
Type in my ini your local ip adress.Install the HeldiSQl open and type login, password and local IP. Create new database,
new table with tree colums and one navigate colum.
Open the data Apache folder, and make in it file index.php.The file consist conection to mysql, take get requst with data, save it in DB and read from db.
Set up the ESP8266
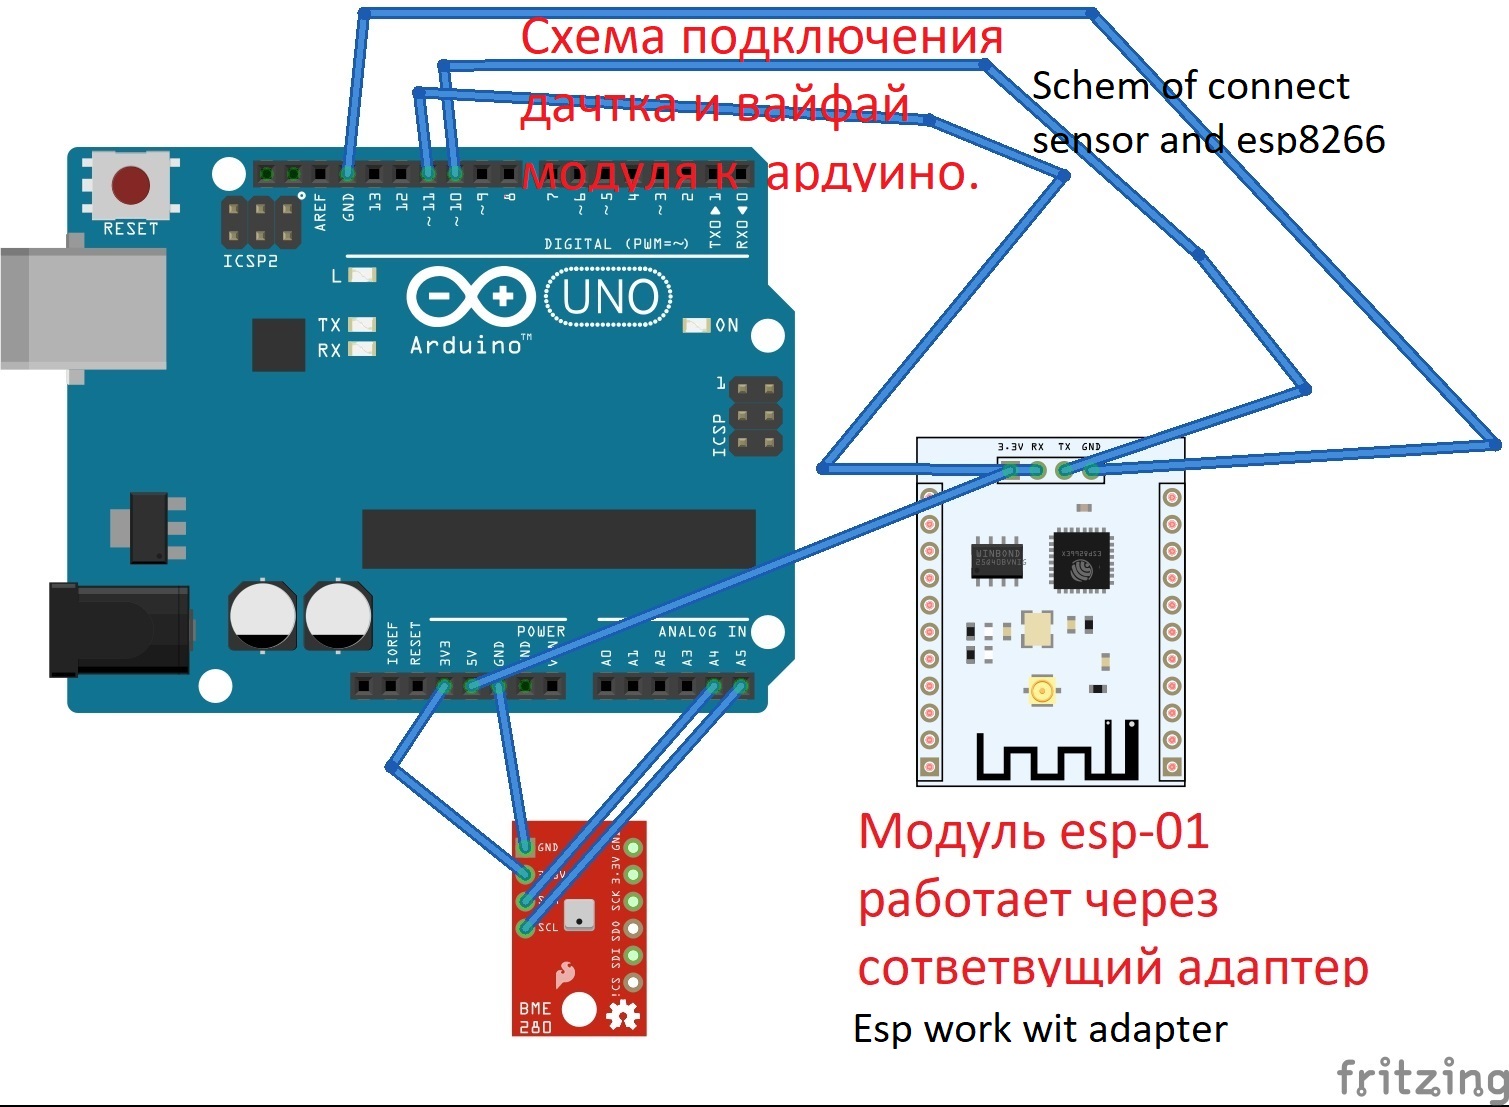
Warning! For connecting ESP8266, you will need the adapter. At first, you need to knowi f the ESP8266 can connect to your local network.
Connection to ESP8266 are Rx to Rx, Tx to tx, Gnd to Gnd, VCC to 5V. You need to ground RESET ARDUINO PORT TO GND.
Connect Arduino Uno with computer, and in Arduino IDE - Serial Monitor choose rate 115200 bod and Both NL & CR.
Type command AT. If ESP8266 works, you see OK. Type AT-RESTORE that reset adapter to factory settings.
Type AT+CWMODE_CUR=1, that set the adapter to client mode.Type AT+CWJAP_CUR with name of network and password.
If connection is done, you see OK. You see that a connection is done.
Set the BME280 and final set.
Set the devices like scheme. Paste code for find IC two adress. Write it up.
Then download Arduino BME280 libraries and install them. Go to the libray master and edit it.
Than open the new IDE sketch and paste the code from description.
It consists of sending comand of ESP8266 function, test BME280 sensor command, GET REQUEST with sensor data.
Finally if all work, you can use heat shrink tubing like you see.
Mission complite, all scripts and comments on discriphon. You can ask any quistions about weather station in comments.
Code for Arduino http://arduino.byethost7.com/

_3u05Tpwasz.png?auto=compress%2Cformat&w=40&h=40&fit=fillmax&bg=fff&dpr=2)


Comments