

Hardware components | ||||||
 |
| × | 1 | |||
| × | 1 | ||||
Software apps and online services | ||||||
 |
| |||||
This tutorial will help you get started with App Inventor + IoT, controlling LED of LinkIt 7697 (Arduino compatible) button and Google Speech recognition.
Hardware
LinkIt 7697 is an Arduino compatible dev board with Wi-Fi / BLE. You can use it like just like any other Aruinos and interfacing with App Inventor through its BLE commutation.
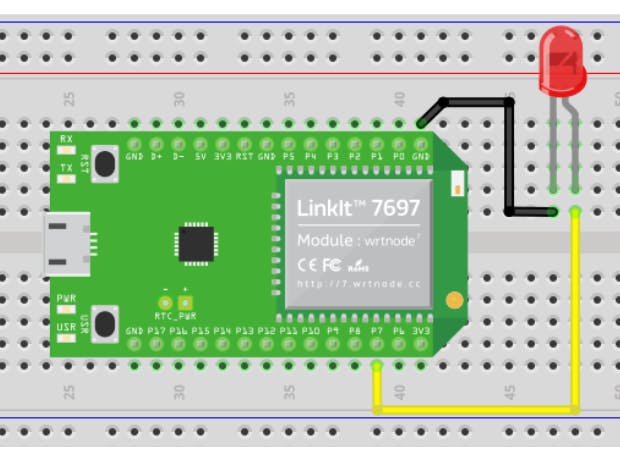
Compared with other Arduino boards with their onboard LED of D13, LinkIt 7697’s onboard LED is D7. In this project, we are going to control this LED by App Inventor. Or you can connect a bigger LED (or relay module) with the help of a breadboard, like below:
Arduino IDE Setup
1. Frist get Arduino IDE 1.8.x version, download the .zip file, unzip and click arduino.exe to open the IDE. From File / Preference menu, enter the link below to Additional Boards Manager URLs field:
http://download.labs.mediatek.com/package_mtk_linkit_7697_index.json
2. Open Tools/ Board/ Board Manager, then search “7697” and install the latest version of 7697 SDK.
3. Download and install CP2102N driver(Windows / MAC/OSX) , then check the COM port in your Device manager. Check if you can see a “Silicon Labs CP210 USB to UART Bridge(COMXX)”, this is the COM port number of your LinkIt 7697.
Finally go back to Arduino IDE, check if IDE had recognized your LinkIt 7697 successfully from Tools/Port menu. For MAC user, it should be something like “
/dev/tty.usbserialXXX…”
Get the BLE address of LinkIt 7697
1. For safety reason, not every board marked its Bluetooth address on its board (Arduino 101 is an exception). In Arduino IDE, first set the board to “LinkIt 7697” then open example “SimplePeripheral” from File/Examples/LBLE menu.
2. Compile and upload to your LinkIt 7697 then open Arduino IDE’s Serial Monitor, should see similar image like below. The [XX:XX:XX:XX:XX:XX] 12-digit string is the Bluetooth address of your LinkIt 7697, we have to modify the addr variable value of your AI2 project. Later we will use the same .ino to receive command from App Inventor.
The purpose of this project is to interact with LinkIt 7697 dev board with App Inventor through BLE communication. The main idea is to toggle the digital pin on/off by two buttons, but since there are so many components in AI2, you can use whatever components which can implement the same idea, that’s why we put a SpeechRecognizer component here. You can easily change the trigger from buttons to speech without modifying the Arduino code.
Now login to your App Inventor account and create a new project.
Designer1. The most used components in this project are buttons (to trigger actions) and labels (to show related messages).
2. And we have to import BLE extension from URL:
http://iot.appinventor.mit.edu/assets/com.bbc.micro:bit.profile.aix
3. Add a BLE extension by dragging it into Viewer.
4. Add a SpeechRecognizer from Media drawer.
After some adjusting, your designer should be like this. Don’t have to be exactly the same, feel free to modify:
Let’s take a look of our blocks step by step:
1. Variable for Bluetooth address Please replace the value with what you get from Arduino’s Serial Monitor.
2. Initialize and connect
The app will start scanning for BLE devices nearby. In Button_connect event, we will check current connect status then decide to connect or disconnect.
3. BLE Connected
When connected successfully (BluetoothLE.Connectedevent), we show related messages on several components and enabled Button_open and Button_close to be clicked.
4. Turn on LED when you touch the button
When you touch the button (Button_open.TouchDown event), first we show related message and send out a number 1 by BluetoothLE.WriteIntValue method. Notice that the service_uuid and characteristic_uuid must be identical with what in Arduino sketch. LinkIt 7697 will put its digital pin #7 to HIGH voltage level, therefore the LED is turned on.
5. Turn off LED when you no longer touch the button
We are doing almost exactly the same when you remove finger off the button (Button_open.TouchUp event) except sending out number 0 instead of 1. LinkIt 7697 will put its digital pin #7 to LOW voltage level, therefore the LED is turned off.
6. Click to start recognizing speech
SpeechRecognizer will ready to receive any voices(SpeechRecognizer.GetText) when Button_Speech is clicked, you screen will show up a Google microphone icon, you can say “light on” and “light off” for now.
In SpeechRecognizer.AfterGettingText event, we check whether the processed result(one at a time) by Google is matched with what we set: “light on” and “light off”. If it is “light on”, then send out a number 1 by BluetoothLE.WriteIntValue method; and if it is “light off” then send out number 0.
Any idea? Here we just change the trigger of App Inventor, LinkIy 7697 is still wait 0/1 to toggle its pin. You can extend the same idea to other trigger events like orientation sensor or someone is give a call (PhoneCall.PhoneCallStartedevent).
7. Disconnect
The Bluetooth connection will be disconnected if you click the Button_connect or pressed the USS button(D6) of LinkIt 7697. This will reset the app to initial state and wait for next connect request.
check the file attached.
Have Fun!Make sure your LinkIt 7697 is running correctly as a BLE peripheral.
Open your app and click Connect button, you should see the ON/OFF two buttons are ready to be clicked. Just click ON button to light on the LED and OFF button to light off. And click Button Speech to say “light on” and “light off” to do the same thing.
Brainstorming1. Use orientation sensor to turn on/off the LED.
2. Add two more buttons to trigger another LED on LinkIt 7697 (hint: more cases in Arduino sketch!)


Comments