

Hardware components | ||||||
| × | 1 | ||||
 |
| × | 1 | |||
 |
| × | 1 | |||
 |
| × | 1 | |||
 |
| × | 1 | |||
 |
| × | 1 | |||
| × | 2 | ||||
 |
| × | 1 | |||
Software apps and online services | ||||||
 |
| |||||
About this project
Read moreUsing the Micro:bit & xCHIPs, assembly of this humidity meter is effortless. Coding is a piece of cake with the blocks software too! This project can be completed in under 5 minutes.
IntroductionI built this humidity meter using the Micro:Bit and a couple of ☒CHIPs from XinaBox. The XinaBox technology made this project extremely easy to do by eliminating the need for soldering and extra tools. The Micro:bit interface allows me to program easily. This project is an adaption of my previous Micro:bit Temperature Monitor project, showcasing another application of the SW01 sensor.
Step 1: Assemble the circuit- Click the OD01 and SW01 together using a ☒BUS connector (from the XC10 pack).
Figure 1: Connected OD01 and SW01
- Click 2 ☒BUS connectors to the left side of the IM02 then click on the connected SW01 and OD01. Make sure that the ☒CHIPs faces the same way up, so you can see the SW01 name and the IM02 name both facing up.
- Use another ☒BUS connector to connect the MD01 to the PB04. Set aside the connected PB04 and MD01 with 3 ☒BUS connectors and the AA batteries.
- Click the Micro:Bit into the IM02. Make sure the LEDs faces up - same way as the SW01 name and the IM02 name.
Figure 2: Connected OD01, SW01, IM02 and Micro:bit
- Attach a Micro-USB connection from your computer to the Micro:Bit. Notice the yellow LED on the bottom side turning on.
- Open a browser and go to makecode.microbit.org
- Scroll down to "Advanced"
- Then Scroll down to "Add Package"
Figure 3: Finding "Add Package"
- Search for "weather" and click on "weather-bit" to add the package
- Repeat points 2 and 3
- Then paste this URL into the search bar : https://github.com/xinabox/pxt-OD01 then click on OD01 to add the package
Figure 4: Adding the packages
- You now have all the necessary packages.
- Drag and drop code elements until you get something that looks like the image below.
Figure 5: The code in Blocks
- You can also cheat and click on the "{ } JavaScript" button on the top and simply copy and paste the code into the code section below. Click on "Blocks" again to see the result.
- Click on "Download"
- Drag the downloaded file, typically named: microbit-Untitled.hex, to your Micro:Bit drive, typically name: MICROBIT.
- You should see the "X" on the rolling LED display on the Micro:bit and the string "Humidity Project" on the OLED screen on the OD01
- Shake the unit. The Humidity reading should show as seen below. If it does then your project is working.
Figure 6: First Reading
- Press button "A" on the Micro:bit to receive a humidity range. As seen below. The ranges are: "DRY" - when relative humidity is below 30%; "Moderate" - when relative humidity is above 30% but below 70% and "HUMID!!!" - when relative humidity is above 70%
Figure 7: Humidity range example
- If it doesn't show appropriately, retrace your steps to pick up the mistake.
- Disconnect the Micro:bit from the Micro-USB connection.
- Insert the AA batteries into the PB04
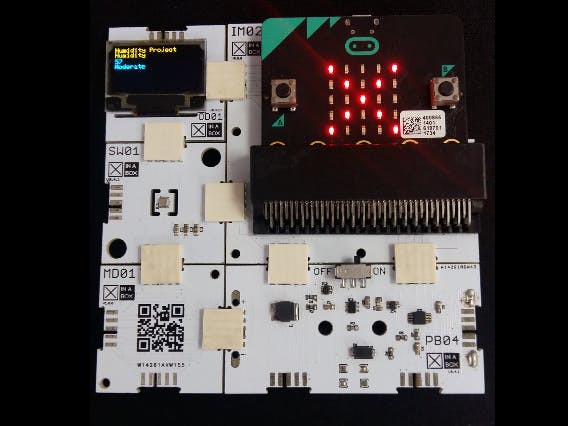
- Use the 3 ☒BUS connectors to connect the PB04 and MD01 to the IM02and SW01 as seen in the picture below.
- Turn the switch on the PB04 on.
- Now your Micro:bit humidity meter is portable and ready to be placed/used wherever you choose.

13 projects • 8 followers
A student exploring the world of coding and IoT from a beginners' perspective


Comments