

Hardware components | ||||||
 |
| × | 1 | |||
 |
| × | 1 | |||
| × | 1 | ||||
 |
| × | 1 | |||
 |
| × | 1 | |||
 |
| × | 1 | |||
Software apps and online services | ||||||
 |
| |||||
| ||||||
Introduction
Step 4: Uploading the code
Read moreI built this project using XinaBox ☒CHIPS and Arduino IDE. It is a 5 min project , that allows you to receive weather data on your phone via the Blynk app and on the OLED screen of the OD01. This project is so useful because you can monitor weather wherever you choose and get updates directly on your phone via the app. I chose to use the ☒CHIPS because they are user friendly, they also eliminate the need for soldering and serious circuit design. Using Arduino IDE I could easily program the ☒CHIPS.
Step 1: Downloading the Libraries- Go to Github.xinabox
- Download xCore ZIP
- Install it into Arduino IDE by going to "Sketch", "Include Library", then "Add .ZIP Library". As seen below
Figure 1: Adding the ZIP libraries
- Download xSW01 ZIP
- Add the library the same way as you did for the xCore.
- You also need install the Blynk library so you can use the app. You can find it here
- Before you can programme you need to ensure you're using the correct board. In this project I make use of the Generic ESP8266 which is in the CW01 ☒CHIP. You can download the board library here.
- Connect the IP01, CW01, SW01, SL01 and OD01 using ☒BUS Connectors. Make sure the ☒CHIPS' names are orientated correctly.
Figure 2: Connected ☒CHIPS
- Now insert the IP01 and connected ☒CHIPS into an available USB port.
- Download or copy and paste the code from the "CODE" heading into your Arduino IDE. Enter your auth token, WiFi name and password where indicated.
- Alternatively you could create your own code using the relevant principles to achieve the same objective
- To ensure there are no errors compile the code.
- After installing the Blynk app free from your app store it is time to do the Project Setup.
- Before clicking "Log In" after entering your email address and password ensure your "Server Settings" are set to "BLYNK".
Figure 3: Server Settings
- Log in.
- Create New Project.
- Choose device "ESP8266"
Figure 4: Choosing the device/board
- Assign a project name
- Receive "Auth Token" notification and email containing the "Auth Token".
Figure 5: Auth Token notification
- Go to the "Widget Box"
Figure 6: Widget Box
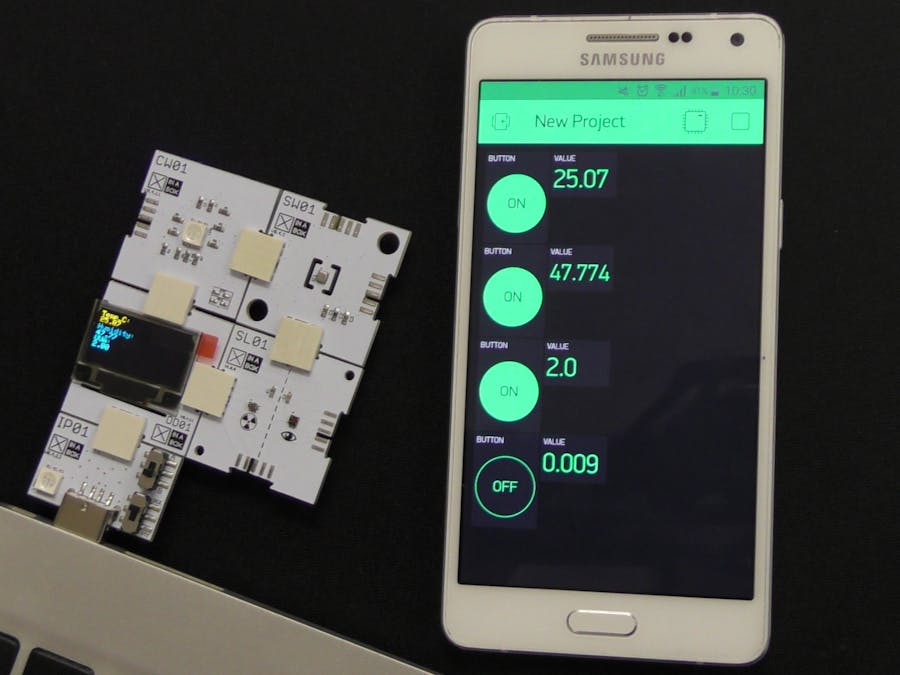
- Add 4 "Buttons" and 4 "Value Displays"
- Assign the respective "Buttons" and "Value Displays" their Virtual Pins as specified in the "CODE". I used even numbers for "Buttons" and corresponding odd numbers for the "Value Displays"
- This setup can be adjusted to suit your needs as you adjust your code.
Figure 7: Project Dashboard (Disclaimer: Ignore the values this is a screenshot after I tested the weather station. Your should be similar, just with blank faces like V7)
- After successful compilation in Step 2(no errors found) you may upload the code to your ☒CHIPS. Ensure the switches are facing "B" and "DCE" respectively before uploading.
- Once the upload is successful, open the Blynk app on your mobile device.
- Open your project from Step 3.
Figure 8
- Press play and press the respective "Buttons" so that the data can be shown in your app and on the OLED screen.
- Now your Blynk weather station is ready to GO!

13 projects • 8 followers
A student exploring the world of coding and IoT from a beginners' perspective


Comments