

Hardware components | ||||||
_wzec989qrF.jpg?auto=compress%2Cformat&w=48&h=48&fit=fill&bg=ffffff) |
| × | 1 | |||
 |
| × | 4 | |||
 |
| × | 3 | |||
 |
| × | 1 | |||
 |
| × | 12 | |||
This project shows you how to make traffic lights using Arduino. It is going to be split into 3 parts:
- Traffic Lights
- Traffic Lights with Button
- Traffic Lights with Button (improved in delay)
At the end of this section, your lights will look like this:
Now, lets start.
The Schematic:You might connect the wires into different pins. So if you do, you must remember to change the code later on. If your Traffic Lights doesn't work, please check the code for errors and/or your circuit for:
- whether your LEDs are the right way round.
- whether your wires are connected properly across the circuit.
- whether you have connected your wires into the correct pins.
To start, add this to your code. This indicates which light goes into which pin.
int red = 3;
int yellow = 4;
int green = 5;
In the void setup() function, add the following. It will tell the MCU whether the pins are Input or Output.
void setup() {
   pinMode(red, OUTPUT);
   pinMode(yellow, OUTPUT);
   pinMode(green, OUTPUT);
}
Then, add the following to the void loop() function.
void loop() {
   changeLights();
   delay(12000);
}
Obviously, the MCU doesn't know what the function changeLights() is, so we need to 'tell' it by adding this function to the code.
void changeLights(){

// green off, yellow on for 3 seconds
   digitalWrite(green, LOW);
   digitalWrite(yellow, HIGH);
   digitalWrite(red, LOW);
   delay(3000);

// turn off yellow, then turn red on for 5 seconds
   digitalWrite(green, LOW);
   digitalWrite(yellow, LOW);
   digitalWrite(red, HIGH);
   delay(4000);

// red and yellow on for 2 seconds (red is already on though)
   digitalWrite(green, LOW);
   digitalWrite(yellow, HIGH);
   digitalWrite(red, HIGH);
   delay(2000);
// turn off red and yellow, then turn on green
   digitalWrite(green, HIGH);
   digitalWrite(yellow, LOW);
   digitalWrite(red, LOW);
   delay(3000);
}
I got this code from makeuseof but keep on reading if you want to see the Traffic Light with Button and improvement to delay.
In the end, the sequence should be like the one in the video - (this one starts on yellow lights) yellow, red, red+yellow, green. This sequence will repeat if you let it.
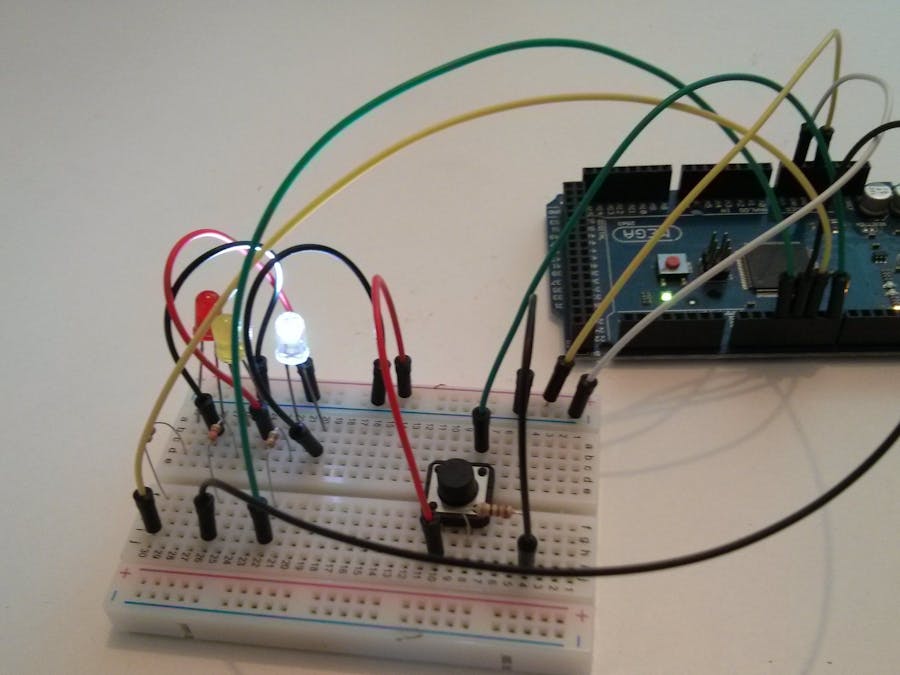
Traffic Lights with Button:In this section, the project will guide you through the process of adding a button to control when the Traffic Lights change. The end result should look like this:
First of, we need to build a circuit. Follow these schematics to build yours. Remember, if you connect your wires into different pins, please remember to update the code.
The Schematic:Now, lets look at the code.
The Code:Add the line below to your code. It tells the MCU which pin the button is connected to.
int button = 7;
Now, in the void setup() function, we need to tell the MCU whether the button is an Input or Output. It is also recommended that you should indicate what is the default state for LEDs.
   pinMode(button, INPUT);
   digitalWrite(green, HIGH);
   digitalWrite(red, LOW);
   digitalWrite(yellow, LOW);
Then, in the void loop() function, add the if() statement so that when the button is pressed, function changeLights() is called.
if (digitalRead(button) == HIGH){
       delay(15); // software debounce
       if (digitalRead(button) == HIGH) {
           // if the switch is HIGH, ie. pushed down - change the lights!
           changeLights();
           delay(10000);
       }
   }
Every time the button is pressed, digitalRead(button) becomes HIGH, and so the changeLights() function will be called. In the function, after changing the lights, the delay() function is used to wait before changing them again. The changeLights() is kept the same.
This code makes the traffic lights work as before but it only changes when you press the button.
Traffic Lights with Button (delay improvement):If you've noticed in the previous section, when you lift up your finger while the lights are changing, it keeps on changing instead of stopping. It is because of the delay() function used in the previous code, the micro-processor wastes its power and time in that function and cannot check for the button anymore.
We want to make the LEDs immediately reset when releasing the button at anytime, so we will replace the delay() function. To do this, we need to check whether the button is still being pressed while delaying the process by using the for loop.
The result should look like this:
As you can see, in this video, after releasing the button, the lights went back to the initial states.
The Schematic:The schematic is the same as before.
We don't need to add anymore components so lets move onto the void loop() function. In here, as you will see, we got rid of the delay() function and now, added an else() to the if() statement. This is where we need to set the default states for LEDs. Why? When you lift your finger, the sequence will not continue and so it will go back to the default order - green on, yellow and red off.
void loop() {
if (digitalRead(button) == HIGH){
       delay(15); // software debounce
       if (digitalRead(button) == HIGH) {
           // if the switch is HIGH, ie. pushed down - change the lights!
           changeLights();
       }
   }
   else {
     digitalWrite(green, HIGH);
     digitalWrite(red, LOW);
     digitalWrite(yellow, LOW);
   }
}
Now, all we need to do is to update all the delay() functions from the changeLights() to this.
// this is to check if button is still pressed while delaying
   for(long int i = 0; i < 200000; i++){
     // if button is released
     if (digitalRead(button) == LOW) {
       return;
     }
   }
In each loop, the microprocessor will check the button. If it is released, the return command will be called to end changeLights(). From my guess, each time a for loop is executed, it probably takes 10 micro-seconds. Therefore, in order to delay 2 seconds, we need to loop 200,000 times, and 600,000 times for 6 seconds.
Have fun with your project
Update (29/07/2018): Instead of using the improvement in delay method, you could use an interrupt. In my project named 'Ultrasonic Sensors' , you will be able to see an Interrupt() function being used.

_3u05Tpwasz.png?auto=compress%2Cformat&w=40&h=40&fit=fillmax&bg=fff&dpr=2)
Comments