Amol DisaleBrijesh Singh
Published © GPL3+

Stopwatch Using Arduino

Use an Arduino Nano to make a simple stopwatch!

BeginnerWork in progress10 hours44,305
Stopwatch Using Arduino

Things used in this project

Hardware components

Arduino Nano R3
Arduino Nano R3
×1
Grove - 16 x 2 LCD (Black on Yellow)
Seeed Studio Grove - 16 x 2 LCD (Black on Yellow)
×1
Pushbutton switch 12mm
SparkFun Pushbutton switch 12mm
×2
Screw Terminal 2-Pin
×1
General Purpose Breadboard PCB
×1
10k pot
×1
Resistor 330 ohm
×1

Software apps and online services

Arduino IDE
Arduino IDE

Hand tools and fabrication machines
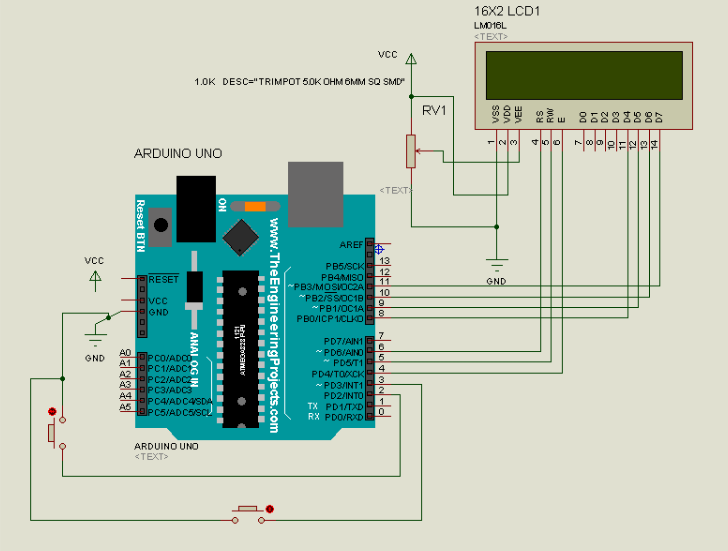
Soldering iron (generic)

Story

Read more

Schematics

Arduino StopWatch Circuit Connection

The connection is shown in Proteus Software!

Code

Arduino StopWatch Code

Arduino
Stopwatch function implemented using Arduino Nano
// include the library code:
#include <LiquidCrystal.h>
#include <Bounce2.h>

// initialize the library by associating any needed LCD interface pin
// with the arduino pin number it is connected to
const int rs = 6, rw = 5, en = 4, d4 = 8, d5 = 9, d6 = 10, d7 = 11;

//LiquidCrystal(rs, rw, enable, d4, d5, d6, d7) 
LiquidCrystal lcd(rs, rw, en, d4, d5, d6, d7);

const byte ledPin = 13;

const byte startButton = 2;
// Instantiate a Bounce object
Bounce startDebouncer1 = Bounce(); 

const byte resetButton = 3;
// Instantiate another Bounce object
Bounce resetDebouncer2 = Bounce();  

void setup() {  
  pinMode(startButton, INPUT_PULLUP);
  // After setting up the button, setup the Bounce instance :
  startDebouncer1.attach(startButton);
  startDebouncer1.interval(5); // interval in ms
    
  pinMode(resetButton, INPUT_PULLUP);
  // After setting up the button, setup the Bounce instance :
  resetDebouncer2.attach(resetButton);
  resetDebouncer2.interval(5); // interval in ms
  
  pinMode(ledPin, OUTPUT);
  
  // set up the LCD's number of columns and rows:
  lcd.begin(16, 2);
  lcd.setCursor(0, 0);
  // Print a message to the LCD.
  lcd.print("*** StopWatch **");
  lcd.setCursor(0, 1);
  lcd.print("***  Project ***");

  delay(500);

  // clear screen for the next loop:
  lcd.clear();
  
  lcd.setCursor(0, 0);
  lcd.print("Press B-Strt/Stp");
  
  lcd.setCursor(0, 1);
  lcd.print("Press R-Reset");

  Serial.begin(9600);

  Serial.println("StopWatch using Arduino Nano");
  Serial.println("Press Following Switches:- ");
  Serial.println("Black Switch for Start/Stop");
  Serial.println("Red Switch for Reset");
}


bool startState = LOW;
bool resetState = LOW;

unsigned long startMillis;
unsigned long currentMillis;
unsigned long elapsedMillis;

void loop() {
  // Update the Bounce instances :
  startDebouncer1.update();

   if ( startDebouncer1.fell() ) {     // Call code if button transitions from HIGH to LOW
     startState = !startState;         // Toggle start button state
     startMillis = millis();
   }

  if (startState)
  {
    currentMillis = millis();
    elapsedMillis = (currentMillis - startMillis);
    
    lcd.setCursor(0, 0);
    lcd.print("SW (hh:mm:ss:ms)");
    lcd.setCursor(0, 1);
    lcd.print("                ");

    Serial.print("elapsedMillis: ");
    Serial.print(elapsedMillis);
    Serial.println("");
    
    unsigned long durMS = (elapsedMillis%1000);       //Milliseconds
    unsigned long durSS = (elapsedMillis/1000)%60;    //Seconds
    unsigned long durMM = (elapsedMillis/(60000))%60; //Minutes
    unsigned long durHH = (elapsedMillis/(3600000));  //Hours
    durHH = durHH % 24; 
    
    Serial.print("Time: ");
    Serial.print(durHH);
    Serial.print(" : ");
    Serial.print(durMM);
    Serial.print(" : ");
    Serial.print(durSS);
    Serial.print(" : ");
    Serial.print(durMS);
    Serial.println("");
    
    String durMilliSec = timeMillis(durHH, durMM, durSS,durMS);
    lcd.setCursor(0, 1);
    lcd.print(durMilliSec);
    
    Serial.println("******************************");
    Serial.println("");
    
    delay(150);
  }
  
  resetDebouncer2.update();

  if (resetDebouncer2.fell())
  {
    resetState = HIGH;
  }

  if (resetState)
  {
    // clear screen for the next loop:
    lcd.clear();
    
    lcd.setCursor(0, 0);
    lcd.print("Press B-Strt/Stp");
    
    lcd.setCursor(0, 1);
    lcd.print("Press R-Reset");

    Serial.println("StopWatch using Arduino Nano");
    Serial.println("Press Following Switches:- ");
    Serial.println("Black Switch for Start/Stop");
    Serial.println("Red Switch for Reset");
    Serial.println("");

    delay(100);
    
    resetState = LOW;
  }
     
}

String timeMillis(unsigned long Hourtime,unsigned long Mintime,unsigned long Sectime,unsigned long MStime)
{
  String dataTemp = "";

  if (Hourtime < 10)
  {
    dataTemp = dataTemp + "0" + String(Hourtime)+ "h:";
  }
  else{
    dataTemp = dataTemp + String(Hourtime)+ "h:";
  }
  
  if (Mintime < 10)
  {
    dataTemp = dataTemp + "0" + String(Mintime)+ "m:";
  }
  else{
    dataTemp = dataTemp + String(Mintime)+ "m:";
  }
  
  if (Sectime < 10)
  {
    dataTemp = dataTemp + "0" + String(Sectime)+ "s:";
  }
  else{
    dataTemp = dataTemp + String(Sectime)+ "s:";
  }
  
  dataTemp = dataTemp + String(MStime);

  Serial.print("String Time: ");
  Serial.println(dataTemp);
  
  return dataTemp;
}

Credits

Amol Disale

Amol Disale

9 projects • 100 followers
I am passionate about the idea of open-source hardware and software. I am ready to help in prototyping IoT, Smart Home, and other products.
Brijesh Singh

Brijesh Singh

23 projects • 37 followers
Utilizing the spare time to Make and Share DIY Electronics and IoT projects with the online maker community.

Comments