
Hardware components | ||||||
| × | 12 | ||||
 |
| × | 1 | |||
Hand tools and fabrication machines | ||||||
_LWNORVejBN.png?auto=compress%2Cformat&w=48&h=48&fit=fill&bg=ffffff) |
| |||||
Hey Everyone, how you doing.
So here's something intriguing: a PCB snowflake with 12 WS2812B LEDs, but these LEDs don't come in the typical WS2812B package.
In this project, 4020 LEDs are used rather than 5050 package LEDs.
This snowflake PCB is a test board for the 4020 LEDs.
This post is about how we can use these new WS2812B 4020 LEDs in our projects, so let's get started.
Material RequiredThese are the things used in this build-
- WS2812 4020 LEDs
- Snowflake PCB
- Solderpaste
- XIAO Dev Board
- Breadboard
- Jumper wires
WS2812B-4020 It is a smart external control LED that combines lighting and control circuitry all embedded in a single form factor.
This LED's internal components include a high-precision internal oscillator, a programmable constant current control portion, a smart digital interface data latch, signal shaping, and an amplifying driving circuit, all in a single wafer/chip.
It functions similarly to other WS2812-based LEDs, uses the same code because of the same communication protocol, and is a suitable replacement for WS2812b LEDs that are currently on the market.
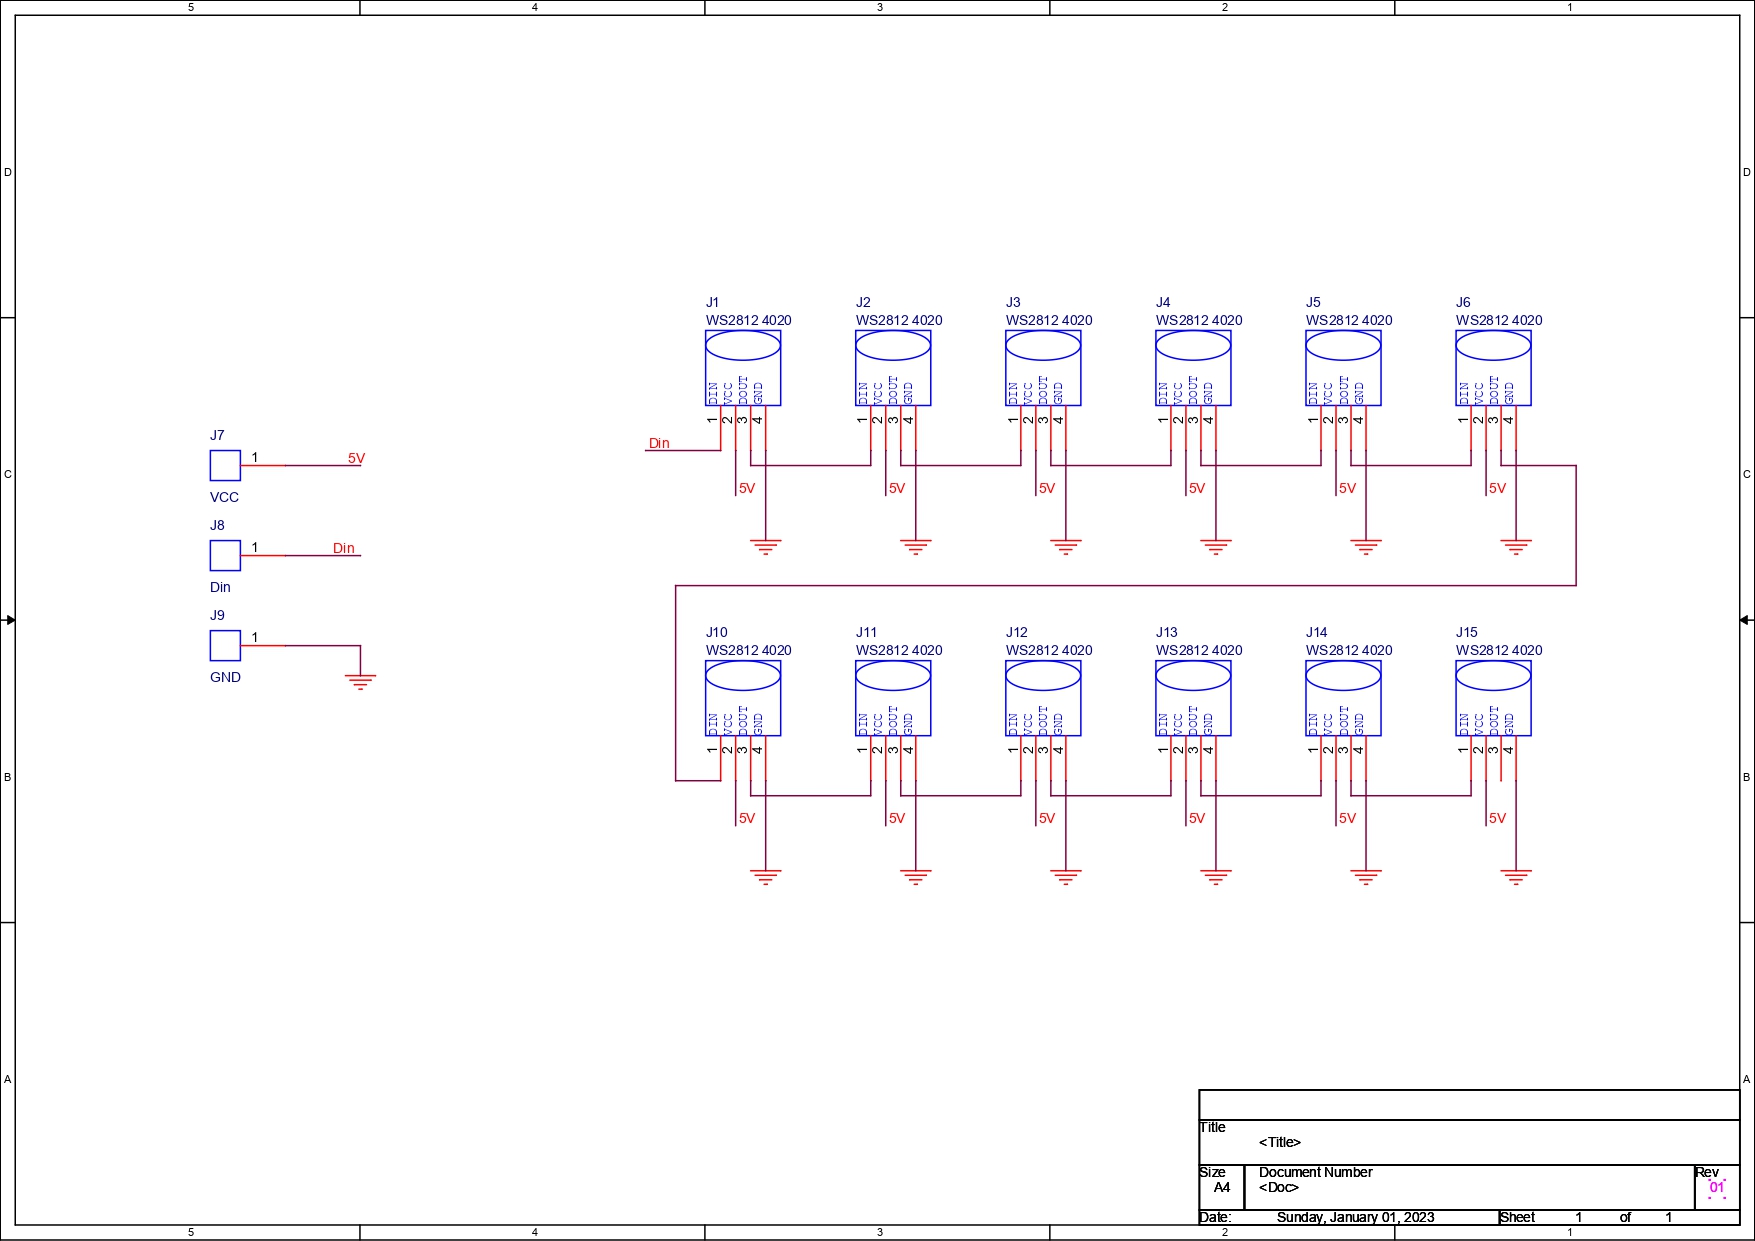
PCB DesignThe PCB schematic for this project begins with 12 of these WS2812B LEDs arranged in parallel, with the first pixel's Dout connected to the second led's Din, the second led's Dout connected to the third led's Din, and so on, all the way up to the last LED.
Three separate CON1 ports have VCC, GND, and Din Pins connected so that we may subsequently add a wire to the CON1 port to provide a microcontroller input for controlling the leds.
After finalizing the schematic, we convert it into a PCB design.
Since test boards are typically made in a rectangular shape, which is dull and fairly standard, I added a snowflake shape design to the PCB Editor to spice things up and make them festive since it's the winter season and snowflakes are somehow related to it.
Seeed Fusion StudioAs for the PCBs of this snowflake PCB project, they were sent to SEEED Studio for samples.
An order was placed for a white solder mask with black silkscreen, and PCBs arrived in less than a week, which was super fast.
The quality was very good considering the price, which was also pretty low.
The PCB Quality of this snowflakePCB WAS SUPER!
Seeed Fusion PCB Service offers one-stop prototyping for PCB manufacture and PCB assembly and as a result, they produce superior quality PCBs and Fast Turnkey PCBA within 7 working days.
Seeed Studio Fusion PCB Assembly Service takes care of the entire fabrication process, from PCB manufacturing and parts sourcing to assembly and testing services, so you can be sure they are getting a quality product.
After gauging market interest and verifying a working prototype, Seeed Propagate Service can help you bring the product to market with professional guidance and a strong network of connections.
Next, we prepare for the circuit construction process.
PCB Assembly- We start first with the solder paste dispensing process by adding solder paste to each led pad one by one.
- We then used an ESD tweezer to carefully pick and place all the SMD LEDs in their assigned places one by one, which took like 30 seconds.
- After the "pick and place process, " we carefully lifted the whole circuit board and placed it on my new Mini Hotplate.
The hotplate heats the PCB from below up to the solder paste melting temperature. As a result, the solder paste melts and components get solder on their pads.
- At last, we add three jumper wires to the CON1 port of the PCB so we can connect a Microcontroller with the VCC GND and Din port of leds.
For testing this LED Board, we use the XIAO M0 Board which is a SAMD21-based Dev board with operating speed up to 48MHz, 32KB of SRAM, and 256KB of onboard flash memory which is plenty for RGB LED Sketches.
for more info about the board- https://www.seeedstudio.com/Seeeduino-XIAO-Arduino-Microcontroller-SAMD21-Cortex-M0+-p-4426.html
We connect the VCC of LED to 5V of XIAO, GND to GND, and D7 pin of XIAO to Din of LED.
Libraries RequiredFor using this test board with WS2812 LEDs, we can utilize a bunch of existing libraries, but we will focus on FASTLED LIBRARY and Adafruit's Neopixel Library for now.
The FASTLED is a library used for controlling a wide variety of LED chipsets, like the ones sold by adafruit (Neopixel, DotStar, LPD8806), Sparkfun (WS2801), and aliexpress.
Here's its GitHub page and you first need to download and install the library in Arduino IDE. https://github.com/FastLED/FastLED
Here's Adafruit's Neopixel Library GitHub page- https://github.com/adafruit/Adafruit_NeoPixel
Example #1 SimpleFor the first test, we will be utilizing Adafruit Neopixel Library, we open Adafruit Neopixel example sketches and upload a sketch called "simple" into the Arduino Board.
Here's the sketch-
#include <Adafruit_NeoPixel.h>
#ifdef __AVR__
  #include <avr/power.h>
#endif

// Which pin on the Arduino is connected to the NeoPixels?
// On a Trinket or Gemma we suggest changing this to 1
#define PIN            7

// How many NeoPixels are attached to the Arduino?
#define NUMPIXELS      12

// When we setup the NeoPixel library, we tell it how many pixels, and which pin to use to send signals.
// Note that for older NeoPixel strips you might need to change the third parameter--see the strandtest
// example for more information on possible values.
Adafruit_NeoPixel pixels = Adafruit_NeoPixel(NUMPIXELS, PIN, NEO_GRB + NEO_KHZ800);

int delayval = 500; // delay for half a second

void setup() {
  // This is for Trinket 5V 16MHz, you can remove these three lines if you are not using a Trinket
#if defined (__AVR_ATtiny85__)
  if (F_CPU == 16000000) clock_prescale_set(clock_div_1);
#endif
  // End of trinket special code

  pixels.begin(); // This initializes the NeoPixel library.
}

void loop() {

  // For a set of NeoPixels the first NeoPixel is 0, second is 1, all the way up to the count of pixels minus one.

  for(int i=0;i<NUMPIXELS;i++){

    // pixels.Color takes RGB values, from 0,0,0 up to 255,255,255
    pixels.setPixelColor(i, pixels.Color(0,150,0)); // Moderately bright green color.

    pixels.show(); // This sends the updated pixel color to the hardware.

    delay(delayval); // Delay for a period of time (in milliseconds).

  }
}
After Uploading, LEDs light up one by one in a sequence, this is like an LED counter Sketch that counts each led one by one.
Example #2 PacificaNow, this is something special, PACIFICA sketch imitates an Ocean wave or water stream, it turns on and off LEDs in such a way that some area looks deep blue in color and some white which looks like moving water steam.
#define FASTLED_ALLOW_INTERRUPTS 0
#include <FastLED.h>
FASTLED_USING_NAMESPACE

#define DATA_PIN            7
#define NUM_LEDS            12
#define MAX_POWER_MILLIAMPS 500
#define LED_TYPE            WS2812B
#define COLOR_ORDER         GRB

//////////////////////////////////////////////////////////////////////////

CRGB leds[NUM_LEDS];

void setup() {
  delay( 3000); // 3 second delay for boot recovery, and a moment of silence
  FastLED.addLeds<LED_TYPE,DATA_PIN,COLOR_ORDER>(leds, NUM_LEDS)
        .setCorrection( TypicalLEDStrip );
  FastLED.setMaxPowerInVoltsAndMilliamps( 5, MAX_POWER_MILLIAMPS);
}

void loop()
{
  EVERY_N_MILLISECONDS( 20) {
    pacifica_loop();
    FastLED.show();
  }
}

//////////////////////////////////////////////////////////////////////////
//
// The code for this animation is more complicated than other examples, and
// while it is "ready to run", and documented in general, it is probably not
// the best starting point for learning.  Nevertheless, it does illustrate some
// useful techniques.
//
//////////////////////////////////////////////////////////////////////////
//
// In this animation, there are four "layers" of waves of light.
//
// Each layer moves independently, and each is scaled separately.
//
// All four wave layers are added together on top of each other, and then
// another filter is applied that adds "whitecaps" of brightness where the
// waves line up with each other more.  Finally, another pass is taken
// over the led array to 'deepen' (dim) the blues and greens.
//
// The speed and scale and motion each layer varies slowly within independent
// hand-chosen ranges, which is why the code has a lot of low-speed 'beatsin8' functions
// with a lot of oddly specific numeric ranges.
//
// These three custom blue-green color palettes were inspired by the colors found in
// the waters off the southern coast of California, https://goo.gl/maps/QQgd97jjHesHZVxQ7
//
CRGBPalette16 pacifica_palette_1 =
    { 0x000507, 0x000409, 0x00030B, 0x00030D, 0x000210, 0x000212, 0x000114, 0x000117,
      0x000019, 0x00001C, 0x000026, 0x000031, 0x00003B, 0x000046, 0x14554B, 0x28AA50 };
CRGBPalette16 pacifica_palette_2 =
    { 0x000507, 0x000409, 0x00030B, 0x00030D, 0x000210, 0x000212, 0x000114, 0x000117,
      0x000019, 0x00001C, 0x000026, 0x000031, 0x00003B, 0x000046, 0x0C5F52, 0x19BE5F };
CRGBPalette16 pacifica_palette_3 =
    { 0x000208, 0x00030E, 0x000514, 0x00061A, 0x000820, 0x000927, 0x000B2D, 0x000C33,
      0x000E39, 0x001040, 0x001450, 0x001860, 0x001C70, 0x002080, 0x1040BF, 0x2060FF };


void pacifica_loop()
{
  // Increment the four "color index start" counters, one for each wave layer.
  // Each is incremented at a different speed, and the speeds vary over time.
  static uint16_t sCIStart1, sCIStart2, sCIStart3, sCIStart4;
  static uint32_t sLastms = 0;
  uint32_t ms = GET_MILLIS();
  uint32_t deltams = ms - sLastms;
  sLastms = ms;
  uint16_t speedfactor1 = beatsin16(3, 179, 269);
  uint16_t speedfactor2 = beatsin16(4, 179, 269);
  uint32_t deltams1 = (deltams * speedfactor1) / 256;
  uint32_t deltams2 = (deltams * speedfactor2) / 256;
  uint32_t deltams21 = (deltams1 + deltams2) / 2;
  sCIStart1 += (deltams1 * beatsin88(1011,10,13));
  sCIStart2 -= (deltams21 * beatsin88(777,8,11));
  sCIStart3 -= (deltams1 * beatsin88(501,5,7));
  sCIStart4 -= (deltams2 * beatsin88(257,4,6));

  // Clear out the LED array to a dim background blue-green
  fill_solid( leds, NUM_LEDS, CRGB( 2, 6, 10));

  // Render each of four layers, with different scales and speeds, that vary over time
  pacifica_one_layer( pacifica_palette_1, sCIStart1, beatsin16( 3, 11 * 256, 14 * 256), beatsin8( 10, 70, 130), 0-beat16( 301) );
  pacifica_one_layer( pacifica_palette_2, sCIStart2, beatsin16( 4,  6 * 256,  9 * 256), beatsin8( 17, 40,  80), beat16( 401) );
  pacifica_one_layer( pacifica_palette_3, sCIStart3, 6 * 256, beatsin8( 9, 10,38), 0-beat16(503));
  pacifica_one_layer( pacifica_palette_3, sCIStart4, 5 * 256, beatsin8( 8, 10,28), beat16(601));

  // Add brighter 'whitecaps' where the waves lines up more
  pacifica_add_whitecaps();

  // Deepen the blues and greens a bit
  pacifica_deepen_colors();
}

// Add one layer of waves into the led array
void pacifica_one_layer( CRGBPalette16& p, uint16_t cistart, uint16_t wavescale, uint8_t bri, uint16_t ioff)
{
  uint16_t ci = cistart;
  uint16_t waveangle = ioff;
  uint16_t wavescale_half = (wavescale / 2) + 20;
  for( uint16_t i = 0; i < NUM_LEDS; i++) {
    waveangle += 250;
    uint16_t s16 = sin16( waveangle ) + 32768;
    uint16_t cs = scale16( s16 , wavescale_half ) + wavescale_half;
    ci += cs;
    uint16_t sindex16 = sin16( ci) + 32768;
    uint8_t sindex8 = scale16( sindex16, 240);
    CRGB c = ColorFromPalette( p, sindex8, bri, LINEARBLEND);
    leds[i] += c;
  }
}

// Add extra 'white' to areas where the four layers of light have lined up brightly
void pacifica_add_whitecaps()
{
  uint8_t basethreshold = beatsin8( 9, 55, 65);
  uint8_t wave = beat8( 7 );

  for( uint16_t i = 0; i < NUM_LEDS; i++) {
    uint8_t threshold = scale8( sin8( wave), 20) + basethreshold;
    wave += 7;
    uint8_t l = leds[i].getAverageLight();
    if( l > threshold) {
      uint8_t overage = l - threshold;
      uint8_t overage2 = qadd8( overage, overage);
      leds[i] += CRGB( overage, overage2, qadd8( overage2, overage2));
    }
  }
}

// Deepen the blues and greens
void pacifica_deepen_colors()
{
  for( uint16_t i = 0; i < NUM_LEDS; i++) {
    leds[i].blue = scale8( leds[i].blue,  145);
    leds[i].green= scale8( leds[i].green, 200);
    leds[i] |= CRGB( 2, 5, 7);
  }
}This sketch creates the appearance of a burning flame by repeatedly flashing RED, YELLOW, and ORANGE colour tones back and forth in a haphazard manner.
#include <FastLED.h>

#define LED_PIN     7
#define COLOR_ORDER GRB
#define CHIPSET     WS2811
#define NUM_LEDS    12

#define BRIGHTNESS  200
#define FRAMES_PER_SECOND 60

bool gReverseDirection = false;

CRGB leds[NUM_LEDS];

void setup() {
  delay(3000); // sanity delay
  FastLED.addLeds<CHIPSET, LED_PIN, COLOR_ORDER>(leds, NUM_LEDS).setCorrection( TypicalLEDStrip );
  FastLED.setBrightness( BRIGHTNESS );
}

void loop()
{
  // Add entropy to random number generator; we use a lot of it.
  // random16_add_entropy( random());

  Fire2012(); // run simulation frame

  FastLED.show(); // display this frame
  FastLED.delay(1000 / FRAMES_PER_SECOND);
}


// Fire2012 by Mark Kriegsman, July 2012
// as part of "Five Elements" shown here: http://youtu.be/knWiGsmgycY
////
// This basic one-dimensional 'fire' simulation works roughly as follows:
// There's a underlying array of 'heat' cells, that model the temperature
// at each point along the line.  Every cycle through the simulation,
// four steps are performed:
//  1) All cells cool down a little bit, losing heat to the air
//  2) The heat from each cell drifts 'up' and diffuses a little
//  3) Sometimes randomly new 'sparks' of heat are added at the bottom
//  4) The heat from each cell is rendered as a color into the leds array
//     The heat-to-color mapping uses a black-body radiation approximation.
//
// Temperature is in arbitrary units from 0 (cold black) to 255 (white hot).
//
// This simulation scales it self a bit depending on NUM_LEDS; it should look
// "OK" on anywhere from 20 to 100 LEDs without too much tweaking.
//
// I recommend running this simulation at anywhere from 30-100 frames per second,
// meaning an interframe delay of about 10-35 milliseconds.
//
// Looks best on a high-density LED setup (60+ pixels/meter).
//
//
// There are two main parameters you can play with to control the look and
// feel of your fire: COOLING (used in step 1 above), and SPARKING (used
// in step 3 above).
//
// COOLING: How much does the air cool as it rises?
// Less cooling = taller flames.  More cooling = shorter flames.
// Default 50, suggested range 20-100
#define COOLING  55

// SPARKING: What chance (out of 255) is there that a new spark will be lit?
// Higher chance = more roaring fire.  Lower chance = more flickery fire.
// Default 120, suggested range 50-200.
#define SPARKING 120


void Fire2012()
{
// Array of temperature readings at each simulation cell
  static byte heat[NUM_LEDS];

  // Step 1.  Cool down every cell a little
    for( int i = 0; i < NUM_LEDS; i++) {
      heat[i] = qsub8( heat[i],  random8(0, ((COOLING * 10) / NUM_LEDS) + 2));
    }

    // Step 2.  Heat from each cell drifts 'up' and diffuses a little
    for( int k= NUM_LEDS - 1; k >= 2; k--) {
      heat[k] = (heat[k - 1] + heat[k - 2] + heat[k - 2] ) / 3;
    }

    // Step 3.  Randomly ignite new 'sparks' of heat near the bottom
    if( random8() < SPARKING ) {
      int y = random8(7);
      heat[y] = qadd8( heat[y], random8(160,255) );
    }

    // Step 4.  Map from heat cells to LED colors
    for( int j = 0; j < NUM_LEDS; j++) {
      CRGB color = HeatColor( heat[j]);
      int pixelnumber;
      if( gReverseDirection ) {
        pixelnumber = (NUM_LEDS-1) - j;
      } else {
        pixelnumber = j;
      }
      leds[pixelnumber] = color;
    }
}Finally, here is a sketch that randomly lights an LED of any hue before gradually shifting the light of surrounding LEDs to light them all.
#include "FastLED.h"

#if defined(FASTLED_VERSION) && (FASTLED_VERSION < 3001000)
#warning "Requires FastLED 3.1 or later; check github for latest code."
#endif


#define NUM_LEDS      12
#define LED_TYPE   WS2811
#define COLOR_ORDER   GRB
#define DATA_PIN        7
//#define CLK_PIN       4
#define VOLTS          12
#define MAX_MA       4000

//  TwinkleFOX: Twinkling 'holiday' lights that fade in and out.
//  Colors are chosen from a palette; a few palettes are provided.
//
//  This December 2015 implementation improves on the December 2014 version
//  in several ways:
//  - smoother fading, compatible with any colors and any palettes
//  - easier control of twinkle speed and twinkle density
//  - supports an optional 'background color'
//  - takes even less RAM: zero RAM overhead per pixel
//  - illustrates a couple of interesting techniques (uh oh...)
//
//  The idea behind this (new) implementation is that there's one
//  basic, repeating pattern that each pixel follows like a waveform:
//  The brightness rises from 0..255 and then falls back down to 0.
//  The brightness at any given point in time can be determined as
//  as a function of time, for example:
//    brightness = sine( time ); // a sine wave of brightness over time
//
//  So the way this implementation works is that every pixel follows
//  the exact same wave function over time.  In this particular case,
//  I chose a sawtooth triangle wave (triwave8) rather than a sine wave,
//  but the idea is the same: brightness = triwave8( time ).
//
//  Of course, if all the pixels used the exact same wave form, and
//  if they all used the exact same 'clock' for their 'time base', all
//  the pixels would brighten and dim at once -- which does not look
//  like twinkling at all.
//
//  So to achieve random-looking twinkling, each pixel is given a
//  slightly different 'clock' signal.  Some of the clocks run faster,
//  some run slower, and each 'clock' also has a random offset from zero.
//  The net result is that the 'clocks' for all the pixels are always out
//  of sync from each other, producing a nice random distribution
//  of twinkles.
//
//  The 'clock speed adjustment' and 'time offset' for each pixel
//  are generated randomly.  One (normal) approach to implementing that
//  would be to randomly generate the clock parameters for each pixel
//  at startup, and store them in some arrays.  However, that consumes
//  a great deal of precious RAM, and it turns out to be totally
//  unnessary!  If the random number generate is 'seeded' with the
//  same starting value every time, it will generate the same sequence
//  of values every time.  So the clock adjustment parameters for each
//  pixel are 'stored' in a pseudo-random number generator!  The PRNG
//  is reset, and then the first numbers out of it are the clock
//  adjustment parameters for the first pixel, the second numbers out
//  of it are the parameters for the second pixel, and so on.
//  In this way, we can 'store' a stable sequence of thousands of
//  random clock adjustment parameters in literally two bytes of RAM.
//
//  There's a little bit of fixed-point math involved in applying the
//  clock speed adjustments, which are expressed in eighths.  Each pixel's
//  clock speed ranges from 8/8ths of the system clock (i.e. 1x) to
//  23/8ths of the system clock (i.e. nearly 3x).
//
//  On a basic Arduino Uno or Leonardo, this code can twinkle 300+ pixels
//  smoothly at over 50 updates per seond.
//
//  -Mark Kriegsman, December 2015

CRGBArray<NUM_LEDS> leds;

// Overall twinkle speed.
// 0 (VERY slow) to 8 (VERY fast).
// 4, 5, and 6 are recommended, default is 4.
#define TWINKLE_SPEED 4

// Overall twinkle density.
// 0 (NONE lit) to 8 (ALL lit at once).
// Default is 5.
#define TWINKLE_DENSITY 5

// How often to change color palettes.
#define SECONDS_PER_PALETTE  30
// Also: toward the bottom of the file is an array
// called "ActivePaletteList" which controls which color
// palettes are used; you can add or remove color palettes
// from there freely.

// Background color for 'unlit' pixels
// Can be set to CRGB::Black if desired.
CRGB gBackgroundColor = CRGB::Black;
// Example of dim incandescent fairy light background color
// CRGB gBackgroundColor = CRGB(CRGB::FairyLight).nscale8_video(16);

// If AUTO_SELECT_BACKGROUND_COLOR is set to 1,
// then for any palette where the first two entries
// are the same, a dimmed version of that color will
// automatically be used as the background color.
#define AUTO_SELECT_BACKGROUND_COLOR 0

// If COOL_LIKE_INCANDESCENT is set to 1, colors will
// fade out slighted 'reddened', similar to how
// incandescent bulbs change color as they get dim down.
#define COOL_LIKE_INCANDESCENT 1


CRGBPalette16 gCurrentPalette;
CRGBPalette16 gTargetPalette;

void setup() {
  delay( 3000 ); //safety startup delay
  FastLED.setMaxPowerInVoltsAndMilliamps( VOLTS, MAX_MA);
  FastLED.addLeds<LED_TYPE,DATA_PIN,COLOR_ORDER>(leds, NUM_LEDS)
    .setCorrection(TypicalLEDStrip);

  chooseNextColorPalette(gTargetPalette);
}


void loop()
{
  EVERY_N_SECONDS( SECONDS_PER_PALETTE ) {
    chooseNextColorPalette( gTargetPalette );
  }

  EVERY_N_MILLISECONDS( 10 ) {
    nblendPaletteTowardPalette( gCurrentPalette, gTargetPalette, 12);
  }

  drawTwinkles( leds);

  FastLED.show();
}


//  This function loops over each pixel, calculates the
//  adjusted 'clock' that this pixel should use, and calls
//  "CalculateOneTwinkle" on each pixel.  It then displays
//  either the twinkle color of the background color,
//  whichever is brighter.
void drawTwinkles( CRGBSet& L)
{
  // "PRNG16" is the pseudorandom number generator
  // It MUST be reset to the same starting value each time
  // this function is called, so that the sequence of 'random'
  // numbers that it generates is (paradoxically) stable.
  uint16_t PRNG16 = 11337;

  uint32_t clock32 = millis();

  // Set up the background color, "bg".
  // if AUTO_SELECT_BACKGROUND_COLOR == 1, and the first two colors of
  // the current palette are identical, then a deeply faded version of
  // that color is used for the background color
  CRGB bg;
  if( (AUTO_SELECT_BACKGROUND_COLOR == 1) &&
      (gCurrentPalette[0] == gCurrentPalette[1] )) {
    bg = gCurrentPalette[0];
    uint8_t bglight = bg.getAverageLight();
    if( bglight > 64) {
      bg.nscale8_video( 16); // very bright, so scale to 1/16th
    } else if( bglight > 16) {
      bg.nscale8_video( 64); // not that bright, so scale to 1/4th
    } else {
      bg.nscale8_video( 86); // dim, scale to 1/3rd.
    }
  } else {
    bg = gBackgroundColor; // just use the explicitly defined background color
  }

  uint8_t backgroundBrightness = bg.getAverageLight();

  for( CRGB& pixel: L) {
    PRNG16 = (uint16_t)(PRNG16 * 2053) + 1384; // next 'random' number
    uint16_t myclockoffset16= PRNG16; // use that number as clock offset
    PRNG16 = (uint16_t)(PRNG16 * 2053) + 1384; // next 'random' number
    // use that number as clock speed adjustment factor (in 8ths, from 8/8ths to 23/8ths)
    uint8_t myspeedmultiplierQ5_3 =  ((((PRNG16 & 0xFF)>>4) + (PRNG16 & 0x0F)) & 0x0F) + 0x08;
    uint32_t myclock30 = (uint32_t)((clock32 * myspeedmultiplierQ5_3) >> 3) + myclockoffset16;
    uint8_t  myunique8 = PRNG16 >> 8; // get 'salt' value for this pixel

    // We now have the adjusted 'clock' for this pixel, now we call
    // the function that computes what color the pixel should be based
    // on the "brightness = f( time )" idea.
    CRGB c = computeOneTwinkle( myclock30, myunique8);

    uint8_t cbright = c.getAverageLight();
    int16_t deltabright = cbright - backgroundBrightness;
    if( deltabright >= 32 || (!bg)) {
      // If the new pixel is significantly brighter than the background color,
      // use the new color.
      pixel = c;
    } else if( deltabright > 0 ) {
      // If the new pixel is just slightly brighter than the background color,
      // mix a blend of the new color and the background color
      pixel = blend( bg, c, deltabright * 8);
    } else {
      // if the new pixel is not at all brighter than the background color,
      // just use the background color.
      pixel = bg;
    }
  }
}


//  This function takes a time in pseudo-milliseconds,
//  figures out brightness = f( time ), and also hue = f( time )
//  The 'low digits' of the millisecond time are used as
//  input to the brightness wave function.
//  The 'high digits' are used to select a color, so that the color
//  does not change over the course of the fade-in, fade-out
//  of one cycle of the brightness wave function.
//  The 'high digits' are also used to determine whether this pixel
//  should light at all during this cycle, based on the TWINKLE_DENSITY.
CRGB computeOneTwinkle( uint32_t ms, uint8_t salt)
{
  uint16_t ticks = ms >> (8-TWINKLE_SPEED);
  uint8_t fastcycle8 = ticks;
  uint16_t slowcycle16 = (ticks >> 8) + salt;
  slowcycle16 += sin8( slowcycle16);
  slowcycle16 =  (slowcycle16 * 2053) + 1384;
  uint8_t slowcycle8 = (slowcycle16 & 0xFF) + (slowcycle16 >> 8);

  uint8_t bright = 0;
  if( ((slowcycle8 & 0x0E)/2) < TWINKLE_DENSITY) {
    bright = attackDecayWave8( fastcycle8);
  }

  uint8_t hue = slowcycle8 - salt;
  CRGB c;
  if( bright > 0) {
    c = ColorFromPalette( gCurrentPalette, hue, bright, NOBLEND);
    if( COOL_LIKE_INCANDESCENT == 1 ) {
      coolLikeIncandescent( c, fastcycle8);
    }
  } else {
    c = CRGB::Black;
  }
  return c;
}


// This function is like 'triwave8', which produces a
// symmetrical up-and-down triangle sawtooth waveform, except that this
// function produces a triangle wave with a faster attack and a slower decay:
//
//     / \
//    /     \
//   /         \
//  /             \
//

uint8_t attackDecayWave8( uint8_t i)
{
  if( i < 86) {
    return i * 3;
  } else {
    i -= 86;
    return 255 - (i + (i/2));
  }
}

// This function takes a pixel, and if its in the 'fading down'
// part of the cycle, it adjusts the color a little bit like the
// way that incandescent bulbs fade toward 'red' as they dim.
void coolLikeIncandescent( CRGB& c, uint8_t phase)
{
  if( phase < 128) return;

  uint8_t cooling = (phase - 128) >> 4;
  c.g = qsub8( c.g, cooling);
  c.b = qsub8( c.b, cooling * 2);
}

// A mostly red palette with green accents and white trim.
// "CRGB::Gray" is used as white to keep the brightness more uniform.
const TProgmemRGBPalette16 RedGreenWhite_p FL_PROGMEM =
{  CRGB::Red, CRGB::Red, CRGB::Red, CRGB::Red,
   CRGB::Red, CRGB::Red, CRGB::Red, CRGB::Red,
   CRGB::Red, CRGB::Red, CRGB::Gray, CRGB::Gray,
   CRGB::Green, CRGB::Green, CRGB::Green, CRGB::Green };

// A mostly (dark) green palette with red berries.
#define Holly_Green 0x00580c
#define Holly_Red   0xB00402
const TProgmemRGBPalette16 Holly_p FL_PROGMEM =
{  Holly_Green, Holly_Green, Holly_Green, Holly_Green,
   Holly_Green, Holly_Green, Holly_Green, Holly_Green,
   Holly_Green, Holly_Green, Holly_Green, Holly_Green,
   Holly_Green, Holly_Green, Holly_Green, Holly_Red
};

// A red and white striped palette
// "CRGB::Gray" is used as white to keep the brightness more uniform.
const TProgmemRGBPalette16 RedWhite_p FL_PROGMEM =
{  CRGB::Red,  CRGB::Red,  CRGB::Red,  CRGB::Red,
   CRGB::Gray, CRGB::Gray, CRGB::Gray, CRGB::Gray,
   CRGB::Red,  CRGB::Red,  CRGB::Red,  CRGB::Red,
   CRGB::Gray, CRGB::Gray, CRGB::Gray, CRGB::Gray };

// A mostly blue palette with white accents.
// "CRGB::Gray" is used as white to keep the brightness more uniform.
const TProgmemRGBPalette16 BlueWhite_p FL_PROGMEM =
{  CRGB::Blue, CRGB::Blue, CRGB::Blue, CRGB::Blue,
   CRGB::Blue, CRGB::Blue, CRGB::Blue, CRGB::Blue,
   CRGB::Blue, CRGB::Blue, CRGB::Blue, CRGB::Blue,
   CRGB::Blue, CRGB::Gray, CRGB::Gray, CRGB::Gray };

// A pure "fairy light" palette with some brightness variations
#define HALFFAIRY ((CRGB::FairyLight & 0xFEFEFE) / 2)
#define QUARTERFAIRY ((CRGB::FairyLight & 0xFCFCFC) / 4)
const TProgmemRGBPalette16 FairyLight_p FL_PROGMEM =
{  CRGB::FairyLight, CRGB::FairyLight, CRGB::FairyLight, CRGB::FairyLight,
   HALFFAIRY,        HALFFAIRY,        CRGB::FairyLight, CRGB::FairyLight,
   QUARTERFAIRY,     QUARTERFAIRY,     CRGB::FairyLight, CRGB::FairyLight,
   CRGB::FairyLight, CRGB::FairyLight, CRGB::FairyLight, CRGB::FairyLight };

// A palette of soft snowflakes with the occasional bright one
const TProgmemRGBPalette16 Snow_p FL_PROGMEM =
{  0x304048, 0x304048, 0x304048, 0x304048,
   0x304048, 0x304048, 0x304048, 0x304048,
   0x304048, 0x304048, 0x304048, 0x304048,
   0x304048, 0x304048, 0x304048, 0xE0F0FF };

// A palette reminiscent of large 'old-school' C9-size tree lights
// in the five classic colors: red, orange, green, blue, and white.
#define C9_Red    0xB80400
#define C9_Orange 0x902C02
#define C9_Green  0x046002
#define C9_Blue   0x070758
#define C9_White  0x606820
const TProgmemRGBPalette16 RetroC9_p FL_PROGMEM =
{  C9_Red,    C9_Orange, C9_Red,    C9_Orange,
   C9_Orange, C9_Red,    C9_Orange, C9_Red,
   C9_Green,  C9_Green,  C9_Green,  C9_Green,
   C9_Blue,   C9_Blue,   C9_Blue,
   C9_White
};

// A cold, icy pale blue palette
#define Ice_Blue1 0x0C1040
#define Ice_Blue2 0x182080
#define Ice_Blue3 0x5080C0
const TProgmemRGBPalette16 Ice_p FL_PROGMEM =
{
  Ice_Blue1, Ice_Blue1, Ice_Blue1, Ice_Blue1,
  Ice_Blue1, Ice_Blue1, Ice_Blue1, Ice_Blue1,
  Ice_Blue1, Ice_Blue1, Ice_Blue1, Ice_Blue1,
  Ice_Blue2, Ice_Blue2, Ice_Blue2, Ice_Blue3
};


// Add or remove palette names from this list to control which color
// palettes are used, and in what order.
const TProgmemRGBPalette16* ActivePaletteList[] = {
  &RetroC9_p,
  &BlueWhite_p,
  &RainbowColors_p,
  &FairyLight_p,
  &RedGreenWhite_p,
  &PartyColors_p,
  &RedWhite_p,
  &Snow_p,
  &Holly_p,
  &Ice_p
};


// Advance to the next color palette in the list (above).
void chooseNextColorPalette( CRGBPalette16& pal)
{
  const uint8_t numberOfPalettes = sizeof(ActivePaletteList) / sizeof(ActivePaletteList[0]);
  static uint8_t whichPalette = -1;
  whichPalette = addmod8( whichPalette, 1, numberOfPalettes);

  pal = *(ActivePaletteList[whichPalette]);
}WS2812 4020 LEDs are easy to work with and share similar features with the other package models, this one is small and flat which makes this great for implementing in badge projects.
This is it for today folks, Leave a comment if you need any help regarding this project.
Thanks, Seeed Studio for supporting this project, you can check them out for getting all sorts of services or materials from their site.
Peace out!


Comments