


Hardware components | ||||||
| × | 1 | ||||
| × | 1 | ||||
Software apps and online services | ||||||
| ||||||
 |
| |||||
Hand tools and fabrication machines | ||||||
 |
| |||||
Greetings everyone and welcome back; meet QuasarQ—a space quiz device built to challenge your curiosity and test your knowledge of the universe.
The goal of this project was to create a compact, interactive device that helps young kids learn about space in a fun and engaging way.
The inspiration came from my 11-year-old nephew, who’s deeply fascinated by stars, planets, and everything beyond. I recently got him a telescope, and that sparked the idea—why not build something that could serve as a simple educational tool for him and his space-loving friends?
Powered by the ESP32-S3-LCD-1.69, it delivers fast-paced questions with crisp visuals and tactile controls. We modeled and 3D printed a custom enclosure with four tactile buttons, each mapped to an answer choice.
This is how this device works: the device asks a question, and we are given four choices; we select any answer by pressing one of four buttons.
If we get it right, we’re greeted with a “Correct!” splash screen. If we miss, it shows the correct answer so we can learn and move on. There are 20 questions in total, and at the end, QuasarQ displays our score out of 20. After a short pause, the quiz resets—ready for another round.
By pressing and holding Button A for three seconds, the device enters deep sleep mode. To wake it up, simply press any button again. This feature allowed us to skip using a physical ON/OFF switch that would cut power entirely. Instead, we implemented a software-controlled sleep system, making the device more compact and efficient while still giving users full control over power management.
This article covers the full build process of the project. so let's get started with the build.
Materials RequiredThese are the components used in this project-
- Custom PCB
- 4x4 tacktile push buttons
- ESP32 S3 1.69 Inch Display- Waveshare
- 3D printed Enclsoure
- M2 Screws
We began the design by importing a model of the ESP32-S3 display board into Fusion360. From there, we created a basic box-style enclosure around the screen. In the lower section, we modeled a switch board and added four custom switch actuators labeled A, B, C, and D to match the quiz interface. To secure the switch PCB, we included two screw bosses with 1.8 mm diameter holes — ideal for M2 screws.
The enclosure was sized to comfortably fit in a child’s hand, making it easy to hold and interact with. It’s split into two parts: a front section and a rear lid. All components were printed in white PLA, except for the switch actuators, which were printed in grey PLA to give the device a clean, duo-tone look.
Circuit DesignCircuit Design of this project was actually pretty simple; we just needed to make a Switch OCB that consists of four 4x4 tacktile Push Buttons so we started the schematic by adding four push buttons in the schematic and connecting each of their four Pins together; this will be connected to GND. we added a CON5 Pin on which we connected all push button pin 1 along with the GND pin of the push button.
For the PCB design, we used the outline from the CAD model and prepared a basic outline, then placed switches in their designated positions, connecting traces from switches to the CON5 port, and completed the board. For aesthetics, we added some graphics on the silkscreen layer of the PCB, which increases the aesthetic appeal of the board.
NextPCB PCB ServiceAfter completing the PCB design, Gerber data was sent to HQ NextPCB, and an order was placed for a White solder mask with Black silkscreen.
After placing the order, the PCBs were received within a week, and the PCB quality was pretty great.
In addition, I have to bring in HQDFM to you, which helped me a lot through many projects. Huaqiu’s in-house engineers developed the free Design for Manufacturing software, HQDFM, revolutionizing how PCB designers visualize and verify their designs.
Take advantage of NextPCB's Accelerator campaign and get 2 free assembled RP2040-based PCBs for your innovative projects.
https://www.nextpcb.com/blog/rp2040-free-pcba-prototypes-nextpcb-accelerator
This offer covers all costs, including logistics, making it easier and more affordable to bring your ideas to life. SMT services can be expensive, but NextPCB is here to help you overcome that hurdle. Simply share your relevant project, and they'll take care of the rest. Don't miss out on this amazing opportunity to advance your tech creations!
HQDFM: Free Online Gerber Viewer and DFM Analysis ToolAlso, NextPCB has its own Gerber Viewer and DFM analysis software.
Your designs are improved by their HQDFM software (DFM) services. Since I find it annoying to have to wait around for DFM reports from manufacturers, HQDFM is the most efficient method for performing a pre-event self-check.
This is what I see in the online Gerber Viewer. It's decent for a quick look, but not entirely clear. For full functionality—like detailed DFM analysis for PCBA—you’ll need to download the desktop software. The web version only offers a basic DFM report.
With comprehensive Design for Manufacture (DFM) analysis features, HQDFM is a free, sophisticated online PCB Gerber file viewer.
With over 15 years of industry experience, it offers valuable insights into advanced manufacturing processes. If you’re looking for reliable PCB services at a budget-friendly price, HQ NextPCB is definitely worth checking out.
PCB Assembly Process- The switch PCB assembly begins by placing all the tactile push buttons in their position.
- We turn the board over and use a soldering iron to solder each pad.
The ESP32-S3-LCD-1.69 truly shines at the heart of this build. Compact yet mighty, it packs a dual-core Xtensa LX7 processor clocking up to 240 MHz—delivering smooth performance across input, logic, and display tasks. Thanks to built-in Wi-Fi and Bluetooth 5, it connects effortlessly without extra modules or messy wiring.
Memory-wise, it’s stacked: 512KB of SRAM, 384KB of ROM, plus 8MB of onboard PSRAM and 16MB of external Flash.
This board is loaded with features that enhance our Guessatron, including a 1.69-inch capacitive LCD screen, a lithium battery charging chip, and a six-axis sensor with a three-axis accelerometer and gyroscope.
It has an ETA6098 lithium battery charging chip for long-term power management, a QMI8658 inertial measurement unit (IMU) for motion tracking, and an RTC chip for clock functions.
Although the ST7789V2 LCD controller's active display area is 240(H) × RGB × 280(V), it offers a 240 × RGB × 320 resolution. It is compatible with RGB444, RGB565, and RGB666 color formats; for best visual results, our project uses RGB565.
The display's smooth corners add to its elegant, small appearance, and the four-wire SPI interface guarantees effective GPIO usage and quick communication speed.
You can check out more about this display from its Wiki page: https://www.waveshare.com/wiki/ESP32-S3-LCD-1.69
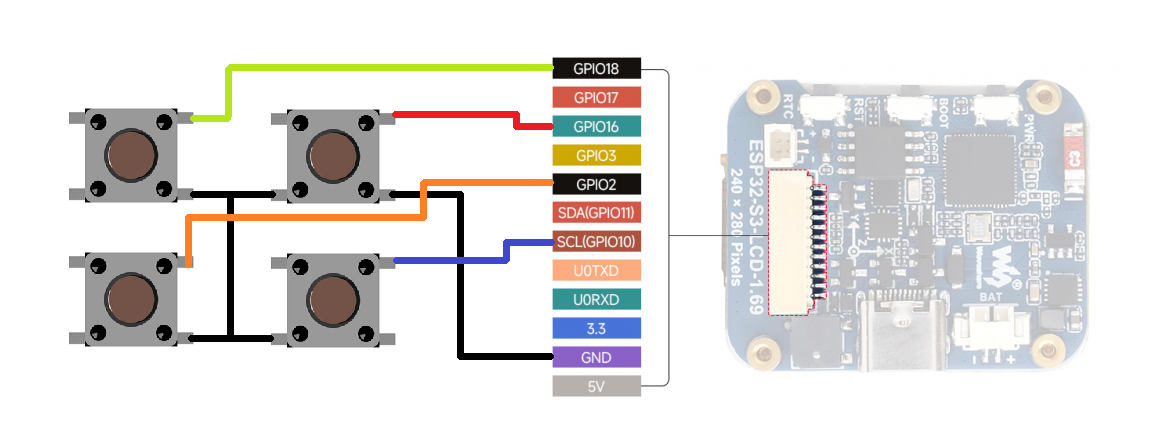
Switch Board - ESP32 S3 Display Assembly- We start the switchboard and display assembly process by soldering jumper wires to ESP32's GPIO18, GPIO16, GPIO2, GPIO10, and GND.
- Next, we paired the switchboard with the ESP32 display board using the jumper wires; we simply followed the attached wiring diagram for connection.
Next comes the power source assembly process; here we are using a 600 mAh 3.7 V LiPo cell whose positive and negative terminals we connect with the ESP32 Display's battery terminals using a soldering iron.
The ESP32 1.68-inch display we are using features a built-in lithium/LiPo charging IC that charges and discharges the cell properly, eliminating the need for a power circuit.
Body Assembly- We begin assembling the body by placing the 3D-printed button actuators into their designated slots. Each button is labeled A, B, C, or D to ensure correct placement and orientation.
- Next, the ESP32 display is positioned and secured using a bit of hot glue.
- The switchboard is then mounted onto two screw bosses and fastened with two M2 screws.
- After that, we insert the LiPo cell into the enclosure and close the device from the back using the lid. The lid is held in place with four M2 screws.
With that, the device assembly is complete.
CODENow comes the most important bit of this project, which is the code. here's a small breakdown of the code we used and it's a simple one.
#include <Arduino_GFX_Library.h>
// --- Color Definitions ---
#define BLACK     0x0000
#define WHITE     0xFFFF
#define RED       0xF800
#define GREEN     0x07E0
// --- Display Setup ---
Arduino_DataBus *bus = new Arduino_ESP32SPI(
4 /* DC */, 5 /* CS */, 6 /* SCK */, 7 /* MOSI */, GFX_NOT_DEFINED /* MISO */
);
Arduino_GFX *gfx = new Arduino_ST7789(
bus, 8 /* RST */, 3 /* rotation */, true /* IPS */,
240, 280, 0, 20, 0, 20
);
#define LCD_BL 15
// --- Button Pins ---
#define BTN_A 18
#define BTN_B 16
#define BTN_C 2
#define BTN_D 10
// --- Screen / layout constants ---
#define SCREEN_W 240
#define SCREEN_H 280
// Layout adjustments
const int QUESTION_X = 5;
const int QUESTION_Y = 17;          // question Y shifted down 5 pixels
const int OPTION_START_Y = 80;      // vertical start for first option
const int OPTION_SPACING = 45;      // vertical spacing between options
const int LETTER_SIZE = 3;          // medium-large letters (A/B/C/D)
const int CENTER_X = SCREEN_W / 2;
// --- Quiz Data (ISS question updated with full names) ---
struct Question {
const char* text;
const char* options[4];
int correctIndex;
};
Question questions[20] = {
{"Which planet is the Red Planet?", {"Venus", "Mars", "Jupiter", "Saturn"}, 1},
{"Largest planet?", {"Earth", "Neptune", "Jupiter", "Uranus"}, 2},
{"Most moons?", {"Saturn", "Mars", "Earth", "Mercury"}, 0},
{"Our galaxy?", {"Andromeda", "Whirlpool", "Milky Way", "Sombrero"}, 2},
{"First person in space?", {"Armstrong", "Gagarin", "Aldrin", "Shepard"}, 1},
{"Closest star?", {"Sirius", "Alpha Centauri", "Sun", "Betelgeuse"}, 2},
{"Moon landing year?", {"1965", "1969", "1972", "1959"}, 1},
{"Planet with rings?", {"Mars", "Venus", "Saturn", "Earth"}, 2},
{"Smallest planet?", {"Mercury", "Mars", "Venus", "Pluto"}, 0},
{"Hubble is a...?", {"Satellite", "Probe", "Telescope", "Rover"}, 2},
{"Which is a dwarf planet?", {"Neptune", "Pluto", "Jupiter", "Saturn"}, 1},
{"Mars rover name?", {"Spirit", "Apollo", "Voyager", "Hubble"}, 0},
{"Brightest planet?", {"Venus", "Mars", "Jupiter", "Saturn"}, 0},
{"First Indian in space?", {"Kalpana", "Rakesh Sharma", "Sunita", "Vikram"}, 1},
{"Planet with day longer than year?", {"Venus", "Earth", "Mars", "Jupiter"}, 0},
{"What does ISS stand for?", {"International Space Station", "National Aeronautics and Space Administration", "European Space Agency", "Indian Space Research Organisation"}, 0},
{"Most volcanoes?", {"Earth", "Venus", "Mars", "Io"}, 3},
{"Farthest planet?", {"Neptune", "Uranus", "Pluto", "Saturn"}, 0},
{"Not a planet?", {"Ceres", "Mars", "Earth", "Neptune"}, 0},
{"No moons?", {"Mercury", "Mars", "Venus", "Earth"}, 0}
};
int currentQuestion = 0;
int score = 0;
// --- Button press / long press handling ---
unsigned long pressStart = 0;
bool holdingA = false;
// --- Sleep flag (display-off sleep) ---
bool isSleeping = false;
unsigned long sleepStartTime = 0;
const unsigned long SLEEP_LOCK_DELAY = 500; // lock after entering "sleep"
// --- Quiz active flag ---
bool quizActive = false;
void setup() {
pinMode(BTN_A, INPUT_PULLUP);
pinMode(BTN_B, INPUT_PULLUP);
pinMode(BTN_C, INPUT_PULLUP);
pinMode(BTN_D, INPUT_PULLUP);
pinMode(LCD_BL, OUTPUT);
digitalWrite(LCD_BL, HIGH);
gfx->begin();
gfx->fillScreen(BLACK);
gfx->setTextWrap(true);
gfx->setTextSize(1);
gfx->setTextColor(WHITE);
showSplash();
}
void loop() {
bool btnA = !digitalRead(BTN_A);
bool btnB = !digitalRead(BTN_B);
bool btnC = !digitalRead(BTN_C);
bool btnD = !digitalRead(BTN_D);
// --- If display is "sleeping" (backlight off) ---
if (isSleeping) {
// allow a small lock window so the same long-press doesn't immediately wake
if (millis() - sleepStartTime > SLEEP_LOCK_DELAY) {
// Wake only on Button A (per your request)
if (btnA) {
digitalWrite(LCD_BL, HIGH);
isSleeping = false;
showWakeUpMessage();
showSplash();
quizActive = false; // wait for user to press to start
}
}
delay(50);
return;
}
// --- Start quiz from splash (splash stays until button pressed) ---
if (!quizActive) {
if (btnA || btnB || btnC || btnD) {
quizActive = true;
currentQuestion = 0;
score = 0;
showQuestion();
}
delay(50);
return;
}
// --- While quizActive handle inputs ---
// Button A: detect long-press for "sleep", short press for answer A
if (btnA) {
if (!holdingA) {
pressStart = millis();
holdingA = true;
} else if (millis() - pressStart > 1500) {
// long press detected -> enter display-off "sleep"
enterSleepMode();
}
} else {
if (holdingA) {
// button released: treat as short press if it wasn't long
if (millis() - pressStart < 1500) {
checkAnswer(0);
nextQuestion();
}
holdingA = false;
}
}
// Other buttons: immediate selection
if (btnB) { checkAnswer(1); nextQuestion(); }
if (btnC) { checkAnswer(2); nextQuestion(); }
if (btnD) { checkAnswer(3); nextQuestion(); }
delay(50); // small debounce
}
void enterSleepMode() {
// stop treating A as held
holdingA = false;
isSleeping = true;
sleepStartTime = millis();
// turn off backlight and show going to sleep message
digitalWrite(LCD_BL, LOW);
gfx->fillScreen(BLACK);
gfx->setTextSize(2);
gfx->setTextColor(WHITE);
gfx->setCursor(40, 100);
gfx->println("Going to sleep...");
}
void showWakeUpMessage() {
gfx->fillScreen(BLACK);
gfx->setTextSize(2);
gfx->setTextColor(WHITE);
gfx->setCursor(40, 100);
gfx->println("Good morning!");
delay(1500);
}
void nextQuestion() {
delay(1200);
currentQuestion++;
if (currentQuestion < (int)(sizeof(questions)/sizeof(questions[0]))) {
showQuestion();
} else {
showFinalScore();
}
}
void showSplash() {
gfx->fillScreen(BLACK);
gfx->setTextSize(3);
gfx->setTextColor(WHITE);
gfx->setCursor(40, 80);
gfx->println("SPACE QUIZ");
gfx->setTextSize(1);
gfx->setCursor(60, 150);
gfx->println("Press any button");
}
void showQuestion() {
gfx->fillScreen(BLACK);
// Show question
gfx->setTextWrap(true);
gfx->setTextSize(2);
gfx->setTextColor(WHITE);
gfx->setCursor(QUESTION_X, QUESTION_Y);
gfx->println(questions[currentQuestion].text);
// --- Vertical options with medium letter and text, centered ---
int y = OPTION_START_Y;
for (int i = 0; i < 4; i++) {
gfx->setTextSize(LETTER_SIZE);
gfx->setTextColor(WHITE);
String line = String((char)('A' + i)) + " - " + questions[currentQuestion].options[i];
int16_t bx, by;
uint16_t bw, bh;
gfx->getTextBounds(line, 0, 0, &bx, &by, &bw, &bh);
int startX = (SCREEN_W - bw) / 2;
gfx->setCursor(startX, y);
gfx->print(line);
y += OPTION_SPACING;
}
}
void checkAnswer(int selected) {
gfx->fillScreen(BLACK);
gfx->setTextSize(3);
gfx->setCursor(40, 80);
if (selected == questions[currentQuestion].correctIndex) {
gfx->setTextColor(GREEN);
gfx->println("Correct!");
score++;
} else {
gfx->setTextColor(RED);
gfx->println("Wrong!");
gfx->setTextSize(2);
gfx->setCursor(20, 150);
gfx->setTextColor(WHITE);
gfx->printf("Answer: %s", questions[currentQuestion].options[questions[currentQuestion].correctIndex]);
}
}
void showFinalScore() {
gfx->fillScreen(BLACK);
gfx->setTextColor(WHITE);
gfx->setTextSize(3);
gfx->setCursor(40, 80);
gfx->println("QUIZ DONE!");
gfx->setTextSize(2);
gfx->setCursor(60, 150);
gfx->printf("Score: %d / %d", score, (int)(sizeof(questions)/sizeof(questions[0])));
// Wait 10 seconds then reset to splash
unsigned long start = millis();
while (millis() - start < 10000) {
delay(50);
}
quizActive = false;
currentQuestion = 0;
score = 0;
showSplash();
}
We start by including the graphics library and defining basic colors for use throughout the UI.
#include <Arduino_GFX_Library.h>
#define BLACK 0x0000
#define WHITE 0xFFFF
#define RED   0xF800
#define GREEN 0x07E0
Next comes the Display Initialiazation, we use the below section that Sets up SPI communication and initializes the ST7789 display with 240×280 resolution and portrait layout.
Arduino_DataBus *bus = new Arduino_ESP32SPI(...);
Arduino_GFX *gfx = new Arduino_ST7789(...);
This Section Defines the backlight pin and four input buttons mapped to answer choices A–D.
#define LCD_BL 15
#define BTN_A 18
#define BTN_B 16
#define BTN_C 2
#define BTN_D 10
We added layout constants that control the positioning of question text and answer options on screen. Ensures clean spacing and alignment.
const int QUESTION_X = 5;
const int QUESTION_Y = 17;
const int OPTION_START_Y = 80;
const int OPTION_SPACING = 45;
const int LETTER_SIZE = 3;
Then there is the Quiz Data, that Defines a Question struct and stores 20 space-themed questions with 4 options each and the correct answer index.
struct Question { const char* text; const char* options[4]; int correctIndex; };
Question questions[20] = { ... };
These are state variables that track quiz progress, score, and whether the device is in sleep mode.
In Setup Functions, we have set up four buttons as inputs with pull-up resistors and a backlight pin as output.
pinMode(BTN_A, INPUT_PULLUP);
pinMode(BTN_B, INPUT_PULLUP);
pinMode(BTN_C, INPUT_PULLUP);
pinMode(BTN_D, INPUT_PULLUP);
pinMode(LCD_BL, OUTPUT);
Also, we initialize the display in the setup function, meaning here the display starts and the splash screen is displayed.
gfx->begin();
gfx->fillScreen(BLACK);
gfx->setTextWrap(true);
gfx->setTextSize(1);
gfx->setTextColor(WHITE);
showSplash();
In Loop first there is the Sleep Mode Handling part.
if (isSleeping) { ... }If the device is in sleep mode (backlight off), it waits for Button A to wake it.We also added a short delay (SLEEP_LOCK_DELAY) to avoid accidental wake from the same long press.
Then there is the Quiz Start Trigger.
if (!quizActive) { ... }if (!quizActive) { ... }If the quiz hasn’t started yet, any button press will begin the quiz.
In the end, we have added the answer checking and progression function.
checkAnswer(...);
nextQuestion();
After an answer is selected, the device shows feedback and moves to the next question. If all 20 questions are done, it shows the final score and resets after 10 seconds.
RESULTHere's the end result of this small build—QuasarQ, a space quiz device designed to spark curiosity and make learning fun. It’s compact, responsive, and built with care, from the custom 3D-printed enclosure to the tactile button layout and crisp display interface.
Right now, we’ve only added a set of 20 questions just for testing purposes. The actual plan is to build a full database of 200+ space-related questions. The idea is that the device will randomly pick 20 questions from that larger pool every time it runs, so each quiz session feels fresh and different.
That’ll make it way more engaging, a bit more challenging, and definitely more educational—especially for kids who keep coming back to play and learn.
For now, the build is complete, and all the related files are included in the attachments.
Special thanks to HQ NextPCB for providing components that I've used in this project; check them out for getting all sorts of PCB or PCBA-related services for less cost.
Thanks for reaching this far, and I will be back with a new project soon.


_t9PF3orMPd.png?auto=compress%2Cformat&w=40&h=40&fit=fillmax&bg=fff&dpr=2)


Comments