

Hardware components | ||||||
 |
| × | 1 | |||
With this tutorial you will learn how to create a web page that allows you to send text messages to your Arduino and display them on the Serial Monitor. The tutorial relies on the WebServer mode of the Yun, please go here to have more information about how to use it.
The HTML code for the web page is really simple, it consists in a small form with only one caption and the submit button and a Javascript function that calls the URL to pass data to the Yun. To create the form you have to add the form tag with the correct properties:
form name="msgform" onSubmit=""
You will add something for the onSubmit parameter when you will add the Javascript function. Now insert the two elements you need in the form:
input type="text" name="msg"
For the text caption of the message, and:
input type="submit" value="Yun it!"
for the button. Then add /form to finish the form. Once your form is ready you can write the Javascript function that will send the data to the Arduino:
function sendMsg() {     $.get('/arduino/msg/' + document.msgform.msg.value + '/',     function(){         alert("Success");     } ); return false;
}
This function concatenates the string "/arduino/msg/" with the text of your message and another "/" and makes an http request to the page arduino.local/arduino/msg/YOURMESSAGE/ by using the function "$.get" showing a popup window if the data is correctly sent to the Arduino. Note that the $.get method is provided by the zepto.min.js file that is available in the lesson files. Now you have everything ready to work but you have to connect the form to the Javascript function, to do this just add sendMsg() in the onSubmit parameter of the form like this:
form name="msgform" onSubmit="sendMsg()"
In this way the form will call the function when you will press the "Yun it!" button.
2. The web page creationHere there is the finished code of the entire page (the HTML page is also in the lesson files):
<!DOCTYPE HTML>
<head>
<title>Yun Messages</title>
<script type="text/javascript" src="zepto.min.js"></script>
</head>
<body>
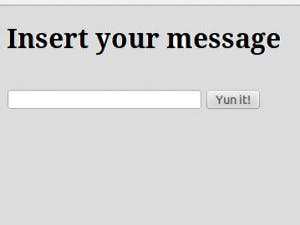
<H1> Insert your message </H1>
<form name="msgform" onSubmit="return sendMsg()">
<input type="text" name="msg">
<input type="submit" value="Yun it!" >
</form>
<script type="text/javascript">
function sendMsg() {
$.get('/arduino/msg/' + document.msgform.msg.value + '/',
function(){
alert("Success");
}
);
return false;
}
</script>
</body>
On the Atmega32u4 side the sketch will create an instance of the YunServer and make it listening for incoming clients. A client is someone that connect to the Yun through its browser and send data to the server. In the setup function there are all the initialization functions to get the Serial connection, the bridge connection and the YunServer instance working. In the loop function the Yun waits for incoming clients and when some of them connects, the data sent is read with the readStringUntil function.
The incoming data is the string that follows "arduino.local/arduino/" in the URL, and because in your case the entire URL is "http://arduino.local/arduino/msg/yourmessage/" the data received by the YunServer class is: "msg/yourmessage/"
Note that this is the final part of the URL called by the Javascript function after you hit the "Yun it!" button. To process the data the function readStringUntil is used because the command and the text are divided by the "/" character so when you use that function the first time it will return the "msg" string that is the command and the second time you use it you will have the "yourmessage" part. The "yourmessage" part is the text you enter in the form, so you just have to save this text into a String variable and use it with the Serial.println() function.
Here is the code.
#include <Bridge.h>
#include <YunServer.h>
#include <YunClient.h>
YunServer server;
String msg;
void setup () {

  Serial.begin(9600);
  Bridge.begin();
  server.listenOnLocalhost();
  server.begin();


}
void loop () {
  //*********Read new message from the client**************
  YunClient client = server.accept(); //check new clients

  if(client) {
    String command = client.readStringUntil('/');  //read the incoming data
    if (command == "msg") {
       msg = client.readStringUntil('/');             // read the incoming data
    }
    client.stop();
  }


}
The access to the webserver feature is protected by default with a password, so to grant the access to your browser you have to open it. To do this go in your Arduino Yun's configuration page by typing arduino.local or its IP and click on "Configure". Then go at the bottom of the page and select Open under "REST API ACCESS".
Now everything is ready and you can send messages to your Arduino, enjoy!


Comments