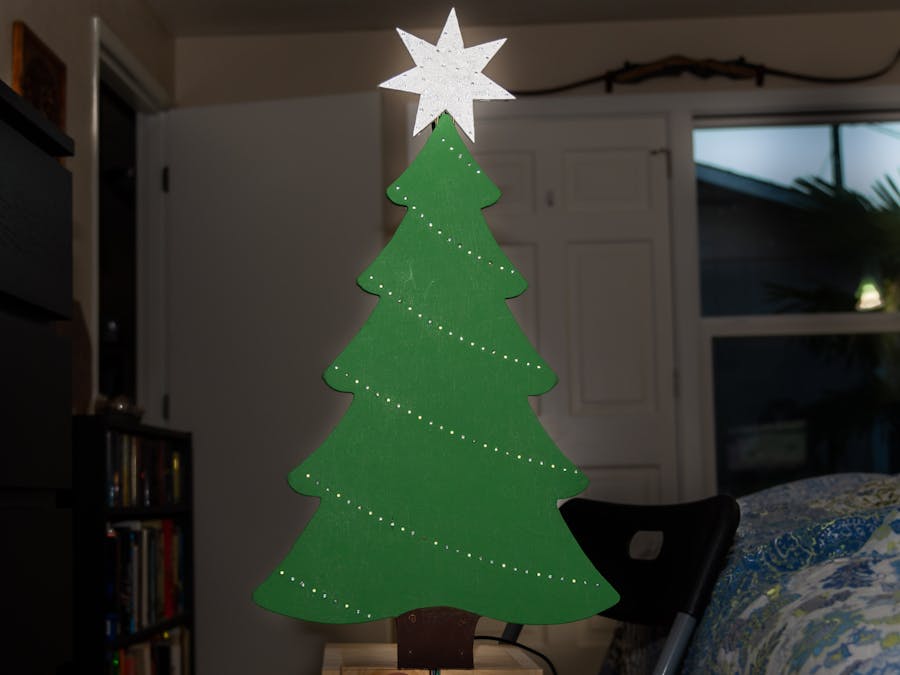
I have come to quite enjoy using LEDs and Arduino to make different projects. This is my Christmas 2017 project, an LED wooden Christmas tree.
Here is the tree in action:
Though it's a fairly simple project in looks, it took me a while to make it; mostly the soldering. The tree consists of 6 rows of alternating red, green, and white LEDs creating garland around the tree. Each color in each row is a separate circuit, this way I have control of all colors and rows independently.
wiring on the back of the tree
I found it easiest to use 20ga tinned wire for connecting all the LEDs, it made for a very clean back and was rigid enough to keep separate from the other circuits. Though I did put in blobs of hot glue as needed for insulators. Then from a resistor connected to each line of LEDs, a 24ga wire going to the base. All the grounds of the LEDs are connected together.
So the tree consists of 18 circuits, powered by a single Uno. The star is separate from the tree consisting of 20 circuits and powered by a Nano. That's all stuffed in the bottom:
Uno, Nano, Buck converter, Switchboard in base of tree.
The inside isn't very pretty. I have plans to redo it, as I've produced my own switchboard PCB, which i'll explain next. But here are all the guts:
So while the star can be powered by a Nano, the tree has enough LEDs that it's just a little too much for the Uno to power, so, using several transistors, I've created a Switchboard that turns on/off power from a second source. It's simply taking 5v power in from a buck converter in the collector side and when the Arduino provides a HIGH signal to the transistor, it sends the 5v from the second source to the row of LEDs, allowing the Uno to power as many LEDs as I need. The board took some time to create, as I have a transistor for each channel. There is also a 1k resistor on the Base of each transistor between it and the Arduino (The capacitors in the picture aren't used, they were a test). There is an additional circuit board you can see in the base which is the AC/DC power supply, which I took out of a DVD player :) I have since also been in to creating circuit boards and getting them produced through JLCPCB, which I plan on using on this project to clean up the wiring. Here is my switchboard. It makes wiring very easy, with an IN side, which comes from the Arduino and an OUT side which goes to the LED.
Unfortunately, I don't have the code for the tree anymore, or I would share it. But my limited coding ability made the code fairly simple, but long, as it only used on/off (HIGH/LOW) commands. I had to layout each circuit on a piece of paper and figure out which one to turn on first, then next, and next, etc. to come up with the patterns I wanted. An example would be:
int delay1 = 60;
int delay2 = 500;
int delay3 = 60;
// the setup function runs once when you press reset or power the board
void setup() {
 pinMode(2, OUTPUT); //white 1
 pinMode(3, OUTPUT); //white 2
 pinMode(4, OUTPUT); //white 3
 pinMode(5, OUTPUT); //red 1
 pinMode(6, OUTPUT); //red 2
 pinMode(7, OUTPUT); //red 3
}
// the loop function runs over and over again forever
void loop() {
 digitalWrite(5, LOW);
 digitalWrite(6, LOW);
 digitalWrite(7, LOW);
 digitalWrite(2, LOW);
 delay(delay1);
 digitalWrite(3, LOW);
 digitalWrite(2, HIGH);
 delay(delay1);
 digitalWrite(4, LOW);
 digitalWrite(3, HIGH);
 delay(delay1);
 digitalWrite(2, LOW);
 digitalWrite(4, HIGH);
 delay(delay1);
 digitalWrite(3, LOW);
 digitalWrite(2, HIGH);
 delay(delay1);
 digitalWrite(4, LOW);
 digitalWrite(3, HIGH);
 delay(delay1);
 digitalWrite(2, LOW);
 digitalWrite(4, HIGH);
 delay(delay1);
 digitalWrite(3, LOW);
 digitalWrite(2, HIGH);
 delay(delay1);
 digitalWrite(4, LOW);
 digitalWrite(3, HIGH);
 delay(delay1);
 digitalWrite(2, LOW);
 digitalWrite(4, HIGH);
 delay(delay1);
Simple, but time consuming to write. Someone may have a better way of coding and/or wiring this project, but this is what my abilities allowed me to do at the time.
I hope you enjoyed reading this as much as I enjoyed making it, and that it inspires you to make a project of your own. I have yet to see any other examples of projects like this, so have nothing else to compare its wiring and coding to. Maybe with this someone will get inspired and show me up! :)


_ztBMuBhMHo.jpg?auto=compress%2Cformat&w=48&h=48&fit=fill&bg=ffffff)


_3u05Tpwasz.png?auto=compress%2Cformat&w=40&h=40&fit=fillmax&bg=fff&dpr=2)
Comments