


Hardware components | ||||||
 |
| × | 1 | |||
 |
| × | 1 | |||
 |
| × | 1 | |||
Software apps and online services | ||||||
 |
| |||||
 |
| |||||
Hand tools and fabrication machines | ||||||
| ||||||
| ||||||
| ||||||
| ||||||
 |
| |||||
DISCLAIMER: This application is used for demonstrative and illustrative purposes only and does not constitute an offering that has gone through regulatory review. It is not intended to serve as a medical application. There is no representation as to the accuracy of the output of this application and it is presented without warranty.
Our heart beats 115200 times a day, it is such a fine machine that does not stop during our lives. However, not many people have the advantage to have this machine in good conditions. Many factors of daily life can permanently affect cardiac function.
Factors such as:
- Sedentarism.
- Diet full of Salt, saturated fats and refined sugar.
- Alcoholic intake.
- Smoking.
- High blood pressure.
- Obesity.
- Family history of heart disease.
- History of a previous heart attack.
- Age over 45 for men, or over 55 for women.
- Male gender (there's a direct correlation for cardiovascular disease).
- Substance abuse.
- Low potassium or magnesium.
Quite a lot of people have to undergo cardiac tests frequently in expensive hospitals with gigantic measuring devices. We are in a time where open health is stronger than ever and it is time to make the patient the point of care.
The market for electrocardiography is quite enormous, as it has become the standard for patients with heart risks.
What we can see in this graphic is that most of the electrocardiographs are those big machines (as a Biomedical Engineer I can attest that most, are quite old). In addition to this most in the "holter" category are not really wearables but smaller ones that can be carried despite that a wearable one that can be used at home could provide invaluable information about the patient's heart.
One thing that we have to notice first. The first of wearables has already come out in the market and the results are not that great. The main issue that Doctors put forth is that it is too much information, think of the internet before data aggregators, it has no value if it cannot be interpreted correctly and that is something that has to be taken into consideration. A solution should aggregate all that data and provide carers with useful information.
Second Problem:This brings us to the second problem that is quite basic, most EKG machines whether they are Holter's or Rest EKGs use gel-based electrodes. These are completely unusable in an athletic environment i.e. Athletes trying to measure themselves during activity. For these reasons we will try while developing the IoT device, to develop at the same time Dry electrodes.
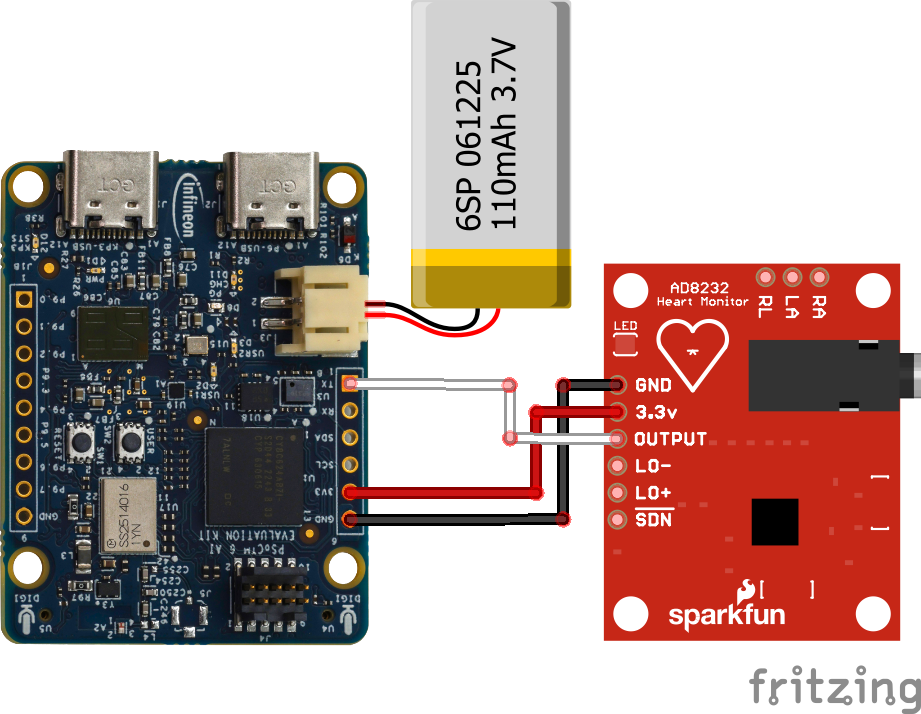
This is the connection diagram of the system.
All the connections on the board, especially the EKG ones, are very sensitive to changes. Therefore, using cables on the board can be problematic, so a soldered board was made to avoid these issues.
This is perhaps the greatest development done in the project!
Due to the fact that this is a device that we are going to be using for long periods of time and it is also a device that must be used every day, we soon understood that the use of disposable electrodes is not feasible. So that's why we decided to make our own dry electrodes.
Materials:
- Copper Plate.
- Silver Conductive Ink.
- Electrode External Snap.
Before starting all the work of collecting data to create an AI model, the first thing we did was write the code needed to read the ADC on our board. Luckily for us, one of the board's TX pins also allows us to read the ADC, P10_0 in this case.
This code is the basic ADC that Infineon provides in the examples; however, there are some important functions we'll use to obtain these values in Studio.
void adc_single_channel_init(void); /* Start the ADC on the board */
void adc_single_channel_process(void); /* Read the ADC values */
Here is the functional example to perform an ADC reading on the board.
Deepcraft Streaming:The process of reading ADC data into Studio was laborious since the documentation for creating new sensors on the board and accessing them in the Studio is not entirely clear. However, a hack was performed on the Deepcraft Streaming sample project to be able to read data from our EKG into Studio.
NOTE: This is a hack that needs to be refined for future versions of the documentation; however, it is fully functional.
First, in the dev_bmm350.c file in the EKG_STREAMING project, the dependencies, functions, and definitions necessary for the ADC to work were added. Specifically, you must add the two functions mentioned above.
void adc_single_channel_init(void); /* Start the ADC on the board */
void adc_single_channel_process(void); /* Read the ADC values */
In the _init_hw function, you must initialize the ADC as shown in the following snippet.
static bool _init_hw(dev_bmm350_t *dev, cyhal_i2c_t* i2c)
{
   adc_single_channel_init();
   cyhal_adc_configure(&adc_obj, &adc_config);
   ...
Modify the _read_hw function so that all data read from the ADC is passed to Deepcraft Studio.
static bool _read_hw(dev_bmm350_t* dev)
{
   ...
   int32_t adc_result_0 = 0;
   adc_result_0 = cyhal_adc_read_uv(&adc_chan_0_obj) / MICRO_TO_MILLI_CONV_RATIO;
   float res = (float)adc_result_0;
   data.y = res;

   float *dest = dev->data + dev->frames_sampled * AXIS_COUNT;
   *dest++ = res;
   ...
The last major change is to change the names and labels the studio receives to be consistent with the sensor.
int device = protocol_add_device(
    protocol,
    protocol_DeviceType_DEVICE_TYPE_SENSOR,
    "EKG",
    "EKG (AD8232)",
    manager);
...
Finally, we'll complete the build, and in our studio, we'll be able to view the EKG sensor data, as well as change its sampling rate, etc.
The data we should see in the study should be as follows. We recommend taking advantage of the study and installing a Low Pass filter, since the EKG signal is very small and the 50-60 Hz signal from the power line can be seen.
Without Filter at 400hz:We strongly recommend reviewing all changes made to the Modus project.
Deepcraft Data:Now that we have the EKG data correctly and can view it in the studio, it's time to create some sessions. These can only last a maximum of 5 minutes, however, I recommend running as many as possible to obtain a good amount of data.
Considerations:
- The data in the studio cannot be split; that is, complete sessions must be assigned to a set type: train, test, and validation.
- Try to ensure that all sessions have as many labels as possible, since Deepcraft Studio will use them for training.
If you want to see the sessions we generated for this model, they are as follows.
Deepcraft Model:The program provides us with a good tool for quickly developing models for our data.
In our case, we're sharing the results of our model training so you can run your own tests and find a better one.
The model we used in our project was the following; you can download and test it directly in Deepcraft Studio.
Deepcraft Deployment:Now that we have a working model, we must deploy it in our PSoC 6 AI. All we have to do is go to the CodeGen tab and generate the model code in C.
Once the model is generated, you will get two files, model.c and model.h. You must place these two files in your Modus code to start making inferences.
NOTE: There is no basic example of how to make inferences from sensors read using ADCs. However, I created my own code based on the examples provided by Infineon.
The Final Product:We think we have achieved a great medical device prototype with this project. It does everything an IoT-capable device should do and probably we have solved some of the problems in relation with gel-based electrodes. And that is perhaps the main innovation with this device. It has huge market potential mainly with sports science applications. For our next steps in relation with this project we will focus on testing it in both sports and clinical applications and also on the market of sport-related or exercise related classes and services, which also show great potential.


Comments