Ahork
Published

Wireless Barcode Scanner

M5StickV and M5StickC with HID Bluetooth Wireless or Atomic QR-Code reader

BeginnerFull instructions provided1 hour11,207
Wireless Barcode Scanner

Things used in this project

Hardware components

M5StickC ESP32-PICO Mini IoT Development Board
M5Stack M5StickC ESP32-PICO Mini IoT Development Board
×1
M5StickV K210 AI Camera (Without Wifi)
M5Stack M5StickV K210 AI Camera (Without Wifi)
×1
Cable grove
×1
M5stack atom QR-code
×1

Software apps and online services

Sipeed Maixpy
Arduino IDE
Arduino IDE
Library ESP32-BLE-Keyboard

Story

Read more

Schematics

Grove StickC to StickV

Image to https://m5stack.hackster.io/anoken2017/mimamori-alert-for-your-home-security-098b12

Code

M5StickC

Arduino
Code for M5SticK
#include <M5StickC.h>
#include <BleKeyboard.h>


//reception M5StickV
HardwareSerial serial_ext(2);

//Connect HID Bluetooth
BleKeyboard bleKeyboard;

void setup() {

  M5.begin();
  M5.Lcd.setRotation(3);
  M5.Lcd.fillScreen(BLACK);
  M5.Lcd.setCursor(0, 0);
  M5.Lcd.setTextSize(2);
  M5.Lcd.println("GO");
  bleKeyboard.begin();

// Connect M5StickV
  pinMode(32, OUTPUT);
  pinMode(33, INPUT);
  serial_ext.begin(115200, SERIAL_8N1, 32, 33);
  
}

// for IBSN (Number)
void loop() {
   
    if(bleKeyboard.isConnected()) {
        
    if ( serial_ext.available() > 0 ) {
      bleKeyboard.press(KEY_LEFT_SHIFT );
      String str = serial_ext.readStringUntil('\n');
      bleKeyboard.print(str);
      bleKeyboard.releaseAll();    
      M5.Lcd.fillScreen(BLACK);
      M5.Lcd.setCursor(0, 0);
      M5.Lcd.println(str);
    }
    
}
}

ATOM QR-CODE

Arduino
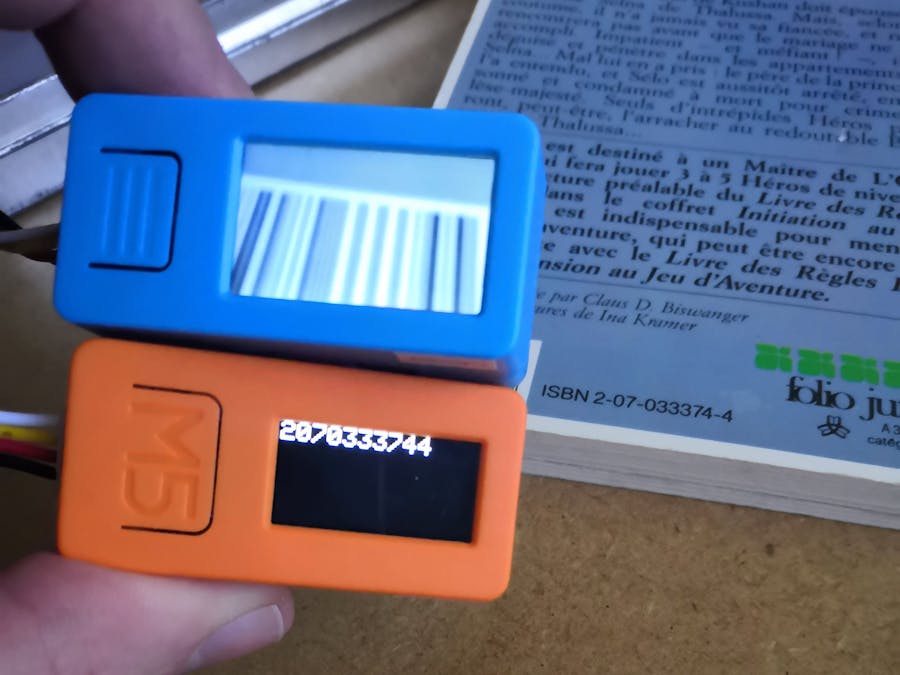
/*Press button to scan, serial monitor will print information*/

#include  <M5Atom.h>
#include <BleKeyboard.h>

String AltGrazerty="~#{[|`\\^@#]}";
String shiftazerty="QBCDEFGHIJKL?NOPARSTUVZXYW1234567890 Q+QQQQM%Q./Q>";
String azerty="qbcdefghijkl,noparstuvzxyw&q\"'(-q_qq )=q$q*mqq;:!<";
const byte scancode[] = {4,5,6,7,8,9,10,11,12,13,14,15,16,17,18,19,20,21,22,23,24,25,26,27,28,29,30,31,32,33,34,35,36,37,38,39,44,45,46,47,48,49,50,51,52,53,54,55,56,100};

const boolean AZERTY = true;

BleKeyboard bleKeyboard;

#define TRIG 23
#define DLED 33

const int tempo=10;
 
void Keyfr(const String &Texte){
  int j = -1;
 
  for (unsigned int i=0; i< Texte.length(); i++){
    delay(tempo);
    
    char c = Texte.charAt(i);
    
    if (c=='\t'){
      bleKeyboard.write(KEY_TAB);
    }
   
    int index = azerty.indexOf(c);
    if (index>-1){
      j = scancode[index]+136;
      bleKeyboard.write(j);
    } else{
      index = shiftazerty.indexOf(c);
      if (index>-1){
        j = scancode[index]+136;
        bleKeyboard.press(KEY_LEFT_SHIFT);
        bleKeyboard.press(j);
        bleKeyboard.releaseAll();
      }else {
        index = AltGrazerty.indexOf(c);
        if (index>-1){
          j = scancode[index+27]+136;
          bleKeyboard.press(KEY_LEFT_CTRL);
          bleKeyboard.press(KEY_LEFT_ALT);
          bleKeyboard.write(j);
          bleKeyboard.releaseAll(); 
          if (index==0 || index==7){
            // Traitement spécial pour ce caractère ~ et ^ qui sont des deads keys
            // ce qui n'est pas le cas sur les clavier qwerty
            // on le tape une seconde fois puis on fait un Retour Arrière.
            bleKeyboard.press(KEY_LEFT_CTRL);
            bleKeyboard.press(KEY_LEFT_ALT);
            bleKeyboard.write(j);
            bleKeyboard.releaseAll();
            bleKeyboard.write(KEY_BACKSPACE);
          }
        }
      }   
    }
  }
}

void Keyfrln(const String &Texte){
  Keyfr(Texte);
  bleKeyboard.write(KEY_RETURN);
}

void setup() {
  bleKeyboard.begin();
  M5.begin(false, false, true);
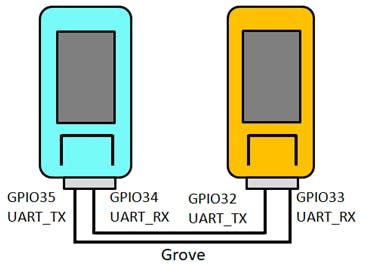
  Serial.begin(9600);
  Serial2.begin(9600, SERIAL_8N1, 22, 19);
  M5.dis.drawpix(0, 0x00f000);
  pinMode(TRIG, OUTPUT);
  pinMode(DLED, INPUT);
  digitalWrite(TRIG, HIGH);
}

void loop() {
  M5.update();
  if(digitalRead(39) == LOW){
    digitalWrite(TRIG, LOW);
  }else {
    digitalWrite(TRIG, HIGH);
  }
  if(digitalRead(DLED) == HIGH){
    while(Serial2.available() > 0){
      char ch = Serial2.read();
     
      if(bleKeyboard.isConnected()) 
      {        
        String phrase;
        phrase = String(phrase + ch);
        
        if (AZERTY) {
         Keyfr(phrase);
         Serial.print(phrase);
        }
        else
        {
          bleKeyboard.print(phrase );
          bleKeyboard.releaseAll();
        }    
      }      
    }
  }
}

M5StickV

Python
Code for M5stickV
import sensor
import image
import lcd
import time
from machine import I2C,UART

from fpioa_manager import fm

#uart initial
fm.register(35, fm.fpioa.UART2_TX, force=True)
fm.register(34, fm.fpioa.UART2_RX, force=True)

uart_Port = UART(UART.UART2, 115200,8,0,0, timeout=1000, read_buf_len= 4096)


clock = time.clock()
lcd.init()
sensor.reset()
sensor.set_pixformat(sensor.RGB565)
sensor.set_framesize(sensor.QVGA)
sensor.set_vflip(1)
sensor.set_hmirror(1)
sensor.run(1)
sensor.skip_frames(20)
while True:
    clock.tick()
    img = sensor.snapshot()
    res = img.find_barcodes()
    fps =clock.fps()
    if len(res) > 0:
        data = res[0].payload()
        print(data)
        uart_Port.write(data)
        time.sleep(2)
    lcd.display(img)

Credits

Ahork

Ahork

6 projects • 4 followers
Maker

Comments