
Hardware components | ||||||
 |
| × | 1 | |||
| × | 1 | ||||
| × | 2 | ||||
| × | 4 | ||||
| × | 1 | ||||
| × | 1 | ||||
 |
| × | 6 | |||
 |
| × | 1 | |||
 |
| × | 1 | |||
Software apps and online services | ||||||
| ||||||
 |
| |||||
Hand tools and fabrication machines | ||||||
 |
| |||||
 |
| |||||
 |
| |||||
The future is here, solar panels everywhere! In the last couple of years a lot of photovoltaic power station have been built, but usually they are using fix placement and thus the solar panels rarely receive the light in the optimal, 90 degree angle.
I wanted to do some experiments on how I can create an inexpensive solar tracker solar panel while I can remotely control and monitor the results.
Another issue I'd like to handle is the negative energy price at peak production hours. It is just as big of an issue as the lack of power as overproduction can damage the electrical network and its connected devices.
Safety firstA lot of thing depends on making systems like this safe. A failure caused by hackers can be very dangerous and expensive. A cascading failure can bring down the electrical network, so we really need to use safe and reliable services here.
Huge botnets were built from IoT devices due to inadequate protection. Among others, Microsoft saw the demand on the market for a safe service to operate these devices, to take the advantages of tech, without its dangers.
And this is how we arrived to Azure Sphere. It is a secured, high-level application platform that includes integrated communication and security features for building Internet of Things solutions. The platform consists of secured crossover microcontroller unit hardware, the Azure Sphere OS operating system, and the cloud-based Azure Sphere Security Service that provides continuous, renewable security.
In this project I'll be using the Avnet Azure Sphere MT3620 starter kit. It is a great and powerful device that is great for experimenting with the Azure Sphere SDK. It contains numerous sensors, wifi, an OLED interface for 128x64 displays, two MikroE Click board expansion sockets, a Grove connector, etc. For a full description take a look at the previous link. It would be too long the mention all of its capabilities here.
The number of accessible GPIOs is quite limited, but it was focused on expanding the dev board with Click Boards, so it is something we have to accept for now.
The Azure Sphere MT3620 Module includes built-in Microsoft security, Wi-Fi connectivity and the combined versatility and power of an Arm® Cortex™-A7 processor with the low overhead and real-time guarantees of two Arm Cortex-M4F microcontrollers. Besides that, it is very small, only 33 x 22 mm. It will fit into most projects.
TL;DR It is a great module.
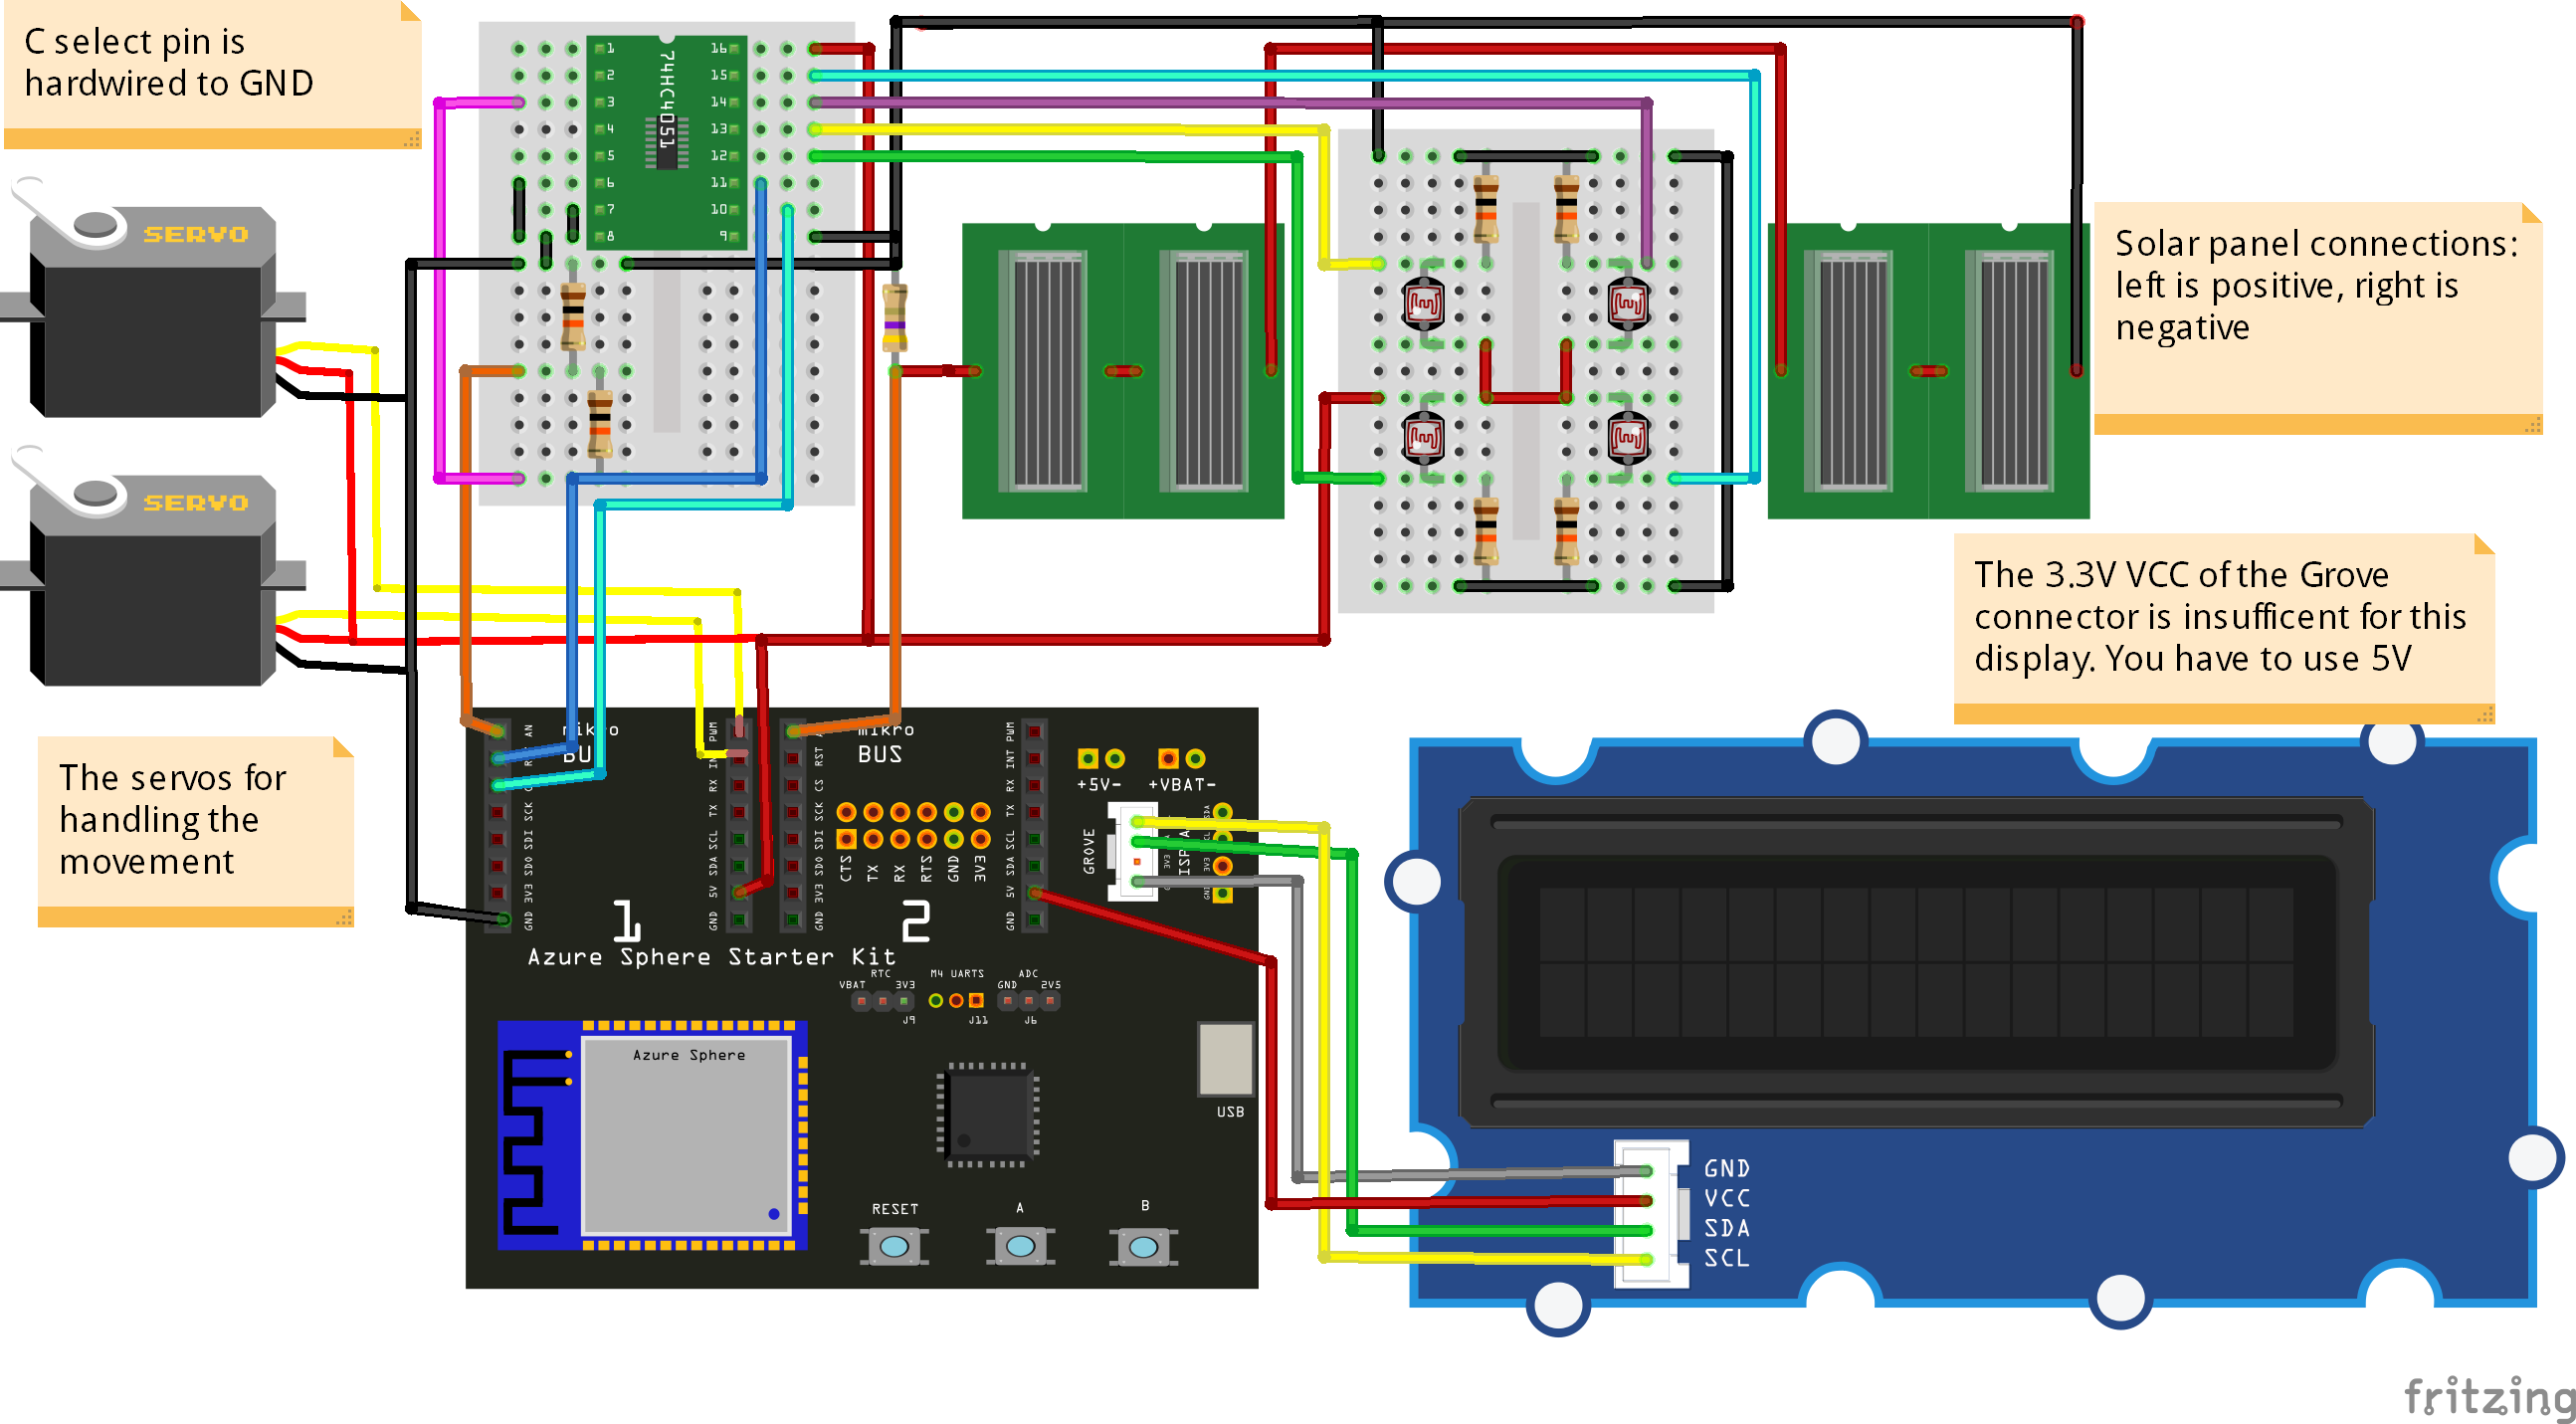
Possibilities and limitationsLet's see what we'll working with. If you take a look at the hardware documentation you'll see that the dev board has three ADC capable GPIO-s, but one of them is directly connected to the onboard light sensor. There's an ADC pin on the first click socket and the other is at the same position at the second click socket.
The two sockets share the SCK, MISO, MOSI, INT, RX, TX, SCL and SDA pins. That can be an issue if you just want to use them as GPIOs. The Grove and the OLED connector is using the same GPIO37 and GPIO38 for I2C. It provides 3.3V, which is gonna be an issue for me, later.
Due to the GPIO limitations I figures I either have to use I2C/SPI Click Boards or I have to come up with a clever solution.
Building the sensorThe first step in building a solar tracker is knowing where - or at least in which direction - is the sun. Traditionally the easiest and cheapest why to do this is using 4 photo sensors and a quite high, cross shaped light shade in the following configuration:
The yellow circles are the photo sensors. I'll be using photo resistors as I had a couple of them at home. As you can see the photo resistors are not exactly the same type, but I measured a couple of them and this four was quite close to each other, so I used them.
This sensor is a resistor, so all I need to do is to create a voltage divider with a 10k resistor for each sensor. I soldered them to a perf board with some cables and then glued them to a camera holder/camera platform that I bought a couple of years ago, but never used. I also put glue on the wires t
The movement part is quite easy, just put two cheap servos into the camera platform. It is something that is easily 3D-printable, but I already had one so I didn't do it.
The direction finding is following these instructions:
int avt = (tl + tr) / 2; // average value top
int avd = (bl + br) / 2; // average value down
int avl = (tl + bl) / 2; // average value left
int avr = (tr + br) / 2; // average value right

int dvert = avd - avt; // check the difference of up and down
int dhoriz = avr - avl;// check the difference of left and right

verticalServoAngle += dvert / SERVO_CONVERGING_SPEED;
if (verticalServoAngle < VERTICAL_SERVO_MIN_ANGLE)
    verticalServoAngle = VERTICAL_SERVO_MIN_ANGLE;
else if (verticalServoAngle > VERTICAL_SERVO_MAX_ANGLE)
    verticalServoAngle = VERTICAL_SERVO_MAX_ANGLE;
SERVO_SetAngle(verticalServo, verticalServoAngle);

horizontalServoAngle += dhoriz / SERVO_CONVERGING_SPEED;
if (horizontalServoAngle < HORIZONTAL_SERVO_MIN_ANGLE)
    horizontalServoAngle = HORIZONTAL_SERVO_MIN_ANGLE;
else if (horizontalServoAngle > HORIZONTAL_SERVO_MAX_ANGLE)
    horizontalServoAngle = HORIZONTAL_SERVO_MAX_ANGLE;
SERVO_SetAngle(horizontalServo, horizontalServoAngle);
Basically the bigger the difference, the faster the head of the Solar Tracker moves. As you can see in most of the videos, it is a quite fast solution.
The brighntess levels are not calculated to Lux as it wouldn't be reliable. The raw values are just as good for comparison as the proper Lux values.
The other ADC pin on socket 2 will be used to measure the voltage level of the solar panels. No voltage divider needed there as the theoratical peak voltage of the solar cells are 4 * 0.5V (2V), which is under the 2.5V reference voltage.
Multiplexing the signalsThe sensors provided 4 analog signals but I still had only 2 ADC capable GPIOs. I solved this issue by creating a custom Click board on a perf board using a 4051 analog multiplexer. It is capable of multiplexing 8 analog channels into just one.
Pin 9, 10 and 11 are the channel selector pin, meaning I can access this 8 channel using an ADC pin and 3 GPIO pins. I didn't need 8 channels and I had very few GPIOs so I soldered the C channel directly to GND and I used channels 0-3, only.
GPIO16 and GPIO34 were used as Channel selector A and B. They are unique to the Click adapter 1, meaning that the Click adapter 2 was fully functional at the moment.
I also created servo connectors on the Solar Tracker perf click board using GPIO0 and GPIO2. These are PWM capable pins. GPIO2 is used on both Click adapters as INT, meaning that it might be an issue with some boards, but I figured I won't include a proper click board in the project, so it is acceptable.
Important note: the ADC on the MT3620 starter kit is using a 2.5 ref voltage, meaning that it is not a good idea to measure 5V signals with it. I made a voltage divider using two 10k resistors to handle this issue. Now the max voltage is 2.5V.
Sensor software footnotesI started working on with the version 2 of the Sphere SDK. That version lacked a couple of important features that I needed. There was no hardware PWM support and we couldn't directly reach the ADC from the high level core, only through the RT core, which is a lot more difficult.
I also used a software PWM based servo control with its terrible soft servo buzzing, so I was really happy when the guys at Microsoft released the version 3 with the hardware PWM support. I immediately updated the servo library to use hardware PWM. It mattered a lot. I made a library out of it, so if you need a servo library for sphere SDK you can find it here.
As I don't need any real time stuff, I removed the RT core app with the ADC related code, as the new, high level one is much easier to work with, but you might see older projects on the internet, that are using the older path, so don't be surprised if you see something like that. It was interesting to learn how the two cores communicate with each other, but I prefer the easier solution.
DisplayJust like most people, I started the project with an OLED display as there was an already working library for it. Later I figured that this isn't the best display for this project. I also wanted some more fun.
One or two years ago I got a Grove starter kit from Hackster. I didn't do much with that, however it had a very good Grove LCD RGB backlight display. Not as fancy as the OLED one, but it won't burn in, that's for sure, and it is quite big. The dev board has a Grove connector, so I wanted to use that for something. In the end I ported an Arduino library to Azure Sphere SDK, so if you have this display, you can easily use it with this library. It is in the same repo as the servo lib.
Fun fact: this display requires 5V VCC, while the Grove connector's VCC pin is only a 3.3V pin. I recommend you to pull the red cable out of the connector and connect it to a 5V pin. It took me more time to figure this out than I'm willing to admit. The background lighting is working properly from 3.3V and the LCD will also respond as expected through I2C, just won't display anything.
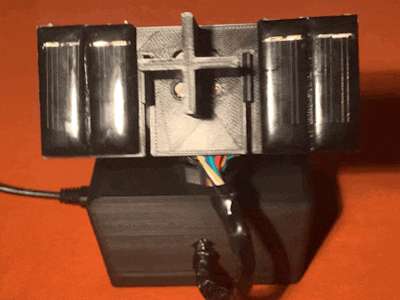
3D printing and assemblyI designed a simple housing for the electronics. You'll find the file at the end. It consists of 3 parts: the bottom part of the housing, the top part of the housing and the cross light shade for the sensor. There's two versions of the cross shade: with and without the solar panel holder wings. Obviously without the solar panels, it is just a toy, but it is a fun toy nonetheless.
I'd suggest you to print it with 100% infill. It isn't much material in this case, but it can prevent cracks, and it can also help with the screws.
I designed it iteratively. There was a bunch of versions that had some kind of issue, or I just didn't like.
But in the end all prints were ready. I just needed to assemble them.
And the hardware is done:
As you can see, under strong, direct sun it is quite a slow poke, while any other time it is very fast. This issue is caused by the fact that these photo resistors have hard time detecting the difference between very bright and very very bright. Actually everything is very bright here. I believe that a better photo sensor would solve this issue.
Cloud is your friendIt is working quite well now, but the plan is remote monitoring and some control. I needed to use Azure IoT Central for this purpose.
It is very easy to setup a device in the IoT Central. The only issue is that there's a bunch of old article or project that is not up to date and thus cannot be used directly. Luckily Microsoft pushes the solution in our face when we create out first app there. You just have to follow their article until you rich the point where you have to download their device capabilities JSON on the second page. Download my device capabilities json in the attachment section instead, and then move on with their article. I won't go into very specific details as they significantly changed the site multiple times in the last couple of months, so maybe my description wouldn't be up to date in a month.
Actually you can also create your app from template. There's a solar monitoring template under the energy section which looked great, but it had too many things that my device doesn't support, so I rather made a custom app.
My device capabilities are just the following:
- Power telemetry
- Voltage telemetry
- Brightness telemetry
- Device enable/disable control
The solar panels has a dummy load with a fix resistance. Using the
U = R * Iand the
P = U * Iformula, we can calculate the power like this:
P = U * U / RThe solar panels can produce 0.5V and 100mA in theory. I wired them in serial, so the total voltage is 2V. Even in best case scenario, we are talking about 200mW, so I display values on a mW scale.
So the first 3 capability is displayed on a graph, while the enable/disable control is a switch:
When I disable the device it will turn its head down to minimize the produced power:
User interfaceYou don't see much of the display, so here's a video about what is being displayed during operation:
A useful function is standby mode. Light sources from the back often causes an issue where the Solar Tracker can't find the light source. Whenever the brightness is too low it will go into standby mode, meaning it is staring directly at the sky. This way it will find the light source wherever it is.
I really like what Microsoft did here. I think there's a huge potential in this microcontroller and in this service. As more and more IoT device appear in the market, we need safety and security to prevent hacker actions and keep our private life private.
Thank you for reading, I hope you found it interesting. Have a nice day! :)


Comments