This project proposes a Low-cost way of virtual instrumentation for real-time monitoring of the PV panel characteristics such as voltage, current and power. The system design is based on a low-cost Arduino acquisition board. The acquisition is made through a low-cost current and voltage sensors, and data are presented in Excel by using the PLX-DAQ data acquisition Macro.
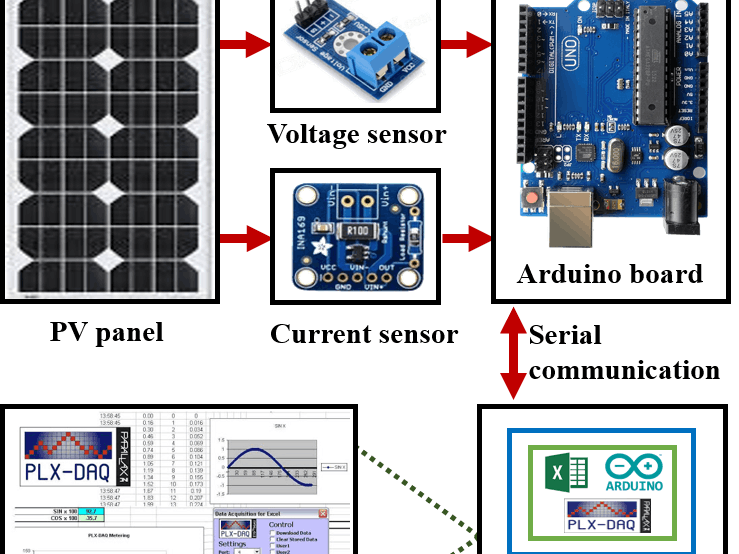
The structure of the equipment used is shown in the Figure below. The PV current and voltage are obtained through the current and voltage sensors. The output of the two sensors is then transmitted to the microcontroller of the Arduino UNO board. During the acquisition process, the data obtained are stored and plotted in real-time in the Excel spreadsheet.
Diagram of the instrumentation system of the PV panel output characteristics
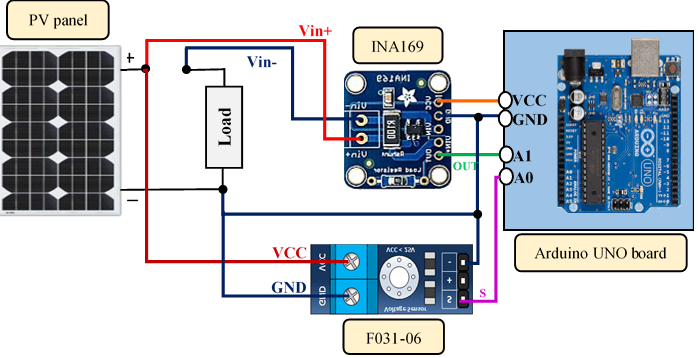
Schematic view of the hardware components connected to the Arduino UNO
The voltage sensor is put in parallel with the load. While the current sensor module is put in series between the positive side of the PV panel and that of the load.
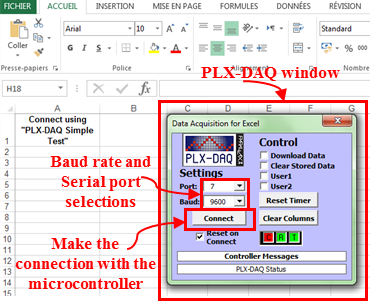
PLX-DAQ Spreadsheet window
The PLX-DAQ Excel Macro is used for data acquisition from the Arduino microcontroller to an Excel Spreadsheet. We only need to download it. After installation, a folder named "PLX-DAQ" will automatically be created on the PC in which a shortcut named "PLX-DAQ Spreadsheet" is inside. Then, to establish the communication between the board and Excel, we just need to open the Spreadsheet and defining the connections settings (Baud rate and port) in the PLX-DAQ window.
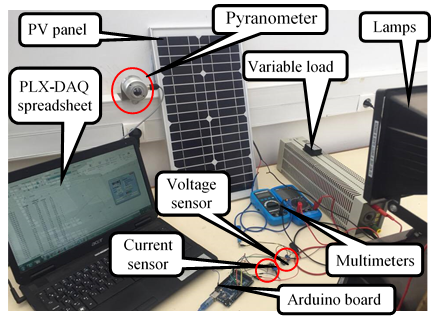
Experimental setup of the virtual instrumentation system
The microcontroller of Arduino board gets the PV panel output voltage and current which are measured by sensors and then computes the output power. Once the Arduino board is connected to the computer through a USB cable, we launch the PLX-DAQ Excel Macro and by defining in the PLX-DAQ window after its display, the serial port where Arduino board is connected to the computer, and the Baud rate (9600 bit/sec). Note that the Baud rate defined in PLX-DAQ window must be the same as that used in the program code embedded in Arduino board. Thereafter, after clicking on "connect" the output data will be collected and displayed in real-time on the Excel Spreadsheet. The light intensity is driven by varying manually a variable resistance between 0 and 330 Ω (to trace the I-V and P-V characteristics). A pyranometer is also used to measure the light radiation (if needed!). The microcontroller is programmed to measure successively in each second the PV current, voltage and power.
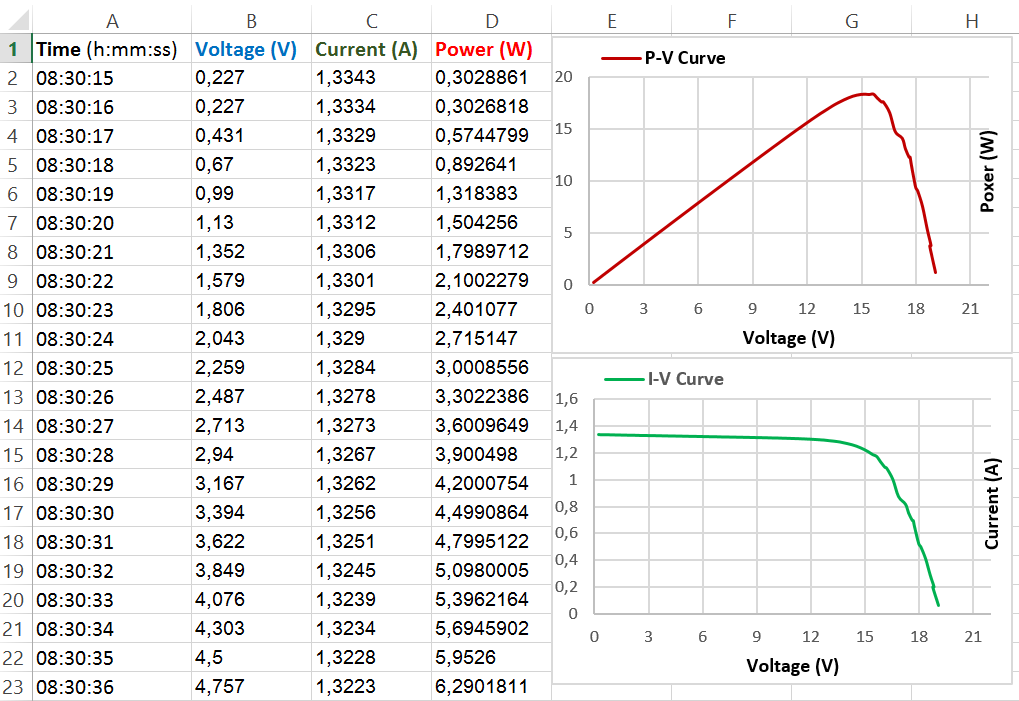
Experimental Results (a)
The I-V and P-V characteristics of the PV panel obtained by our virtual instrumentation are presented in the Figure below.
Experimental Results (b)
The results of a test similar to the previous one are shown in the Figure below, while the difference relates to the time step between each measurement, decreasing the step size from 1 s to only 100 ms. As shown in this Figure, oscillations have appeared on the I-V and P-V curves due to the inaccuracy of data obtained by the instrument system but with small extent. However, a small step size leads to obtain a big sample of measurements, and hence give us too many significant results. As a result, a compromise between small and large step size is needed. Generally, if you would like to note precise changes in the PV characteristics, then it is recommended to use a smaller step size. If you are not concerned about the precise changes and would like to run the instrument system faster, use a large step size.
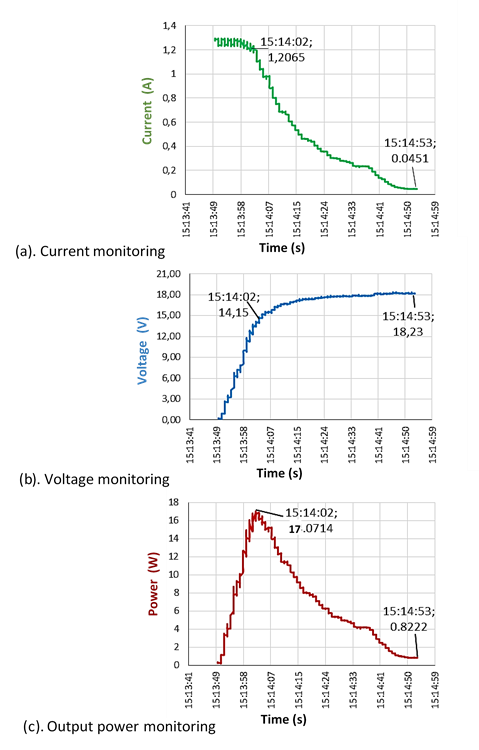
Experimental Results (c)
The results of a monitoring test for current, voltage and power of PV panel are presented in the Figure below. From the experimental results, it can be seen that the PV panel produced a maximum power of 17.07 W at "15h14min02s" when a voltage of 14.15 V and a current of 1.20 A appear. Subsequently, the output power is tends to a minimum value 822.2 mW when there is a voltage of 18.23 V and a current of 45.1 mA. Hence, as the present system is used such as a virtual instrument to acquire the PV panel characteristics under the real operation conditions, it can also be used on field periodical monitoring activities for PV systems.
Real-time data acquisition of solar panel using Arduino and Excel
Arduino
The program code embedded in the Arduino UNO board, which allows to acquire the measured data of PV panel from sensors and send it to a PLX-DAQ Spreadsheet, is presented as follows
/***************************************************************************** Aboubakr El Hammoumi*****************************************************************************//****************************************************************************** PROJECT : Instrumentation of PV panel characteristics Function : Real-time data acquisition of solar panel using Arduino and Excel ****************************************************************************** * * Written by : Aboubakr El Hammoumi Date : 04/05/2018 * * Email : aboubakr.elhammoumi@usmba.ac.ma ******************************************************************************/*initialization function*/voidsetup(){//serial connection setup//opens serial port, sets data rate to 9600 bpsSerial.begin(9600);//clear all data that’s been place in alreadySerial.println("CLEARDATA");//define the column headings (PLX-DAQ command)Serial.println("LABEL,t,voltage,current,power");}/*the main code*/voidloop(){//measuring voltage using "B25 0 to 25V" Voltage Sensor//measuring current using "INA169" Current Sensor//reading of the current and voltage from sensorsfloatvoltage=analogRead(A0)*5*5.0/1023;//PV panel voltagefloatcurrent=analogRead(A1)*5.0/1023;//PV panel currentfloatpower=voltage*current;//PV panel power//allows the serial port to send data to Excel in real-timeSerial.print("DATA,TIME,");// PLX-DAQ commandSerial.print(voltage);//send the voltage to serial portSerial.print(",");Serial.print(current);//send the current to serial portSerial.print(",");Serial.println(power);//send the power to serial portdelay(1000);//wait 1s before repeating}


_ztBMuBhMHo.jpg?auto=compress%2Cformat&w=48&h=48&fit=fill&bg=ffffff)


Comments