

Hardware components | ||||||
_ev7w8evpYW.jpg?auto=compress%2Cformat&w=48&h=48&fit=fill&bg=ffffff) |
| × | 1 | |||
It's a horrible habit, but I was waiting for some important messages. Every time my phone buzzed, I would become distracted and take it out, but nothing would happen. Just another spam, email alert. It was very distracting and completely disrupted my workflow.
I decided that I needed a way to cut through the background noise. I didn't want to completely turn off my phone, but I also couldn't afford to keep checking it every two minutes. What if I could design a fully autonomous physical alert system? Something that engages in
AtomS3 is a highly integrated programmable controller based on the ESP32-S3 main controller. It integrates the ESP32-S3 main controller, Wi-Fi functionality, 8 MB on-chip Flash, and a 0.85-inch IPS screen. Below the screen, there is a programmable button function, a built-in 5V to 3.3V circuit, and a 6-axis gyroscope sensor MPU6886. It has an onboard USB Type-C interface for power supply and firmware download The product size is 24.0 x 24.0 x 13.0mm, suitable for various embedded smart device applications.
MATERIAL REQUIREDSupplies You Will Need:
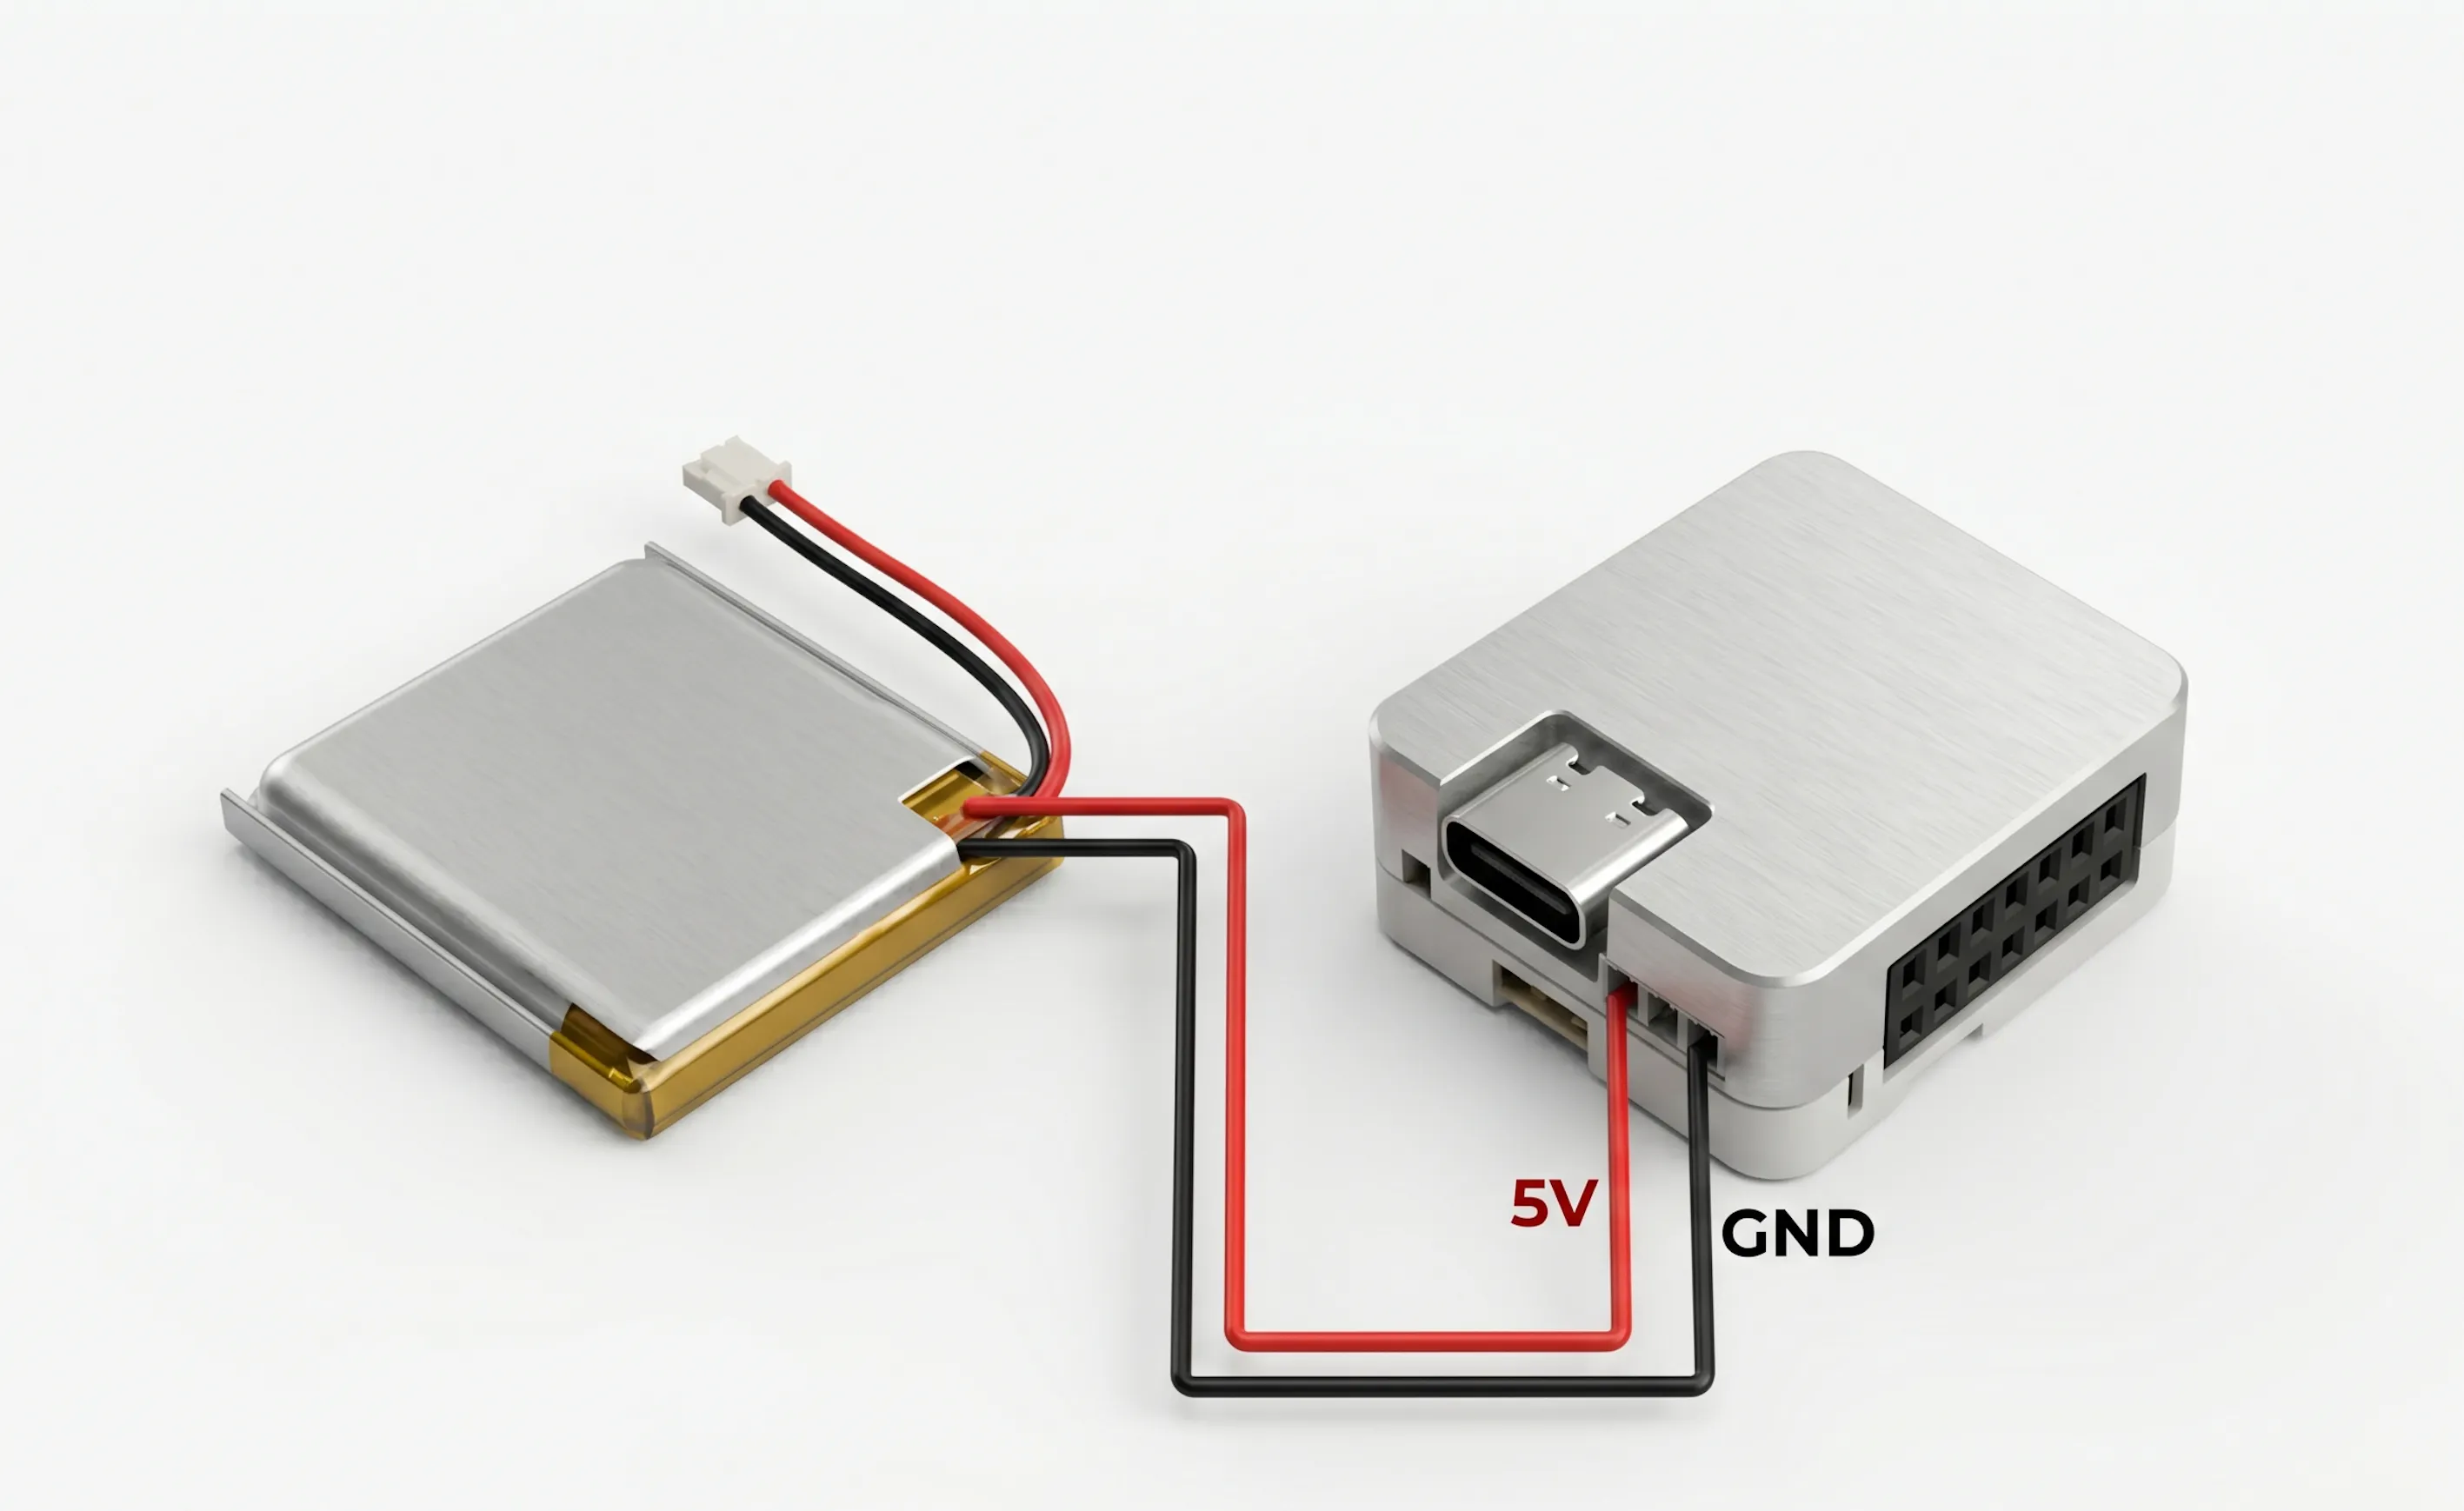
- M5Stack AtomS3
- 3.7V LiPo Battery
- 3D Printed Partts
Software & Account (Open Source):
- Arduino IDE
- Make.com Account
- Adafruit IO Account
3D MODEL
I started by importing the 3D model of the M5Stack Atom into Fusion 360, then designed a custom enclosure around it. The enclosure consists of two parts—a top body and a bottom body—that come together to sandwich the M5Stack securely in place. Both parts are fastened using M2 screws, with mounting holes designed on the top and bottom sections.
On the top side, I included an opening for the USB Type-C port, allowing easy access for charging or reprogramming the device without disassembly. I also added a circular loop to attach a chain, so the device can be used as a wearable or hung easily.
After finalizing the design, I exported the mesh files for both enclosure parts and 3D printed them using orange Hyper PLA and black Hyper PLA
Set Up (Software)Our AtomS3 is a smart little device, but we don't want it constantly logging into Google every 5 seconds to check for new emails. That would drain power and hit API limits instantly. Instead, we want the device to sit quietly and wait for a signal.
To do this, we use Adafruit IO.
How to set it up:
- Go to io.adafruit.com and create a free account.
- In the top menu, click on Feeds and then click + New Feed.
- Name your feed something simple, like atoms3-alerts, and click Create. (This feed is the exact "channel" your AtomS3 will tune into).
- Now, look for the yellow button with a Key icon (usually in the top right corner). Click it.
- A window will pop up showing your Username and your Active Key. Keep this window open or paste these into a notepad—you will need them for both Make.com and your Arduino code!
We now require a method to receive and forward critical emails via our Adafruit bridge. Make.com, a free automation tool, will serve as the intermediary.
Section A: Make.com's The Catcher
- Register for a free Make.com account and click Create a new scenario.
- Click the enormous "+" button, look up Webhooks, and choose Custom Mailhook.
- After selecting "Add, " give it a name, and press "Save."
- Make.com will immediately produce an extremely lengthy and disorganized email address, such as hwdc8jr6...@hook.eu1.make.com. This address is copied.
Part B: The Filter (Gmail) If you skip this section, your AtomS3 will flash for each piece of spam you receive!
- On a computer, launch Gmail and select Settings (the gear icon) > See all settings.
- Open the POP/IMAP and Forwarding tab.
- Paste that lengthy Make.com address after selecting Add a forwarding address. (Make.com will receive a confirmation code from Gmail simply click "Run once" in Make.com to receive the code, then paste it back into Gmail to confirm).
- Click Create a new filter under the Filters and Blocked Addresses tab.
- Here's where the magic takes place: The "From" field allows you to input specific email addresses, such as your spouse, your boss, or your best client.
- Click the "Create filter, " choose your Make.com address, and check the "Forward it to!" box.
Section C: Linking the Bridge
- Return to Make.com now. To add a second module, click the tiny "ear" on your Webhook circle and drag it out.
- Choose Make a request after searching for HTTP. Adafruit will speak with this module.
- Prepare it precisely as follows:
- URL: https://io.adafruit.com/api/v2/YOUR_USERNAME/feeds/atoms3-alerts/data (insert your real Adafruit username in place of YOUR_USERNAME).
- Process: POST
- Headers: Include a piece. Paste your Adafruit Active Key as the value and give it the name X-AIO-Key.
- Type of body: Raw
- JSON (application/json) content type
- Request information: Paste the code below, but drag and drop the Sender and Subject variables from your Mailhook into the values using the Make.com popup menu:
{
"value": "{\"app\":\"GMAIL\", \"sender\":\"{{Sender}}\", \"subject\":\"{{Subject}}\", \"snippet\":\"null\"}"
}- Click OK, save your scenario, and flip the Scheduling switch to ON at the bottom left.
The trap has been set. Gmail sends emails to Make.com, which then packages them into a tidy JSON file and sends it to Adafruit IO. All we have to do now is program the AtomS3 to catch it!
Programming AtomS3We now have to program our little AtomS3 to draw those amazing user interface screens, connect to your WiFi, and listen to the Adafruit bridge.
Configure the Arduino IDE:
- Install the free Arduino IDE after downloading it.
- In order for your computer to recognize the AtomS3, you must install the M5Stack board package and add the M5Stack board manager URL in your preferences if you have never used an M5Stack board. If you run into trouble, you can refer to M5Stack's official quick-start guide.
- Install the following three necessary libraries by selecting Sketch > Include Library > Manage Libraries:
- (by M5Stack) M5AtomS3
- PubSubClient, created by Nick O'Leary
- Benoit Blanchon created ArduinoJson.
The Code: Use a USB-C cable to connect your AtomS3 to your computer.
Essential: The credentials at the top of the code (Lines 7 through 12) must be changed before you hit upload. Enter your Adafruit username, Adafruit Active Key, and WiFi name and password.
RAW TESTINGhad to make sure the NotiFY was operating properly before we put it together. so that it won't cause problems. I'm glad it works!
ASSEMBLYIt's time to put everything into a modern, 3D-printed body now that the cloud is listening and the brain has been programmed. The AtomS3 looks flawless on your desk thanks to this unique enclosure that conceals the battery and gives it a polished appearance.
- Get your 3D-printed base ready for the enclosure.
- Seat the LiPo Battery: Gently insert your 3.7-volt LiPo battery into the 3D-printed case's lower portion.
- Route the Wires: To prevent pinching, coil the battery wires neatly.
- Install the AtomS3: Insert the AtomS3 into the upper portion of the housing that was 3D printed.
- Get Rid of It: Align the 3D-printed case's upper and lower halves.
You have a fully wireless, self-contained, intelligent email pager once those screws are in place.
The Final Test RunHere's what you should see after the code has finished uploading:
- When the AtomS3 boots up, a cool blue/green cyber-looking "ONLINE! CONNECTED" screen appears after the screen says "Wi-Fi..."
- Going Dark: The screen will turn entirely black after roughly 1.5 seconds. Remain calm! It entered stealth mode instead of breaking. It is currently waiting for a signal in silence.
- To initiate the trap, send an email from a VIP account that you have configured in your Gmail filter. Alternatively, you can manually initiate your Make.com scenario.
- The Alert: Your AtomS3 will flash a red hazard warning and display the sender's name and the email subject line in a matter of milliseconds.
- The Reset: You have two options for clearing the alert: either ignore it or press the physical screen, which functions as a huge button. The gadget will automatically turn off the backlight and return to sleep after ten seconds.
This build doesn't need to sit on a desk because it is fully wireless and runs on a LiPo battery. Put it in your pocket, fasten it to your lanyard, or clip it to the strap of your backpack! Now, you can go out and about with your phone securely tucked away. You can rest easy knowing that your AtomS3 will quickly exit its stealth mode to Notify you. Everything else remains stuck in the cloud, where it belongs, including spam notifications.


Comments