


Hardware components | ||||||
 |
| × | 1 | |||
 |
| × | 2 | |||
 |
| × | 2 | |||
 |
| × | 1 | |||
 |
| × | 1 | |||
Software apps and online services | ||||||
 |
| |||||
1) Install Arduino IDE
2) In the boards manager install Arduino SAMD Boards (32-bits ARM Cortex M0+)
3) Install WiFi101.h library to run the firmware checker
https://www.arduino.cc/en/Tutorial/CheckWiFi101FirmwareVersion
4) The version did not match the one required by the library
5) Load wifi101 firmwareUpdater from the examples, and run the WiFi101 Updater plugin from tools. Chose WINC 1501 Model B (19.5.2)
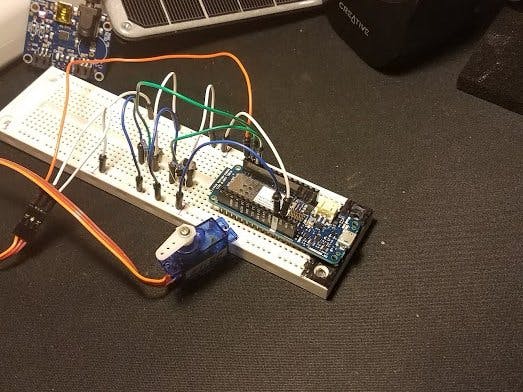
6) connected the continuous servo pins to 5V, Ground , and to pin 5 on MKR1000, loaded the following code, which makes a smooth ccw and cw turn sequence.
#include <Servo.h>
Servo cont_ser;
int spd = 90;    // variable to store the servo speed
void setup() {
 cont_ser.attach(5);  // attaches the servo on pin 5 to the servo
}
void loop() {
 for (spd = 90; spd <= 180; spd += 5) {
   // in steps of 5 incremetal speed 90 being stop
   cont_ser.write(spd);
   delay(150);
 }
 for (spd = 180; spd >= 90; spd += -5) {
   // in steps of 1 incremetal speed 90 being stop
   cont_ser.write(spd);
   delay(150);
 }
 for (spd = 90; spd >= 0; spd += -5) {
   // in steps of 1 incremetal speed 90 being stop
   cont_ser.write(spd);
   delay(150);
 }
 for (spd = 0; spd <= 90; spd += 5) {
   // in steps of 1 incremetal speed 90 being stop
   cont_ser.write(spd);
   delay(150);
 }
}
7) added 2 buttons to control the turn directions with them, with the following code, used 3.3 V this time.
#include <Servo.h>
Servo cont_ser;
const int servoPin = 5;
const int button1Pin = 4;
const int button2Pin = 3;
int spd = 90;    // variable to store the servo speed
void setup() {
 cont_ser.attach(servoPin);
 pinMode(button1Pin, INPUT);
 pinMode(button2Pin, INPUT);
}
void loop() {
 int buttonState1;
 int buttonState2;
 buttonState1 = digitalRead(button1Pin);
 buttonState2 = digitalRead(button2Pin);
 if (buttonState1 == LOW) {
   spd = 180;
   cont_ser.write(spd);
   delay(150);
 }
 else if (buttonState2 == LOW) {
   spd = 0;
   cont_ser.write(spd);
   delay(150);
 }
 else
   spd = 90;
   cont_ser.write(spd);
   delay(150);
}


2 projects • 2 followers
Started watching FliteTest on Youtube year ago, and since then it has been a journey of DIY drones, 3D printing, 3D design and lot's of fun.
Comments