

Hardware components | ||||||
 |
| × | 1 | |||
Software apps and online services | ||||||
 |
| |||||
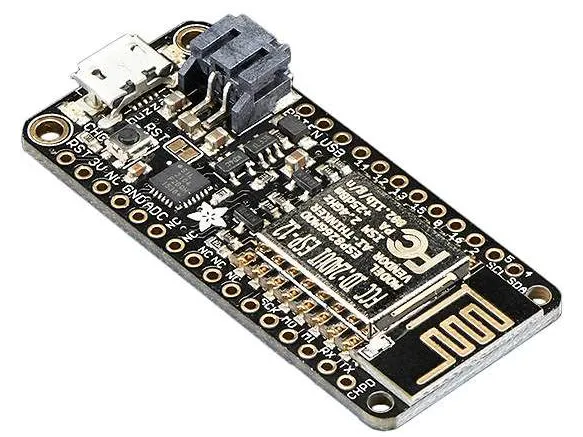
The Adafruit Feather HUZZAH ESP8266 is an 'all-in-one' ESP8266 WiFi development board with built in USB and battery charging.
The Feather HUZZAH has an ESP8266 WiFi microcontroller clocked at 80 MHz and 3.3V logic, able to be programmed using the Arduino IDE for an easy-to-use Internet of Things applications; click here for additional specs for the Feather HUZZAH ESP8266.
In the following tutorial, Ubidots will demonstrate how to setup and program the Adafruit Feather HUZZAH with ESP8266 using the Arduino IDE to display data with Ubidots.
Requirements- Ubidots account - Educational License - Business License
Begin by connecting your Feather HUZZAH ESP8266 to your computers USB port to configure the device.
1. Download the Arduino IDE if you not already have it. 1a. Open the Arduino IDE, select Files -> Preferences and enter the URL below into the Additional Board Manager URLs field. You can add multiple URLs by separating them with commas:
http://arduino.esp8266.com/stable/package_esp8266com_index.json
NOTE: If you're a Mac user, please note that in the Arduino software configurations are slightly different from Windows and Linux. Further, you may have to install the following driver to be able to upload your NodeMCU.
2. Open Boards Manager from Tools -> Board -> Boards Manager and install esp8266 platform. To simply find the correct device, search ESP8266 within the search bar.
3. Select your Adafruit Feather HUZZAH ESP8266 from Tools > Board menu. 4. Additionally, we need to be able to communicate with the Feather HUZZAH ESP8266 by selecting the proper port com. Go to Tools > Port > Select the appropriate PORT for your device.
5. To keep everything running fast and smooth - let's make sure the upload speed is optimized to 115200. Go to Tools > Upload Speed > 115200:
IMPORTANT NOTE: Don't forget you will also need to install the SiLabs CP2104 Driver to be able to program the board properly.
6. Close and REBOOT the Arduino IDE.
7. Now with everything configured, UPLOAD the Blink Sketch to verify that everything is working properly. Go to File > Examples > Basics > Blink and compile the code.
8. Once the code is properly updated the a red LED will start blinking.
Step 2. Ubidots account setupWith the following example you will be able to publish ANALOG reading taken from the A0 pin of the Feather HUZZAH ESP8266 to Ubidots
1. To post your first value to Ubidots, open the Arduino IDE and paste the code below. Once you have copied the code, you will need to assign the parameters: Wi-Fi name and password, plus your individual, unique Ubidots TOKEN.
/********************************
 * Libraries included
 *******************************/
#include <ESP8266WiFi.h>
/********************************
 * Constants and objects
 *******************************/
const char* SSID_NAME = "....."; // Put here your SSID name
const char* SSID_PASS = "....."; // Put here your password
const char* TOKEN = "....."; // Put here your TOKEN
const char* DEVICE_LABEL = "feather-huzzah"; // Your device label
const char* VARIABLE_LABEL = "temperature"; // Your variable label
const char* USER_AGENT = "ESP8266";
const char* VERSION = "1.0";
const char* HTTPSERVER = "things.ubidots.com";
int HTTPPORT = 80;
WiFiClient clientUbi;
/********************************
 * Auxiliar Functions
 *******************************/
/**
 * Gets the length of the body
 * @arg variable the body of type char
 * @return dataLen the length of the variable
 */
int dataLen(char* variable) {
  uint8_t dataLen = 0;
  for (int i = 0; i <= 250; i++) {
    if (variable[i] != '\0') {
      dataLen++;
    } else {
      break;
    }
  }
  return dataLen;
}
/********************************
 * Main Functions
 *******************************/
void setup() {
  Serial.begin(115200);

  /* Connects to AP */
  WiFi.begin(SSID_NAME, SSID_PASS);
  while (WiFi.status() != WL_CONNECTED) {
    delay(500);
    Serial.print(".");
    }
  WiFi.setAutoReconnect(true);
  Serial.println(F("WiFi connected"));
  Serial.println(F("IP address: "));
  Serial.println(WiFi.localIP());
}
void loop() {
  char* body = (char *) malloc(sizeof(char) * 150);
  char* data = (char *) malloc(sizeof(char) * 300);
  /* Space to store values to send */
  char str_val[10];
  /* Read the sensor from the analog input*/
  float sensor_value = analogRead(A0);
  /*---- Transforms the values of the sensors to char type -----*/
  /* 4 is mininum width, 2 is precision; float value is copied onto str_val*/
  dtostrf(sensor_value, 4, 2, str_val);
  /* Builds the body to be send into the request*/
  sprintf(body, "{\"%s\":%s}", VARIABLE_LABEL, str_val);

  /* Builds the HTTP request to be POST */
  sprintf(data, "POST /api/v1.6/devices/%s", DEVICE_LABEL);
  sprintf(data, "%s HTTP/1.1\r\n", data);
  sprintf(data, "%sHost: things.ubidots.com\r\n", data);
  sprintf(data, "%sUser-Agent: %s/%s\r\n", data, USER_AGENT, VERSION);
  sprintf(data, "%sX-Auth-Token: %s\r\n", data, TOKEN);
  sprintf(data, "%sConnection: close\r\n", data);
  sprintf(data, "%sContent-Type: application/json\r\n", data);
  sprintf(data, "%sContent-Length: %d\r\n\r\n", data, dataLen(body));
  sprintf(data, "%s%s\r\n\r\n", data, body);
  /* Initial connection */
  clientUbi.connect(HTTPSERVER, HTTPPORT);
  /* Verify the client connection */
  if (clientUbi.connect(HTTPSERVER, HTTPPORT)) {
        Serial.println(F("Posting your variables: "));
        Serial.println(data);
        /* Send the HTTP Request */
        clientUbi.print(data);
  }
  /* While the client is available read the response of the server */
  while (clientUbi.available()) {
        char c = clientUbi.read();
        Serial.write(c);
  }
   /* Free memory */
  free(data);
  free(body);
  /* Stop the client */
  clientUbi.stop();
  /* Five second delay */
  delay(5000);
}
2. Verify your code within the Arduino IDE. To do this, in the top left corner of our Arduino IDE you will see the "Check Mark" icon press it to verify your code.
3. Upload the code into your Feather HUZZAH ESP8266. To do this, choose the "right-arrow"icon beside the check mark icon.
4. To verify the connectivity of the device, open the serial monitor by selecting the "magnifying glass" icon in the top right corner of our Arduino IDE.
5. Confirm your data in Ubidots. Now you should see the published data in your Ubidots account, locate the device called "feather-huzzah" and visualize your data.
With this simple tutorial we are able to POST data to Ubidots with the ease of the Arduino IDE and a Feather HUZZAH with an ESP8266. If your desire send more than one variable to Ubidots, reference Ubidots REST API to learn how to build the request properly. :)
Now its time to create Ubidots Dashboards to visualize your data and deploy your internet connected monitoring solution!


Comments