


Hardware components | ||||||
| × | 1 | ||||
 |
| × | 1 | |||
 |
| × | 1 | |||
| × | 2 | ||||
| × | 1 | ||||
| × | 1 | ||||
| × | 1 | ||||
| × | 1 | ||||
| × | 1 | ||||
| × | 1 | ||||
| × | 1 | ||||
| × | 1 | ||||
Software apps and online services | ||||||
 |
| |||||
| ||||||
 |
| |||||
| ||||||
Hand tools and fabrication machines | ||||||
 |
| |||||
| ||||||
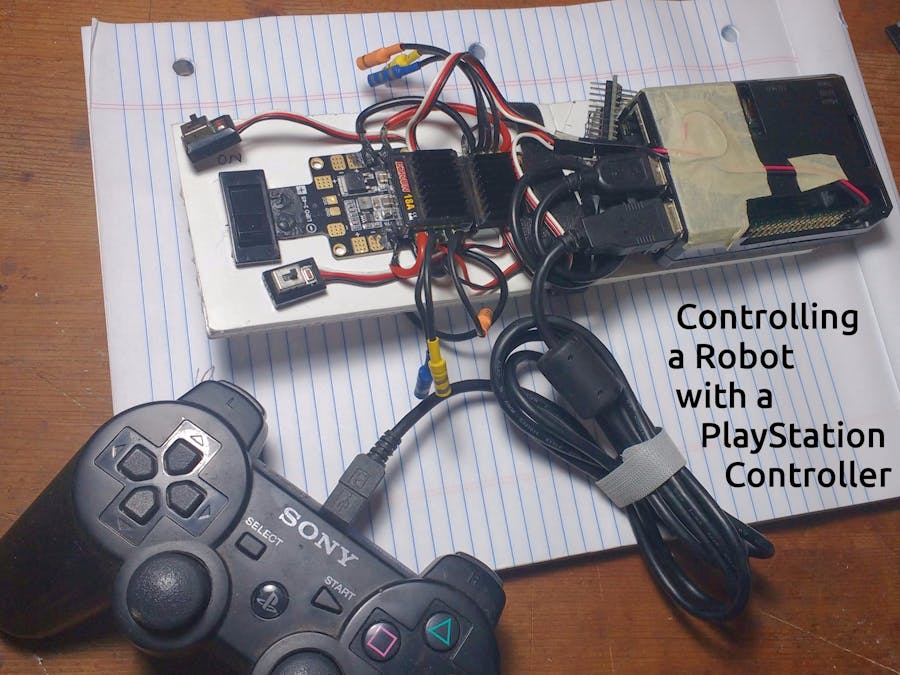
This control scheme was developed as part of an underwater ROV project in order to control the ROV using a video game controller. In the following guide, the underwater aspects are omitted in order to focus on the fundamentals of this control system (and because they're currently a mess).
A schematic of the system is below. The USB controller reads input, then transmits it to the Raspberry Pi. A Python program reads the input using the Pygame library, then formats the input into a string that is transmitted over USB to an Arduino using the Python serial library. The Arduino splits the string it receives, converts elements back into numeric values, and then sends an appropriate signal to a Electronic Speed Controller (ESC), which drives a brushless motor.
1.1 : Have Python recognize your controller
Follow the instructions that come with the Pi (or any of these: 1 2 3 4 5) so that you can boot into the Raspberry Pi. Directly or remotely are both fine.
Plug the controller into one of the Pi's USB ports, then run the python file controller-reader.py. It should load the necessary libraries, check for a USB joystick, and output the name of the joystick it finds. If it does not, run jstesk-gtk. Jstest-gtk allows a user to view, test, and troubleshoot connected controllers. This will require an active desktop, so if you've been working on the Pi over SSH, hook up a monitor or access your Pi using a remote desktop. Or switch to a different computer.
1.2 : Read controller input in Python
If detected, the Python program should report the name of the joystick, then begin writing out to the terminal the the values that Python is reading from the x-axis of each of the thumb sticks whenever they're moved from center. If this doesn't work, try changing the axes to check in line 34. For my controller, the axes I wanted were one and three. You can examine your controller in jstest-gtk to determine your axes, or in Python via trial-and-error. Specify a button as the breakout button too. This button will end the program. Mine is the start key. Otherwise, you'll have to do a keyboard interrupt (ctrl+C).
If your controller is being read properly, move on to formatting the readings for serial. The raw values are floating point decimals from -1 to 1, so it's convenient to multiply them and round them, then add 100 so that they are integers ranging from 0 to 200. We'll also need to turn these numbers into a a character string, as the serial function sends data as a string of text in binary. Uncomment line 56. If it looks like two numbers separated by a comma and followed by a semicolon, we're good. Currently, that text isn't being sent to serial, because it would raise an error if there is nothing to connect to. We'll set up the Arduino, then enable serial communication.
If you want your values to range from 0 - 1000 or to include decimals, or to use a different end-of-line character, by the way, you can do so. As long as you modify the Arduino sketch that receives the serial signals accordingly, you can format the string that gets sent however you like.
The next step is to set up the Arduino, after which we can connect it to the Raspberry Pi and enable the serial connection.
Step 2 : Set up the Arduino Nano to receive a string over serialYou may notice that we don't actually NEED the Arduino for this system to work. Instead of formatting our signal into a string, passing it to the Arduino, and having the Arduino output these to its pins, we could just send the signal to the Raspberry Pi's GPIO pins.
We could even keep the Arduino and drop the Raspberry Pi by using these instructions by TechMonkeyBusiness .
The benefit of including the both the Raspberry Pi and the Arduino, however, is scalability. The Raspberry Pi can act as a hub to many separate systems on an ROV, while a single Arduino can control up to a dozen motors based on commands from one serial channel. If you don't want to do this, feel free to write the controller signal to GPIO pins on the Pi instead of pins on the Arduino and cut out steps 2 and 3.
2.1 : Load the Arduino sketch onto the Arduino
Connect the Arduino Nano to a computer on which you can run the Arduino IDE. If you don't have a personal computer which you can run the Arduino IDE on, don't forget that you can use the Raspberry Pi.
In the Arduino IDE, open the file controller-interpretter.ino. Set your board (and chip if necessary) and your port and upload this sketch to your Arduino. Open the serial monitor and send a command in the appropriate format, such as:
10,0;
The Arduino should receive this one character at a time and stored each in a string until it sees a semi-colon, which we've specified as our end-of-line character. It will then split the string at the comma. It will convert the two resulting strings into variables and assign them as the new values for thruster_left and thruster_right. It will write these values out to the serial channel to show that it's working.
2.2 : Test the sketch using a servo motor
You can now connect a servo up to your Arduino as shown below and test the sketch. Try sending commands and confirming that the servo responds appropriately.
If you don't have a servo, you can also test it by connecting an LED, which will brighten and dim in response to new commands. If you're comfortable with ESCs and brushless motors, you can connect these up to test the sketch, although be aware at the motors are fast and could present a safety hazard if not handled appropriately.
Step 3 : Connect the Raspberry Pi to the Arduino3.1 : Connect the Pi to the Arduino
Use the USB-to-mini-USB cable to connect the Arduino to the Raspberry Pi. Then run:
ls /dev/tty*
You should see /dev/ttyUSB0 or something similar at the end. If it says that exactly, you're all set. Otherwise, you'll need to edit line 25 of the controller-reader.py file to match whatever your Pi has named that port. You can now also enable the serial functions by changing serial_is_on to 'True'.
3.2 : Test the controller-to-arduino connection
You should now be logged into a Raspberry Pi which has a controller plugged into one USB port and an Arduino connected to a servo plugged into another. If you run the controller-reader program, you should see the servos connected to the correct Arduino pins react accordingly. If they are, then all we need to do is switch out the servos for ESCs connected to brushless motors.
Step 4 : Set up the power distribution systemIn order to substitute the servo(s) for brushless motors, we need to connect the Electronic Speed Controllers (ESCs) to a power source. While we're at it, now is a good time to connect the Raspberry Pi to the same power source as well.
4.1 : Connect the ESCs to the brushless motors
Before connecting the ESCs to power, make sure there that the motor wires can't short out. On my ESC, I soldered female bullet connectors of the same size as my motors. Whether you solder your wires directly to your motor or include a connector, wrap any exposed metal in electrical tape or heat shrink it so that nothing can touch metal it isn't supposed to touch.
4.2 : Connect the ESCs to the PDB
The Power Distribution Board (PDB) will take power from the battery and distribute it to each component that needs power. The main two components to connect (or more, if you like) are the ESCs. Solder the positive and negative leads of each ESC to an appropriate pad on the PDB. After they've cooled, I like to coat them in a bit of liquid electrical tape to make sure there is no chance of anything shifting and causing a short.
Connect your PDB to your battery. The PDB I bought came with an XT60 connector that fits with most batteries, although I added a rocker switch between the PDB and the battery so I could turn the system on and off without having to unplug the battery. Once connected, an LED on the PDB itself should light up, and the ESCs power indicator lights should come on when they are switched on.
4.3 : Power the Raspberry Pi from the battery
There are several ways to power the Pi off of battery. Up until now, you've likely been powering the Pi using a 5V 2.1 A wall wart with a micro-USB plug, perhaps the one you use to charge your phone. In order to draw power from the battery, we'll need to step the power coming off the battery down to 5V and 2.1 A. Once you've done so, the USB cable connecting the Pi to the Arduino will power the Arduino.
In the past, devices like these were often given a separate battery at a lower voltage, but now that redundancy is typically avoided using a Battery Eliminator Circuit (BEC). This is just a a simple circuit that steps down the voltage and amps so you can safely plug in 5V circuit electronics like the standard Raspberry Pis and most Arduinos, and fortunately in this design we've got SEVERAL to choose from: both the PDB and the ESCs specified in the parts list have integrated BECs.
- One simple option is to cut a micro-USB cable in half and solder the positive and negative wires inside to the +5 and GRD pads on the PDB. (USB cables only have four wires: positive, ground, signal out, and signal in, so you can find lots of guides for wiring micro-USB cables to power sources). Then just plug the micro-USB connector into the Pi, and if there is power going to the PDB, the Pi will turn on.
- You can also power the Raspberry Pi over GPIO pins instead. I did this, because the micro-USB connector would jut out of the Pi at a 90 degree angle, which wouldn't fit in the housing I had in mind. I've heard that the GPIO pins aren't as electrically protected as the USB plug, so be careful to keep the voltage and current in range if you do this.
- Alternatively, instead of drawing power from the power distribution board, you can draw it from the ESCs, since they have BECs in them. This is what I did.
In my case, I powered the Raspberry Pi by connecting jumper wires from the ESCs to the Pi's GPIO pins.
At this point, the controller is connected to the Pi; the Pi is connected to a power source, and to the Arduino, which it is powering; and the ESCs are receiving power. The ESCs still need to be connected to the Arduino to receive instructions, and they need to be connected to their brushless DC motors to execute those instructions.
My Arduino Nano has built in header pins, so all I had to do was connect the white signal wire from each ESC to header pins 9 and 10, which are designated as the outputs for thruster_left and thruster_right in the Arduino sketch. If yours doesn't have these male headers, you'll need to connect a jumper cable or solder a connection.
ESCs need to be programmed to know what signal indicates maximum, minimum and neutral positions. High end ESCs can be programmed on a computer, but basic ones like the ones I used have a setup button. When held, the ESC will blink and/or flash to indicate that it is in setup mode. The user navigates to settings by pressing the setup button with the timing outlined in the ESC's manual. Users are then to put a throttle in its maximum position and save it, put it in its minimum position and save it, and go to neutral and save it. This is fairly straightforward, but requires that our full chain of instruction from the controller, to the Pi, to the Arduino, to the ESCs is functioning, so make sure you've completed all previous steps before programming ESCs.
If all previous steps have been completed:
- Connect a battery (or switch on the connection) to the power distribution board.
- Power on one ESC and put it into its setup mode.
- Confirm that the Raspberry Pi and the Arduino have powered up.
- Log into your Raspberry Pi. This can be through a locally connected keyboard and monitor, a remote desktop, or just SSH. I prefer SSH
- Run the controller-reader.py program. You can set this to start on default, too. I think it's a good idea one everything is working, but for now I think it makes sense to be connected to the Pi in case we want to troubleshoot or edit the code.
- Move the thumb sticks to confirm they're being read
- Enter the ESCs' setup modes (one at a time) and program in the values, and change any settings you desire, such as the braking mode or the response to a lower battery condition.
- When each ESC has been programmed, moving the thumb sticks should precisely control their speed with low latency.
I like this setup because it's a modular starting point from which to add other control options. If you use this, please consider sharing your experience in the comments. Cheers!


_3u05Tpwasz.png?auto=compress%2Cformat&w=40&h=40&fit=fillmax&bg=fff&dpr=2)
Comments