


Hardware components | ||||||
_baVEVgguW1.jpg?auto=compress%2Cformat&w=48&h=48&fit=fill&bg=ffffff) |
| × | 1 | |||
| × | 1 | ||||
| × | 1 | ||||
| × | 1 | ||||
Software apps and online services | ||||||
 |
| |||||
 |
| |||||
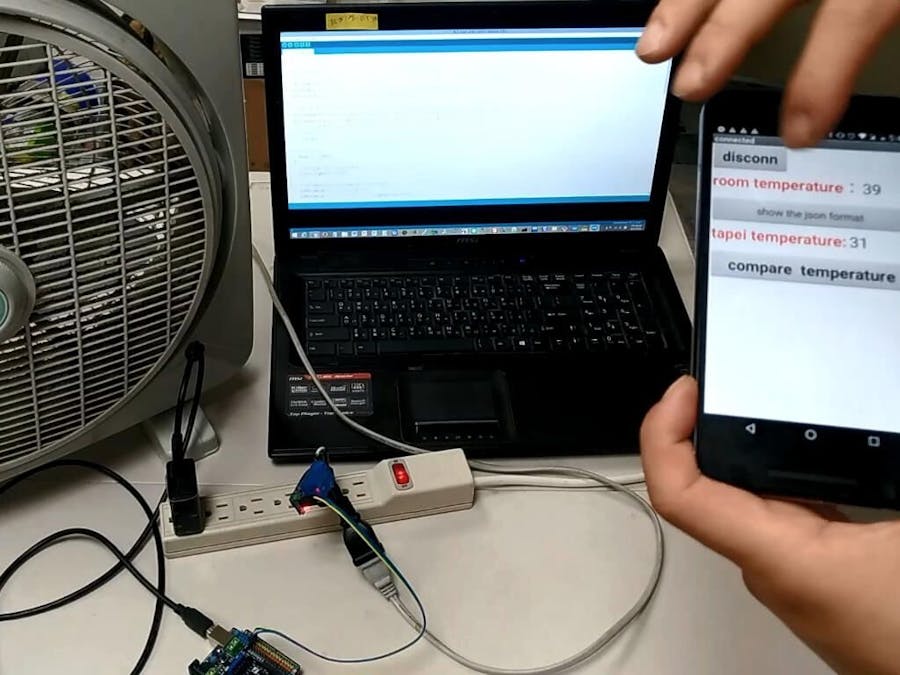
Open data is becoming a popular data source in many respects, and the most common application is the weather station. This project will get temperature open data from a webpage and compare it with the temperature with LM35 sensor on your Arduino 101.
If the sensor data is higher than the web data, this means it's hotter inside. In this case, we will ask Arduino 101 to turn on a small fan (using a relay module). Otherwise the fan will be shut down.
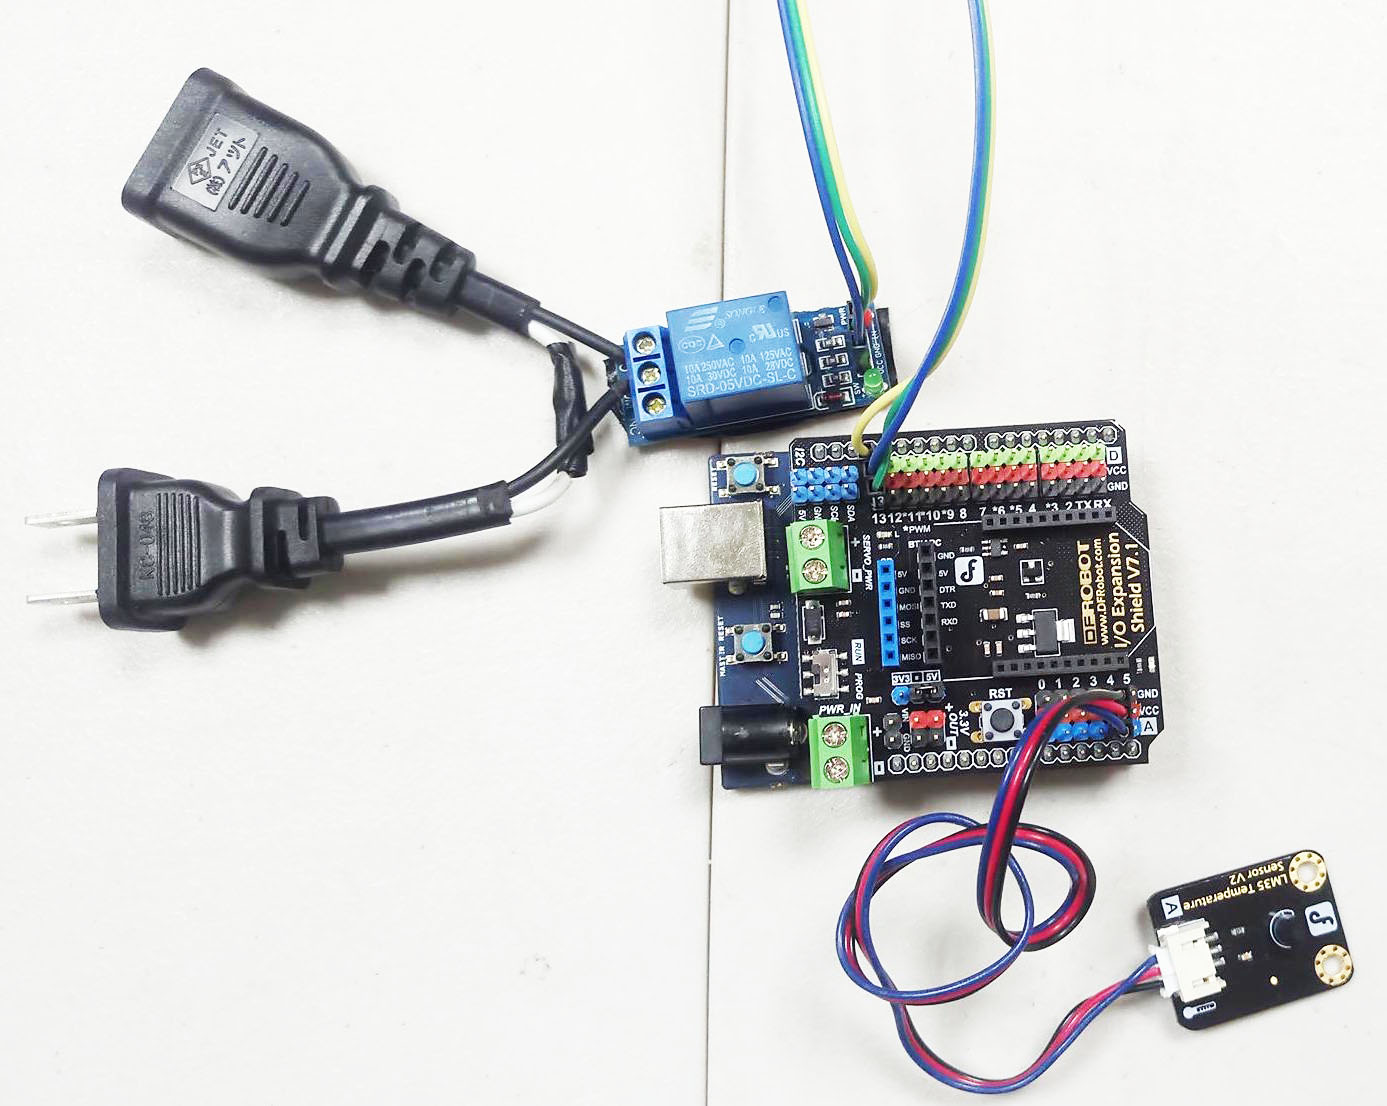
VideoHardwarePrepare your hardware as below:
- Attach Gravity expansion board on your Arduino 101.
- Attach Gravity LM35 sensor's data pin to Arduino 101's A4 analog pin, and connect 5V/GND to Arduino 101's 5V/GND separately.
- Attach Gravity relay module's data pin to Arduino 101's D13 digital pin, and connect 5V/GND to Arduino 101's 5V/GND separately.
Finish as below:
This project use Arduino IDE to finish logics on Arduino, and use App Inventor to design a small Android app. The two are communicating through BLE, you can use other BLE-supported board instead.
ArduinoPlease check the complete Arduino sketch in this project's attachments. Here we only go through several key commands:
- #5: declare a new LM35 object (name: temp) and set data pin to Arduino 101's A4 pin.
- #6~11: set BLE UUID, must be identical with which in your App Inventor. switchCharacteristic is for reading char from App Inventor and LM35Data is for sending LM35 sensor data to App Inventor
- #12: set relay module attach to Arduino's D13 pin.
- #17~36: start BLE service (peripheral).
- #53~70: check which char is sent from App Inventor. Switch relay on when receive 'O' and switch relay off when receive 'C'.
- #70~78: send LM35 sensor data to App Inventor.
App Inventor is an online graphical Android IDE hosted by MIT. You can design apps by drag-n-drop components you like, and finish coding like playing puzzles. App Inventor’s app can not only run on emulators and also installed on real Android devices.
For more tutorials please visit: http://www.appinventor.tw
Please log in MIT App Inventor website with your Gmail account. Create a new project, you will first see the Designer page, we will decide which components will be used in this app.
Since AI2’s BLE components is still under testing, therefore it must be import to your project as an extension (.aix).
Please find the “Import extension” option on the left hand side of the Designer page, and click URL and paste this link: http://iot.appinventor.mit.edu/assets/edu.mit.appinventor.ble.aix
Please add components as figure below:
- ListPicker x 1: To view parsed JSON result.
- Button x 2: one is for connect/disconnect from Arduino 101, the other on is for turning on/off Arduino's relay module according to the comparison result.
- label x 5: show messages.
- Web x1: get webpage data and parsed JSON format into list.
- BLE x 1: send/receive data by BLE.
- Clock x2: Clock1 is for receiving LM35 sensor data from Arduino (Timer Interval: 1000 ms). And Clock2 is for getting JSON data from webpage and parse the result into list(Timer Interval: 1000 ms).
Your Designer should be very similar like figure below, but doesn’t have to be exactly the same.
Next please click “Blocks” on the top-right corner of the webpage, it will switch to Blocks, we are going to decide the behavior of this app.
STEP1: Set BLE address and connectYou can find Arduino 101's BLE address on its back side (like 98:4F:EE:0F:42), please modify the addr variable to yours, otherwise your phone will be unable to connect to Arduino 101.
Your phone will scan for available BLE devices nearby when started (Screen1.Initialized event). Please click Button_connect to connect to your Arduino 101, your phone will show different message when BLE device is connected (BluetoothLE.Connected event) or disconnected (BluetoothLE.Disconnected event).
When connected, Arduino 101 will send LM35 sensor data to App Inventor every one second.
App Inventor will get weather content(https://works.ioa.tw/weather/api/weathers/1.json) every 10 second. Actuallt this webpage will update every 20 minutes, we set 10 second here is just for getting result quicker.
You can see how to use [select list item] to get the temperature of Taipei City.
Here we use JsonTextDecode command of the Web component to parse JSON data into list ,then set the result as ListPicker's element. This is more friendly for us to view and select the data.
ListPicker is for viewing JSON result in list, as below:
App Inventor will send char 'O' if taipei_data is smaller than temp_data, which means it's hotter inside. Arduino 101 will switch on relay module to turn on a small fan. Otherwise, App Inventor will send char 'C' if taipei_data is larger than temp_data and turn off the fan accordingly.
Please make sure your Arduino 101 is running correctly.
Click Connect button to connect to Arduino; LM35 sensor data should be shown on screen when connected. And Taipei City's temperature should be seen on screen right away, as figure below:
You can click the [show the json format] listpicker to view the JSON data in list.


Comments