



Hardware components | ||||||
 |
| × | 1 | |||
 |
| × | 9 | |||
 |
| × | 9 | |||
 |
| × | 9 | |||
 |
| × | 1 | |||
Stocksense is a functional wearable and platform that translates real-time stock market movements into customizable vibration patterns across the chest, creating a direct somatic communication between human intelligence and collective market intelligence. The collar form, inspired by the Egyptian Usekh worn by ancient Egyptian elites, positions the wearer as a channel of emergent collective intelligence.
Narrative Framing:CONFIDENTIAL INTERNAL MEMO
Re: Stocksense Adoption Strategy
Goldman Sachs Innovation Division, March 2026
Following successful pilot programs, we are proceeding with firm-wide Stocksense deployment. This memo clarifies both operational protocols and strategic positioning.
Operational: All trading floor personnel will receive collar devices by Q4 2026. Morning attunement sessions (0700-0730) are mandatory. Performance reviews will now include "somatic resonance scores" measuring physiological alignment with market movements. Employees are encouraged to wear devices outside work hours, particularly at industry events.
Strategic Positioning: Stocksense represents our pivot from computational to perceptual advantage. As algorithmic parity has eliminated speed-based edges, embodied market intelligence creates differentiation that competitors cannot easily replicate. The Egyptian Usekh design is deliberate: ancient pharaohs, priests, and deities wore these collars as symbols of divine authority and cosmic intermediation. By adopting this form, we position our personnel not as mere traders but as oracles channeling emergent collective intelligence.
Risks: Legal has flagged concerns about differential data tiers and potential insider trading implications. Our position: haptic sensation constitutes personal interpretation, not material information transfer. Communications has noted online ridicule ("Pharaoh LARPing," "Finance bro mysticism"). Our response: lean into it. The perception that we operate at levels others cannot access reinforces market position.
Our Definition of Intelligence:Intelligence = the capacity of a system to perceive something from its environment, interpret it according to its own logic, act based on it, and adapt over time.
Our Definition of Communication:Communication = Sending a message that can be understood by the recipient.
Team & Roles:Erandi Estrada: MDEF Website
Ayal Bark: MDEF Website
All of the roles were shared as we both wanted hands-on experience on all facets of the project. That said, Erandi did the bulk of the soldering while Ayal spent an hour trying to connect the Raspberry Pico 2 W to wifi (turns out he just needed to go to a different room with better connection).
Fabrication & Design ProcessDAY 1:
STEP 1: Define 3 Project Tracks
Artifact
- Start w/ second spine as prototype while connecting data streams
- Create new artifact
Platform
- Needs to connect to the wearable
- Needs to let users customize their haptic patterns
Data Streams
- IDEAL: Visual Tracker to connect to animal live-feed streams
- Prototype ready: Stock Market API or Seismic Activity
STEP 2: Ask for Feedback
Artifact
- Create new artifact using silicon embedded w/ haptic motors ---> COOL!
Platform
- Use Node-RED for data flow and MQTT Protocol to communicate with artifact.
Data Streams
- Hard to find API for real-time data on animal behaviors. Might want to try using a live webcam of birds or fish. To do this, we should use OpenCV for visual tracking
- Better to start training it in a "closed setting" ---> a youtube video of birds flying for example
- Better to START with stock market API for proof of concept, and if we have time go with visual analysis.
STEP 3: Testing
1: Install and Run Node-Red
- nodered download guide https://nodered.org/docs/getting-started/local
- installing pre-reqs https://nodered.org/docs/faq/node-versions
- node js download: https://nodejs.org/en/download
- install node-red gpio: https://flows.nodered.org/node/node-red-node-pi-gpio
2: Figure out how to connect to stock market data
step 1 - tried this: https://flows.nodered.org/node/node-red-contrib-alpaca
- didn't work well
- step 2 - try finnhub API: https://finnhub.io/register
- step 3: import json flow into Node-RED (See attachments: "Node-Red Stock AAPL Flow")
3: Figure out how to connect to prototype
- Working w/ Claude AI
4: Test embedding motors in silicon w/ Julia
DAY 2:
STEP 1: Define Goals
- Iterate Artifact
- Build Platform
STEP 2: Artifact
- Test motors in silicone (they worked!)
Decide between making the artifact a vest or sleeve (We chose vest!)
- Decide between making the vest out of fabric or silicon (We chose silicon!)
- Mix and pour silicon mold
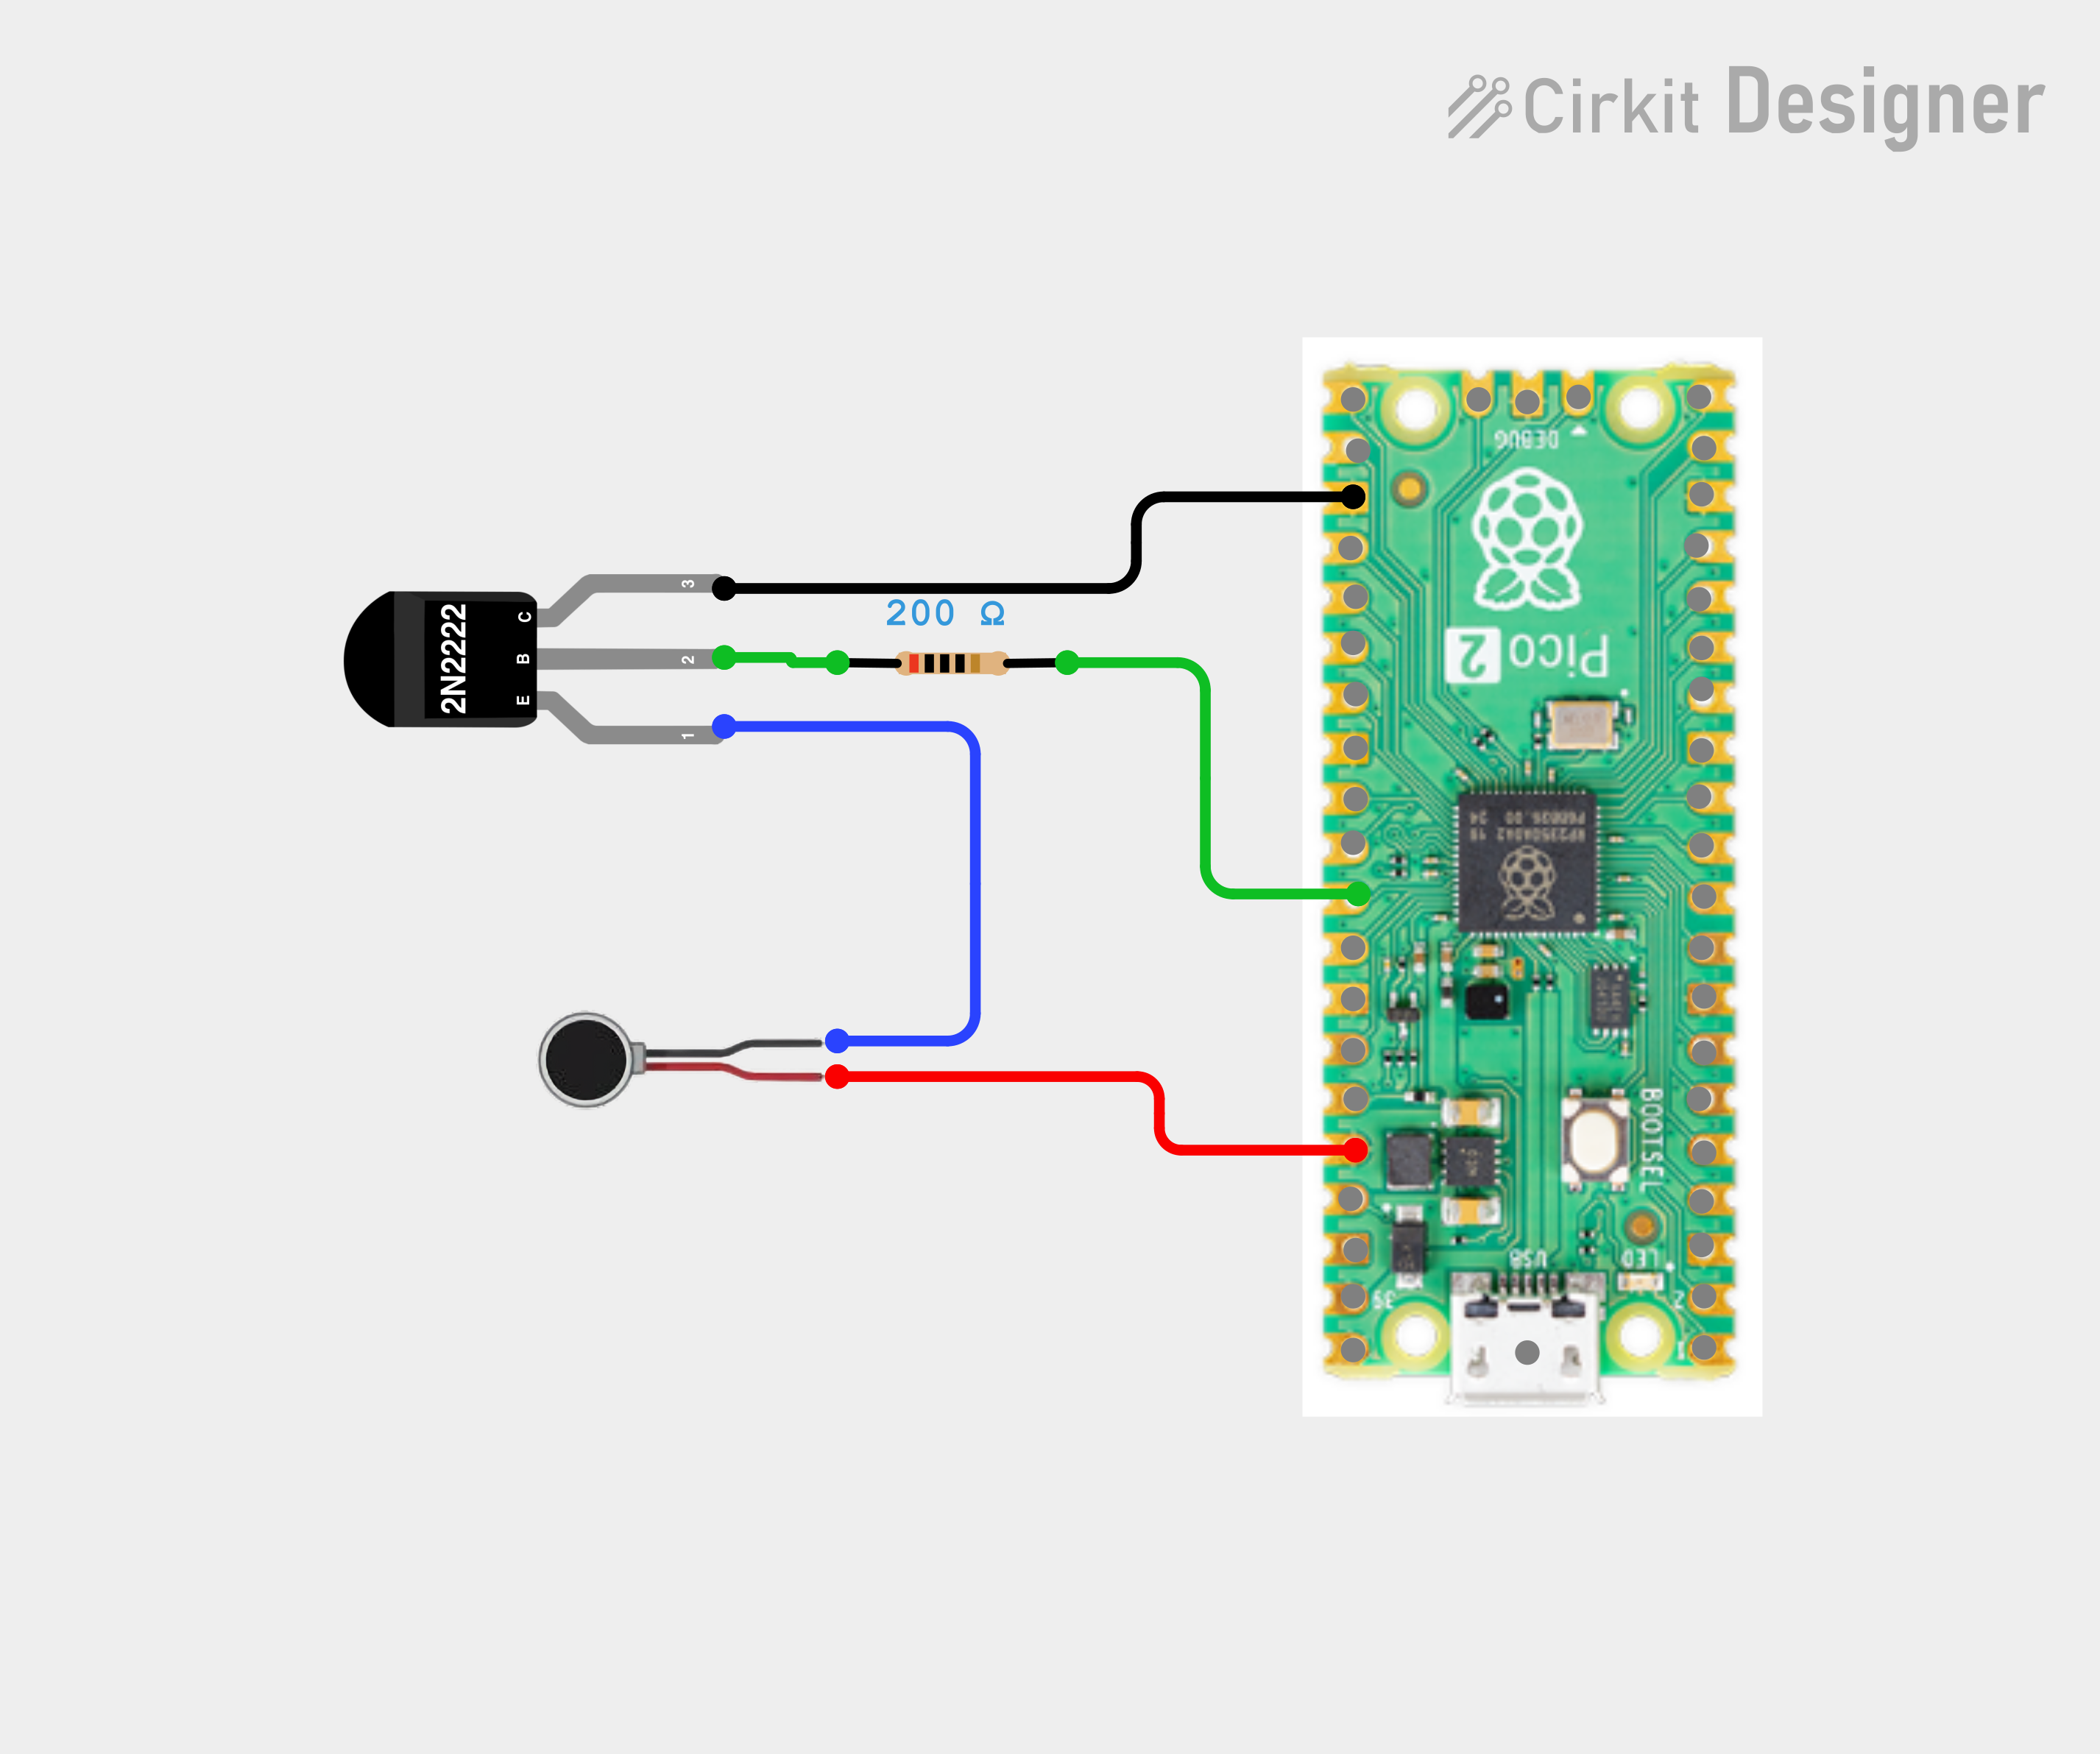
- Decide motor fabrication (transistors/resistors on breadboard by raspberry pi, or at each motor). We decided to put them at each motor. For Ayal's previous cognitive orgy project he chose to put them on the breadboard and things got real messy and unorganized.
- Make motors
- Cut (dremel) matrix board into 6 pieces for each motor
- Arrange motor, transistor, resistor, and cables
- Solder them together
- Test each motor (one broke, we had to make another)
STEP 3: Connect motors to code
SO ANNOYING -->
- couldn't connect to wifi, just had to go upstairs
- happened again, just had to unplug and replug the raspberry pi 2 w (why is this a universal fix for technology?!?!?!?!)
- Got it to work w/ test code
- Got it to work w/ live data from node-red
- Connect motors to code
STEP 4: Platform
- Decided specifications for what user could adjust
- Type of stock (eg: AAPL, TSLA)
- Haptic adjustments (intensity, pattern, duration, direction, etc)
- Type of trigger (set price, continuous feel, rate of change, etc)
- Decided specs for platform itself
- Log in w/ accounts
- Save designs as presets
- Share w/ community, and download from community
- Test/preview each pattern
- Made a mockup MVP w/ Loveable (just UI/UX, not connected to node-red)
DAY 3:
Step 1: Ayal had a dream about having 9 motors so it could be a full 3x3 grid... so we're going to add 3 more.
Step 2: Define Goals
- Make the vest out of silicon
- Make more motors
- Embed motors into silicon vest
- CABLE MANAGEMENT!
- Finish Platform
- Get it all working smoothly
- Visual tracking if we have time :)
Step 3: Making more motors
- Same steps as yesterday
- Test if the new motors work (they did!)
Step 4: Make the vest
- Decide if the motors are going to be on the chest or on the back. We went with the chest after looking which part had better tactile perception (determined by 2 point discrimination).
- Decides to use a fabric underneath the silicon to give it structure, and to sow the cables to the fabric so that they stay in place when we pour the silicone on top.
Struggles:
- Cable management. We decided to braid them. This is the third project we've done with some sort of braiding.
- Braiding kept the cables together, but it wasn't enough to keep them in place, so we sewed them to the fabric. Took a loooooot of time.
- We didn't have enough silicone in our original mix, so we had to pour another layer with a different type of silicone. We still didn't have enough, and the closest store selling silicone was closed, so we made plans to buy more first thing the next morning.
- Tie up the cables to a rafter from the ceiling so they don't fall into the silicone mold and get stuck. Leave the cables and silicone there overnight to dry.
STEP 5: WORK ON PLATFORM
*Disclaimer: The coding for this part was all done using Claude AI.*
- Instead of asking Claude to build the whole thing from start to finish, we used a method in which we map out all the small steps we need to take to build up to the final product we’re hoping for, and adding asking claude to code each step one at a time. This has made fixing errors much easier for us, and has given us a better understanding of how the code works.
Step 5a: Make sure that the platform (webapp) actually grabs data from Node-RED
- Changed the stock “trigger” using the webapp and confirmed it was reflected in Node-RED output log
Step 5b: Make sure that the data drawn by the platform can trigger haptic patterns in the motors
- Download mqtt protocol onto raspberry pi pico 2 w (See attachments: "Import MQTT onto Raspberry Pi")
- Upload haptic feedback code onto pico (See attachments: "Stock Market Haptic Wearable + MQTT)
Step 5c: Make sure that the other variables on the webapp trigger changes as well
- Changed intensity levels
- Changed haptic pattern (ex: wave up vs wave down, etc)
Step 5d: Build in Cursor
- Upload code from Loveable to Github, then download onto our own devices so we can continue building the platform with Cursor
DAY 4:
Step 1: Define Goals
- Finish Artifact
- Clean the UI
- Buy silicone
- Mix silicone
- Pour silicone
- Make Pouch for raspberry pi and battery
- Confirm all motors are working
- Confirm that it can connect to the Platform
- Finish Platform
- Clean the UI
- Clean the logic
- SCALE DOWN the user's choices
- Play with different haptic pattern presets
STEP 2: DO THE STUFF
Artifact:
- As planned, we started the day by walking to the store in the pouring rain to buy more silicone to compensate for the thin layers we poured the day before.
- When we arrived back we found out that the silicone from the previous day did NOT DRY overnight, and so we couldn't pour more on top.
- Decided to split tasks: Erandi removed the cables from the fabric and cleaned all the silicone off, and Ayal went back to the store to buy the quickest drying silicone they had (30 minute cure).
- Because we didn't have enough silicone for an entire vest, we poured the new silicone layer on top in the shape of a wesekh, or broad collar, worn by the elites, royalty, and gods of ancient egypt. This pivot was innocuous at first, but served crucial to our narrative framing of the project later on.
- Unfortunately, we didn't have enough silicone, or time, to create the pouch in the back that we wanted for cable management and to hold the microcontroller and battery power.
- After the silicone dried, it was time to solder the wires together (all the + cables and - cables from the individual motors), and then attach each motor to it's respective pin with alligator clips.
Platform:
- Since we didn't have much time left until the presentation, and we hadn't tested all the options the users had to customize their haptic patterns, we decided to scale down the choices.
- We opened the platform code in cursor after cloning the repo from github (https://github.com/ayalbark/haptic-heartbeat-studio) and got rid of all the options except for: type of stock, intensity, and pattern type. We also made it so that the user could only track one stock at once.
- After testing to make sure that making changes in the platform affected the haptic pattern, we switched the visual design around a bit to make it less generic.
***Erandi can you put these in?***
References:https://oryano.com/touched-by-time/
https://ancientegyptonline.co.uk/jewellerycollar/
https://en.wikipedia.org/wiki/Usekh_collar
https://www.sciencedirect.com/topics/medicine-and-dentistry/two-point-discrimination-test
https://en.wikipedia.org/wiki/Sensory_substitution
Future Work:- Multiplexing and/or Charlieplexing the motor wiring so there aren't so many wires
- Blinging out the artifact so that it looks more like an usekh collar
- Cable management in the back of the artifact. Also a pouch for the microcontroller and battery source
- Change the Platform interface layout, and add more options for haptic customization



Comments