


Hardware components | ||||||
_ztBMuBhMHo.jpg?auto=compress%2Cformat&w=48&h=48&fit=fill&bg=ffffff) |
| × | 1 | |||
 |
| × | 1 | |||
 |
| × | 1 | |||
| × | 1 | ||||
 |
| × | 1 | |||
| × | 1 | ||||
 |
| × | 1 | |||
| × | 1 | ||||
 |
| × | 1 | |||
 |
| × | 1 | |||
Software apps and online services | ||||||
| ||||||
| ||||||
| ||||||
 |
| |||||
| ||||||
| ||||||
 |
| |||||
Medibox is a student project developed as part of the third year of a Bachelor's degree in Computer Science (IUT). It is a connected medication dispenser designed for individuals with disabilities, particularly those with memory disorders or at risk of addiction.
The main goal is to secure medication intake at home while reducing the mental load for families and minimizing the intervention time of caregivers.
Different actors:
- Doctor
- Healthcare
- Patient
- Technician
A doctor examines the patient, makes a medical diagnosis, and prescribes the appropriate medication by writing a prescription.
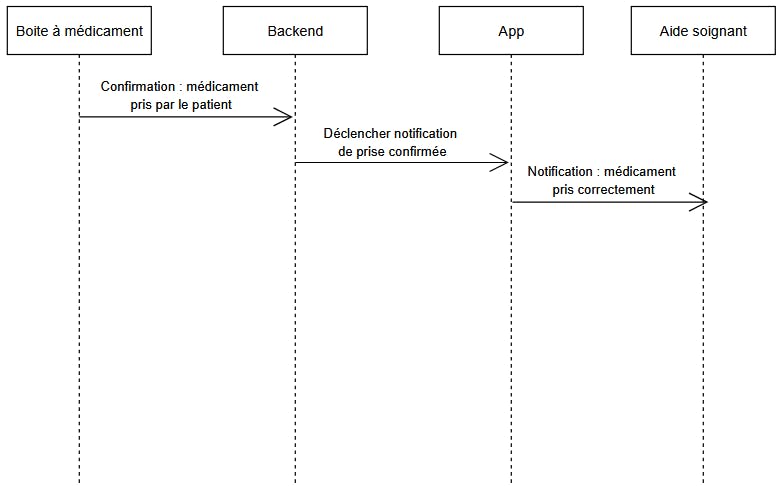
A healthcare assistant supports the patient in daily life and, since the patient is senile, ensures that the medication is taken correctly and on time, following the doctor’s prescription.
The technician The technician is our official technician who knows the box's structure and can intervene at any time at the patients' homes.
3. Problem StatementToday, many people struggle to manage their daily medication regimen:
Frequent missed doses (due to illness, aging, or cognitive impairment)
- Risk of overuse of certain medications, which can lead to addiction
- Strong dependence on family and caregivers
- Difficulties accessing medical follow-up once the patient returns home
- Furthermore, caregivers are overworked and work very long hours.
These situations can have serious consequences for patients' health and represent a heavy emotional burden for their families. Moreover, in France, the situation is worsening with a decreasing number of medical personnel; therefore, our project falls within the framework of supporting caregivers.
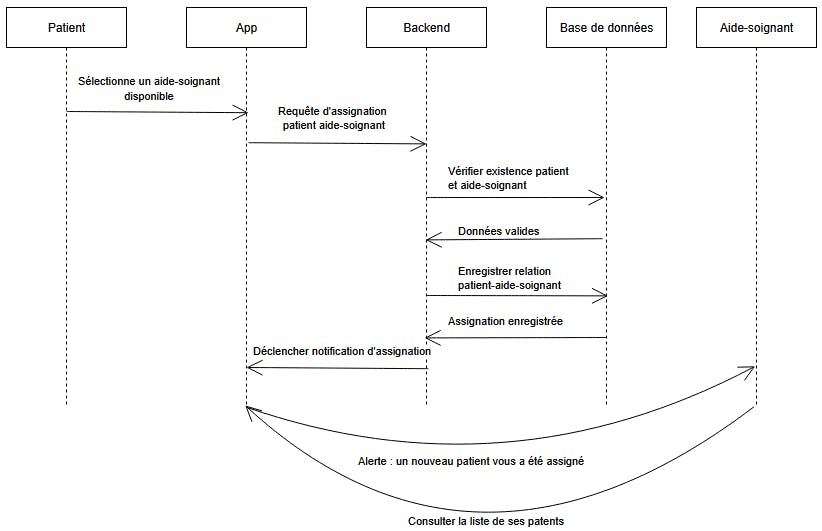
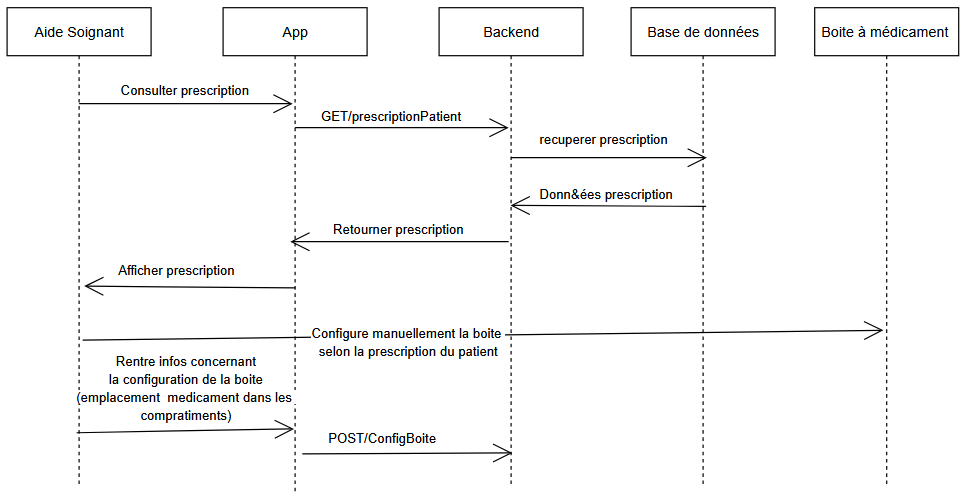
4. Overall FunctioningTypical use case for the project:
case 1 :
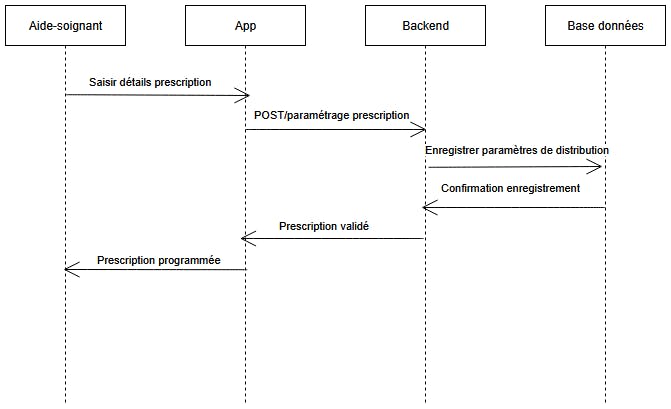
- The doctor downloads the prescription to the app.
- The healthcare professional retrieves the prescription via the app and prepares the medication device according to the prescribed dosage and schedule.
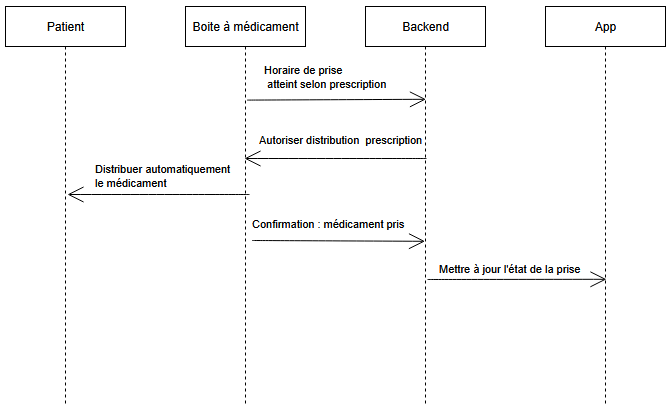
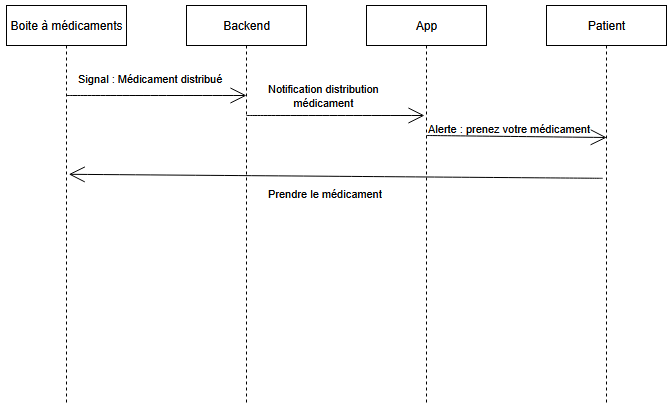
- At the scheduled time, the medication device alerts the patient (audible and visual signals, notification).
- The patient takes their medication.
- Sensors detect the medication intake and transmit the information to the server.
- The data is stored on Azure and accessible to healthcare professionals.
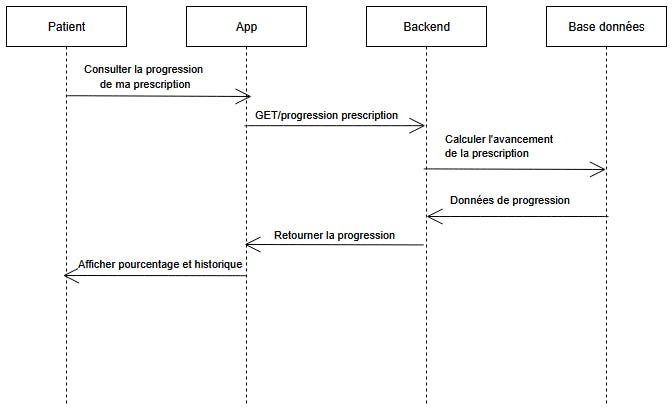
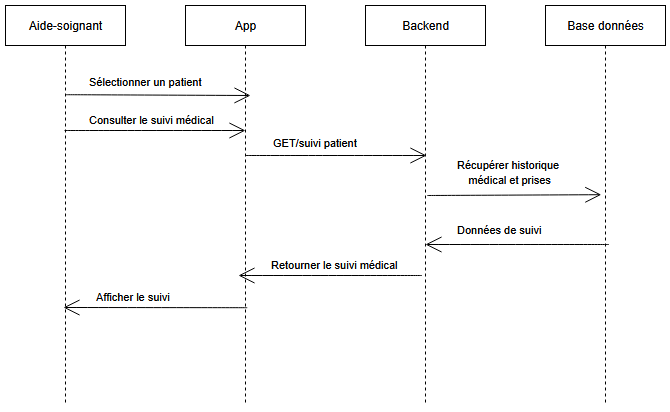
- The caregiver can check the progress of one of their patients' prescriptions at any time.
case 2 :
Our box expresses itself in different levels of message which will be detailed later on this page.
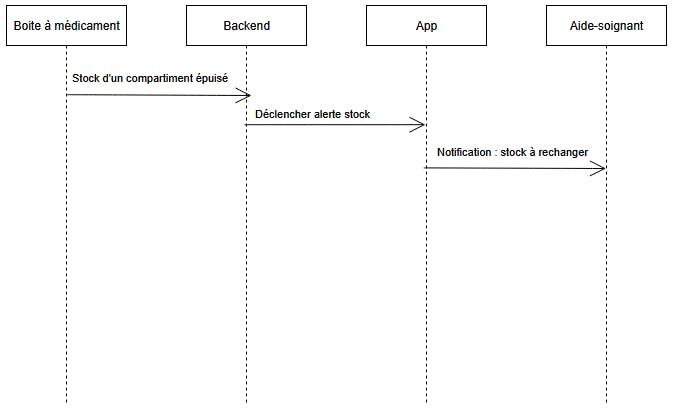
- When the threshold for the number of medications is exceeded, which will mean that there is almost no medication left, the box will send messages to alert the caregiver on the application with an warning message level.
- If there is no more medicine at all in the box, a message will also be sent to the caregiver with an important message level.
- If a physical or technical problem occurs, our company's official technician will be notified via email.
Hardware Architecture
The Medibox relies on several components:
- Arduino Uno: system core
- Presence sensor (PIR): confirms interaction
- Magnetic presence sensor ky-035 : to ensure the belt rotates correctly
- Stepper motor: distributes medication
- LCD screen: displays instructions
- Buzzer: sound alerts
- ESP8266 WiFi module: network communication
Software Architecture
- Backend: API and business logic
- PostgreSQL database on Azure: stores users, prescriptions, history, and alerts
- React.js web application: user interface
Protocols:
MQTT (Medibox → server)
WebSocket (real-time alerts)
6. Setting up the Medibox6.1. BreadboardThe Arduino board has two GND pins, one for 3.3V and one for 5V. The breadboard is divided into two sections for clarity. The components operating at 5V are located at the top, and those operating at 3.3V are located at the bottom.
Both GNDs are used for clarity and to avoid short circuits, although the option of using only one common GND is entirely possible.
6.2 Presence sensorThe presence sensor is placed in the 5V section. It uses pin 5 with Echo and pin 4 with Trig.
6.3 LCD screenThe LCD screen is powered by 5V and uses the breadboard for extended reach, as the Arduino board is at the back of the box and the screen is at the front. The screen is analog, so it uses port A4 with SDA and port A5 with SCL.
6.4 BuzzerThe buzzer only needs two of its three pins to function, provided its sound is not being managed. For this project, the default sound is suitable, so pin 6 of the Arduino Uno is connected to pin S of the buzzer.
6.5 Magnetic presence sensor ky-035Sensor pin S connected to Arduino port 7
6.6 Step motorThe stepper motor is connected to the Arduino board via the ULN2003A driver. This driver controls the motor's operation, including its speed and rotation sequences. In this project, it also plays a crucial role in power management: it cuts off or limits the voltage sent to the motor when it is not in use. This prevents the motor from consuming all the system's power, which could lead to a drop in power for other components, such as the LCD screen described earlier, which would then become very dim.
6.7 ESP8266The esp8266 allows you to connect to the internet via wifi, as part of our project it is used to send mqtt messages to the server which will process them. PLEASE NOTE: the ESP8266 is powered by 3.3V and not 5V, so its VCC and GND are located on the bottom part of the breadboard. In addition, the figure above shows a global set of connections to indicate which pins of the Arduino Uno are concerned.
Additionally, regarding the code-level operation of the Arduino Uno, it sends commands to the ESP8266 by writing data via serial communication. This transmission is carried out using ports 3 and 2, corresponding to the TX and RX pins respectively. However, the Arduino transmits signals at 5 V, while the ESP8266 operates at 3.3 V. Too high a voltage can cause overheating or damage the ESP8266 module. This is why the assembly represented by the white square in the figure must be respected: it allows the voltage to be adapted using the connections made on the breadboard.
The TX side corresponds to data transmission from the ESP8266 to the Arduino and operates at 3.3 V; no resistance is therefore necessary on this line. On the other hand, the RX side corresponds to the transmission of data from the Arduino to the ESP8266 and operates at 5 V. In order to avoid any risk of damage to the ESP8266 module, it is essential to lower this voltage. For this, two resistors of 5 kΩ each are used and connected to the ground (GND) of the transmission circuit — distinct from the ground of the ESP8266.
The diagram shown in Figure 7 illustrates the correct positioning of the resistors so that the data is transmitted without being corrupted and can be correctly interpreted by the ESP8266. This data corresponds to the commands sent by the Arduino to the ESP8266.
7. Setting up the server (Raspberry Pi)7.1. Download the code from the GITThe server code is in the repository previously cloned. If you have not cloned it yet, run the following commands on your Raspberry Pi:
Bash
git clone https://github.com/matlacheny/sae-s5-but3-iot-g2-api.git
cd sae-s5-but3-iot-g2-api
git checkout main-server
git pullThe server runs on containers to easily manage the API, MQTT Broker, and Monitoring tools.
Update your system:
Bash
sudo apt update && sudo apt upgrade -yInstall Docker:
Bash
curl -sSL https://get.docker.com | shAdd permission to your user:
Bash
sudo usermod -aG docker $USERNote: Reboot your Pi after this step for changes to take effect.
7.3. Configure the EnvironmentBefore running the server, you need to set up the environment variables and external access configuration.
1. Create the .env file
This file holds your secrets and API configurations.
Bash
nano .envCopy and paste the following content (adjust with your real keys):
Ini, TOML
PORT=3200
API_KEY=your_super_secret_api_key
MQTT_URL=mqtt://mosquitto:1883
API_BASE_URL=https://apidatabasesae-....azurewebsites.net/api
GIST_ID=your_gist_id
GITHUB_TOKEN=your_github_token
2. Create the ngrok.yml file
Required if you want to expose your local server to the internet via Ngrok.
Bash
nano ngrok.ymlAdd your tunnels configuration:
YAML
version: "2"
authtoken: YOUR_NGROK_TOKEN
tunnels:
  api:
    proto: http
    addr: app:3200
  mqtt:
    proto: tcp
    addr: mosquitto:1883
  grafana:
    proto: http
addr: grafana:3000The docker-compose.yml file is the recipe that tells Docker how to run all your services (API, Database, Monitoring) together.
Create the file:
Bash
nano docker-compose.ymlPaste the following configuration:
YAML
services:
  # --- NODE.JS API SERVER ---
  app:
    image: matlacheny/saeiotserver:latest
    container_name: saeiotserver
    restart: unless-stopped
    ports:
      - "3200:3200"
    environment:
      - PORT=3200
      - API_KEY=${API_KEY}
      - MQTT_URL=${MQTT_URL}
      - API_BASE_URL=${API_BASE_URL}
      - RETRY_INTERVAL_MS=10000
      - GIST_ID=${GIST_ID}
      - GITHUB_TOKEN=${GITHUB_TOKEN}
    depends_on:
      - mosquitto

  # --- MQTT BROKER ---
  mosquitto:
    image: eclipse-mosquitto:2
    container_name: mosquitto
    restart: unless-stopped
    ports:
      - "1883:1883"
      - "9001:9001"
    volumes:
      - ./mosquitto/config:/mosquitto/config
      - ./mosquitto/data:/mosquitto/data
      - ./mosquitto/log:/mosquitto/log

  # --- MONITORING: PROMETHEUS ---
  prometheus:
    image: prom/prometheus:latest
    container_name: prometheus
    restart: unless-stopped
    volumes:
      - ./prometheus.yml:/etc/prometheus/prometheus.yml
    ports:
      - "9090:9090"
    depends_on:
      - app

  # --- MONITORING: GRAFANA ---
  grafana:
    image: grafana/grafana:latest
    container_name: grafana
    restart: unless-stopped
    ports:
      - "3000:3000"
    environment:
      - GF_SECURITY_ADMIN_PASSWORD=admin
    volumes:
      - grafana_data:/var/lib/grafana
    depends_on:
      - prometheus

  # --- EXTERNAL ACCESS: NGROK ---
  ngrok:
    image: ngrok/ngrok:latest
    container_name: ngrok-tunnel
    restart: unless-stopped
    volumes:
      - ./ngrok.yml:/etc/ngrok.yml
    command: "start --all --config /etc/ngrok.yml"
    ports:
      - "4040:4040"

  # --- AUTO-UPDATE: WATCHTOWER ---
  watchtower:
    image: containrrr/watchtower
    container_name: watchtower
    restart: unless-stopped
    volumes:
      - /var/run/docker.sock:/var/run/docker.sock
    command: --interval 60 --cleanup

volumes:
grafana_data:The Docker Compose file relies on specific configuration files for Mosquitto and Prometheus. You must create them for the services to start correctly.
1. Mosquitto Configuration
Bash
mkdir -p mosquitto/config
nano mosquitto/config/mosquitto.conf
Add this content to allow connections:
Plaintext
listener 1883
allow_anonymous true
2. Prometheus Configuration
Bash
nano prometheus.ymlAdd this content to link Prometheus to your Node.js app:
YAML
global:
  scrape_interval: 5s
scrape_configs:
  - job_name: 'sae-iot-api'
    static_configs:
- targets: ['app:3200']Use Docker Compose to build and start all services (Node.js API, Mosquitto, Prometheus, Grafana, Ngrok).
Start the services:
Bash
docker compose up -d --buildVerify execution:
Check the logs to ensure the server is connected to MQTT and ready.
Bash
docker logs -f saeiotserverExpected output: HTTP server running on port 3200 and Connected to MQTT broker.
This server acts as the central gateway for the IoT architecture:
Node.js API (app): Processes alerts, logs data to the external Database (Azure), and pushes notifications to Aide-Soignants via WebSockets.
Mosquitto: Receives MQTT alerts from ESP32 sensors.
Prometheus & Grafana: Monitors the server health (CPU, RAM, Request latency) visually.
Ngrok: Provides a secure public URL to access the API and Dashboard from outside the local network.
Watchtower: Checks for updates to the Docker images and updates the containers automatically.
8. Configuring the API on AzureYou need two main resources on Azure:
- Azure SQL Database: To store your data (since
package.jsonincludesmssql). - Azure App Service (Web App): To host the Node.js API.
Your code connects to a SQL Server. You must create one first.
- Log in to the Azure Portal.
- Search for SQL Databases and click Creat
- Resource Group: Create a new one (e.g.,
SAE_IoT_Group). - Database Name: Give it a name (e.g.,
sae-db).
Server: Click "Create new".
- Server name: Must be unique (e.g.,
sae-sql-server-yourname). - Authentication: Select SQL authentication.
- Admin login/password: Create them and WRITE THEM DOWN. You will need them for the environment variables.
Networking:
- In the "Networking" tab (or after creation in "Firewalls and virtual networks"), check "Allow Azure services and resources to access this server". This is crucial for your API to talk to the DB.
- Review and Create.
- Search for App Services and click Create > Web App.
- Name: This must be unique (e.g.,
sae-api-g2). - Publish: Code.
- Runtime stack: Node 20 LTS (Based on your
package.jsonengines or current standards). - Operating System: Linux.
- Region: Same as your database (e.g., France Central).
- Review and Create.
Your code (server.js and app.js) reads configuration from environment variables (using dotenv). You must define these in Azure so the app can connect to the database.
Go to your new App Service resource.
- Go to your new App Service resource.
On the left menu, under Settings, click Environment variables.
- On the left menu, under Settings, click Environment variables.
Add the following settings (based on standard mssql usage in your code):
- Add the following settings (based on standard
mssqlusage in your code):
Name    Value (Example)
DB_SERVER : sae-sql-server-yourname.database.windows.net (Found in your SQL Server Overview)
DB_USER : The admin login you created in Step 1
DB_PWD : The password you created in Step 1
DB_NAME : sae-db (The name of the database you created)
API_KEY : Define a secure key here (required by your server.js middleware)
PORT : 8080 (Optional, Azure sets this automatically, but good to have)- Click Apply and then Confirm. The app will restart.
If you do not plan to update the code frequently or prefer not to use GitHub Actions, you can upload your code directly through the Azure Portal using the "Zip Deploy" feature.
Otherwise the project contains a workflow file: .github/workflows/main_apidatabasesae.yml. This means it is designed to deploy automatically when you push to GitHub.
1. Push code to GitHub:
- Create a new public or private repository on GitHub.
- Download the repo as a ZIP file (https://github.com/matlacheny/sae-s5-but3-iot-g2-api/tree/main)
- Push the contents of the ZIP file to this repository.
2. Link GitHub to Azure:
- In the Azure Portal, go to your App Service.
- In the Overview page, click "Get publish profile" (top toolbar). This downloads a file.
- Open the file with a text editor and copy the entire content.
3. Configure GitHub Secrets:
- Go to your GitHub Repository > Settings > Secrets and variables > Actions.
- Click New repository secret.
- Name:
AZUREAPPSERVICE_PUBLISHPROFILE_0CD...(Check your.ymlfile for the exact name expected, or see the note below). - Value: Paste the content of the publish profile file.
Important Note on the Workflow File: Open the file .github/workflows/main_apidatabasesae.yml in your repo.
- Look for
app-name: 'apidatabasesae'. Change this to the name of your App Service (e.g.,sae-api-g2). - Look for the secret name:
${{secrets.AZUREAPPSERVICE_PUBLISHPROFILE_... }}. Ensure the secret you created in GitHub matches this name exactly.
4. Trigger Deployment:
- Commit and push the changes (the workflow file update).
- Go to the Actions tab in GitHub. You should see the deployment running.
Once the GitHub Action is green:
- Go to your App Service URL (e.g.,
https://sae-api-g2.azurewebsites.net). - Try hitting an endpoint (e.g.,
/api/healthor/depending on your routes). - If you get a database error, double-check the Environment Variables in Step 3 and the Firewall Rule in Step 1.
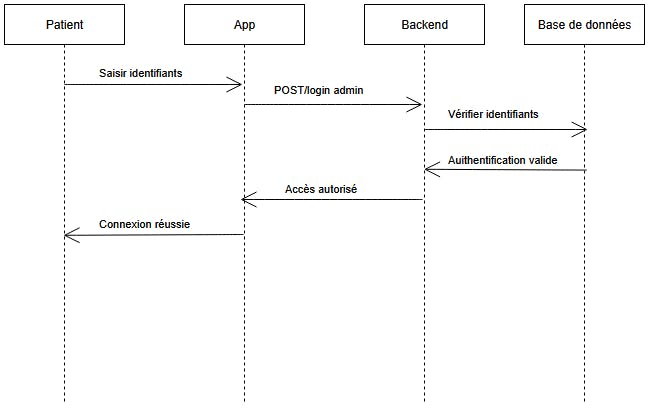
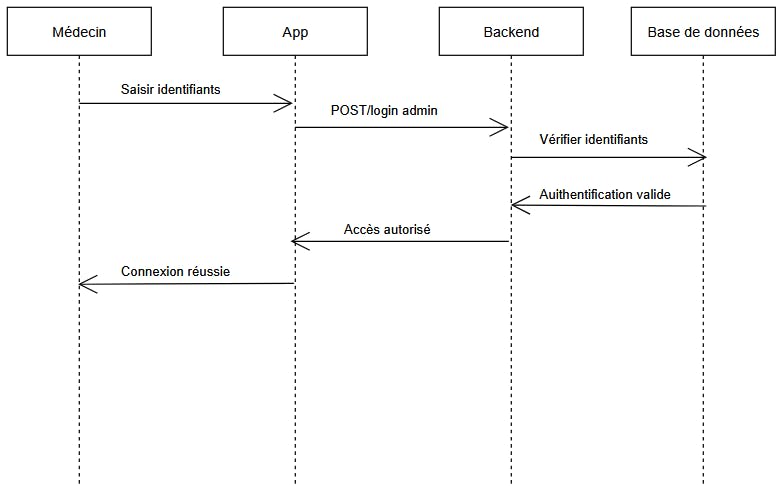
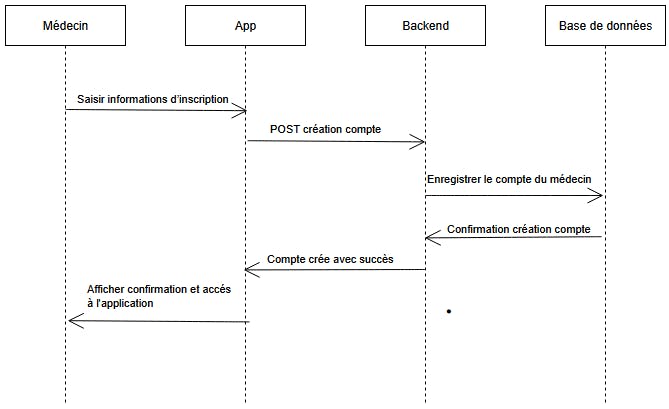
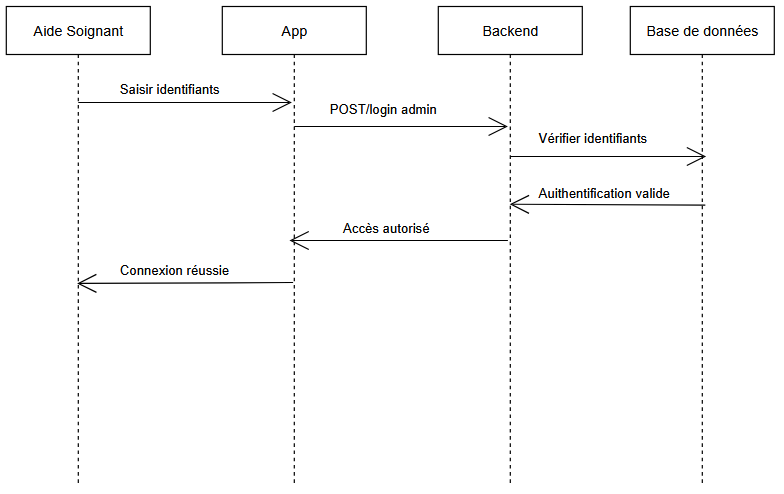
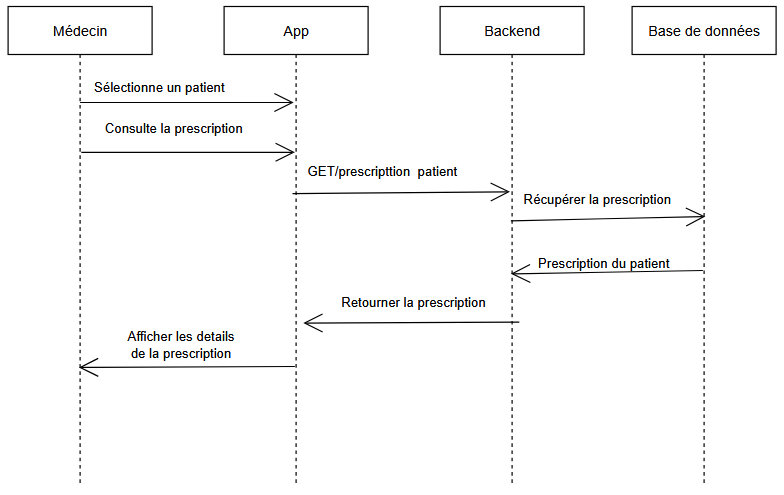
When a user launches the application, they can log in with a username and password and identify themselves in one of three roles: patient, caregiver, or doctor. Each role has different access and rights within the application.
1. Patient :
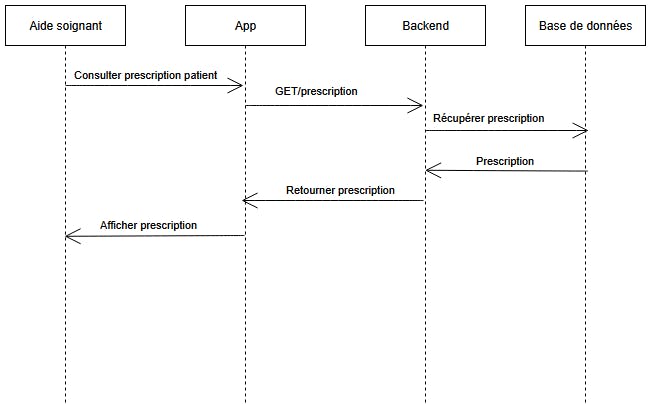
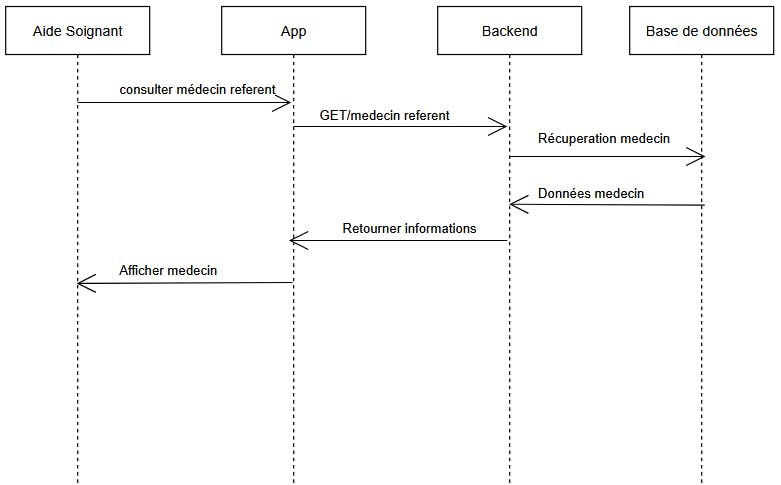
The patient role represents the person for whom the Medibox is useful. Their permissions within the application are limited to reading information, such as their prescription, information from their attending physician or caregiver, and their medical follow-up.
The only information the patient can modify is their assigned caregiver. This can be changed within the application, which will save the change in the database and redirect patient alerts to their new caregiver.
2. Caregiver :
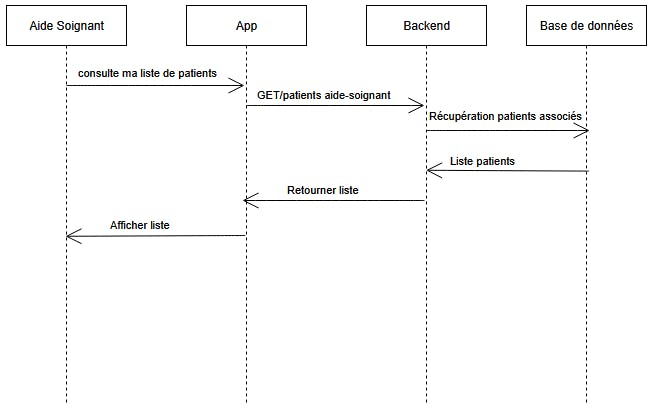
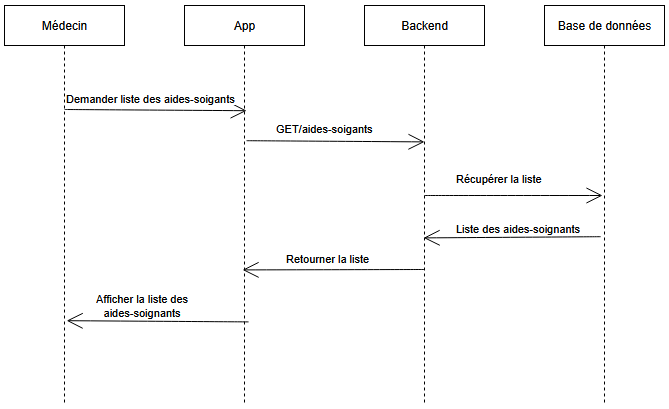
The caregiver first arrives at a page where they can view their client list and the latest alerts received.
They have access to each patient's profile, where they can view the patient's information (name, surname, address, etc.), their prescription, their medical follow-up, and the configuration of their Medibox, which they can modify.
The caregiver has two main tasks: configuring the box physically and within the application, and creating profiles for new patients. This latter function is accessible via the first page displayed, above the patient list.
3. Doctor :
The attending doctor, although less present with the patient, still plays a very important role and has extensive access to various information: they also have access to their patient list and can view their profiles.
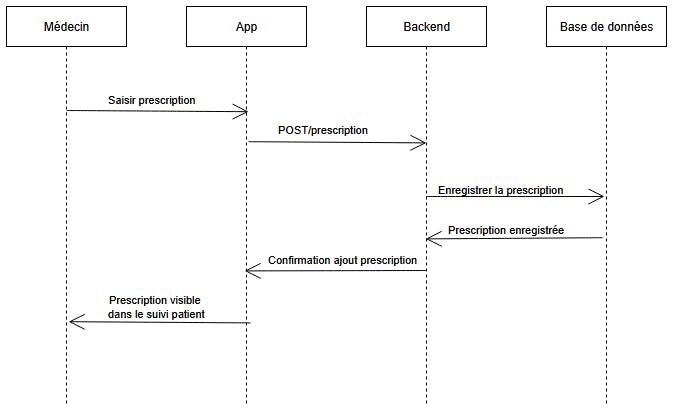
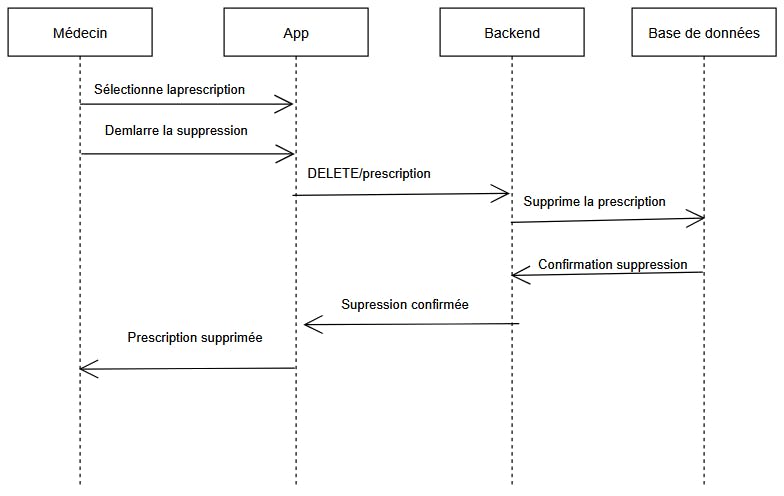
There, they can find the patient's and caregiver's information, as well as the patient's medical follow-up. The doctor's role includes responsibility for managing prescriptions within the application; they can create, replace, or delete them.
9.2 Application Structure1. Separation of Plateforms :
Since the application is a web application on Android, the separation between the web and Android platforms is crucial. To avoid duplicate coding for each platform, we decided to program the application on our web interface and then render it on Android using a WebViewer, an XML object that transfers a web application to a phone.
The program is located in a web folder, and the mobile configuration is in an android folder.
2/ Web folder
The web folder contains all the business logic, the frontend interface, and the configuration files (Vite, .gitignore, .env, ...). It also contains all the code in a src folder.
The files are organized according to their purpose:
- Those in the pages subfolder correspond to the different views in the application, each associated with a specific function.
This organization makes code navigation and maintenance easier, as each page is clearly identified and independent of the others. - The components subfolder contains reusable interface components that are called across multiple pages.
- The hooks folder contains the logic for recurring application components.
These files are grouped separately to ensure consistency and avoid code duplication. - The services folder contains the files responsible for communication with the API (using api.js) and WebSocket management (using WebSocketService.js).
This separation isolates the network logic from the rest of the application. - The config folder contains serverConfig.js, which configures server-related parameters (URL, API key).
This allows for easy configuration changes without impacting the rest of the code. - The public folder is for resources accessible via the browser, such as images and icons.
- The files at the root of src form the core of the application: main.jsx initializes the application, AuthContext.jsx handles authentication, and ProtectedRoute.jsx controls access to pages.
All of these files are orchestrated by the root component App.jsx, which centralizes routing and the overall structure of the application.
All network communication for the Medibox application is centralized in a dedicated service (`api.js`), which clearly separates business logic from communication logic.
Connection configuration is defined in the `serverConfig.js` file, which retrieves data (API key, server URL) stored in the .env file (application environment variables).
The main data (patients, caregivers, and doctor) is retrieved directly from the Azure API via API key-secured requests. The application thus allows users to view, create, and update profiles according to the rights associated with each user role.
9.4 Server ConnectionFeatures requiring more complex business logic, such as prescription management, alerts, and patient-caregiver relationships, are handled by the application server. The server ensures compliance with business rules in several ways:
1. Rights and role control:
The server systematically verifies the user's identity and role (doctor, caregiver, technician, patient). For example, only a doctor is authorized to create or modify a medical prescription, while a caregiver can only view it and follow its execution.
2. Data validation:
All received data (prescriptions, alerts, MQTT events) is validated before being saved to the database, thus preventing inconsistencies or errors.
The application server also exposes monitoring endpoints to verify its operational status.
This architecture provides several key advantages:
- Reinforced security:
Web and Android applications do never communicate directly with the database. All requests pass through the application server, which enforces access controls, API keys, and validation rules. - System scalability:
The separation between clients, the server, and the database allows each component to be upgraded independently. New Medibox equipment, users, or functionalities can be added without impacting the existing architecture.
1. Azure – Database Hosting:
The choice of cloud hosting over an on-premises server is primarily driven by availability and accessibility constraints. An on-premises server is geographically limited and more susceptible to hardware failures or network outages. Conversely, a cloud solution allows access to data at any time and from any location, which is essential for a connected medical project like Medibox.
Microsoft Azure was chosen over other cloud platforms such as AWS because AWS is often required for its very high computing power useful for Big Data or high-performance computing but not essential for Medibox's needs.
Azure also offers managed database services, including SQL Server and PostgreSQL, making integration with the project's API easier. Finally, hosting on Azure increases the partition tolerance thanks to:
- Data replication across multiple physical infrastructures,
- Automatic backups, ensuring data restoration in case of an incident.
These mechanisms lower the vulnerability to failures inherent in centralized databases.
2. Server Hosting Business Logic – Connecting All Components:
The project's business logic is centralized on an application server, which acts as a single point of access between the application, the database, and the Medibox equipment.
Centralizing the business logic offers several major advantages :
- Allowing for strict access control by applying different rules depending on the user's role (patient, caregiver, doctor). This ensures compliance with medical regulations, particularly regarding prescription management.
- Approach is promoting a clear separation of system components (client, server, database), which makes project scalability easier. Business rules can be modified or enhanced without directly impacting client applications or hardware, making the architecture more maintainable and robust.
1. Relational Database:
The Medibox project requires continuous data access with up-to-date, consistent, and reliable information. The handled datas (patients, prescriptions, history, alerts) are tightly linked together, making relational database a very good option.
A relational database guarantees data consistency through relationships and integrity constraints, while also offering high availability for client applications. This choice is therefore consistent with the requirements of a medical system.
However, a relational database naturally presents a single point of failure risk: in the event of a failure, data access can be completely interrupted. This risk is significantly reduced by hosting on Azure, which provides replication and backup mechanisms, as explained previously.
It is important to note that this risk is not completely eliminated. A global Azure network outage or a connectivity issue could still affect data access. The system is thus strengthened and resilient, but not entirely invulnerable.
2. PostgreSQL:
PostgreSQL was chosen for its robustness, reliability, and ability to efficiently manage complex relational data. It is particularly well-suited to projects requiring strong data consistency, as is the case in a medical context.
Furthermore, PostgreSQL is an open-source system, widely used and well-documented, which facilitates its integration, maintenance, and evolution. Its compatibility with Azure cloud services makes it a relevant choice for a project requiring both stability and scalability.
10.3 Communication Protocols1. Application ↔ Server/Database Communication (WebSocket) :
The WebSocket protocol was chosen for communication between the application and the server because it is particularly well-suited to real-time applications. Unlike the classic HTTP protocol, which relies on one-off requests, WebSocket maintains a persistent connection between the client and the server.
This bidirectional communication allows the server to immediately send information to the application as soon as an event occurs (alert, medication refill, incident). This significantly improves the system's responsiveness and ensures instant updates to the user interface.
Since the alert system is an essential component of the project (without this system, medication refills and fault detection become more complex), real-time communication is therefore indispensable.
2. Hardware ↔ Server Communication (MQTT):
The MQTT protocol was chosen for communication between Medibox devices and the server because it is specifically designed for IoT environments. MQTT is a lightweight protocol with low bandwidth and resource requirements, making it perfectly suited to microcontrollers like the ESP8266.
Its publish/subscribe model allows for the efficient sending of event-driven messages (medication intake, low stock, failure), while ensuring reliable transmission even on unstable networks. This choice ensures robust communication between the hardware and the central server.
10.4 Deployment Technologies1. Docker :
Docker is used to containerize the various services of the project. This technology ensures the reproducibility of environments, guaranteeing that the application functions the same way everywhere.
Isolating services in containers also improves system stability and maintainability, as each component can be updated or restarted independently of the others.
2. GitHub Actions :
GitHub Actions is used to automate the deployment process using a CI/CD approach. This automation allows for reliable testing and deployment of the code with each update, reducing the risk of human error.
It also ensures that the deployed version exactly matches the code committed to the repository, thus improving the reliability and traceability of deployments.
11. Advantages and Impacts11.1.1 Benefits for the PatientThe main objective here is autonomy and safety.
- Reduced forgetfulness and errors: The Medibox eliminates the mental burden. The patient no longer has to wonder if they took their midday pill, for example. This prevents underdosing and overdosing. It will be able to dispense the correct dose of medication.
- Maintaining autonomy at home: This allows the patient to maintain a certain level of autonomy for longer, inevitably avoiding the infantilizing effect of having a caregiver put the medication directly into the mouth each time.
- Psychological reassurance: The patient feels cared for without being constantly physically monitored. They know that in case of a problem, their caregiver will be alerted.
The goal here is efficiency and quality of monitoring.
- Real-time monitoring: The application allows for verification of adherence without needing to be physically present or call the patient.
- Targeted intervention: Instead of only asking if the patient has taken their medication, the caregiver only receives an alert when the medication has not been taken. This allows them to focus their efforts where needed.
- Reduced workload: The device was designed so that the patient can follow their treatment without the presence of their caregiver. This allows the caregiver to avoid unnecessary trips.
Often, the family is very involved and anxious.
- Peace of mind: Loved ones no longer need to pester the patient on the phone to find out if they've taken their medication.
- Simplified coordination: The app serves as a link between family and healthcare professionals. Everyone has the same level of information.
Beyond the individual level, it can have a systemic impact:
- Reduced healthcare costs: By improving adherence, reducing medical complications, hospital readmissions, and emergency room visits.
- Optimized caregiver time: In a context of medical deserts and staff shortages, automating basic monitoring allows caregivers to dedicate more time to complex patient care.
- Less medication waste: Better monitoring allows for prescription adjustments and prevents the accumulation of unused medications in the patient's possession.
- Less chemical waste: The manufacturing and disposal of medications are very energy-intensive processes. Less waste = less useful production
- Reduction in medical transport: Emergency vehicles consume enormous amounts of fuel. By stabilizing the patient's condition through proper medication administration, we avoid these highly polluting transports.
- Families: reduced stress and constant presence
- Caregivers: time savings
- Doctors: reliable and continuous monitoring
Medibox is not intended to replace human care but to assist it effectively.
12. Future PerspectivesThe Medibox project represents a first functional version of a connected medication dispensing system. Several ideas of development can be explored to improve its functionality, robustness, and integration into a real-world medical setting.
12.1 Improved Fault ToleranceWhile the current architecture is strengthened by the use of the cloud, an application-side caching mechanism could be implemented to ensure temporary system autonomy in the event of a failure, thus limiting immediate dependence on the database.
12.2 Regulatory ComplianceFor real-world deployment in the medical field, the project must comply with several security standards, as outlined by requirements such as the GDPR.
To this end, several enhanced security measures could be considered:
- Implementation of strong authentication (multi-factor authentication).
- Full encryption of sensitive data, both at rest and in transit.
As the project originated in France and must comply with French and European regulations, migrating the cloud to at least European hosting providers could be a significant challenge.
12.3 Functional Enhancement of the ApplicationNumerous features could be added to improve the user experience:
- Implementation of smart notifications tailored to patient behavior (frequent lateness, repeated forgetfulness).
- Addition of a secure messaging module for healthcare professionals and physicians.
- Customization of the interface to accommodate patients with visual or cognitive impairments.
The project was carried out by students in the Computer Science program (IUT), with a clear role distribution:
- Pierre MAYER (Arduino)
- Mattéo LACHENY (CI/CD, backend)
- Thibault LABARTHE (App)
- Andhy Leong RAHARISON (Arduino)
- Khadidja THIAW (App)
- Alexis TYSZKA (Helper)


Comments