The materials that come with the kit are shown below. Along with those materials you will need a BeagleBone Blue and an 8 GB or larger Micro SD card.
The Video below has step by step instructions, if you choose to use this video to setup your MIP robot you can skip to the "LabVIEW installation steps" below. The video was created by Mark A. Yonder.
First step includes removing both motors from the casing. To do this remove the 6 screws attaching both sides.
Once you have each motor removed you will need to solder the wires to the motor. Making sure to attach the + to the pluses and the black to the -.
Once you have the wires soldered properly put the motors back into the blue containers and put it back together the same way it was before. A good check is that the red wires will both be on top of the black wires.
Next, get out your Beaglebone Blue and attach the 2 blue hooks along with the part that holds the battery. Do this by using the medium sized screws.
Next we need to make a modification to one of the parts that would interfere with a component on the bored. We will simply cut of the tab shown in the picture below.
Next attach the encoder wires, these wires fit only one way so you don't have to worry about putting them in wrong. Next the wires below have to come through and cross before you screw the top 2 pieces together.
Next the battery fits underneath the BeagleBone.
Take the 2 smallest screws and put them through the Beaglebone and into the motor piece like shown below.
Use the long screws to attach each other wheels.
When wiring up the BeagleBone the short motor wire goes first red on the right next one red one the right. Next attach the short encoder wire to the top left and the longer wire to the top right.
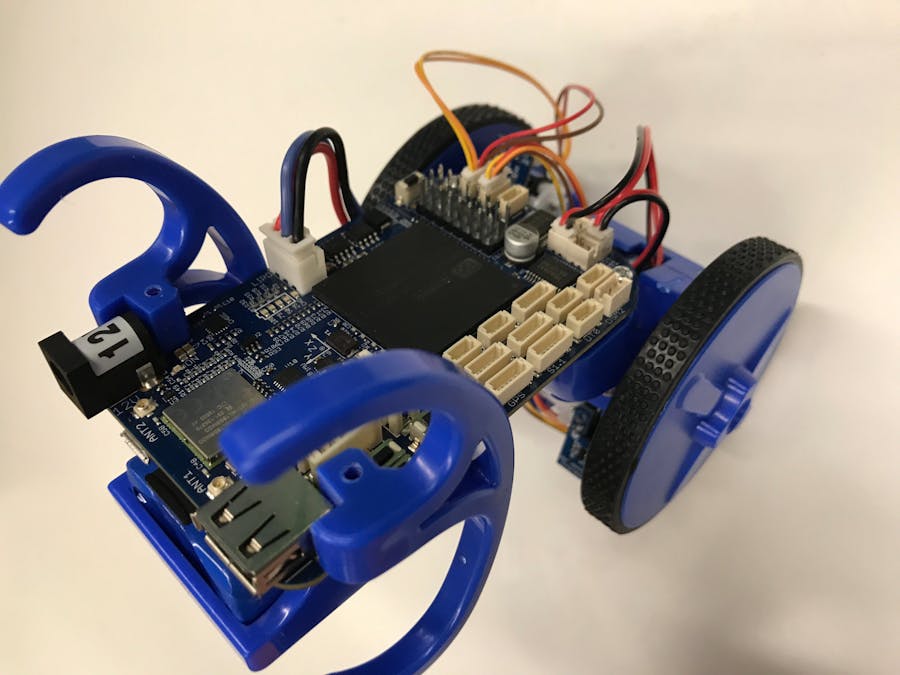
Finally attach the Battery to turn on the BeagleBone Blue. It should look like the picture below.
- Flash your BBB/L with the latest or preffered version of Debian (https://rcn-ee.com/rootfs/bb.org/testing/2017-03-07/iot/). This repository should work with both 8.6 and 8.7 versions (currently, there are issues with 8.8 and 9.1 compatability). For 8.7 versions and later (~2/2017), the root password is locked down, and you will need to change the root password in order to install the Linx software below.
- Enable the robotics cape device tree: This will enable the robotics cape on the BBB/L.
#~ sudo configure_robotics_dt.sh
#~ reboot
- Change root password if needed (Linx need to be installed as the root user): http://elinux.org/Beagleboard:BeagleBoneBlack_Debian#i_take_full_responsibility_for_knowing_my_beagle_is_now_insecure
- Install Labview on the BBB using the Linx target configuration wizard (From Labview, goto Tools->MakerHub->Linx->Linx Target Configuration...). the default address is 192.168.7.2 (or 192.168.8.1 if using the hotspot on the Blue), and use your new root/password to login. Once Logged in, click on Install Software. Note: you will need to get internet access to your BBB in order to install Labview.
Labview will create a Change root (chroot) on the BBB/L which is conceptually like a virtual machine. This allows NI to control the user libraries, thus making configuration management easier, but development more challenging as basic user libraries are often missing
- Install user libraries inside the Chroot: SSH into your BBB/L from the terminal/putty.
#~ ssh root@192.168.7.2)
- Type in your password when prompted (in the image uploaded, the password is temppwd). Then, enter the change root.
#~ sudo schroot -r -c lv.
- Then update and install packagegroup core buildessentials using opkg (note this may take 5-10min):
#~ okpg update
#~ opkg install packagegroup-core-buildessential
- Download the version of the Robotics cape given here, or the latest released version of the Robotics_Cape_Installer, found here: https://github.com/StrawsonDesign/Robotics_Cape_Installer/releases. In the released version downloaded, navigate to Robotics_Cape_Installer_x.x.x/libraries, and edit the "Makefile" as follows: In the ARCFLAGS sections (line 9), change "
-mfloat-abi=hard" to "-mfloat-abi=softfp"
- Move the rc_interrupt folder and Robotics_Cape_Installer_XXXX folder into the chroot: Move the files onto the BBB using any ftp tool. I recommend Filezilla for an easy graphical user experience. Once the files are on the BBB's root, use the copy command to move them into the chroot (this must be done while outside the chroot):
#~ cp -r "Directory Name" /srv/chroot/labview/root
- Install the rc_interrupt and robotics cape inside the chroot: Due to the chroot, these libraries need to be compiled manually, as the install scripts don't work inside the chroot. Move into chroot as above, then go into the robotics cape libraries folder.
 #~ cd /Robotics_Cape_Installxxxx/libraries/
#~ make
#~ cp *.h /usr/include/
#~ cp *.so /usr/lib/
#~ cd ../../rc_interrupt/
#~ make
#~ cp *.h /usr/include/
#~ cp *.so /usr/lib/
If the libraries install without errors, you can move the SO and header files into the respective /usr/ folders, and the BBB will be setup and ready to use with Labview
- Install the RC Cape vip to run in Labview 2014: Open the VI package manager program. Download and double click on the ucsd_robotics_lab_robotics_cape-1.0.1.3.vip, and install the package. Repeat with ucsd_robotics_lab_lib_rc_cape_examples-1.0.1.1.vip.
- In Labview 2014, Create a new blank project. Then right click on the project in the tree to add a new target:
Project: Untitled Project 1 >New >Targets and Devices...
Change to "New Target or Device", expand the "LINX" folder, and select BeagleBone Black. Right click on the new BeagleBone Black(0.0.0.0) target and go to properties:
BeagleBone Black(0.0.0.0)>Properties
Type in the IP address of your EduMiP. This could be 192.168.7.2, or the wifi IP address. Move one or all of the examples into the project. Then, move them down to the target, and open one of the VI's. Run the .VI and dig around the VI to see how it works.
- Note: whenever closing/ending a running VI, make sure to press the rectangular stop button on the front panel. This will properly shutdown the board so that it can run properly again after without rebooting/restarting labview.
- Troubleshooting: A) Can ping the BBB, but Labview fails to connect to target. Solution: Restart labview on the BBB. This is possible by right clicking on the target, and restarting labview, or easier from the terminal/putty:
#~ systemctl restart labview.serviceB) DHCP errors, and unable to connect over 192.168.7.2. This is a problem with compatability with Debian 8.8 and 9.1, which occurs after the device tree is enabled. Currently, the only fix for this is to use Debian 8.6 or 8.7.


Comments