

Hardware components | ||||||
 |
| × | 1 | |||
 |
| × | 1 | |||
 |
| × | 1 | |||
 |
| × | 1 | |||
 |
| × | 1 | |||
| × | 1 | ||||
| × | 1 | ||||
 |
| × | 2 | |||
Software apps and online services | ||||||
 |
| |||||
 |
| |||||
| ||||||
| ||||||
Hand tools and fabrication machines | ||||||
 |
| |||||
 |
| |||||
In a world where we walk past hundreds of signboards every week, most are static—conveying instructions, offers, or warnings. But what if even one of them could notice you, understand how you feel, and make your day better?
Our concept transforms ordinary signage into an emotion-aware companion that detects a passerby’s mood through facial expression analysis, then adapts its visuals and sounds to respond — cheering you up if you’re down, energizing you if you’re tired, or celebrating with you if you’re happy.
Studies show that small positive interventions in public spaces can improve emotional wellbeing and reduce stress for up to 68% of individuals (American Psychological Association, 2022). In essence, this signboard becomes a tiny, unexpected emotion coach — a quiet ally in your everyday walk, aiming to lift at least one person’s mood every day.
Interactive Signage Contest 2025This project is my submission to the Interactive Signage Contest conducted by Seeed Studio, inspired by my experience of traveling long distances from college to home. Waiting at the bus stop for long-haul buses—often delayed—can be exhausting and monotonous. I wanted to create something that could make this waiting time a little brighter and more engaging. By turning an ordinary sign into an interactive, emotion-aware display, my aim is to lift the mood of at least one person passing by, just as it would for me during those long, tiresome waits.
MoodBoard: The Bus Stop Mood MirrorBy default, when no one is looking at the sign, it displays a standard bus stop sign — blending naturally into the environment.
This makes it ideal for locations where people spend a lot of idle time, like waiting for public transport. Bus stops are often boring, tiring, and mentally draining spots — especially during long waits or in bad weather.
When someone glances at the sign, the Grove Vision AI V2 camera detects their face and emotion. Instantly, the static sign transforms into an interactive emotion coach, displaying animations and playing sounds tailored to uplift or engage the viewer.
This seamless transition from a familiar, functional sign to an unexpected emotional companion creates surprise, delight, and mood improvement — turning an ordinary wait into a small positive moment in the day.
How MoodBoard worksThe Grove Vision AI V2 acts as the primary detection module in this project. Using its onboard AI capabilities, it continuously analyzes the video feed from the connected Raspberry Pi Camera Module to detect facial expressions in real time. The AI model—trained to classify different emotions—runs locally on the Vision AI V2, ensuring fast inference without relying on cloud processing.
Once an emotion is recognized, the Grove Vision AI V2 sends the classification result via I2C communication to the Wio Terminal. The Wio Terminal then interprets this signal and updates its LCD display to show a corresponding emoji that matches the detected emotion.
If no face is detected, the system defaults to displaying a static bus stop sign—a playful nod to the real-world scenario where this prototype idea was born, waiting at a bus stop. This ensures the sign remains visually relevant even when idle, while turning interactive the moment a person approaches.
This seamless combination of on-device AI detection and instant visual feedback transforms an ordinary signboard into an emotion-aware companion that can brighten someone’s day in a public space.
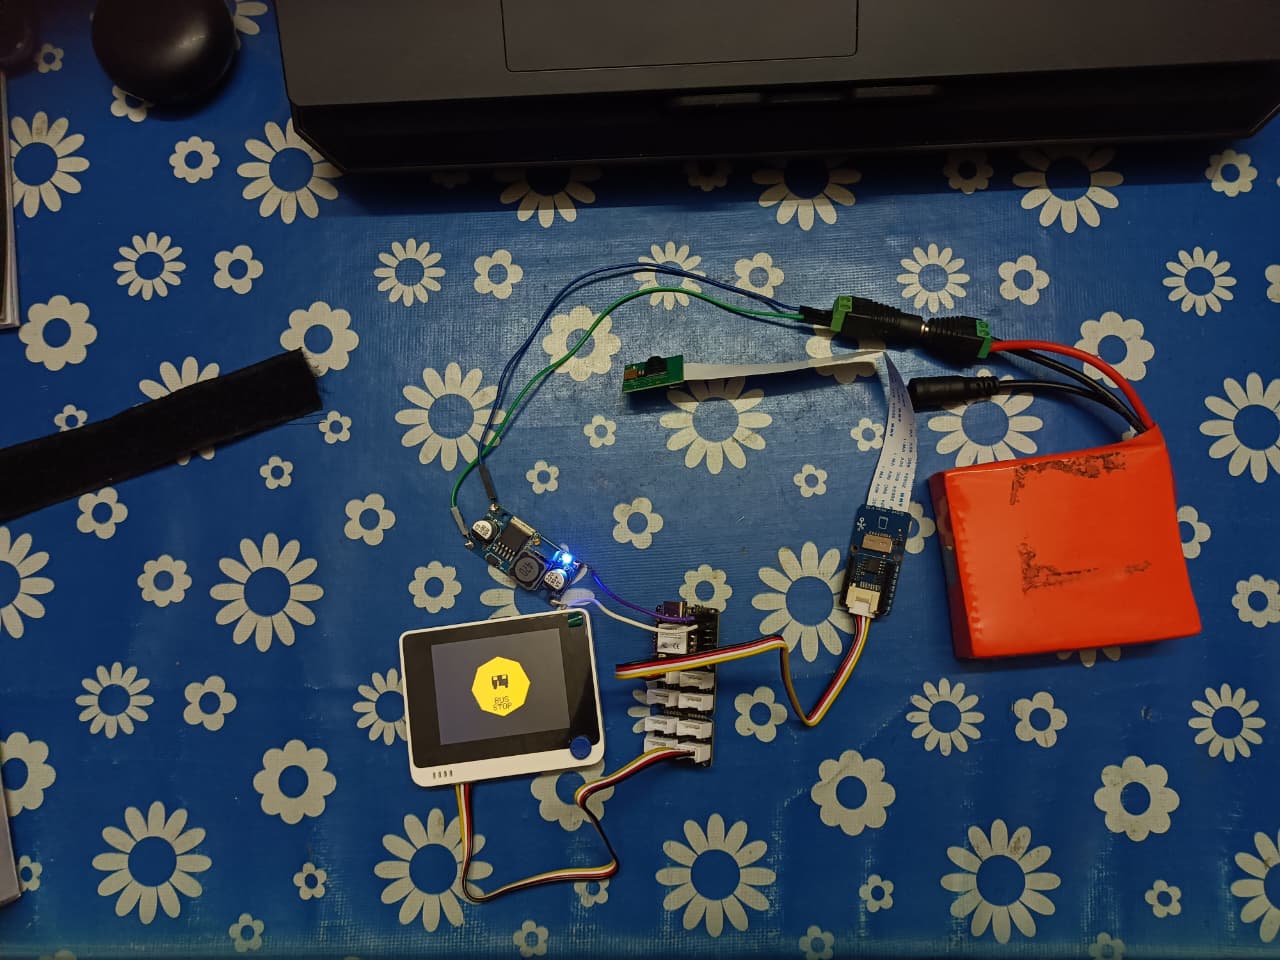
Tech StackAt the heart of the MoodBoard system is the Seeed Studio Wio Terminal, a compact yet powerful SAMD51-based controller. It comes equipped with a 2.4” LCD display, onboard IMU, microphone, buzzer, light sensor, IR emitter, and microSD slot. With Realtek RTL8720DN wireless connectivity and Raspberry Pi-compatible GPIO pins, it serves as the perfect all-in-one interface for displaying visuals, playing audio feedback, and managing user interactions. Its compatibility with both Arduino and MicroPython makes development fast and versatile.
Complementing the Wio Terminal is the Seeed Studio XIAO ESP32-S3 Plus, a high-performance microcontroller powered by a 240 MHz Xtensa LX7 dual-core processor. With integrated Wi-Fi and Bluetooth 5.0, along with 8 MB of PSRAM and 16 MB of Flash storage, it enables smooth AI processing and communication. Its ultra-low power sleep modes and expanded GPIO access make it ideal for energy-efficient, always-ready public installations.
To simplify sensor and module integration, the Seeed Studio Grove Shield for Seeeduino XIAO is used, allowing seamless plug-and-play connectivity for additional components without complex wiring.
The core of the emotion detection system is the Seeed Studio Grove Vision AI V2, powered by the WiseEye2 HX6538 processor with a dual-core Arm Cortex-M55 and an Arm Ethos-U55 NPU. This module supports AI models from TensorFlow and PyTorch, including MobileNet, EfficientNet-lite, and YOLO (v5 and v8). It comes with a built-in PDM microphone, SD card slot, USB Type-C port, and a Grove interface, making it fully open source and easy to customize for our specific use case.
The Raspberry Pi Camera Module serves as the primary visual input device for emotion detection. It captures high-quality facial images that are processed by the AI system to determine emotional states, which are then reflected in real-time on the Wio Terminal display.
Finally, to power the system, a 18650 Li-ion Battery Pack (2000 mAh, 4-cell, 14.8 V, 3C) is used along with a buck converter to step down the voltage to 3.7 V, providing stable power to the XIAO ESP32-S3 Plus and to the system.
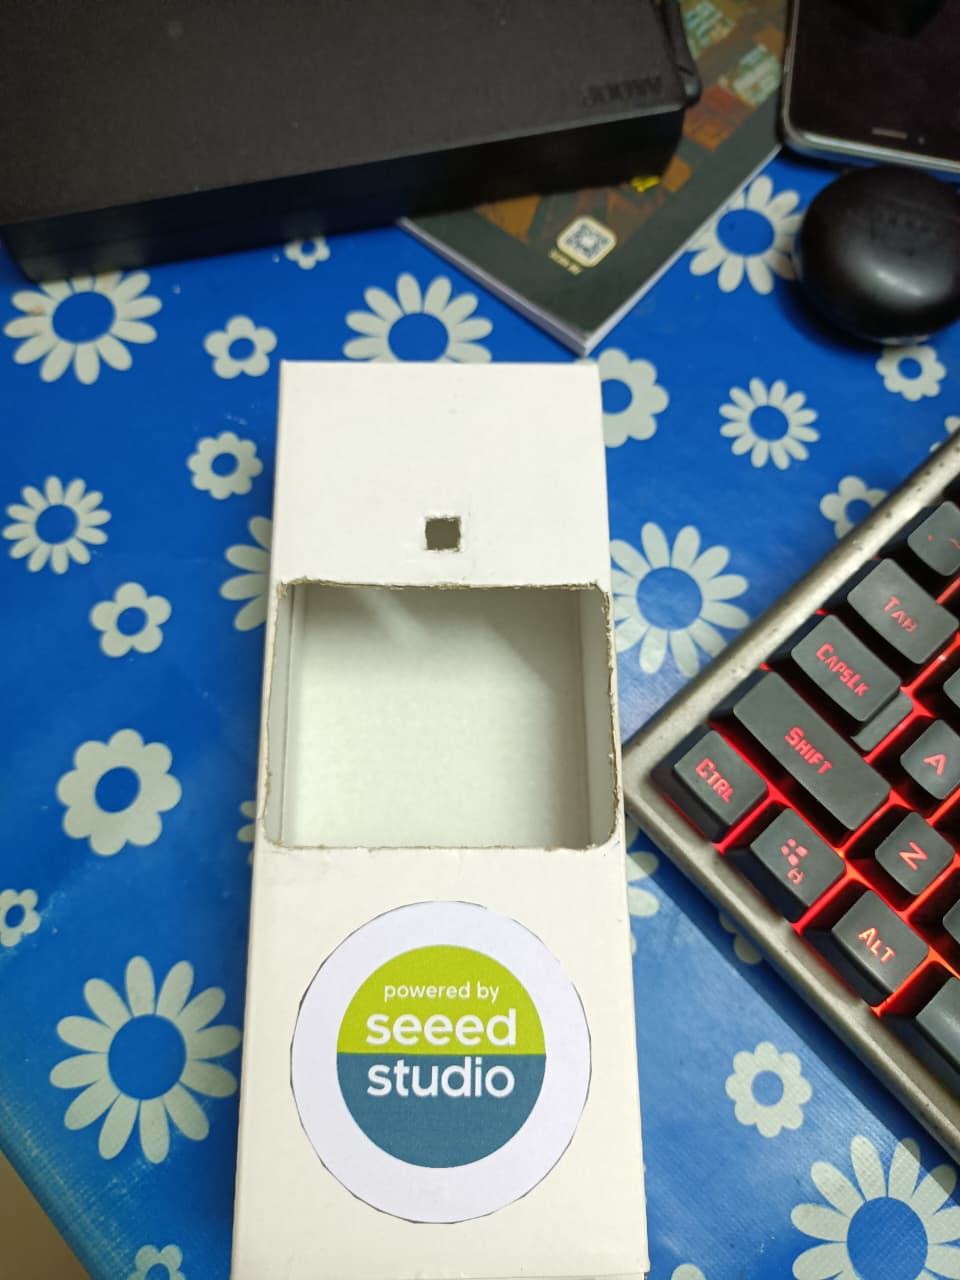
All of this is enclosed in an enclosure that was crafted from a simple cardboard box, providing a lightweight, cost-effective, and eco-friendly housing for the components. Its handmade aesthetic adds a friendly, approachable charm while keeping the electronics neatly protected.
The Wio Terminal is a SAMD51-based microcontroller with Wireless Connectivity powered by Realtek RTL8720DN that’s compatible with Arduino and MicroPython. Currently, wireless connectivity is only supported by Arduino. It runs at 120MHz (Boost up to 200MHz), 4MB External Flash and 192KB RAM. It supports both Bluetooth and Wi-Fi providing backbone for IoT projects. The Wio Terminal itself is equipped with a 2.4” LCD Screen, onboard IMU(LIS3DHTR), Microphone, Buzzer, microSD card slot, Light sensor, and Infrared Emitter(IR 940nm). On top of that, it also has two multifunctional Grove ports for Grove Ecosystem and 40 Raspberry pi compatible pin GPIO for more add-ons.
Pinout Diagram
Software
- Step 1. You need to Install an Arduino Software.
- Step 2. Open the Blink example
Open the LED blink example sketch: File > Examples >01.Basics > Blink.
- Step 3. Add the Wio Terminal Board Library
1.Open your Arduino IDE, click on File > Preferences, and copy below url to Additional Boards Manager URLs:
https://files.seeedstudio.com/arduino/package_seeeduino_boards_index.json2.Click on Tools > Board > Board Manager and Search Wio Terminal in the Boards Manager.
- Step 4. Select your board and portYou'll need to select the entry in the Tools > Board menu that corresponds to your Arduino. Selecting the Wio Terminal.
Select the serial device of the Wio Terminal board from the Tools -> Port menu. This is likely to be COM3 or higher (COM1 and COM2 are usually reserved for hardware serial ports). To find out, you can disconnect your Wio Terminal board and re-open the menu; the entry that disappears should be the Arduino board. Reconnect the board and select that serial port.
- Step 5. Upload the program
Now, simply click the Upload button in the environment. Wait a few seconds and if the upload is successful, the message "Done uploading." will appear in the status bar.
A few seconds after the upload finishes, you should see the LED at the bottom of the Wio Terminal start to blink. If it does, congratulations! You've gotten Wio Terminal up-and-running
Drawing the Bus Sign Board and Emojis for different expressionsThis Wio Terminal project displays different emoji expressions using the TFT display. Each emoji is drawn using geometric shapes and colors to create expressive faces. Here's how each emoji is constructed:
1. Neutral Emoji 😐 (drawNeutralEmoji)
Purpose: Shows a basic, emotionless face
Step-by-Step Construction:
- Draw the face outline
tft.fillCircle(x, y, radius, COLOR_FACE);
tft.drawCircle(x, y, radius, COLOR_EYE);- Add the eyes
int eyeSize = radius / 10;
int eyeOffset = radius / 3;
tft.fillCircle(x - eyeOffset, y - radius/4, eyeSize, COLOR_EYE);
tft.fillCircle(x + eyeOffset, y - radius/4, eyeSize, COLOR_EYE);- Draw the mouth
int mouthWidth = radius / 2;
tft.fillRect(x - mouthWidth/2, y + radius/4, mouthWidth, 4, COLOR_EYE);- Key Features: Simple dots for eyes, straight line for mouth
2. Happy Emoji 😄 (drawHappyEmoji)
Purpose: Shows joy and happiness with closed smiling eyes
Step-by-Step Construction:
- Draw the face base (same as neutral)
- Create smiling eyes (curved lines)
for (int i = 0; i < eyeWidth; i++) {
    int eyeY = y - radius/4 + (i - eyeWidth/2) * (i - eyeWidth/2) / (eyeWidth/4);
    tft.drawPixel(x - eyeOffset - eyeWidth/2 + i, eyeY, COLOR_EYE);
}- Draw the big smile
for (int angle = 0; angle <= 180; angle += 2) {
    int mouthX = x + cos(radians(angle)) * mouthRadius;
    int mouthY = y + radius/6 + sin(radians(angle)) * mouthRadius/2;
    tft.fillCircle(mouthX, mouthY, 2, COLOR_EYE);
}- Add blush marks
tft.fillCircle(x - radius * 0.7, y + radius/8, radius/8, COLOR_BLUSH);
tft.fillCircle(x + radius * 0.7, y + radius/8, radius/8, COLOR_BLUSH);
Key Features: Curved smiling eyes, wide smile arc, pink blush marks
3. Sad Emoji 😞 (drawSadEmoji)
Purpose: Expresses sadness with droopy features and tears
Step-by-Step Construction:
- Draw the face base
- Create larger, sad eyes
int eyeSize = radius / 8;
tft.fillCircle(x - eyeOffset, y - radius/4, eyeSize, COLOR_EYE);- Add droopy eyebrows
for (int i = 0; i < 3; i++) {
    tft.drawLine(x - eyeOffset - eyeSize, y - radius/3 + i,
                 x - eyeOffset + eyeSize, y - radius/2.5 + i, COLOR_EYE);
}- Draw downward frown
for (int angle = 30; angle <= 150; angle += 1) {
    int mouthX = x + cos(radians(angle)) * mouthRadius;
    int mouthYPos = mouthY + sin(radians(angle)) * (mouthRadius/3);
    tft.fillCircle(mouthX, mouthYPos, 2, COLOR_EYE);
}- Add tear drops
tft.fillCircle(x - eyeOffset + eyeSize/2, y - radius/8, 4, 0x87FF);
tft.fillCircle(x - eyeOffset + eyeSize/2, y - radius/12, 3, 0x87FF);
tft.fillCircle(x - eyeOffset + eyeSize/2, y, 2, 0x87FF);- Key Features: Droopy eyebrows, downward mouth arc, blue tear drops
4. Angry Emoji 😡 (drawAngryEmoji)
Purpose: Shows anger with red face and aggressive features
Step-by-Step Construction:
- Draw red face
tft.fillCircle(x, y, radius, COLOR_ANGRY_RED);- Create squinted angry eyes
tft.fillRect(x - eyeOffset - eyeSize, y - radius/4, eyeSize*2, eyeSize, COLOR_EYE);
tft.fillRect(x + eyeOffset - eyeSize, y - radius/4, eyeSize*2, eyeSize, COLOR_EYE);- Add angled eyebrows
tft.fillTriangle(
    x - eyeOffset - eyeSize*2, y - radius/2,
    x - eyeOffset + eyeSize, y - radius/3,
    x - eyeOffset - eyeSize, y - radius/3,
    COLOR_EYE
);- Draw angry frown
tft.fillRect(x - mouthWidth/2, y + radius/3, mouthWidth, 6, COLOR_EYE);- Add anger marks around head
for (int i = 0; i < 6; i++) {
    float angle = i * 60 * PI / 180;
    int markX = x + cos(angle) * (radius + 15);
    tft.fillCircle(markX, markY, 3, COLOR_ANGRY_RED);
}- Key Features: Red face color, rectangular squinted eyes, triangular eyebrows, anger marks
5. Confused Emoji 😵 (drawConfusedEmoji)
Purpose: Shows confusion with asymmetrical features and question marks
Step-by-Step Construction:
- Draw the face base
- Create asymmetrical eyes
tft.fillCircle(x - eyeOffset, y - radius/4, radius/10, COLOR_EYE);

tft.drawLine(x + eyeOffset - rightEyeSize, y - radius/4 - rightEyeSize,
x + eyeOffset + rightEyeSize, y - radius/4 + rightEyeSize, COLOR_EYE);- Draw wavy confused mouth
for (int i = -radius/3; i < radius/3; i += 2) {
    int waveY = y + radius/4 + sin(i * 0.3) * 3;
    tft.fillCircle(x + i, waveY, 1, COLOR_EYE);
}- Add confusion swirls
drawSpiral(x - 20, y - radius - 20, 8, COLOR_CONFUSED);- Display question mark
tft.setTextColor(COLOR_CONFUSED);
tft.setTextSize(3);
tft.drawString("?", x + radius/2, y - radius/2);- Key Features: One normal eye, one X'd eye, wavy mouth, spiral effects, question mark
6. Bus Stop Sign 🚏 (drawBusStopSign)
Purpose: When no face is detected a bus stop sign is shown instead of an emoji serving it's original purpose.
Step-by-Step Construction:
- Create octagon shape
for (int i = 0; i < 8; i++) {
    float angle = i * 45 * PI / 180;  // 8 sides, 45° apart
    points[i*2] = x + cos(angle) * octagonRadius;
}- Fill octagon with orange color
for (int i = 0; i < 8; i++) {
    tft.fillTriangle(x, y, points[i*2], points[i*2+1],
                     points[next*2], points[next*2+1], orangeColor);
}- Draw bus icon
tft.fillRoundRect(busX, busY, busWidth, busHeight, 4, COLOR_EYE);


tft.fillRect(busX + 4, busY + 2, windowWidth, windowHeight, orangeColor);

tft.fillCircle(busX + wheelSize + 2, busY + busHeight + 2, wheelSize, COLOR_EYE);- Add text
tft.drawString("BUS", x - 18, y + radius/3);
tft.drawString("STOP", x - 24, y + radius/3 + 16);- Key Features: Octagonal orange background, detailed bus icon, clear text labels
Color Definitions Used
#define COLOR_BG          0x0000
#define COLOR_FACE        0xFFE0
#define COLOR_EYE         0x0000
#define COLOR_BLUSH       0xF81F
#define COLOR_ANGRY_RED   0xF800
#define COLOR_CONFUSED    0x8410
Each emoji uses different combinations of circles, rectangles, lines, and triangles to create distinct emotional expressions that are clearly visible on the Wio Terminal's 320x240 TFT display.
Setting up Buzzer sounds on the Wio Terminal to match the emotionsThe Wio Terminal uses its built-in buzzer (pin WIO_BUZZER) to provide audio feedback that matches each detected emotion. Each emotion has a unique sound pattern designed to be ambient and non-intrusive while clearly conveying the emotional state.
Sound Patterns by Emotion
🙂 Neutral
- Pattern: Single gentle beep
- Frequency: 440 Hz (A4 musical note)
- Duration: 200ms
- Description: A simple, clean tone that's neither positive nor negative
case NEUTRAL:

  tone(BUZZER_PIN, 440, 200);
  break;
😄 Happy
- Pattern: Cheerful ascending melody (3 notes)
- Sequence:
- C5 (523 Hz) for 150ms
- E5 (659 Hz) for 150ms
- G5 (784 Hz) for 200ms
- Spacing: 180ms between notes
- Description: Uplifting major chord progression that sounds celebratory
case HAPPY:

  tone(BUZZER_PIN, 523, 150);
  delay(180);
  tone(BUZZER_PIN, 659, 150);
  delay(180);
  tone(BUZZER_PIN, 784, 200);
  break;
😞 Sad
- Pattern: Descending minor melody (3 notes)
- Sequence:
- A4 (440 Hz) for 300ms
- G4 (392 Hz) for 300ms
- F4 (349 Hz) for 400ms
- Spacing: 350ms between notes
- Description: Slow, melancholic descending pattern with longer note durations
case SAD:

  tone(BUZZER_PIN, 440, 300);
  delay(350);
  tone(BUZZER_PIN, 392, 300);
  delay(350);
  tone(BUZZER_PIN, 349, 400);
  break;
😡 Angry
- Pattern: Harsh buzzing sounds (6 rapid bursts)
- Sequence: Alternating between 150 Hz and 200 Hz
- Duration: 100ms per buzz, 120ms spacing
- Repetitions: 3 cycles (6 total buzzes)
- Description: Aggressive, low-frequency buzzing that sounds agitated
case ANGRY:
  // Angry - harsh buzzing sounds
  for (int i = 0; i < 3; i++) {
    tone(BUZZER_PIN, 150, 100);
    delay(120);
    tone(BUZZER_PIN, 200, 100);
    delay(120);
  }
  break;
😵 Confused
- Pattern: Random wandering notes (6 notes)
- Frequencies: 330, 440, 370, 494, 415, 523 Hz (seemingly random)
- Duration: 120ms per note, 150ms spacing
- Description: Erratic, unpredictable sequence that conveys uncertainty
case CONFUSED:
  {

    int confusedNotes[] = {330, 440, 370, 494, 415, 523};
    for (int i = 0; i < 6; i++) {
      tone(BUZZER_PIN, confusedNotes[i], 120);
      delay(150);
    }
  }
  break;
🚌 Bus Stop (No Emotion
- Pattern: Silent
- Description: No sound is played when no face is detected or emotion is unclear
case BUS_STOP:
  break;
To show you the different sounds, we used the in-built button on the Wio Terminal to move to different emojis.
if (digitalRead(BUTTON_LEFT) == LOW) {
 currentEmotion = ANGRY;
 drawCurrentEmotion();
 playAmbientSound(currentEmotion);
 Serial.println("Selected: Angry 😡");
}
else if (digitalRead(BUTTON_RIGHT) == LOW) {
 currentEmotion = CONFUSED;
 drawCurrentEmotion();
 playAmbientSound(currentEmotion);
 Serial.println("Selected: Confused 😵");
}
else if (digitalRead(BUTTON_DOWN) == LOW) {
 currentEmotion = SAD;
 drawCurrentEmotion();
 playAmbientSound(currentEmotion);
 Serial.println("Selected: Sad 😞");
}
else if (digitalRead(BUTTON_PRESS) == LOW) {
 currentEmotion = NEUTRAL;
 drawCurrentEmotion();
 playAmbientSound(currentEmotion);
 Serial.println("Selected: Neutral 😐");
}
else if (digitalRead(BUTTON_UP) == LOW) {
 currentEmotion = HAPPY;
 drawCurrentEmotion();
 playAmbientSound(currentEmotion);
 Serial.println("Selected: Happy 😄");
}Control Mapping
- UP Button → Happy 😄
- DOWN Button → Sad 😞
- LEFT Button → Angry 😡
- RIGHT Button → Confused 😵
- PRESS Button → Neutral 😐
- UP + DOWN → Bus Stop
The Wio Terminal acts as an I2C slave device that receives emotion classification commands from a master device (XIAO ESP32-S3) and displays the appropriate emoji on its TFT screen with accompanying sound effects.
I2C Configuration
The Wio Terminal is configured as an I2C slave device with address 0x08 to receive single-byte commands from the master device. The hardware I2C interface uses the Wire library for Arduino, which provides reliable communication with built-in error handling and standard I2C protocol compliance. During initialization, the device registers an interrupt callback function receiveI2CCommand that will be triggered whenever the master sends data to this slave address.
#define WIO_TERMINAL_I2C_ADDRESS 0x08

void setup() {

  Wire.begin(WIO_TERMINAL_I2C_ADDRESS);
  Wire.onReceive(receiveI2CCommand);
}
Command Protocol
The I2C communication uses single-byte commands to represent different emotions:
// Command definitions (must match XIAO ESP32-S3)
#define CMD_ANGRY       0x00
#define CMD_CONFUSED    0x01
#define CMD_HAPPY       0x02
#define CMD_NEUTRAL     0x03
#define CMD_SAD         0x04
#define CMD_NULL        0x05  // No emotion detected
I2C Reception Implementation
The system implements interrupt-driven I2C reception to ensure immediate response to incoming commands without blocking the main program execution. When data is received, the interrupt service routine receiveI2CCommand is automatically called, which reads the first byte from the I2C buffer and stores it in a volatile variable receivedCommand. A boolean flag newCommandReceived is set to indicate that new data is available for processing. The function also includes buffer clearing logic to prevent data corruption by reading and discarding any additional bytes that might be present in the receive buffer.
volatile uint8_t receivedCommand = CMD_NULL;
volatile bool newCommandReceived = false;

void receiveI2CCommand(int numBytes) {
  if (numBytes > 0) {
    receivedCommand = Wire.read();
    newCommandReceived = true;
  }


  while (Wire.available()) {
    Wire.read();
  }
}
Main Loop Processing
To maintain system stability and avoid performing complex operations within interrupt service routines, command processing is handled in the main program loop. The loop continuously checks the newCommandReceived flag, and when it detects a new command, it calls the handleI2CCommand() function to process the received data. After processing, the flag is reset to false, preparing the system for the next incoming command. A small delay of 10 milliseconds is included to provide system stability and prevent excessive CPU usage while maintaining responsive command handling.
void loop() {
  if (newCommandReceived) {
    handleI2CCommand();
    newCommandReceived = false;
  }

  delay(10);
}
Command Handling
The command handling function processes the received I2C data using a switch statement that matches the command byte against the predefined command definitions. Each valid command triggers appropriate actions such as updating the current emotion state and providing serial debug output for monitoring purposes. The function includes comprehensive error handling for unknown commands, logging them to the serial monitor with their hexadecimal values for debugging purposes. This approach ensures that all valid commands are processed correctly while providing visibility into any communication issues or protocol mismatches.
void handleI2CCommand() {
  switch (receivedCommand) {
    case CMD_ANGRY:
      Serial.println("I2C Command: Angry (0x00)");
      currentEmotion = ANGRY;
      break;

    case CMD_CONFUSED:
      Serial.println("I2C Command: Confused (0x01)");
      currentEmotion = CONFUSED;
      break;

    // Additional cases for other commands...

    default:
      Serial.print("Unknown I2C command: 0x");
      Serial.println(receivedCommand, HEX);
      // Handle unknown command
      break;
  }
}Seeed Studio Grove Base for XIAO is a plug-and-play Grove extension board for Seeed Studio XIAO. With the on-board battery management chip and battery bonding pad, you could easily power your Seeed Studio XIAO with lithium battery and recharge it. 8 Grove connectors onboard includes two Grove I2C and one UART. It acts as a bridge for Seeed Studio XIAO and Seeed's Grove system.
Pinout
The Seeed Studio XIAO ESP32-S3 Plus is a powerful, thumb-sized development board based on the ESP32-S3R8 microcontroller. This compact board combines the advanced capabilities of the ESP32-S3 with expanded memory and enhanced connectivity options, making it ideal for IoT applications, embedded AI projects, and space-constrained designs.
Key Features
- Powerful MCU: ESP32-S3R8 Xtensa LX7 dual-core, 32-bit processor operating up to 240 MHz
- Enhanced Memory: On-chip 8M PSRAM & 16MB Flash (doubled flash compared to standard version)
- Wireless Connectivity: Complete 2.4GHz Wi-Fi subsystem and Bluetooth 5.0/BLE with mesh support
- Compact Design: Ultra-small form factor at 21 x 17.8mm
- Rich Interfaces: Multiple communication protocols and GPIO options
- Power Efficiency: Advanced power management with multiple sleep modes
- Arduino & MicroPython Support: Compatible with popular development environments
Power Management
Input Voltage:
- USB Type-C: 5V
- Battery: 4.2V (3.7V lithium battery recommended)
- Input Voltage:USB Type-C: 5VBattery: 4.2V (3.7V lithium battery recommended)
Operating Current:
- Ready to operate: 5V@28mA (Type-C), 3.8V@35mA (Battery)
- Wi-Fi Active: ~85mA
- BLE Active: ~77mA
Low Power Modes:
- Modem-sleep: 3.8V/26.5mA
- Light-sleep: 3.8V/2.2mA
- Deep Sleep: 3.8V/69µA (ultra-low power)
- Battery Charging: 100mA charging current with LED indicator
Physical Characteristics
- Dimensions: 21 x 17.8mm (thumb-sized)
- Weight: Approximately 3g
- Operating Temperature: -40°C to +65°C
- Form Factor: Compatible with XIAO ecosystem
Hardware Overview
Board Layout
The XIAO ESP32-S3 Plus features a carefully designed layout optimizing the available space:
Front Side Components:
- ESP32-S3 Plus main processor
- USB Type-C connector
- User LED (orange)
- Charge LED (red)
- Reset button
- Boot button
Back Side Components:
- B2B (Board-to-Board) connector
- External antenna connector
- Battery connection pads
Pinout Configuration
Pin Categories:
Power Pins:
- 5V: USB 5V output/input (requires diode protection for external power)
- 3V3: 3.3V regulated output (700mA max)
- GND: Ground reference
Digital I/O:
18x GPIO pins with the following capabilities:
- All pins support PWM output
- Multiple pins support ADC input
- Configurable pull-up/pull-down resistors
- Interrupt capability on all pins
Communication Interfaces:
- UART: TX/RX pins for serial communication
- I2C: SDA/SCL pins for I2C devices
- SPI: MOSI/MISO/SCK pins for SPI communication
- I2S: Audio interface pins
Strapping Pins
Critical boot configuration pins that require careful handling:
- GPIO0: Boot mode selection (pull-down for download mode)
- GPIO45: VDD_SPI voltage selection
- GPIO46: ROM message printing and boot mode
- GPIO3: JTAG signal source selection
Hardware Setup
1. Soldering Pin Headers
The XIAO ESP32-S3 Plus ships without pre-soldered headers. Carefully solder appropriate pin headers:
Safety Notes:
- Use proper soldering technique to avoid bridging pins
- Avoid excess solder on shields or components
- Work in well-ventilated area
2. Antenna Installation
For optimal wireless performance, install the included antenna:
Installation Steps:
- Locate the U.FL connector on the board's bottom-left
- Align one side of the antenna connector first
- Gently press down the other side until it clicks
- For removal, lift from one side rather than pulling directly
3. Battery Connection
For portable applications, connect a 3.7V lithium battery.
Software Setup
Arduino IDE Configuration
Step 1: Install Arduino IDE. Download and install the latest Arduino IDE from the official website.
Step 2: Add ESP32 Board Package
- Open Arduino IDE
- Navigate to File → Preferences
Add to "Additional Boards Manager URLs":
https://raw.githubusercontent.com/espressif/arduino-esp32/gh-pages/package_esp32_index.jsonGo to Tools → Board → Boards Manager
Search for "esp32" and install version 2.0.8 or higher
Step 3: Board Selection
- Select Tools → Board → esp32 → XIAO_ESP32S3
- Choose the appropriate COM port
- Set other parameters as needed
Alternative Development Environments
- MicroPython: Full MicroPython support for rapid prototyping
- ESP-IDF: Native Espressif development framework for advanced users
- PlatformIO: Professional IDE with advanced debugging capabilities
Programming Your First Application
Basic Blink Program
The classic LED blink program demonstrates basic GPIO control:
Key Points:
- User LED is connected to a GPIO21 pin
- LED turns ON when pin is set LOW (active low)
- LED turns OFF when pin is set HIGH
- Always verify board selection before uploading
Upload Process
- Connect XIAO to computer via USB Type-C
- Select correct board and port in Arduino IDE
- Compile and upload your program
- Monitor serial output if needed
Troubleshooting Upload Issues
Bootloader Mode
If upload fails or device is not recognized:
Enter Bootloader Mode:
- Press and hold BOOT button
- Connect USB cable while holding BOOT
- Release BOOT button after connection
- Upload program
Reset Function:
- Press RESET button to restart program
- Hold BOOT + press RESET for bootloader mode
Advanced Features
Power Management
The ESP32-S3 Plus offers sophisticated power management:
Sleep Modes:
- Modem Sleep: CPU active, radio off (26.5mA)
- Light Sleep: CPU suspended, RTC active (2.2mA)
- Deep Sleep: Minimal power consumption (69µA)
Wireless Connectivity
Wi-Fi Features
- Station mode (client)
- Access Point mode (hotspot)
- Wi-Fi Direct
- WPS support
- Multiple security protocols (WEP, WPA, WPA2)
Bluetooth Features
- Classic Bluetooth
- Bluetooth Low Energy (BLE)
- Bluetooth Mesh networking
- Multiple profiles support
Battery Usage and Management
Battery Specifications
- Recommended: 3.7V lithium rechargeable battery
- Capacity: Based on application requirements
- Connector: Solder pads on board back
Charging System
- Charging Current: 100mA (safe for most batteries)
Charge Indicator: Red LED shows charging status
- Flashing: Charging in progress
- Off: Fully charged or no battery
- Solid (briefly): USB connected, no battery
The XIAO ESP32-S3 Plus acts as an I2C master device that receives AI inference results from the Grove Vision AI V2 module, processes emotion classification data, and transmits corresponding commands to slave devices (Wio Terminal) for real-time emotion display and feedback.
I2C Configuration
The XIAO ESP32-S3 Plus operates as an I2C master device, managing communication with both the Grove Vision AI V2 module for inference data reception and the Wio Terminal for command transmission. The system initializes the I2C interface with a clock speed of 400kHz to ensure optimal communication performance and reduced latency. The master device coordinates the entire emotion detection pipeline by collecting AI inference results and distributing appropriate commands to connected slave devices.
#define WIO_TERMINAL_I2C_ADDRESS         0x08
void setup() {
    // Initialize I2C as master
    Wire.begin();
    Wire.setClock(400000)
    AI.begin(&Wire);
}
Command Protocol
The I2C master implements the same command protocol as the Wio Terminal slave to ensure seamless communication between devices. Six distinct command bytes represent different emotion states detected by the AI inference engine: CMD_ANGRY (0x00), CMD_CONFUSED (0x01), CMD_HAPPY (0x02), CMD_NEUTRAL (0x03), CMD_SAD (0x04), and CMD_NULL (0x05) for no emotion detected. This standardized command set enables consistent interpretation of emotion data across all connected devices in the system.
// Command definitions - matching emotion classes
#define CMD_ANGRY       0x00
#define CMD_CONFUSED    0x01
#define CMD_HAPPY       0x02
#define CMD_NEUTRAL     0x03
#define CMD_SAD         0x04
#define CMD_NULL        0x05  // No emotion detected / bus stop
AI Inference and I2C Integration
The system performs AI inference operations at controlled intervals of 200 milliseconds to balance responsiveness with system performance. During each inference cycle, the XIAO ESP32-S3 communicates with the Grove Vision AI V2 module via I2C to obtain emotion classification results. The inference process analyzes detected classes and their confidence scores, selecting the emotion with the highest score above a threshold of 0.5 to ensure reliable detection. The AI inference results are then mapped to corresponding I2C command bytes for transmission to the display device.
unsigned long lastInferenceTime = 0;
unsigned long inferenceInterval = 200;
uint8_t lastEmotionCommand = CMD_NULL;

void loop() {
    unsigned long currentTime = millis();

    // Run inference at controlled intervals
    if (currentTime - lastInferenceTime >= inferenceInterval) {
        lastInferenceTime = currentTime;

        uint8_t detectedEmotion = CMD_NULL;
        float highestScore = 0.0;

        if (!AI.invoke(1, false, false)) {
            // Process AI inference results
            for (int i = 0; i < AI.classes().size(); i++) {
                if (AI.classes()[i].score > highestScore && AI.classes()[i].score > 0.5) {
                    highestScore = AI.classes()[i].score;
                    // Map class target to command
                    switch (AI.classes()[i].target) {
                        case 0: detectedEmotion = CMD_ANGRY; break;
                        case 1: detectedEmotion = CMD_CONFUSED; break;
                        case 2: detectedEmotion = CMD_HAPPY; break;
                        case 3: detectedEmotion = CMD_NEUTRAL; break;
                        case 4: detectedEmotion = CMD_SAD; break;
                        default: detectedEmotion = CMD_NULL; break;
                    }
                }
            }
        }
    }
}
I2C Transmission Implementation
The master device implements intelligent I2C transmission by only sending commands when emotion states change, significantly reducing I2C bus traffic and improving overall system efficiency. The sendCommandToWio() function handles the complete transmission process, including error detection and automatic retry mechanisms. When transmission errors occur, the system implements a single retry attempt after a brief delay to handle temporary communication issues. Successful transmissions are logged with command details, while errors are reported with specific error codes for debugging purposes.
void sendCommandToWio(uint8_t command) {
    Wire.beginTransmission(WIO_TERMINAL_I2C_ADDRESS);
    Wire.write(command);

    uint8_t error = Wire.endTransmission();

    if (error == 0) {
        Serial.print("I2C Command sent successfully: 0x");
        Serial.println(command, HEX);
    }
    else {
        Serial.print("I2C Error: ");
        Serial.println(error);
        delay(10);
        Wire.beginTransmission(WIO_TERMINAL_I2C_ADDRESS);
        Wire.write(command);
        Wire.endTransmission();
    }
}
Optimized Communication Flow
The system implements several optimization strategies to minimize communication latency and improve real-time performance. State change detection prevents unnecessary I2C transmissions by comparing the current detected emotion with the previously sent command, only transmitting when actual changes occur. The inference interval of 200 milliseconds provides responsive emotion detection while preventing system overload. LED status indication provides visual feedback about the detection state, turning on when emotions are detected and off during null states. This optimized approach ensures efficient use of I2C bandwidth while maintaining responsive emotion detection and display updates.
if (detectedEmotion != lastEmotionCommand) {
    lastEmotionCommand = detectedEmotion;

    if (detectedEmotion == CMD_NULL) {
        digitalWrite(LED_PIN, HIGH);
        sendCommandToWio(CMD_NULL);
        Serial.println("No emotion detected. Showing bus stop");
    }
    else {
        digitalWrite(LED_PIN, LOW)
        sendCommandToWio(detectedEmotion);
        Serial.print("Emotion changed to: ");
        // Print emotion name for debugging
    }
}It is an MCU-based vision AI module powered by Arm Cortex-M55 & Ethos-U55. It supports TensorFlow and PyTorch frameworks and is compatible with Arduino IDE. With the SenseCraft AI algorithm platform, trained ML models can be deployed to the sensor without the need for coding. It features a standard CSI interface, an onboard digital microphone and an SD card slot, making it highly suitable for various embedded AI vision projects.
Features
- Powerful AI Processing Capabilities: Utilizes WiseEye2 HX6538 processor with a dual-core Arm Cortex-M55 and integrated Arm Ethos-U55 neural network unit.
- Versatile AI Model Support: Easily deploy off-the-shelf or your custom AI models from SenseCraft AI, including Mobilenet V1, V2, Efficientnet-lite, Yolo v5 & v8. TensorFlow and PyTorch frameworks are supported.
- Rich Peripheral Devices: Includes PDM microphone, SD card slot, Type-C, Grove interface, and other peripherals.
- High Compatibility: Compatible with XIAO series, Arduino, Raspberry Pi, ESP dev board, easy for further development.
- Fully Open Source: All codes, design files, and schematics available for modification and use.
Hardware Overview
The full functionality of the Grove Vision AI V2 can be unlocked by connecting a OV5647-62 FOV Raspberry Pi Camera Module to it via the CSI connector.
Driver
If you find that the Grove Vision AI V2 is not recognised after connecting it to your computer. Then you may need to install the CH343 driver on your computer. Here are some links to download and install the CH343 driver.
- Windows Vendor VCP Driver One-Click Installer: CH343SER.EXE
- Windows Vendor VCP Driver: CH343SER.ZIP
- Windows CDC driver one-click installer: CH343CDC.EXE
- Windows CDC driver: CH343CDC.ZIP
- macOS Vendor VCP Driver: CH34xSER_MAC.ZIP
The Seeed_Arduino_SSCMA library is a comprehensive Arduino driver designed to enable seamless communication between Arduino host boards and AI-enabled sensors equipped with the SSCMA-Micro firmware. This library serves as a bridge that allows developers to easily integrate advanced machine learning capabilities into their Arduino projects without requiring deep knowledge of the underlying AI algorithms.
Purpose and Features
Primary Function
The library provides the necessary drivers and communication protocols to facilitate interaction between:
- Arduino-compatible microcontrollers (hosts)
- Sensors and modules running SSCMA-Micro firmware
- AI inference engines for real-time processing
Key Capabilities
- Real-time AI Inference: Execute machine learning models directly on sensor hardware
- Multiple Detection Types: Support for object detection, classification, and point detection
- Performance Monitoring: Built-in performance metrics for optimization
- Simple API: Easy-to-use methods for quick integration
- Cross-platform Compatibility: Works with various Arduino-compatible boards
Installation Guide
- Visit the official repository:
https://github.com/Seeed-Studio/Seeed_Arduino_SSCMA- Download the latest release as a ZIP file
- Open Arduino IDE
- Navigate to Sketch → Include Library → Add.ZIP Library
- Select the downloaded ZIP file
- Restart Arduino IDE
Seeed Arduino SSCMA Library Examples
- camera_web_server - Web-based camera server with AI inference capabilities
- fan_tacking - Fan or rotating object tracking system
- inference - Core AI inference functionality with image processing and keypoints detection
- inference_class - Object classification with class label retrieval
- inference_i2c - AI inference over I2C communication protocol
- inference_spi - AI inference over SPI communication protocol
- inference_uart - AI inference over UART/Serial communication
- lock_screen - Automated screen locking based on user presence detection
- mouse_hand - Hand gesture-based mouse control
- mqtt2spi - MQTT to SPI bridge for IoT applications
- mqtt2uart - MQTT to UART bridge with WiFi support
- proxy_i2c - I2C communication proxy/bridge
- proxy_spi - SPI communication proxy/bridge
- we2_iic_bootloader_recover - WE2 device recovery tool via I2C bootloader
Deployment Process
The model deployment begins by accessing the SenseCraft AI platform and browsing through the available pre-trained models. After selecting the face detection model and verifying its compatibility with the Grove Vision AI V2, the device is connected to the platform for model transfer. The deployment process involves downloading the optimized model onto the device and confirming successful installation and loading.
Model Functionality and Performance
Once deployed, the face detection model operates directly on the Grove Vision AI V2, processing camera feed input in real-time to detect faces and generate bounding box outputs. The model is specifically optimized for edge computing, providing low latency inference without requiring cloud connectivity. This on-device processing ensures power-efficient operation while maintaining the ability to detect multiple faces simultaneously.
Technical Integration
The face detection model integrates seamlessly with Arduino projects through the SSCMA library examples. Developers can utilize the basic inference example for fundamental face detection functionality, implement the camera web server example for web-based monitoring applications, or use the various communication protocol examples such as I2C, SPI, or UART to transmit detection results to other connected devices in their system.
In order to deploy a model for emotion detection on Grove Vision AI V2, you need to train a custom model using the SSCMA framework and export it in the device-compatible format.
Dataset Preparation
Emotion Detection Dataset Overview
The emotion detection dataset contains six distinct emotional classes that represent common human emotional states detectable through facial expressions:
- angry - Facial expressions showing anger, frustration, or irritation
- sad - Expressions indicating sadness, disappointment, or melancholy
- confused - Facial expressions showing confusion, uncertainty, or puzzlement
- neutral - Calm, expressionless, or emotionally neutral faces
- happy - Expressions showing happiness, joy, or positive emotions
- null - Background or non-face regions, used for negative samples
Step 1: Create a Roboflow Account
Create a free Roboflow account to access the emotion detection dataset.
Choose the Public Plan for this tutorial and optionally invite collaborators to your workspace.
Step 2: Access the Emotion Detection Dataset
Navigate to Roboflow Universe and search for emotion detection datasets. Look for datasets that contain the six emotion classes mentioned above with proper annotations and balanced class distribution.
When evaluating datasets, check for:
- Annotation Quality: Accurate and consistent bounding boxes around faces
- Dataset Size: Minimum 100-200 images per emotion class for effective training
- Class Balance: Relatively equal distribution across all six emotion categories
- Image Diversity: Various lighting conditions, backgrounds, and demographics
Step 3: Export Dataset
Once you've selected your emotion detection dataset:
- Click Export Dataset
- Choose COCO format for compatibility with SSCMA training
- Apply Mosaic augmentation to improve model generalization
- Generate and copy the Raw URL - you'll need this for Google Colab training
Keep the Raw URL safe - it will be used in the next section for model training.
Google Colab Training Process
Step 1: Access the SSCMA Training Notebook
Visit the SenseCraft Model Assistant Wiki and select the Swift-YOLO notebook for object detection. Here I'm using the person detection notebook.
Important: Ensure you're using a T4 GPU runtime, not CPU, for optimal training performance.
Step 2: Environment Setup
Run the first code block to install dependencies and set up the environment:
# Ethos-U-Vela needs to be installed this way for SSCMA compatibility
!git clone https://review.mlplatform.org/ml/ethos-u/ethos-u-vela.git
%cd ethos-u-vela
!pip install .
%cd ..

# Clone ModelAssistant repository
!git clone https://github.com/Seeed-Studio/ModelAssistant.git -b 2.0.0
%cd ModelAssistant
!. ./scripts/setup_colab.sh
Step 3: Prepare Emotion Detection Directory and Pretrained Weights
# Create project directory for emotion detection
%mkdir -p emotion_Detection_Swift-YOLO_192

# Download pretrained weights for person detection (will be fine-tuned for emotions)
!wget -c https://files.seeedstudio.com/sscma/model_zoo/detection/person/person_detection.pth -O emotion_Detection_Swift-YOLO_192/pretrain.pth
Step 4: Download and Prepare Emotion Dataset
Replace the dataset URL with your Roboflow emotion detection dataset URL:
# Create dataset directory
%mkdir -p emotion_Detection_Swift-YOLO_192/dataset

# Download emotion detection dataset (replace URL with your Roboflow dataset)
!wget -c https://app.roboflow.com/ds/UHsY20miKo?key=uaT98vmIU6 -O emotion_Detection_Swift-YOLO_192/dataset.zip

# Extract dataset
!unzip -q emotion_Detection_Swift-YOLO_192/dataset.zip -d emotion_Detection_Swift-YOLO_192/dataset
Important: Replace the wget URL with your actual Roboflow emotion dataset Raw URL obtained in Step 3 of dataset preparation.
Step 5: Configure Training Parameters
The training configuration is optimized for emotion detection with 6 classes:
# Train Swift-YOLO model for emotion detection
!sscma.train configs/swift_yolo/swift_yolo_tiny_1xb16_300e_coco.py \
--cfg-options  \
    work_dir=emotion_Detection_Swift-YOLO_192 \
    num_classes=6 \
    epochs=48  \
    height=192 \
    width=192 \
    data_root=emotion_Detection_Swift-YOLO_192/dataset/ \
    load_from=emotion_Detection_Swift-YOLO_192/pretrain.pth
Key Parameters Explanation:
num_classes=6: Matches our six emotion categoriesepochs=48: Sufficient training cycles for emotion recognition convergence. I had to fix this number because going above 50 finished my GPU limit for the day.height=192, width=192: Optimal resolution for Grove Vision AI V2 performancework_dir: Directory for storing training outputs and checkpoints
Step 6: Monitor Training Progress
Training will take approximately 30-60 minutes depending on dataset size. Monitor the loss reduction and accuracy improvements throughout the training process.
Model Export and Evaluation
Step 1: Export Model to Grove Vision AI V2 Format
After training completion, export the model to the required format:
# Read the checkpoint path
import os
with open('emotion_Detection_Swift-YOLO_192/last_checkpoint', 'r') as f:
    os.environ['CHECKPOINT_FILE_PATH'] = f.read()

# Export model to multiple formats including Grove Vision AI V2 compatible
!sscma.export configs/swift_yolo/swift_yolo_tiny_1xb16_300e_coco.py $CHECKPOINT_FILE_PATH \
--cfg-options  \
    work_dir=emotion_Detection_Swift-YOLO_192 \
    num_classes=6 \
    epochs=30  \
    height=192 \
    width=192 \
    data_root=emotion_Detection_Swift-YOLO_192/dataset/ \
    load_from=emotion_Detection_Swift-YOLO_192/pretrain.pth
Step 2: Evaluate Model Performance
Test different model formats to understand performance characteristics:
Evaluate PyTorch Model
!sscma.inference configs/swift_yolo/swift_yolo_tiny_1xb16_300e_coco.py ${CHECKPOINT_FILE_PATH%.*}.pth \
--cfg-options  \
    work_dir=emotion_Detection_Swift-YOLO_192 \
    num_classes=6 \
    epochs=10  \
    height=192 \
    width=192 \
    data_root=emotion_Detection_Swift-YOLO_192/dataset/ \
    load_from=emotion_Detection_Swift-YOLO_192/pretrain.pth
Evaluate TFLite INT8 Model (Grove Vision AI V2 Compatible)
!sscma.inference configs/swift_yolo/swift_yolo_tiny_1xb16_300e_coco.py ${CHECKPOINT_FILE_PATH%.*}_int8.tflite \
--cfg-options  \
    work_dir=emotion_Detection_Swift-YOLO_192 \
    num_classes=6 \
    epochs=30  \
    height=192 \
    width=192 \
    data_root=emotion_Detection_Swift-YOLO_192/dataset/ \
    load_from=emotion_Detection_Swift-YOLO_192/pretrain.pth
Step 3: Download Model Files
Navigate to the emotion_Detection_Swift-YOLO_192 directory and download the model file ending with *_int8_vela.tflite - this is the only format compatible with Grove Vision AI V2.
# List available model files
%ls -lh emotion_Detection_Swift-YOLO_192/
Critical: Only the *_int8_vela.tflite file works with Grove Vision AI V2. Do not use other formats like *_int8.tflite or *_float32.tflite.
Model Deployment
Step 1: Access SenseCraft Model Assistant
Navigate to SenseCraft Model Assistant and:
- Connect your Grove Vision AI V2 device
- Select Grove Vision AI V2 from device options
- Choose Upload Custom AI Model
Step 2: Configure Model Labels
Enter the emotion class labels in the exact order they appear in your dataset:
Angry
Confused
Happy
Neutral
Sad
null
Important Notes:
- Enter only class names, not numbers or IDs
- Order must match your training dataset exactly
- The system automatically assigns numerical IDs
Step 3: Upload Model
- Model Name: Enter "Emotion Detection" or your preferred name
- Model File: Upload your
*_int8_vela.tflitefile - Labels: Verify the six emotion classes are correctly entered
- Click Send Model
The upload process takes 3-5 minutes and includes both model transfer and firmware updates.
Step 4: Verify Deployment
Once upload completes, you should see your emotion detection model active in the Preview window, ready to detect emotions in real-time!
Troubleshooting
Common Issues and Solutions
Low Model Accuracy
- Cause: Insufficient or imbalanced training data
- Solution: Increase dataset size, ensure balanced emotion class distribution, improve annotation quality
- Low Model AccuracyCause: Insufficient or imbalanced training dataSolution: Increase dataset size, ensure balanced emotion class distribution, improve annotation quality
"Invoke Failed" Error During Deployment
- Cause: Incorrect model format or configuration
- Solution: Verify you're using
*_int8_vela.tfliteformat and 192x192 input dimensions - "Invoke Failed" Error During DeploymentCause: Incorrect model format or configurationSolution: Verify you're using
*_int8_vela.tfliteformat and 192x192 input dimensions
Training Fails in Google Colab
- Cause: Using CPU instead of GPU runtime
- Solution: Switch to T4 GPU runtime in Colab settings
- Training Fails in Google ColabCause: Using CPU instead of GPU runtimeSolution: Switch to T4 GPU runtime in Colab settings
Poor Emotion Recognition on Specific Classes
- Cause: Class imbalance in training data
- Solution: Add more training examples for underperforming emotion classes
- Poor Emotion Recognition on Specific ClassesCause: Class imbalance in training dataSolution: Add more training examples for underperforming emotion classes
Performance Optimization Tips
- Ensure good lighting conditions for optimal face detection
- Position faces clearly within the camera's field of view
- Consider demographic diversity in your training dataset
- Test model performance across different age groups and ethnicities
The model took 4 hrs to complete it's training.
The evaluation results of the emotion detection model after training completion. The model achieved an Average Precision (AP) of 0.246 at IoU 0.50-0.95 and 0.288 at IoU 0.50, indicating moderate detection accuracy. The Average Recall (AR) metrics range from 0.852 to 0.872, showing the model successfully detects most emotion instances in the test images. Key performance indicators include a coco/bbox_mAP of 0.248 and strong recall performance across different object sizes. The training progressed through 48 epochs with decreasing loss values (final loss: 0.8439), and the model demonstrates consistent performance with processing speeds around 6 iterations per second during evaluation.
The inference results are then transferred to the XIAO ESP32-S3 Plus via I2C communication to be displayed on the Wio Terminal.
Final DemoConclusionIn conclusion, this project demonstrates how affordable, low-power AI hardware from Seeed Studio can be used to create an interactive, emotion-aware signboard capable of brightening public spaces. By detecting facial expressions locally using the Grove Vision AI V2 and providing instant feedback via the Wio Terminal, we aimed to bring a touch of warmth and engagement to everyday environments—turning waiting at a bus stop into a more cheerful experience. Future improvements include refining the AI model for higher accuracy, integrating solar panels for sustainable off-grid operation, and replacing the prototype cardboard enclosure with a professionally designed 3D-printed or IP65-rated weatherproof housing for durability in outdoor conditions. Additional planned features involve expanding the emotion set to recognize more nuanced moods, enabling adaptive audio feedback to further engage passersby, and incorporating network connectivity for remote updates and analytics. With these enhancements, the system can evolve into a robust, autonomous installation that not only blends technology, sustainability, and human connection, but also continuously learns and adapts to better serve the community over time.


Comments