SmartTrack: Smarter Attendance, Less Hassle
Introduction
The best technology solutions are the ones that quietly solve problems without adding complexity. Students, teachers, or event organizers don’t need to understand RFID protocols or HTTP requests — they just need to know that attendance is taken instantly and accurately, without wasted time or errors.
That’s exactly what SmartTrack does. With a simple tap of a card, attendance is logged, time-stamped, and synced to the cloud — no paperwork, no roll call, no proxies.
---
The Problem
Traditional attendance methods are:
Slow: Calling names or signing sheets wastes valuable time.
Error-prone: Papers get lost, signatures are unclear, and mistakes creep in.
Easily faked: Proxy attendance undermines the system’s credibility.
We wanted to change this by making attendance faster, reliable, and tamper-proof.
---
The Solution
SmartTrack transforms attendance into a seamless experience:
Tap your RFID card.
Get instant confirmation on the LCD with a buzzer beep.
Data is logged, time-stamped, and sent to Google Sheets in real time.
It’s designed for schools, offices, and events — anywhere accurate attendance matters.
---
Hardware Used
ESP32 – the brain of the project, managing communication and processing.
MFRC522 RFID Reader – scans RFID cards/tags.
I2C LCD Display – shows instant messages like “Welcome, John!”
Buzzer – gives quick audio feedback.
Google Sheets (via Apps Script Web App) – for cloud logging and access.
---
Software & Implementation
1. ESP32 firmware written in Arduino IDE handles RFID scanning, LCD display, and buzzer alerts.
2. Google Apps Script Web App acts as the bridge, receiving POST requests and logging data into Google Sheets.
3. Each scan includes UID, access status, and timestamp, ensuring reliable records.
4. Debugging tools like the Serial Monitor helped fine-tune communication and troubleshoot errors.
---
Build Instructions
Step 1: Gather Components
ESP32 Development Board
MFRC522 RFID Module
I2C LCD Display (16x2 or 20x4)
Active Buzzer
Breadboard + Jumper Wires
RFID Cards/Tags
Micro-USB Cable for programming
---
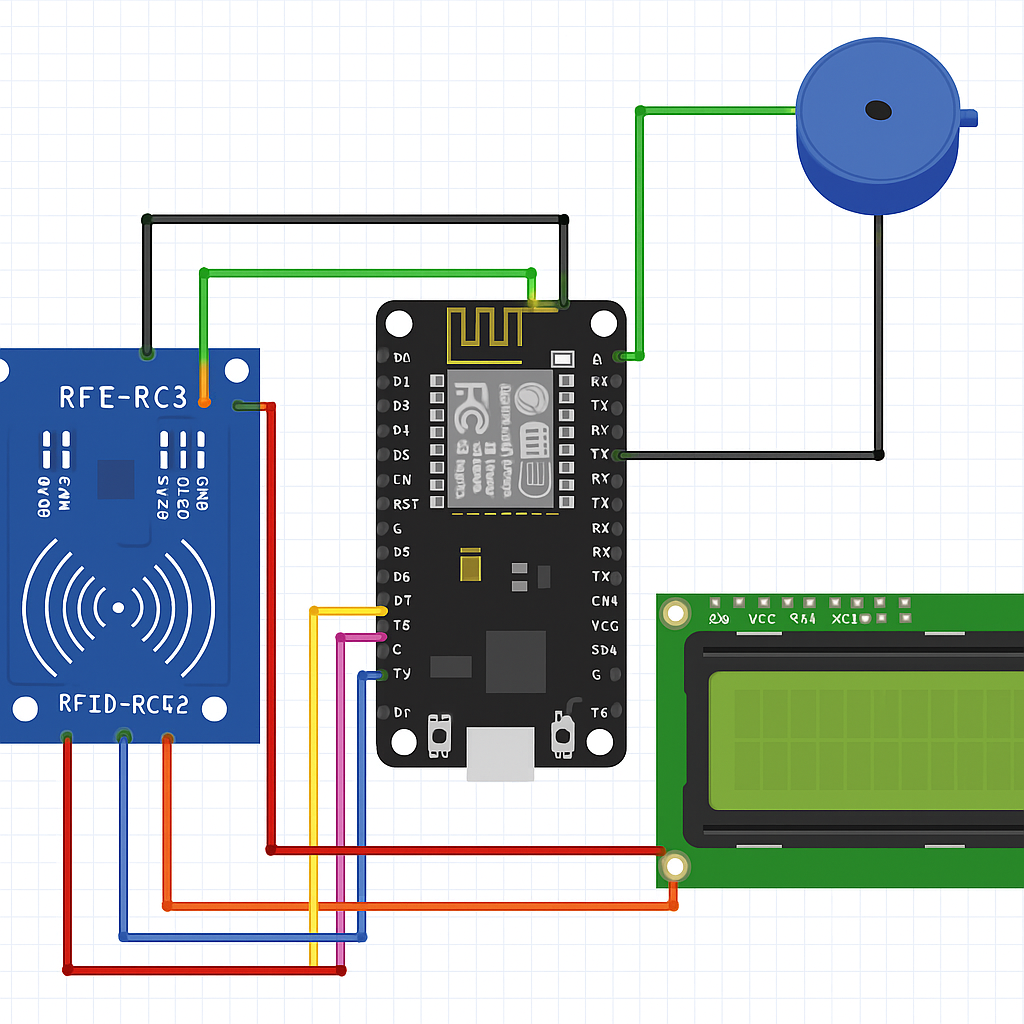
Step 2: Wiring Diagram
RFID Module (MFRC522) → ESP32
SDA → GPIO 21
SCK → GPIO 18
MOSI → GPIO 23
MISO → GPIO 19
RST → GPIO 22
3.3V → 3.3V
GND → GND
I2C LCD → ESP32
SDA → GPIO 5
SCL → GPIO 4
VCC → 5V
GND → GND
Buzzer → ESP32
Positive → GPIO 15
Negative → GND
---
Step 3: Setting up Google Sheets
1. Create a Google Sheet (e.g., “SmartTrack Attendance”).
2. Go to Extensions → Apps Script and paste a script that accepts POST requests.
3. Deploy as Web App (set to “Anyone with the link”).
4. Copy the deployment URL — you’ll need this in your ESP32 code.
---
Step 4: Arduino IDE Setup
1. Install the following libraries via Library Manager:
MFRC522
Wire
LiquidCrystal_I2C
WiFi.h (built-in for ESP32)
HTTPClient.h (built-in for ESP32)
2. Select Board: ESP32 Dev Module in Arduino IDE.
---
Step 5: Example Code
#include <WiFi.h>
#include <HTTPClient.h>
#include <SPI.h>
#include <MFRC522.h>
#include <Wire.h>
#include <LiquidCrystal_I2C.h>

#define RST_PIN 22
#define SS_PIN 21
#define BUZZER 15

MFRC522 rfid(SS_PIN, RST_PIN);
LiquidCrystal_I2C lcd(0x27, 16, 2);

const char* ssid = "YOUR_WIFI_SSID";
const char* password = "YOUR_WIFI_PASSWORD";
String serverName = "YOUR_WEB_APP_URL"; // Google Apps Script Web App link

void setup() {
  Serial.begin(115200);
  WiFi.begin(ssid, password);

  lcd.init();
  lcd.backlight();
  lcd.setCursor(0, 0);
  lcd.print("Connecting...");

  while (WiFi.status() != WL_CONNECTED) {
    delay(500);
    Serial.print(".");
  }
  lcd.clear();
  lcd.print("WiFi Connected");

  SPI.begin();
  rfid.PCD_Init();

  pinMode(BUZZER, OUTPUT);
}

void loop() {
  if (!rfid.PICC_IsNewCardPresent() || !rfid.PICC_ReadCardSerial()) return;

  String uid = "";
  for (byte i = 0; i < rfid.uid.size; i++) {
    uid += String(rfid.uid.uidByte[i], HEX);
  }
  uid.toUpperCase();

  Serial.println("Card UID: " + uid);

  lcd.clear();
  lcd.print("Card Scanned");
  digitalWrite(BUZZER, HIGH);
  delay(200);
  digitalWrite(BUZZER, LOW);

  if (WiFi.status() == WL_CONNECTED) {
    HTTPClient http;
    http.begin(serverName);
    http.addHeader("Content-Type", "application/x-www-form-urlencoded");

    String httpRequestData = "UID=" + uid;
    int httpResponseCode = http.POST(httpRequestData);

    if (httpResponseCode > 0) {
      lcd.setCursor(0, 1);
      lcd.print("Logged!");
    } else {
      lcd.setCursor(0, 1);
      lcd.print("Error!");
    }
    http.end();
  }
  rfid.PICC_HaltA();
}
---
Step 6: Test the System
1. Upload the code to ESP32.
2. Power it on and connect to WiFi.
3. Scan your RFID card.
4. Check your Google Sheet — you should see the UID and timestamp logged instantly!
---
Challenges We Faced
Timestamp accuracy: Synchronizing RTC with ESP32 for precise logging.
HTTP requests: Handling retries when internet connection was unstable.
Circuit glitches: Clean wiring and grounding fixed mysterious resets and misreads.
---
Lessons Learned
This project taught us more than just coding and wiring:
Debugging discipline: Every bug became a puzzle to solve.
Design matters: A clean circuit layout prevents future headaches.
Teamwork and persistence: Coffee breaks were as important as brainstorming — we never gave up, we just tried again.
---
What’s Next?
SmartTrack works great for small-scale setups, but we’re already dreaming big:
Face recognition for contactless attendance.
Mobile app integration for teachers and admins.
IoT dashboards for real-time analytics and reporting.
---
Conclusion
SmartTrack is more than just an electronics project — it’s a glimpse into how simple, accessible technology can solve everyday challenges. By combining ESP32’s power, RFID’s simplicity, and Google Sheets’ flexibility, we built a system that saves time, improves accuracy, and eliminates proxy attendance.
This project reminds us that the most impactful innovations don’t always come from flashy tech — sometimes, they’re the ones that quietly disappear into the background while providing immense value.
Attendance may seem like a small task, but SmartTrack shows how even small improvements can ripple out into better learning environments, smoother workplaces, and smarter events.
Let’s build a future where classrooms, offices, and events run smarter — one tap at a time. 🚀


Comments